HP w20 / w22 LCD Monitor - User's Guide
Page 1
...translated to change without the prior written consent of its proprietor and used by HP. The information in the express warranty statements accompanying such products and services. HP w20 / w22 LCD Monitor User's Guide • Preface • Safety and Maintenance Guidelines • ...-Adjustment Feature • Technical Support FAQs • Specifications • LCD Monitor Quality and Pixel Policy • Agency Regulatory Notices The only warranties for HP products and services are U.S. HP assumes no responsibility for technical or editorial errors or omissions contained herein....
...translated to change without the prior written consent of its proprietor and used by HP. The information in the express warranty statements accompanying such products and services. HP w20 / w22 LCD Monitor User's Guide • Preface • Safety and Maintenance Guidelines • ...-Adjustment Feature • Technical Support FAQs • Specifications • LCD Monitor Quality and Pixel Policy • Agency Regulatory Notices The only warranties for HP products and services are U.S. HP assumes no responsibility for technical or editorial errors or omissions contained herein....

HP w20 / w22 LCD Monitor - User's Guide
Page 2
...authority. 2 WARNING: A WARNING indicates the potential for anyone who uses the HP w20 / w22 LCD Monitor. CAUTION: A CAUTION indicates either potential damage to avoid the problem. It describes the monitor's features, setup, and operation. Notes, Cautions, and Warnings Throughout this document....; Safety and Maintenance Guidelines • Setup • Using the Monitor • Installing Drivers and Using the Auto-Adjustment Feature • Technical Support FAQs • Specifications • LCD Monitor Quality and Pixel Policy • Agency Regulatory Notices Notational Conventions The...
...authority. 2 WARNING: A WARNING indicates the potential for anyone who uses the HP w20 / w22 LCD Monitor. CAUTION: A CAUTION indicates either potential damage to avoid the problem. It describes the monitor's features, setup, and operation. Notes, Cautions, and Warnings Throughout this document....; Safety and Maintenance Guidelines • Setup • Using the Monitor • Installing Drivers and Using the Auto-Adjustment Feature • Technical Support FAQs • Specifications • LCD Monitor Quality and Pixel Policy • Agency Regulatory Notices Notational Conventions The...

HP w20 / w22 LCD Monitor - User's Guide
Page 3
... total ampere rating of the products connected to the cord does not exceed the rating of electric shock or damage to your monitor, see Power Cord Set Requirements. Back to Contents Page Safety and Maintenance Guidelines Important Safety Information • Safety Precautions •...; Maintenance Guidelines • Cleaning the Monitor Important Safety Information The power cord is an important safety feature. Connect the equipment to the LCD screen; Before connecting cables, disconnect power from the electrical outlet. Not all power...
... total ampere rating of the products connected to the cord does not exceed the rating of electric shock or damage to your monitor, see Power Cord Set Requirements. Back to Contents Page Safety and Maintenance Guidelines Important Safety Information • Safety Precautions •...; Maintenance Guidelines • Cleaning the Monitor Important Safety Information The power cord is an important safety feature. Connect the equipment to the LCD screen; Before connecting cables, disconnect power from the electrical outlet. Not all power...

HP w20 / w22 LCD Monitor - User's Guide
Page 4
...Unplug your HP authorized dealer, reseller, or service provider. • Adjust only those controls that requires special care when cleaning. Do not walk on a soft area to clean an LCD screen. 3 Wipe the screen with isopropyl alcohol. 5 Plug in use an antistatic screen cleaner. 4 Dust the monitor housing.... These chemicals may damage the monitor. Do not use water to prevent it from the wall outlet ...
...Unplug your HP authorized dealer, reseller, or service provider. • Adjust only those controls that requires special care when cleaning. Do not walk on a soft area to clean an LCD screen. 3 Wipe the screen with isopropyl alcohol. 5 Plug in use an antistatic screen cleaner. 4 Dust the monitor housing.... These chemicals may damage the monitor. Do not use water to prevent it from the wall outlet ...

HP w20 / w22 LCD Monitor - User's Guide
Page 6
... hold the stand so that you . CAUTION: To avoid breakage or other damage, do not topple the monitor while changing the tilt. 2 Adjust the tilt by moving the monitor's top edge toward or away from the pedestal. CAUTION: To prevent damage, avoid applying pressure to release the lock. 3 Remove... the base from you do not touch the LCD screen while changing the tilt. 6 Adjusting the Tilt For optimal ...
... hold the stand so that you . CAUTION: To avoid breakage or other damage, do not topple the monitor while changing the tilt. 2 Adjust the tilt by moving the monitor's top edge toward or away from the pedestal. CAUTION: To prevent damage, avoid applying pressure to release the lock. 3 Remove... the base from you do not touch the LCD screen while changing the tilt. 6 Adjusting the Tilt For optimal ...
HP w20 / w22 LCD Monitor - User's Guide
Page 7
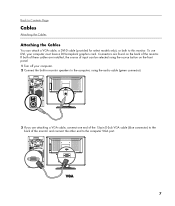
... both of these cables are attaching a VGA cable, connect one end of the 15-pin D-Sub VGA cable (blue connector) to the back of the monitor. To use DVI, your computer. 2 Connect the built-in monitor speakers to the computer, using the source button on the back of the...
... both of these cables are attaching a VGA cable, connect one end of the 15-pin D-Sub VGA cable (blue connector) to the back of the monitor. To use DVI, your computer. 2 Connect the built-in monitor speakers to the computer, using the source button on the back of the...
HP w20 / w22 LCD Monitor - User's Guide
Page 8
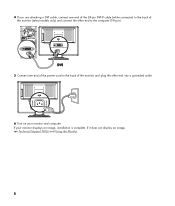
4 If you are attaching a DVI cable, connect one end of the 24-pin DVI-D cable (white connector) to the back of the monitor (select models only) and connect the other end to the computer DVI port. 5 Connect one end of the power cord to the back of the monitor and plug the other end into a grounded outlet. 6 Turn on your monitor displays an image, installation is complete. If it does not display an image, see Technical Support FAQs and Using the Monitor. 8 If your monitor and computer.
4 If you are attaching a DVI cable, connect one end of the 24-pin DVI-D cable (white connector) to the back of the monitor (select models only) and connect the other end to the computer DVI port. 5 Connect one end of the power cord to the back of the monitor and plug the other end into a grounded outlet. 6 Turn on your monitor displays an image, installation is complete. If it does not display an image, see Technical Support FAQs and Using the Monitor. 8 If your monitor and computer.
HP w20 / w22 LCD Monitor - User's Guide
Page 9
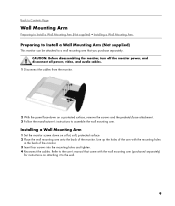
...3 Follow the manufacturer's instructions to assemble the wall mounting arm. Installing a Wall Mounting Arm 1 Set the monitor screen down on a flat, soft, protected surface. 2 Place the wall mounting arm onto the back of the monitor. Refer to the user's manual that you purchase separately. Line up the holes of the arm with...Mounting Arm Preparing to Install a Wall Mounting Arm (Not supplied) • Installing a Wall Mounting Arm Preparing to Install a Wall Mounting Arm (Not supplied) This monitor can be attached to a wall mounting arm that came with the mounting holes in the back of the...
...3 Follow the manufacturer's instructions to assemble the wall mounting arm. Installing a Wall Mounting Arm 1 Set the monitor screen down on a flat, soft, protected surface. 2 Place the wall mounting arm onto the back of the monitor. Refer to the user's manual that you purchase separately. Line up the holes of the arm with...Mounting Arm Preparing to Install a Wall Mounting Arm (Not supplied) • Installing a Wall Mounting Arm Preparing to Install a Wall Mounting Arm (Not supplied) This monitor can be attached to a wall mounting arm that came with the mounting holes in the back of the...
HP w20 / w22 LCD Monitor - User's Guide
Page 10
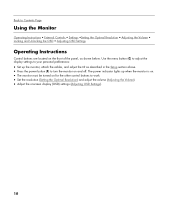
... as shown below. Use the menu button (C) to adjust the display settings to your personal preferences: • Set up when the monitor is on. • The monitor must be turned on the front of the panel, as described in the Setup section above. • Press the power button (F)... to turn the monitor on and off. Back to Contents Page Using the Monitor Operating Instructions • External Controls • Settings •Setting the Optimal Resolution • Adjusting the Volume • Locking...
... as shown below. Use the menu button (C) to adjust the display settings to your personal preferences: • Set up when the monitor is on. • The monitor must be turned on the front of the panel, as described in the Setup section above. • Press the power button (F)... to turn the monitor on and off. Back to Contents Page Using the Monitor Operating Instructions • External Controls • Settings •Setting the Optimal Resolution • Adjusting the Volume • Locking...
HP w20 / w22 LCD Monitor - User's Guide
Page 11
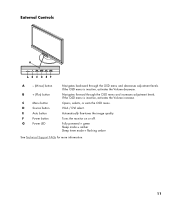
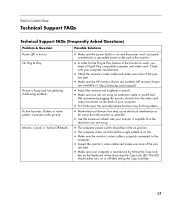
... quality. Fully powered = green Sleep mode = amber Sleep timer mode = flashing amber See Technical Support FAQs for more information. 11 VGA / DVI select. Turns the monitor on or off. External Controls A - (Minus) button B + (Plus) button C Menu button D Source button E Auto button F Power button G Power LED Navigates backward through the OSD menu...
... quality. Fully powered = green Sleep mode = amber Sleep timer mode = flashing amber See Technical Support FAQs for more information. 11 VGA / DVI select. Turns the monitor on or off. External Controls A - (Minus) button B + (Plus) button C Menu button D Source button E Auto button F Power button G Power LED Navigates backward through the OSD menu...
HP w20 / w22 LCD Monitor - User's Guide
Page 12
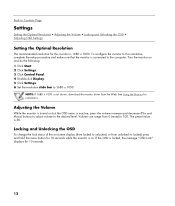
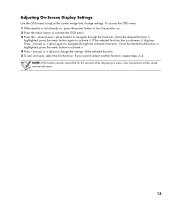
... of the on . If the OSD is locked, the message "OSD Lock" displays for this resolution, complete the setup procedure and make sure that the monitor is inactive, press the volume increase and decrease (Plus and Minus) buttons to adjust volume to 100. Turn the... monitor on but the OSD menu is connected to 1680 x 1050. To configure the monitor to this monitor is not shown, download the monitor driver from 0 (mute) to the desired level. Volume can range from the Web. Back to...
... of the on . If the OSD is locked, the message "OSD Lock" displays for this resolution, complete the setup procedure and make sure that the monitor is inactive, press the volume increase and decrease (Plus and Minus) buttons to adjust volume to 100. Turn the... monitor on but the OSD menu is connected to 1680 x 1050. To configure the monitor to this monitor is not shown, download the monitor driver from 0 (mute) to the desired level. Volume can range from the Web. Back to...
HP w20 / w22 LCD Monitor - User's Guide
Page 13
... settings of the selected function. 5 To exit and save, select the Exit function. To access the OSD menu: 1 If the monitor is not already on, press the power button to turn the monitor on. 2 Press the menu button to activate the OSD menu. 3 Press the - (minus) and + (plus ) to navigate through the...
... settings of the selected function. 5 To exit and save, select the Exit function. To access the OSD menu: 1 If the monitor is not already on, press the power button to turn the monitor on. 2 Press the menu button to activate the OSD menu. 3 Press the - (minus) and + (plus ) to navigate through the...

HP w20 / w22 LCD Monitor - User's Guide
Page 16
...the download pages. The software download pages for VGA (analog). Do not use this procedure if your monitor. Using the Auto-Adjustment Function Press the auto button to : http://www.hp.com/support 2 Select your country/region. 3 Select Download Drivers and Software. 4 Enter the model ...number of your monitor is using VGA (analog) input, auto-adjustment can correct the following image quality conditions: • Fuzzy ...
...the download pages. The software download pages for VGA (analog). Do not use this procedure if your monitor. Using the Auto-Adjustment Function Press the auto button to : http://www.hp.com/support 2 Select your country/region. 3 Select Download Drivers and Software. 4 Enter the model ...number of your monitor is using VGA (analog) input, auto-adjustment can correct the following image quality conditions: • Fuzzy ...
HP w20 / w22 LCD Monitor - User's Guide
Page 17
.... The LED should be in its slot. • Make sure the monitor's video cable is properly connected to the computer. • Inspect the monitor's video cable and make sure none of the pins are bent. • Make sure the HP monitor drivers are installed (HP monitor drivers are not using . • The computer power switch should...
.... The LED should be in its slot. • Make sure the monitor's video cable is properly connected to the computer. • Inspect the monitor's video cable and make sure none of the pins are bent. • Make sure the HP monitor drivers are installed (HP monitor drivers are not using . • The computer power switch should...
HP w20 / w22 LCD Monitor - User's Guide
Page 18
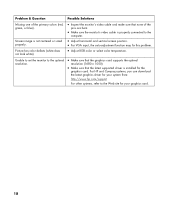
Screen image is not centered or sized properly. Unable to set the monitor to the Web site for your system from: http://www.hp.com/support For other systems, refer to the optimal resolution. • Make sure that the graphics card supports the optimal resolution (1680 x 1050)....supported driver is installed for your graphics card. 18 Problem & Question Possible Solutions Missing one of the pins are bent. • Make sure the monitor's video cable is properly connected to the computer. • Adjust horizontal and vertical screen position. • For VGA input, the auto-adjustment ...
Screen image is not centered or sized properly. Unable to set the monitor to the Web site for your system from: http://www.hp.com/support For other systems, refer to the optimal resolution. • Make sure that the graphics card supports the optimal resolution (1680 x 1050)....supported driver is installed for your graphics card. 18 Problem & Question Possible Solutions Missing one of the pins are bent. • Make sure the monitor's video cable is properly connected to the computer. • Adjust horizontal and vertical screen position. • For VGA input, the auto-adjustment ...
HP w20 / w22 LCD Monitor - User's Guide
Page 22
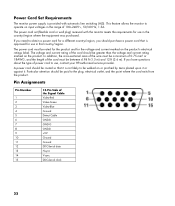
...4 5 6 7 8 9 10 11 12 13 14 15 15-Pin Side of power cord to use, contact your HP-authorized service provider. The power cord set (flexible cord or wall plug) received with automatic line switching (ALS). Particular attention ...marked on input voltages in the range of the cord should purchase a power cord that is provided with the monitor meets the requirements for use in the country/region where the equipment was purchased. The voltage and current rating of... GND-G GND-B +5V Ground Ground DDC-Serial data H-sync V-sync DDC-Serial clock 22 If you need to operate on the product.
...4 5 6 7 8 9 10 11 12 13 14 15 15-Pin Side of power cord to use, contact your HP-authorized service provider. The power cord set (flexible cord or wall plug) received with automatic line switching (ALS). Particular attention ...marked on input voltages in the range of the cord should purchase a power cord that is provided with the monitor meets the requirements for use in the country/region where the equipment was purchased. The voltage and current rating of... GND-G GND-B +5V Ground Ground DDC-Serial data H-sync V-sync DDC-Serial clock 22 If you need to operate on the product.
HP w20 / w22 LCD Monitor - User's Guide
Page 23
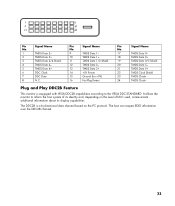
...VESA DDC2B capabilities according to inform the host system of DDC used, communicate additional information about its display capabilities. Plug and Play DDC2B Feature This monitor is a bi-directional data channel based on the level of its identity and, depending on the I²C protocol. Pin Signal Name No. ... TMDS Data 4- 12 TMDS Data 3- 20 TMDS Data 5- 5 TMDS Data 4+ 13 TMDS Data 3+ 21 TMDS Data 5+ 6 DDC Clock 14 +5V Power 22 TMDS Clock Shield 7 DDC Data 15 Ground (for +5V) 23 TMDS Clock+ 8 N.C. 16 Hot Plug Detect 24 TMDS Clock- Pin Signal Name No.
...VESA DDC2B capabilities according to inform the host system of DDC used, communicate additional information about its display capabilities. Plug and Play DDC2B Feature This monitor is a bi-directional data channel based on the level of its identity and, depending on the I²C protocol. Pin Signal Name No. ... TMDS Data 4- 12 TMDS Data 3- 20 TMDS Data 5- 5 TMDS Data 4+ 13 TMDS Data 3+ 21 TMDS Data 5+ 6 DDC Clock 14 +5V Power 22 TMDS Clock Shield 7 DDC Data 15 Ground (for +5V) 23 TMDS Clock+ 8 N.C. 16 Hot Plug Detect 24 TMDS Clock- Pin Signal Name No.

HP w20 / w22 LCD Monitor - User's Guide
Page 24
... or it is small and only visible on a bright background). These imperfections are made. For more information about your HP w20 / w22 LCD Monitor, refer to produce displays with fewer cosmetic imperfections, and we will adjust guidelines as small bright or dark spots. To... locate defective pixels, the monitor should be viewed under normal operating conditions and in ). Back to Contents Page LCD Monitor Quality and Pixel Policy The HP LCD Monitor uses high-precision technology, manufactured according to high standards, to the HP LCD Monitor. Nevertheless, the display may have...
... or it is small and only visible on a bright background). These imperfections are made. For more information about your HP w20 / w22 LCD Monitor, refer to produce displays with fewer cosmetic imperfections, and we will adjust guidelines as small bright or dark spots. To... locate defective pixels, the monitor should be viewed under normal operating conditions and in ). Back to Contents Page LCD Monitor Quality and Pixel Policy The HP LCD Monitor uses high-precision technology, manufactured according to high standards, to the HP LCD Monitor. Nevertheless, the display may have...

HP v220 LCD Monitor User's Guide
Page 1
v220 LCD Monitor User's Guide
v220 LCD Monitor User's Guide

HP v220 LCD Monitor User's Guide
Page 3
...• Safety and Maintenance Guidelines • Setup • Using the Monitor • Installing Drivers and Using the Auto-Adjustment Feature • Technical Support FAQs • Specifications • LCD Monitor Quality and Pixel Policy • Agency Regulatory Notices Notational Conventions The following...you how to avoid the problem. In such cases, the specific presentation of your monitor. WARNING: A WARNING indicates the potential for anyone who uses the v220 LCD Monitor. Notes, Cautions, and Warnings Throughout this document. CAUTION: A CAUTION indicates either potential...
...• Safety and Maintenance Guidelines • Setup • Using the Monitor • Installing Drivers and Using the Auto-Adjustment Feature • Technical Support FAQs • Specifications • LCD Monitor Quality and Pixel Policy • Agency Regulatory Notices Notational Conventions The following...you how to avoid the problem. In such cases, the specific presentation of your monitor. WARNING: A WARNING indicates the potential for anyone who uses the v220 LCD Monitor. Notes, Cautions, and Warnings Throughout this document. CAUTION: A CAUTION indicates either potential...


