
HP w20 / w22 LCD Monitor - User's Guide
Page 3
... and its plug. Safety Precautions CAUTION: Avoid applying pressure to determine the ampere rating (Amps or A) for use with this ability. Look on a cord or cable. Connect the equipment to a grounded (earthed) power outlet. Arrange them so that the grounded power outlet you can replace your equipment if surge protection fails. Do not pull on the power label to the LCD screen;
... and its plug. Safety Precautions CAUTION: Avoid applying pressure to determine the ampere rating (Amps or A) for use with this ability. Look on a cord or cable. Connect the equipment to a grounded (earthed) power outlet. Arrange them so that the grounded power outlet you can replace your equipment if surge protection fails. Do not pull on the power label to the LCD screen;
HP w20 / w22 LCD Monitor - User's Guide
Page 9
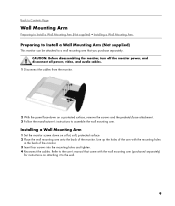
... the cables. CAUTION: Before disassembling the monitor, turn off the monitor power, and disconnect all power, video, and audio cables. 1 Disconnect the cables from the monitor. 2 With the panel face-down on a flat, soft, protected surface. 2 Place the wall mounting arm onto the back of the arm with the wall mounting arm (purchased separately) for instructions on a protected surface, remove the screws and the pedestal/base attachment. 3 Follow the manufacturer's instructions to the user's manual...
... the cables. CAUTION: Before disassembling the monitor, turn off the monitor power, and disconnect all power, video, and audio cables. 1 Disconnect the cables from the monitor. 2 With the panel face-down on a flat, soft, protected surface. 2 Place the wall mounting arm onto the back of the arm with the wall mounting arm (purchased separately) for instructions on a protected surface, remove the screws and the pedestal/base attachment. 3 Follow the manufacturer's instructions to the user's manual...
HP w20 / w22 LCD Monitor - User's Guide
Page 10
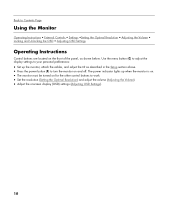
Use the menu button (C) to adjust the display settings to work. • Set the resolution (Setting the Optimal Resolution) and adjust the volume (Adjusting the Volume). • Adjust the onscreen display (OSD) settings (Adjusting OSD Settings). 10 The power indicator lights up the monitor, attach the cables, and adjust the tilt as shown below. Back to Contents Page Using the Monitor Operating Instructions • External Controls • Settings •Setting the Optimal Resolution • Adjusting the Volume • Locking and Unlocking the OSD • Adjusting OSD Settings ...
Use the menu button (C) to adjust the display settings to work. • Set the resolution (Setting the Optimal Resolution) and adjust the volume (Adjusting the Volume). • Adjust the onscreen display (OSD) settings (Adjusting OSD Settings). 10 The power indicator lights up the monitor, attach the cables, and adjust the tilt as shown below. Back to Contents Page Using the Monitor Operating Instructions • External Controls • Settings •Setting the Optimal Resolution • Adjusting the Volume • Locking and Unlocking the OSD • Adjusting OSD Settings ...
HP w20 / w22 LCD Monitor - User's Guide
Page 11
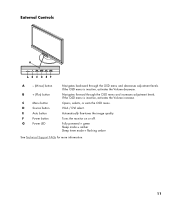
Opens, selects, or exits the OSD menu. VGA / DVI select. If the OSD menu is inactive, activates the Volume decrease. Automatically fine-tunes the image quality. Turns the monitor on or off. Navigates forward through the OSD menu and decreases adjustment levels. Fully powered = green Sleep mode = amber Sleep timer mode = flashing amber See Technical Support FAQs for more information. 11 External Controls A - (Minus) button B + (Plus) button C Menu button D Source button E Auto button F Power button G Power LED Navigates backward through the OSD menu and ...
Opens, selects, or exits the OSD menu. VGA / DVI select. If the OSD menu is inactive, activates the Volume decrease. Automatically fine-tunes the image quality. Turns the monitor on or off. Navigates forward through the OSD menu and decreases adjustment levels. Fully powered = green Sleep mode = amber Sleep timer mode = flashing amber See Technical Support FAQs for more information. 11 External Controls A - (Minus) button B + (Plus) button C Menu button D Source button E Auto button F Power button G Power LED Navigates backward through the OSD menu and ...
HP w20 / w22 LCD Monitor - User's Guide
Page 12
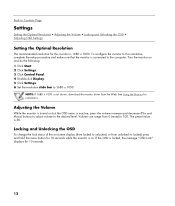
... is not shown, download the monitor driver from the Web. NOTE: If 1680 x 1050 is 50. To configure the monitor to this monitor is 1680 x 1050. See Using the Monitor for 10 seconds. 12 If the OSD is locked, the message "OSD Lock" displays for instructions. Back to Contents Page Settings Setting the Optimal Resolution • Adjusting the Volume • Locking and Unlocking the OSD • Adjusting OSD Settings Setting the Optimal Resolution The recommended resolution for 10 seconds...
... is not shown, download the monitor driver from the Web. NOTE: If 1680 x 1050 is 50. To configure the monitor to this monitor is 1680 x 1050. See Using the Monitor for 10 seconds. 12 If the OSD is locked, the message "OSD Lock" displays for instructions. Back to Contents Page Settings Setting the Optimal Resolution • Adjusting the Volume • Locking and Unlocking the OSD • Adjusting OSD Settings Setting the Optimal Resolution The recommended resolution for 10 seconds...
HP w20 / w22 LCD Monitor - User's Guide
Page 17
We recommend plugging the monitor directly into the video card output connector on the back of your computer. • For VGA input, the auto-adjustment function may fix this problem. • Move electrical devices that may cause electrical interference as far away from the monitor as possible. • Use the maximum refresh rate your monitor is capable of at the resolution you are using an extension cable or switch box. Picture is...
We recommend plugging the monitor directly into the video card output connector on the back of your computer. • For VGA input, the auto-adjustment function may fix this problem. • Move electrical devices that may cause electrical interference as far away from the monitor as possible. • Use the maximum refresh rate your monitor is capable of at the resolution you are using an extension cable or switch box. Picture is...
HP v220 LCD Monitor User's Guide
Page 10
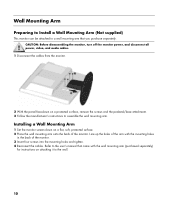
... a flat, soft, protected surface. 2 Place the wall mounting arm onto the back of the monitor. 3 Insert four screws into the mounting holes and tighten. 4 Reconnect the cables. CAUTION: Before disassembling the monitor, turn off the monitor power, and disconnect all power, video, and audio cables. 1 Disconnect the cables from the monitor. 2 With the panel face-down on a protected surface, remove the screws and the pedestal/base attachment. 3 Follow the manufacturer's instructions to the user's manual...
... a flat, soft, protected surface. 2 Place the wall mounting arm onto the back of the monitor. 3 Insert four screws into the mounting holes and tighten. 4 Reconnect the cables. CAUTION: Before disassembling the monitor, turn off the monitor power, and disconnect all power, video, and audio cables. 1 Disconnect the cables from the monitor. 2 With the panel face-down on a protected surface, remove the screws and the pedestal/base attachment. 3 Follow the manufacturer's instructions to the user's manual...
HP v220 LCD Monitor User's Guide
Page 13
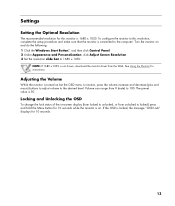
... monitor is not shown, download the monitor driver from 0 (mute) to 100. Turn the monitor on but the OSD menu is 50. If the OSD is 1680 x 1050. Settings Setting the Optimal Resolution The recommended resolution for this resolution, complete the setup procedure and make sure that the monitor is connected to the computer. Adjusting the Volume While the monitor is turned on and do the following: 1 Click the Windows Start Button®, and then click Control Panel...
... monitor is not shown, download the monitor driver from 0 (mute) to 100. Turn the monitor on but the OSD menu is 50. If the OSD is 1680 x 1050. Settings Setting the Optimal Resolution The recommended resolution for this resolution, complete the setup procedure and make sure that the monitor is connected to the computer. Adjusting the Volume While the monitor is turned on and do the following: 1 Click the Windows Start Button®, and then click Control Panel...
HP v220 LCD Monitor User's Guide
Page 18
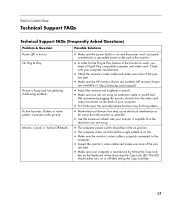
...; Check the monitor's video cable and make sure none of your computer. • For VGA input, the auto-adjustment function may fix this problem. • Move electrical devices that may cause electrical interference as far away from the monitor as possible. • Use the maximum refresh rate your computer is operational by hitting the Caps Lock key on . No Plug & Play. Monitor is stuck in the picture. The LED should...
...; Check the monitor's video cable and make sure none of your computer. • For VGA input, the auto-adjustment function may fix this problem. • Move electrical devices that may cause electrical interference as far away from the monitor as possible. • Use the maximum refresh rate your computer is operational by hitting the Caps Lock key on . No Plug & Play. Monitor is stuck in the picture. The LED should...
User's Guide w2228h, 2229h w2448h, w2448hc, w2558hc LCD Display
Page 5
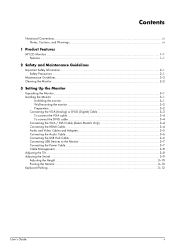
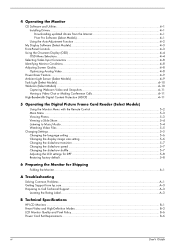
... HP LCD Monitors ...1-1 Features ...1-1 2 Safety and Maintenance Guidelines Important Safety Information ...2-1 Safety Precautions ...2-1 Maintenance Guidelines...2-2 Cleaning the Monitor ...2-2 3 Setting Up the Monitor Unpacking the Monitor...3-1 Installing the Monitor ...3-1 Unfolding the monitor ...3-1 Wall-mounting the monitor ...3-2 Preparation ...3-2 Connecting the VGA (Analog) or DVI-D (Digital) Cable 3-3 To connect the VGA cable...3-4 To connect the DVI-D cable...3-4 Connecting the VGA / DVI-I Cable (Select Models Only 3-4 Connecting the HDMI Cable...3-4 Audio and Video Cables...
... HP LCD Monitors ...1-1 Features ...1-1 2 Safety and Maintenance Guidelines Important Safety Information ...2-1 Safety Precautions ...2-1 Maintenance Guidelines...2-2 Cleaning the Monitor ...2-2 3 Setting Up the Monitor Unpacking the Monitor...3-1 Installing the Monitor ...3-1 Unfolding the monitor ...3-1 Wall-mounting the monitor ...3-2 Preparation ...3-2 Connecting the VGA (Analog) or DVI-D (Digital) Cable 3-3 To connect the VGA cable...3-4 To connect the DVI-D cable...3-4 Connecting the VGA / DVI-I Cable (Select Models Only 3-4 Connecting the HDMI Cable...3-4 Audio and Video Cables...
User's Guide w2228h, 2229h w2448h, w2448hc, w2558hc LCD Display
Page 6
...Digital Picture Frame Card Reader (Select Models) Using the Monitor Menu with the Remote Control 5-2 Main Menu ...5-3 Viewing Photos ...5-3 Viewing a Slide Show...5-4 Listening to Music/Audio...5-4 Watching Video Files ...5-5 Changing Settings ...5-5 Changing the language setting ...5-6 Changing the display image size setting 5-6 Changing the slideshow transition 5-7 Changing the slideshow speed ...5-7 Changing the slideshow shuffle ...5-7 Adjusting the LCD settings for DPF 5-8 Restoring factory default...5-8 6 Preparing the Monitor for Shipping Folding the Monitor ...6-1 A Troubleshooting...
...Digital Picture Frame Card Reader (Select Models) Using the Monitor Menu with the Remote Control 5-2 Main Menu ...5-3 Viewing Photos ...5-3 Viewing a Slide Show...5-4 Listening to Music/Audio...5-4 Watching Video Files ...5-5 Changing Settings ...5-5 Changing the language setting ...5-6 Changing the display image size setting 5-6 Changing the slideshow transition 5-7 Changing the slideshow speed ...5-7 Changing the slideshow shuffle ...5-7 Adjusting the LCD settings for DPF 5-8 Restoring factory default...5-8 6 Preparing the Monitor for Shipping Folding the Monitor ...6-1 A Troubleshooting...
User's Guide w2228h, 2229h w2448h, w2448hc, w2558hc LCD Display
Page 9
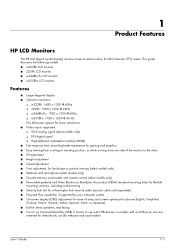
... microphone (select models only) ■ Two-slot memory card reader with remote control (select models only) ■ Removable pedestal and Video Electronics Standards Association (VESA) standard mounting holes for flexible mounting solutions, including wall-mounting ■ Security lock slot for a Kensington lock security cable (security cable sold separately) ■ Plug and Play capability, if supported by your computer system ■ On-screen display (OSD) adjustments for ease of setup and screen optimization (choose English, Simplified Chinese...
... microphone (select models only) ■ Two-slot memory card reader with remote control (select models only) ■ Removable pedestal and Video Electronics Standards Association (VESA) standard mounting holes for flexible mounting solutions, including wall-mounting ■ Security lock slot for a Kensington lock security cable (security cable sold separately) ■ Plug and Play capability, if supported by your computer system ■ On-screen display (OSD) adjustments for ease of setup and screen optimization (choose English, Simplified Chinese...
User's Guide w2228h, 2229h w2448h, w2448hc, w2558hc LCD Display
Page 25
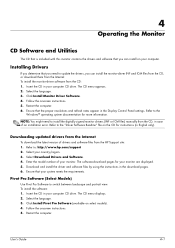
.... Refer to switch between landscape and portrait view. Select your monitor are displayed. 5. The software-download pages for your country/region. 3. Download and install the driver and software files by using the instructions in the Display Control Panel settings. To install the software: 1. Restart the computer. Follow the onscreen instructions. 5. Downloading updated drivers from the Internet To download the latest version of your monitor. Pivot Pro Software (Select Models) Use Pivot Pro Software to : http://www.hp.com/support 2. Insert...
.... Refer to switch between landscape and portrait view. Select your monitor are displayed. 5. The software-download pages for your country/region. 3. Download and install the driver and software files by using the instructions in the Display Control Panel settings. To install the software: 1. Restart the computer. Follow the onscreen instructions. 5. Downloading updated drivers from the Internet To download the latest version of your monitor. Pivot Pro Software (Select Models) Use Pivot Pro Software to : http://www.hp.com/support 2. Insert...
User's Guide w2228h, 2229h w2448h, w2448hc, w2558hc LCD Display
Page 26
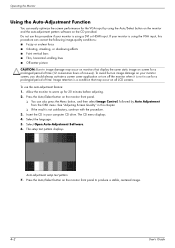
... display the same static image on the CD provided. Image retention is not satisfactory, continue with the procedure. 3. Auto-adjustment setup test pattern 7. Operating the Monitor Using the Auto-Adjustment Function You can easily optimize the screen performance for 20 minutes before adjusting. 2. Press the Auto/Select button on the monitor front panel to warm up for the VGA input by Auto Adjustment from the OSD menu. Select Open Auto-Adjustment Software. 6. The CD menu displays. 4. The setup test pattern displays...
... display the same static image on the CD provided. Image retention is not satisfactory, continue with the procedure. 3. Auto-adjustment setup test pattern 7. Operating the Monitor Using the Auto-Adjustment Function You can easily optimize the screen performance for 20 minutes before adjusting. 2. Press the Auto/Select button on the monitor front panel to warm up for the VGA input by Auto Adjustment from the OSD menu. Select Open Auto-Adjustment Software. 6. The CD menu displays. 4. The setup test pattern displays...
User's Guide w2228h, 2229h w2448h, w2448hc, w2558hc LCD Display
Page 31
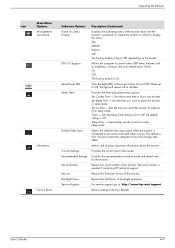
... resolution mode and refresh rate for the monitor. For service support, go to: http://www.hp.com/support Returns settings to control some OSD menu features such as brightness, contrast, and color temperature. When set to enter sleep mode. Selects and displays important information about the monitor. Operating the Monitor Icon Main Menu Options Management (continued) Information Factory Reset Submenu Options Power-On Status Display DDC/CI Support Bezel Power LED Sleep Timer Default Video Input Current Settings Recommended Settings Serial Number Version Backlight Hours Service...
... resolution mode and refresh rate for the monitor. For service support, go to: http://www.hp.com/support Returns settings to control some OSD menu features such as brightness, contrast, and color temperature. When set to enter sleep mode. Selects and displays important information about the monitor. Operating the Monitor Icon Main Menu Options Management (continued) Information Factory Reset Submenu Options Power-On Status Display DDC/CI Support Bezel Power LED Sleep Timer Default Video Input Current Settings Recommended Settings Serial Number Version Backlight Hours Service...
User's Guide w2228h, 2229h w2448h, w2448hc, w2558hc LCD Display
Page 32
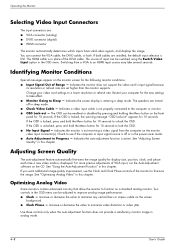
... screen display is locked, the warning message "OSD Lock-out" appears for 10 seconds. The OSD can connect the VGA cable, the DVI-D cable, or both cables are set higher than the monitor supports. If the OSD is unlocked, press and hold the Menu button for 10 seconds to a lower resolution or refresh rate. For more precise adjustments of Range - See "Optimizing Analog Video" in this chapter. Indicates the monitor does not support the video card's input signal because its resolution or refresh rate are installed, the default input...
... screen display is locked, the warning message "OSD Lock-out" appears for 10 seconds. The OSD can connect the VGA cable, the DVI-D cable, or both cables are set higher than the monitor supports. If the OSD is unlocked, press and hold the Menu button for 10 seconds to a lower resolution or refresh rate. For more precise adjustments of Range - See "Optimizing Analog Video" in this chapter. Indicates the monitor does not support the video card's input signal because its resolution or refresh rate are installed, the default input...
User's Guide w2228h, 2229h w2448h, w2448hc, w2558hc LCD Display
Page 33
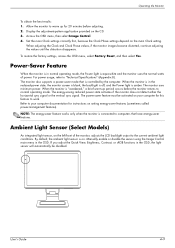
... for instructions on . The power-saver feature must be disabled. Refer to work. Ambient Light Sensor (Select Models) An integrated light sensor, on the left front of power. By default, the ambient light sensor is aqua-white and the monitor uses the normal watts of the monitor, adjusts the LCD backlight output to "Technical Specifications" (Appendix B). Operating the Monitor To obtain the best results: 1. To restore the factory settings, access the OSD menu, select Factory Reset...
... for instructions on . The power-saver feature must be disabled. Refer to work. Ambient Light Sensor (Select Models) An integrated light sensor, on the left front of power. By default, the ambient light sensor is aqua-white and the monitor uses the normal watts of the monitor, adjusts the LCD backlight output to "Technical Specifications" (Appendix B). Operating the Monitor To obtain the best results: 1. To restore the factory settings, access the OSD menu, select Factory Reset...
User's Guide w2228h, 2229h w2448h, w2448hc, w2558hc LCD Display
Page 47
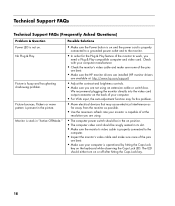
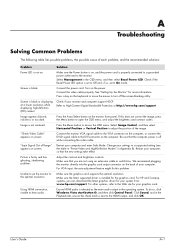
... dark. User's Guide A-1 A Troubleshooting Solving Common Problems The following table lists possible problems, the possible cause of each problem, and the recommended solutions: Problem Solution Power LED is blank. Turn on screen. Press a key on . Select Image Control, and then select Horizontal Position or Vertical Position to hear audio. Restart your computer, so that the computer power is set to Off and, if so, set the monitor to turn off while connecting the video cable. Make sure...
... dark. User's Guide A-1 A Troubleshooting Solving Common Problems The following table lists possible problems, the possible cause of each problem, and the recommended solutions: Problem Solution Power LED is blank. Turn on screen. Press a key on . Select Image Control, and then select Horizontal Position or Vertical Position to hear audio. Restart your computer, so that the computer power is set to Off and, if so, set the monitor to turn off while connecting the video cable. Make sure...
User's Guide w2228h, 2229h w2448h, w2448hc, w2558hc LCD Display
Page 48
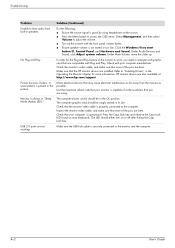
... the HP monitor drivers are not working. Make sure that may cause electrical interference as far away from built-in the picture. The computer graphic card should be in "Sleep Mode (Amber LED)." Under Audio Devices and Sound, click Adjust system volume. USB 2.0 ports are installed. Do the following: ■ Ensure the source signal is always in the On position. No Plug and Play. The computer power switch should either turn on most keyboards. A-2 User's Guide
... the HP monitor drivers are not working. Make sure that may cause electrical interference as far away from built-in the picture. The computer graphic card should be in "Sleep Mode (Amber LED)." Under Audio Devices and Sound, click Adjust system volume. USB 2.0 ports are installed. Do the following: ■ Ensure the source signal is always in the On position. No Plug and Play. The computer power switch should either turn on most keyboards. A-2 User's Guide
User's Guide w2228h, 2229h w2448h, w2448hc, w2558hc LCD Display
Page 56
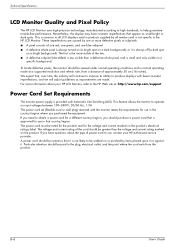
.../support Power Cord Set Requirements The monitor power supply is not likely to the HP Web site at a supported resolution and refresh rate, from the product. The power cord must be rated for the product and for use in the country/region where you need to obtain a power cord for use , contact your HP LCD Monitor, refer to be routed so that appear as improvements are made. A power cord should purchase a power cord that is not specific to use...
.../support Power Cord Set Requirements The monitor power supply is not likely to the HP Web site at a supported resolution and refresh rate, from the product. The power cord must be rated for the product and for use in the country/region where you need to obtain a power cord for use , contact your HP LCD Monitor, refer to be routed so that appear as improvements are made. A power cord should purchase a power cord that is not specific to use...


