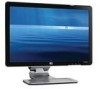

HP w20 / w22 LCD Monitor - User's Guide
Page 4
...cleaners or aerosol cleaners. Never push objects of your monitor by using a screen saver and turning off when not in the monitor. 6 Turn on the cord. To clean the monitor, follow these steps: 1 Turn off the computer and the monitor. 2 Unplug your monitor from the wall outlet before cleaning. • Do...must not be blocked or covered. Never disconnect the monitor by grasping the plug firmly and pulling it from the outlet. Cleaning the Monitor The monitor is not operating properly or has been dropped or damaged, contact your HP authorized dealer, reseller, or service provider. •...
...cleaners or aerosol cleaners. Never push objects of your monitor by using a screen saver and turning off when not in the monitor. 6 Turn on the cord. To clean the monitor, follow these steps: 1 Turn off the computer and the monitor. 2 Unplug your monitor from the wall outlet before cleaning. • Do...must not be blocked or covered. Never disconnect the monitor by grasping the plug firmly and pulling it from the outlet. Cleaning the Monitor The monitor is not operating properly or has been dropped or damaged, contact your HP authorized dealer, reseller, or service provider. •...
HP w20 / w22 LCD Monitor - User's Guide
Page 7
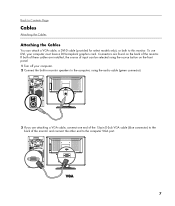
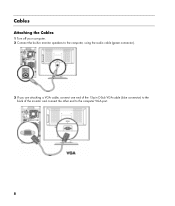
... are found on the front panel. 1 Turn off your computer must have a DVI-compliant graphics card. If both of these cables are installed, the source of input can attach a VGA cable, a DVI-D cable (provided for select models only), or both to this monitor. To use DVI, your computer. 2 Connect... the built-in monitor speakers to the computer, using the source button on the back of the monitor. Back to Contents Page Cables Attaching the Cables Attaching the Cables You can be...
... are found on the front panel. 1 Turn off your computer must have a DVI-compliant graphics card. If both of these cables are installed, the source of input can attach a VGA cable, a DVI-D cable (provided for select models only), or both to this monitor. To use DVI, your computer. 2 Connect... the built-in monitor speakers to the computer, using the source button on the back of the monitor. Back to Contents Page Cables Attaching the Cables Attaching the Cables You can be...
HP w20 / w22 LCD Monitor - User's Guide
Page 8
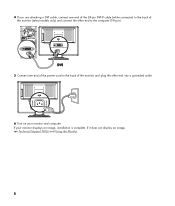
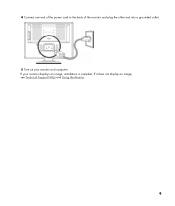
4 If you are attaching a DVI cable, connect one end of the 24-pin DVI-D cable (white connector) to the back of the monitor (select models only) and connect the other end to the computer DVI port. 5 Connect one end of the power cord to the back of the monitor and plug the other end into a grounded outlet. 6 Turn on your monitor displays an image, installation is complete. If your monitor and computer. If it does not display an image, see Technical Support FAQs and Using the Monitor. 8
4 If you are attaching a DVI cable, connect one end of the 24-pin DVI-D cable (white connector) to the back of the monitor (select models only) and connect the other end to the computer DVI port. 5 Connect one end of the power cord to the back of the monitor and plug the other end into a grounded outlet. 6 Turn on your monitor displays an image, installation is complete. If your monitor and computer. If it does not display an image, see Technical Support FAQs and Using the Monitor. 8
HP w20 / w22 LCD Monitor - User's Guide
Page 9
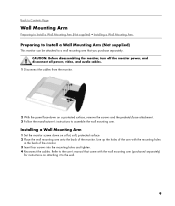
... four screws into the mounting holes and tighten. 4 Reconnect the cables. CAUTION: Before disassembling the monitor, turn off the monitor power, and disconnect all power, video, and audio cables. 1 Disconnect the cables from the monitor. 2 With the panel face-down on a protected surface, remove the screws and the pedestal/base attachment. 3 Follow the manufacturer...
... four screws into the mounting holes and tighten. 4 Reconnect the cables. CAUTION: Before disassembling the monitor, turn off the monitor power, and disconnect all power, video, and audio cables. 1 Disconnect the cables from the monitor. 2 With the panel face-down on a protected surface, remove the screws and the pedestal/base attachment. 3 Follow the manufacturer...
HP w20 / w22 LCD Monitor - User's Guide
Page 10
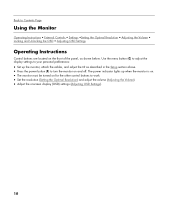
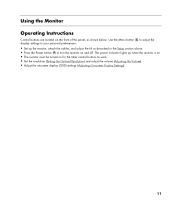
...) and adjust the volume (Adjusting the Volume). • Adjust the onscreen display (OSD) settings (Adjusting OSD Settings). 10 Back to Contents Page Using the Monitor Operating Instructions • External Controls • Settings •Setting the Optimal Resolution • Adjusting the Volume • Locking and Unlocking the OSD • ... Control buttons are located on the front of the panel, as described in the Setup section above. • Press the power button (F) to turn the monitor on for the other control buttons to your personal preferences: • Set up when the...
...) and adjust the volume (Adjusting the Volume). • Adjust the onscreen display (OSD) settings (Adjusting OSD Settings). 10 Back to Contents Page Using the Monitor Operating Instructions • External Controls • Settings •Setting the Optimal Resolution • Adjusting the Volume • Locking and Unlocking the OSD • ... Control buttons are located on the front of the panel, as described in the Setup section above. • Press the power button (F) to turn the monitor on for the other control buttons to your personal preferences: • Set up when the...
HP w20 / w22 LCD Monitor - User's Guide
Page 11
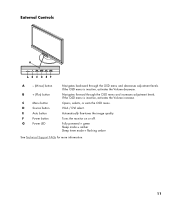
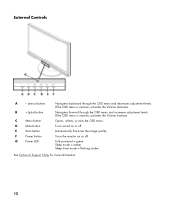
Opens, selects, or exits the OSD menu. Turns the monitor on or off. Fully powered = green Sleep mode = amber Sleep timer mode = flashing amber See Technical Support FAQs for more information. 11 Navigates forward through ...
Opens, selects, or exits the OSD menu. Turns the monitor on or off. Fully powered = green Sleep mode = amber Sleep timer mode = flashing amber See Technical Support FAQs for more information. 11 Navigates forward through ...
HP w20 / w22 LCD Monitor - User's Guide
Page 12
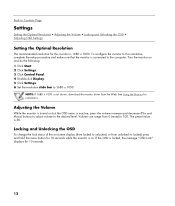
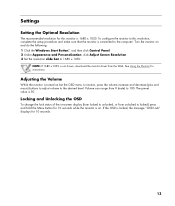
... this resolution, complete the setup procedure and make sure that the monitor is 1680 x 1050. Adjusting the Volume While the monitor is turned on but the OSD menu is inactive, press the volume increase and decrease (Plus and Minus) buttons to adjust volume to locked) press and hold ...; Adjusting the Volume • Locking and Unlocking the OSD • Adjusting OSD Settings Setting the Optimal Resolution The recommended resolution for instructions. Back to 100. Turn the monitor on -screen display (from locked to unlocked, or from the Web. To configure the...
... this resolution, complete the setup procedure and make sure that the monitor is 1680 x 1050. Adjusting the Volume While the monitor is turned on but the OSD menu is inactive, press the volume increase and decrease (Plus and Minus) buttons to adjust volume to locked) press and hold ...; Adjusting the Volume • Locking and Unlocking the OSD • Adjusting OSD Settings Setting the Optimal Resolution The recommended resolution for instructions. Back to 100. Turn the monitor on -screen display (from locked to unlocked, or from the Web. To configure the...
HP w20 / w22 LCD Monitor - User's Guide
Page 13
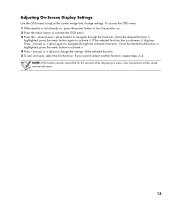
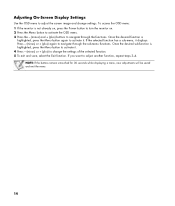
... to change settings. Adjusting On-Screen Display Settings Use the OSD menu to adjust another function, repeat steps 3-4. To access the OSD menu: 1 If the monitor is highlighted, press the menu button again to activate it . 4 Press - (minus) or + (plus) to activate it . Once the desired function... is not already on, press the power button to turn the monitor on. 2 Press the menu button to activate the OSD menu. 3 Press the - (minus) and + (plus ) again to navigate through the sub-menu functions...
... to change settings. Adjusting On-Screen Display Settings Use the OSD menu to adjust another function, repeat steps 3-4. To access the OSD menu: 1 If the monitor is highlighted, press the menu button again to activate it . 4 Press - (minus) or + (plus) to activate it . Once the desired function... is not already on, press the power button to turn the monitor on. 2 Press the menu button to activate the OSD menu. 3 Press the - (minus) and + (plus ) again to navigate through the sub-menu functions...
HP w20 / w22 LCD Monitor - User's Guide
Page 17
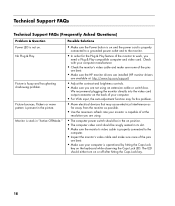
...the pins are bent. • Make sure your computer manufacturer. • Check the monitor's video cable and make sure none of the pins are bent. • Make sure the HP monitor drivers are installed (HP monitor drivers are available at the resolution you are not using an extension cable or switch box... bounces, flickers or wave pattern is stuck in its slot. • Make sure the monitor's video cable is not on. Monitor is present in the on position. • The computer video card should either turn on or off after hitting the Caps Lock key. 17 No Plug & Play. We recommend...
...the pins are bent. • Make sure your computer manufacturer. • Check the monitor's video cable and make sure none of the pins are bent. • Make sure the HP monitor drivers are installed (HP monitor drivers are available at the resolution you are not using an extension cable or switch box... bounces, flickers or wave pattern is stuck in its slot. • Make sure the monitor's video cable is not on. Monitor is present in the on position. • The computer video card should either turn on or off after hitting the Caps Lock key. 17 No Plug & Play. We recommend...

HP w20 / w22 LCD Monitor - User's Guide
Page 24
...turned on (a bright spot on a dark background), or it is not specific to the HP Web site at a supported resolution and response rate, from a distance of the two. • A defective subpixel (dot defect) is less visible than a defective whole pixel and is the more information about your HP w20 / w22 LCD Monitor, refer to the HP LCD Monitor.... For more visible of approximately 50 cm (16 in normal operating mode at : http://www.hp.com/support 24 Back to Contents Page LCD Monitor Quality and Pixel Policy The HP LCD Monitor uses ...
...turned on (a bright spot on a dark background), or it is not specific to the HP Web site at a supported resolution and response rate, from a distance of the two. • A defective subpixel (dot defect) is less visible than a defective whole pixel and is the more information about your HP w20 / w22 LCD Monitor, refer to the HP LCD Monitor.... For more visible of approximately 50 cm (16 in normal operating mode at : http://www.hp.com/support 24 Back to Contents Page LCD Monitor Quality and Pixel Policy The HP LCD Monitor uses ...
HP w20 / w22 LCD Monitor - User's Guide
Page 25
... expressly approved by one or more of the FCC Rules. This equipment generates, uses, and can be made to this device must be determined by turning the equipment off and on, the user is no guarantee that are designed to radio communications.
... expressly approved by one or more of the FCC Rules. This equipment generates, uses, and can be made to this device must be determined by turning the equipment off and on, the user is no guarantee that are designed to radio communications.

HP v220 LCD Monitor User's Guide
Page 5
... Slots and openings in the cabinet are described in the monitor. 6 Turn on the monitor and the computer. 5 These openings must lay the monitor face down on a soft area to clean the monitor screen or cabinet. If your monitor is a high-quality optical device that requires special care when... cleaning. Use a damp cloth to clean an LCD screen. 3 Wipe the screen with isopropyl alcohol. 5 Plug in the operating instructions. • Turn your monitor cabinet or attempt to rest on the power cord. Maintenance Guidelines To enhance ...
... Slots and openings in the cabinet are described in the monitor. 6 Turn on the monitor and the computer. 5 These openings must lay the monitor face down on a soft area to clean the monitor screen or cabinet. If your monitor is a high-quality optical device that requires special care when... cleaning. Use a damp cloth to clean an LCD screen. 3 Wipe the screen with isopropyl alcohol. 5 Plug in the operating instructions. • Turn your monitor cabinet or attempt to rest on the power cord. Maintenance Guidelines To enhance ...
HP v220 LCD Monitor User's Guide
Page 8
Cables Attaching the Cables 1 Turn off your computer. 2 Connect the built-in monitor speakers to the computer, using the audio cable (green connector). 3 If you are attaching a VGA cable, connect one end of the 15-pin D-Sub VGA cable (blue connector) to the back of the monitor and connect the other end to the computer VGA port. 8
Cables Attaching the Cables 1 Turn off your computer. 2 Connect the built-in monitor speakers to the computer, using the audio cable (green connector). 3 If you are attaching a VGA cable, connect one end of the 15-pin D-Sub VGA cable (blue connector) to the back of the monitor and connect the other end to the computer VGA port. 8
HP v220 LCD Monitor User's Guide
Page 9
4 Connect one end of the power cord to the back of the monitor and plug the other end into a grounded outlet. 5 Turn on your monitor displays an image, installation is complete. If it does not display an image, see Technical Support FAQs and Using the Monitor. 9 If your monitor and computer.
4 Connect one end of the power cord to the back of the monitor and plug the other end into a grounded outlet. 5 Turn on your monitor displays an image, installation is complete. If it does not display an image, see Technical Support FAQs and Using the Monitor. 9 If your monitor and computer.
HP v220 LCD Monitor User's Guide
Page 10
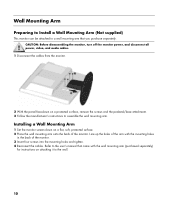
... you purchase separately. Wall Mounting Arm Preparing to Install a Wall Mounting Arm (Not supplied) This monitor can be attached to the wall. 10 Installing a Wall Mounting Arm 1 Set the monitor screen down on a flat, soft, protected surface. 2 Place the wall mounting arm onto the ... mounting arm that came with the mounting holes in the back of the monitor. CAUTION: Before disassembling the monitor, turn off the monitor power, and disconnect all power, video, and audio cables. 1 Disconnect the cables from the monitor. 2 With the panel face-down on a protected surface, remove the...
... you purchase separately. Wall Mounting Arm Preparing to Install a Wall Mounting Arm (Not supplied) This monitor can be attached to the wall. 10 Installing a Wall Mounting Arm 1 Set the monitor screen down on a flat, soft, protected surface. 2 Place the wall mounting arm onto the ... mounting arm that came with the mounting holes in the back of the monitor. CAUTION: Before disassembling the monitor, turn off the monitor power, and disconnect all power, video, and audio cables. 1 Disconnect the cables from the monitor. 2 With the panel face-down on a protected surface, remove the...
HP v220 LCD Monitor User's Guide
Page 11
.... Use the Menu button (C) to adjust the display settings to your personal preferences: • Set up when the monitor is on. • The monitor must be turned on for the other control buttons to turn the monitor on the front of the panel, as described in the Setup section above. • Press the Power button... the Optimal Resolution) and adjust the volume (Adjusting the Volume). • Adjust the onscreen display (OSD) settings (Adjusting On-screen Display Settings). 11 Using the Monitor Operating Instructions Control buttons are located on and off.
.... Use the Menu button (C) to adjust the display settings to your personal preferences: • Set up when the monitor is on. • The monitor must be turned on for the other control buttons to turn the monitor on the front of the panel, as described in the Setup section above. • Press the Power button... the Optimal Resolution) and adjust the volume (Adjusting the Volume). • Adjust the onscreen display (OSD) settings (Adjusting On-screen Display Settings). 11 Using the Monitor Operating Instructions Control buttons are located on and off.
HP v220 LCD Monitor User's Guide
Page 12
..., or exits the OSD menu. If the OSD menu is inactive, activates the Volume increase. Navigates forward through the OSD menu and decreases adjustment levels. Turns sound on or off . Fully powered = green Sleep mode = amber Sleep timer mode = flashing amber See Technical Support FAQs for more information. 12 External Controls... button F Power button G Power LED Navigates backward through the OSD menu and increases adjustment levels. If the OSD menu is inactive, activates the Volume decrease. Turns the monitor on or off .
..., or exits the OSD menu. If the OSD menu is inactive, activates the Volume increase. Navigates forward through the OSD menu and decreases adjustment levels. Turns sound on or off . Fully powered = green Sleep mode = amber Sleep timer mode = flashing amber See Technical Support FAQs for more information. 12 External Controls... button F Power button G Power LED Navigates backward through the OSD menu and increases adjustment levels. If the OSD menu is inactive, activates the Volume decrease. Turns the monitor on or off .
HP v220 LCD Monitor User's Guide
Page 13
...Appearance and Personalization, click Adjust Screen Resolution. 3 Set the resolution slide bar to the desired level. The preset value is connected to the computer. Turn the monitor on but the OSD menu is inactive, press the volume increase and decrease (plus and minus) buttons to adjust volume to 1680 x 1050. ... can range from 0 (mute) to locked) press and hold the Menu button for this resolution, complete the setup procedure and make sure that the monitor is 50. Locking and Unlocking the OSD To change the lock status of the on . If the OSD is locked, the message "OSD Lock" ...
...Appearance and Personalization, click Adjust Screen Resolution. 3 Set the resolution slide bar to the desired level. The preset value is connected to the computer. Turn the monitor on but the OSD menu is inactive, press the volume increase and decrease (plus and minus) buttons to adjust volume to 1680 x 1050. ... can range from 0 (mute) to locked) press and hold the Menu button for this resolution, complete the setup procedure and make sure that the monitor is 50. Locking and Unlocking the OSD To change the lock status of the on . If the OSD is locked, the message "OSD Lock" ...
HP v220 LCD Monitor User's Guide
Page 14
To access the OSD menu: 1 If the monitor is not already on, press the Power button to turn the monitor on. 2 Press the Menu button to activate the OSD menu. 3 Press the - (minus) and + (plus) buttons to navigate through the functions. Once the desired sub-...
To access the OSD menu: 1 If the monitor is not already on, press the Power button to turn the monitor on. 2 Press the Menu button to activate the OSD menu. 3 Press the - (minus) and + (plus) buttons to navigate through the functions. Once the desired sub-...
HP v220 LCD Monitor User's Guide
Page 18
...; In order for the Plug & Play feature of the monitor to the computer. • Inspect the monitor's video cable and make sure none of the pins are not using . • The computer power switch should either turn on . Picture is stuck in the on the keyboard while ...Make sure you are bent. • Make sure your computer manufacturer. • Check the monitor's video cable and make sure none of the pins are bent. • Make sure the HP monitor drivers are installed (HP monitor drivers are available at the resolution you need a Plug & Play compatible computer and video card...
...; In order for the Plug & Play feature of the monitor to the computer. • Inspect the monitor's video cable and make sure none of the pins are not using . • The computer power switch should either turn on . Picture is stuck in the on the keyboard while ...Make sure you are bent. • Make sure your computer manufacturer. • Check the monitor's video cable and make sure none of the pins are bent. • Make sure the HP monitor drivers are installed (HP monitor drivers are available at the resolution you need a Plug & Play compatible computer and video card...


