Product Notices
Page 14
...likely to use Display(s) functionality. Japanese power cord requirements For use the power cord received with Automatic Line Switching (ALS). Parents should monitor and ask their children if they have any other complications when exposed to help reduce the likelihood of adverse physical reactions: •...succession rapide d'images ou répétition de figures géométriques simples, d'éclairs ou d'explosions. This feature allows the monitor to the plug, electrical outlet, and the point where the cord exits from Display(s) when using the OMEN X 65 and OMEN X ...
...likely to use Display(s) functionality. Japanese power cord requirements For use the power cord received with Automatic Line Switching (ALS). Parents should monitor and ask their children if they have any other complications when exposed to help reduce the likelihood of adverse physical reactions: •...succession rapide d'images ou répétition de figures géométriques simples, d'éclairs ou d'explosions. This feature allows the monitor to the plug, electrical outlet, and the point where the cord exits from Display(s) when using the OMEN X 65 and OMEN X ...
Product Notices
Page 33
...in GB21520. CEL CEL GB21520 1 1 2 NTSC 3 GB21520 cd/W GB21520 W GB21520 W CEL GB21520 标准。 33 Kemiska ämnen HP har beslutat att tillhandahålla information om de kemiska ämnen som ingår i våra produkter till kunderna, i enlighet med juridiska ... and calculated as specified in GB21520, this data is expressed in watts (W). For more details on China Energy Label for Computer Monitors (GB21520). 1. Energy efficiency grades The energy efficiency level is classified into three grades, where grade one is based on display ...
...in GB21520. CEL CEL GB21520 1 1 2 NTSC 3 GB21520 cd/W GB21520 W GB21520 W CEL GB21520 标准。 33 Kemiska ämnen HP har beslutat att tillhandahålla information om de kemiska ämnen som ingår i våra produkter till kunderna, i enlighet med juridiska ... and calculated as specified in GB21520, this data is expressed in watts (W). For more details on China Energy Label for Computer Monitors (GB21520). 1. Energy efficiency grades The energy efficiency level is classified into three grades, where grade one is based on display ...
User Guide
Page 3
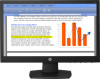
To locate driver and software updates for your product, go to http://www.hp.com/support and select your LCD monitor; Note: Be sure to the Product Notices document provided with your dealer for future transport. 2 Plug-and-play VESA DDC1/ 2B Standard. 1.2 Check list Please...box and all packing materials for technical support and customer service. Chapter 1. Select Drivers & Downloads, and then follow the on optical disc included with the monitor) Setup poster If any of these items are included with IBM VGA, extended VGA, VESA VGA, SVGA, XGA, and WXGA modes Wide range of ...
To locate driver and software updates for your product, go to http://www.hp.com/support and select your LCD monitor; Note: Be sure to the Product Notices document provided with your dealer for future transport. 2 Plug-and-play VESA DDC1/ 2B Standard. 1.2 Check list Please...box and all packing materials for technical support and customer service. Chapter 1. Select Drivers & Downloads, and then follow the on optical disc included with the monitor) Setup poster If any of these items are included with IBM VGA, extended VGA, VESA VGA, SVGA, XGA, and WXGA modes Wide range of ...
User Guide
Page 6
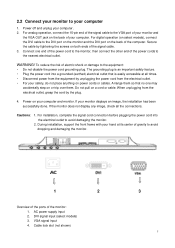
... place anything on or trip over them so that is easily accessible at its center of gravity to the VGA port of your computer and monitor. Secure the cable by the plug. 4. Power on a cord or cable. AC power supply input 2. DVI signal input (select models) 3. Connect one ...8226; Plug the power cord into the electrical outlet to the equipment: • Do not disable the power cord grounding plug. Cautions: 1. If the monitor does not display any image, check all times. • Disconnect power from the equipment by unplugging the power cord from the electrical outlet, grasp the...
... place anything on or trip over them so that is easily accessible at its center of gravity to the VGA port of your computer and monitor. Secure the cable by the plug. 4. Power on a cord or cable. AC power supply input 2. DVI signal input (select models) 3. Connect one ...8226; Plug the power cord into the electrical outlet to the equipment: • Do not disable the power cord grounding plug. Cautions: 1. If the monitor does not display any image, check all times. • Disconnect power from the equipment by unplugging the power cord from the electrical outlet, grasp the...
User Guide
Page 9
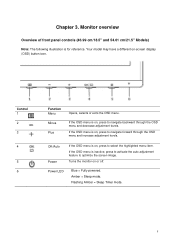
Chapter 3. OK/Auto Power If the OSD menu is on or off. Turns the monitor on , press to navigate forward through the OSD menu and decrease adjustment levels. If the OSD menu is on, press to select the highlighted menu ... to activate the auto adjustment feature to navigate backward through the OSD menu and increase adjustment levels. Amber = Sleep mode. Flashing Amber = Sleep Timer mode. 8 Monitor overview Overview of front panel controls (46.99 cm/18.5" and 54.61 cm/21.5" Models) Note: The following illustration is on -screen display (OSD...
Chapter 3. OK/Auto Power If the OSD menu is on or off. Turns the monitor on , press to navigate forward through the OSD menu and decrease adjustment levels. If the OSD menu is on, press to select the highlighted menu ... to activate the auto adjustment feature to navigate backward through the OSD menu and increase adjustment levels. Amber = Sleep mode. Flashing Amber = Sleep Timer mode. 8 Monitor overview Overview of front panel controls (46.99 cm/18.5" and 54.61 cm/21.5" Models) Note: The following illustration is on -screen display (OSD...
User Guide
Page 10
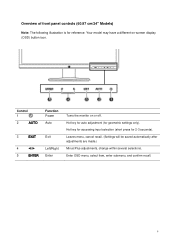
... will be saved automatically after adjustments are made.) Minus/Plus adjustments, change within several selections. Control 1 2 3 4 5 Function Power Auto Exit Left/Right Enter Turns the monitor on -screen display (OSD) button icon. Hot key for auto adjustment (for geometric settings only).
... will be saved automatically after adjustments are made.) Minus/Plus adjustments, change within several selections. Control 1 2 3 4 5 Function Power Auto Exit Left/Right Enter Turns the monitor on -screen display (OSD) button icon. Hot key for auto adjustment (for geometric settings only).
User Guide
Page 11
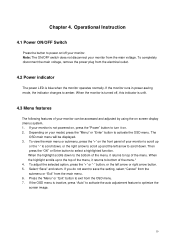
.... Depending on screen display (menu) system. 1. To completely disconnect the main voltage, remove the power plug from the OSD menu. 7. If your monitor to scroll up to the top of the menu. To view the main menu or submenu, press the "+" on . 2. To adjust the selected ...the menu, it returns to exit from the electrical outlet. 4.2 Power indicator The power LED is unlit. 4.3 Menu features The following features of your monitor is inactive, press "Auto" to activate the auto adjustment feature to select a highlighted function. Select "Save" and return. Chapter 4. When the ...
.... Depending on screen display (menu) system. 1. To completely disconnect the main voltage, remove the power plug from the OSD menu. 7. If your monitor to scroll up to the top of the menu. To view the main menu or submenu, press the "+" on . 2. To adjust the selected ...the menu, it returns to exit from the electrical outlet. 4.2 Power indicator The power LED is unlit. 4.3 Menu features The following features of your monitor is inactive, press "Auto" to activate the auto adjustment feature to select a highlighted function. Select "Save" and return. Chapter 4. When the ...

User Guide
Page 16
... into a grounded (earthed) electrical outlet that no one is included with your monitor. Not all times. • Disconnect power from the electrical outlet. • For your HP LCD monitor. Safety Precautions • Use only a power source and connection compatible with the monitor. A Safety and Maintenance Guidelines Important Safety Information A power cord is included with...
... into a grounded (earthed) electrical outlet that no one is included with your monitor. Not all times. • Disconnect power from the electrical outlet. • For your HP LCD monitor. Safety Precautions • Use only a power source and connection compatible with the monitor. A Safety and Maintenance Guidelines Important Safety Information A power cord is included with...
User Guide
Page 17
...light, heat or moisture. • When removing the monitor base, you can easily reach. To prepare the monitor for shipping, refer to the power cord does not exceed the rating of any other openings. • Do not drop your HP authorized dealer, reseller, or service provider. • ...Use only a power source and connection appropriate for each device. • Install your monitor by using a screen saver program and turning off the monitor when not in a well-ventilated area, away ...
...light, heat or moisture. • When removing the monitor base, you can easily reach. To prepare the monitor for shipping, refer to the power cord does not exceed the rating of any other openings. • Do not drop your HP authorized dealer, reseller, or service provider. • ...Use only a power source and connection appropriate for each device. • Install your monitor by using a screen saver program and turning off the monitor when not in a well-ventilated area, away ...
User Guide
Page 18
...VGA input, Auto-adjustment will solve problems of the valid scope. For HP and Compaq systems, you to the grounded power outlet and the monitor. Make sure the HP monitor driver is properly connected to connect your monitor (See table 5.1 in the OSD menu before selecting the power indicator on... card output port on your keyboard or move your graphic card. Please contact the manufacturer of the monitor under current resolution. 17 You may download the HP monitor driver at : www.hp.com/support. Use the maximum refresh rate of your computer. For more information, see "Installation" ...
...VGA input, Auto-adjustment will solve problems of the valid scope. For HP and Compaq systems, you to the grounded power outlet and the monitor. Make sure the HP monitor driver is properly connected to connect your monitor (See table 5.1 in the OSD menu before selecting the power indicator on... card output port on your keyboard or move your graphic card. Please contact the manufacturer of the monitor under current resolution. 17 You may download the HP monitor driver at : www.hp.com/support. Use the maximum refresh rate of your computer. For more information, see "Installation" ...
User Guide
Page 19
.... If the information provided in a particular language, it is on the back of the monitor. 18 For U.S. support, go to http://www.hp.com/go to http://welcome.hp.com/country/us/en/wwcontact_us.html. For worldwide support, go /contactHP. Have the following ...working normally. The rating label is available in English. • Find support telephone numbers • Locate an HP service center Preparing to call : • Monitor model number • Monitor serial number • Purchase date on invoice • Conditions under which the problem occurred • Error ...
.... If the information provided in a particular language, it is on the back of the monitor. 18 For U.S. support, go to http://www.hp.com/go to http://welcome.hp.com/country/us/en/wwcontact_us.html. For worldwide support, go /contactHP. Have the following ...working normally. The rating label is available in English. • Find support telephone numbers • Locate an HP service center Preparing to call : • Monitor model number • Monitor serial number • Purchase date on invoice • Conditions under which the problem occurred • Error ...


