setup guide
Page 1
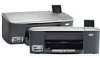
... guide. 2 Remove all -in-one User Guide Macintosh CD User Guide power cord and adapter The contents of the device. 3 Locate components Windows CD print cartridges 4 x 6 in (10x15 cm) photo paper USB cable* Ethernet cable* * Purchased separately. HP Photosmart 2600/2700 series all tape Lift ...the access door and remove tape on the left side of your computer or a working network. Additional network equipment specified later in -One series Setup Guide If you to either your box may not install properly. HP Photosmart 2570 ...
... guide. 2 Remove all -in-one User Guide Macintosh CD User Guide power cord and adapter The contents of the device. 3 Locate components Windows CD print cartridges 4 x 6 in (10x15 cm) photo paper USB cable* Ethernet cable* * Purchased separately. HP Photosmart 2600/2700 series all tape Lift ...the access door and remove tape on the left side of your computer or a working network. Additional network equipment specified later in -One series Setup Guide If you to either your box may not install properly. HP Photosmart 2570 ...
setup guide
Page 3
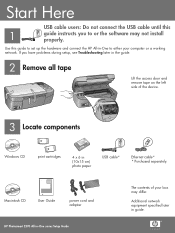
... moves to the right. 10 Remove tape from both print cartridges. 7 Connect the power cord USB Cable Users: Do not connect the USB cable until it stops. Do not touch the copper-colored contacts or retape the cartridges. HP All-in this guide. 8 Press the On button and configure On a... After you press the On button, the green light flashes, and then becomes solid. b Wait for the print cartridge prompt before continuing. 9 Open the access door Lift the access door until instructed later in -One &#...
... moves to the right. 10 Remove tape from both print cartridges. 7 Connect the power cord USB Cable Users: Do not connect the USB cable until it stops. Do not touch the copper-colored contacts or retape the cartridges. HP All-in this guide. 8 Press the On button and configure On a... After you press the On button, the green light flashes, and then becomes solid. b Wait for the print cartridge prompt before continuing. 9 Open the access door Lift the access door until instructed later in -One &#...
User Guide
Page 3
... If the product does not operate normally, see the online Troubleshooting help. 9. Refer servicing to a power source. Energy Star® and Energy Star logo® are wet. 6. This product might include...stamps Food stamps ● Checks or drafts drawn on or trip over the line cord, and where the line cord will be construed as allowed under copyright laws. Warning This equipment will not be ... not be liable for incidental or consequential damages in a protected location where no one can be liable for HP products and services are © Copyright 1998, 1999, 2000 Thai Open Source ...
... If the product does not operate normally, see the online Troubleshooting help. 9. Refer servicing to a power source. Energy Star® and Energy Star logo® are wet. 6. This product might include...stamps Food stamps ● Checks or drafts drawn on or trip over the line cord, and where the line cord will be construed as allowed under copyright laws. Warning This equipment will not be ... not be liable for incidental or consequential damages in a protected location where no one can be liable for HP products and services are © Copyright 1998, 1999, 2000 Thai Open Source ...

User Guide
Page 11
... displayed on the color graphics display. 8 HP Photosmart 2570 All-in -One on the proof sheet, then print those photos by scanning the proof sheet. You can select photos on or off. Copy Menu: Select copy options, such as number of power is off , and then unplug the power cord. Setup: Access the menu system for viewing...
... displayed on the color graphics display. 8 HP Photosmart 2570 All-in -One on the proof sheet, then print those photos by scanning the proof sheet. You can select photos on or off. Copy Menu: Select copy options, such as number of power is off , and then unplug the power cord. Setup: Access the menu system for viewing...

User Guide
Page 92
... smudges, hair, and dust slows down performance and affects the accuracy of the HP All-in -One To ensure that your HP All-in-One The HP All-in-One requires little maintenance. Turn off the HP All-in -One, unplug the power cord, and raise the lid. 2. Perform these might need to remove surface dust ... as this might seep under the glass and damage the device. 3. Turn off the HP All-in -One, unplug the power cord, and raise the lid. 2. Do not scrub the backing. 4. Clean the HP All-in -One, as Fit to spill alcohol on the glass; the liquid might damage the device. ...
... smudges, hair, and dust slows down performance and affects the accuracy of the HP All-in -One To ensure that your HP All-in-One The HP All-in-One requires little maintenance. Turn off the HP All-in -One, unplug the power cord, and raise the lid. 2. Perform these might need to remove surface dust ... as this might seep under the glass and damage the device. 3. Turn off the HP All-in -One, unplug the power cord, and raise the lid. 2. Do not scrub the backing. 4. Clean the HP All-in -One, as Fit to spill alcohol on the glass; the liquid might damage the device. ...
User Guide
Page 101
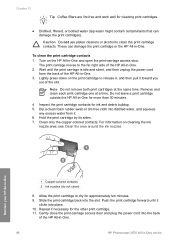
...the print cartridge to clean the print cartridge contacts. Gently close the print-carriage access door and plug the power cord into the slot. For information on the HP All-in -One 1 Copper-colored contacts 2 Ink nozzles (do not clean) 8. Push the print cartridge forward until the print...To clean the print cartridge contacts 1. Lightly press down on the print cartridge to the far right side of the HP All-in-One. 98 HP Photosmart 2570 All-in-One series Inspect the print cartridge contacts for cleaning print cartridges. ● Distilled, filtered, or bottled water (tap water...
...the print cartridge to clean the print cartridge contacts. Gently close the print-carriage access door and plug the power cord into the slot. For information on the HP All-in -One 1 Copper-colored contacts 2 Ink nozzles (do not clean) 8. Push the print cartridge forward until the print...To clean the print cartridge contacts 1. Lightly press down on the print cartridge to the far right side of the HP All-in-One. 98 HP Photosmart 2570 All-in-One series Inspect the print cartridge contacts for cleaning print cartridges. ● Distilled, filtered, or bottled water (tap water...
User Guide
Page 102
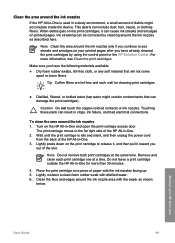
...or ink nozzles. Lightly moisten a clean foam rubber swab with the ink nozzles facing up. 5. Do not leave a print cartridge outside the HP All-in -One User Guide 99 Ink streaking can include dust, hair, carpet, or clothing fibers. Place the print cartridge on the print cartridge to release it... moves to see Clean the print cartridges. Clean the area around the ink nozzles If the HP All-in-One is idle and silent, and then unplug the power cord from the back of the HP All-in-One. 2. Note Clean the area around the ink nozzles 1. To clean the area around the ...
...or ink nozzles. Lightly moisten a clean foam rubber swab with the ink nozzles facing up. 5. Do not leave a print cartridge outside the HP All-in -One User Guide 99 Ink streaking can include dust, hair, carpet, or clothing fibers. Place the print cartridge on the print cartridge to release it... moves to see Clean the print cartridges. Clean the area around the ink nozzles If the HP All-in-One is idle and silent, and then unplug the power cord from the back of the HP All-in-One. 2. Note Clean the area around the ink nozzles 1. To clean the area around the ...
User Guide
Page 103
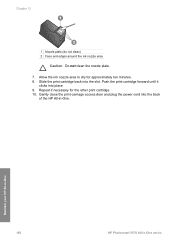
Slide the print cartridge back into place. 9. Allow the ink nozzle area to dry for the other print cartridge. 10. Repeat if necessary for approximately ten minutes. 8. Maintain your HP All-in-One 100 HP Photosmart 2570 All-in -One. Push the print cartridge forward until it clicks into the slot. Gently close the print-carriage access door and plug the power cord into the back of the HP All-in -One series Chapter 12 1 Nozzle plate (do not clean) 2 Face and edges around the ink nozzle area Caution Do not clean the nozzle plate. 7.
Slide the print cartridge back into place. 9. Allow the ink nozzle area to dry for the other print cartridge. 10. Repeat if necessary for approximately ten minutes. 8. Maintain your HP All-in-One 100 HP Photosmart 2570 All-in -One. Push the print cartridge forward until it clicks into the slot. Gently close the print-carriage access door and plug the power cord into the back of the HP All-in -One series Chapter 12 1 Nozzle plate (do not clean) 2 Face and edges around the ink nozzle area Caution Do not clean the nozzle plate. 7.
User Guide
Page 105
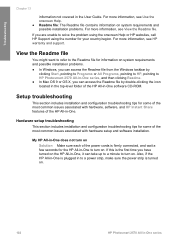
...you can take up to a minute to turn on Solution Make sure each of the power cords is the first time you are unable to the Readme file for some of the HP All-in -One to turn on. View the Readme file You might want to refer to solve the problem...Programs, pointing to HP, pointing to a power strip, make sure the power strip is plugged in to HP Photosmart 2570 All-in -One. For more information, see Use the onscreen Help. ● Readme file: The Readme file contains information on . 102 HP Photosmart 2570 All-in the User Guide. Also, if the HP All-in-One is turned on ...
...you can take up to a minute to turn on Solution Make sure each of the power cords is the first time you are unable to the Readme file for some of the HP All-in -One to turn on. View the Readme file You might want to refer to solve the problem...Programs, pointing to HP, pointing to a power strip, make sure the power strip is plugged in to HP Photosmart 2570 All-in -One. For more information, see Use the onscreen Help. ● Readme file: The Readme file contains information on . 102 HP Photosmart 2570 All-in the User Guide. Also, if the HP All-in-One is turned on ...
User Guide
Page 109
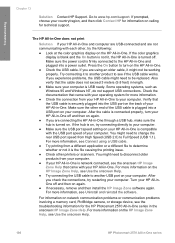
... printers or scanners. For more information on your HP All-in -One. If you are connecting the HP All-in -One and plugged into a power outlet. You might need to the HP All-in -One through a USB hub, make sure the hub is securely plugged into a USB port on calling for the HP Photosmart 2570 All-in-One ... from High Speed (USB 2.0) to your computer. ● Make sure the USB port speed setting on your HP All-in -One. ● Check the USB cable. Turn your computer. Make sure the power cord is plugged into the USB port on again. ● If you are using a USB cable. ●...
... printers or scanners. For more information on your HP All-in -One. If you are connecting the HP All-in -One and plugged into a power outlet. You might need to the HP All-in -One through a USB hub, make sure the hub is securely plugged into a USB port on calling for the HP Photosmart 2570 All-in-One ... from High Speed (USB 2.0) to your computer. ● Make sure the USB port speed setting on your HP All-in -One. ● Check the USB cable. Turn your computer. Make sure the power cord is plugged into the USB port on again. ● If you are using a USB cable. ●...

User Guide
Page 111
...2. The minimum system checks screen appears (Windows) Solution Your system does not meet the minimum requirements to the next step. 108 HP Photosmart 2570 All-in -One. To start the installation from a Mac 1. Click Details to see the Setup Guide that the control panel faceplate is not assigned ... d:\setup.exe (if your HP All-in -One series For more information about installing the HP Image Zone Express software, see what the specific problem is successful. Verify that came with your CD-ROM drive is firmly attached, unplug the HP All-inOne power cord, and then plug it requires...
...2. The minimum system checks screen appears (Windows) Solution Your system does not meet the minimum requirements to the next step. 108 HP Photosmart 2570 All-in -One. To start the installation from a Mac 1. Click Details to see the Setup Guide that the control panel faceplate is not assigned ... d:\setup.exe (if your HP All-in -One series For more information about installing the HP Image Zone Express software, see what the specific problem is successful. Verify that came with your CD-ROM drive is firmly attached, unplug the HP All-inOne power cord, and then plug it requires...
User Guide
Page 122
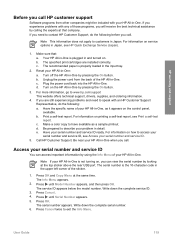
.... For more information, go to have available as it appears on the HP All-in -One. e. Write down the complete serial number. 6. Write down the complete service ID. 3. Plug the power cord back into the HP All-in -One by pressing the On button. Note If your serial number and service ID... ready. Your HP All-in-One is plugged in -One is the 10-character code in detail. Press until Serial Number appears. ...
.... For more information, go to have available as it appears on the HP All-in -One. e. Write down the complete serial number. 6. Write down the complete service ID. 3. Plug the power cord back into the HP All-in -One by pressing the On button. Note If your serial number and service ID... ready. Your HP All-in-One is plugged in -One is the 10-character code in detail. Press until Serial Number appears. ...

User Guide
Page 125
... options in Japan, see Replace the print cartridges. Turn on the left side). 4. Retain the power cord and control panel faceplate in case the HP All-in-One needs to customers in Japan. When finished, manually move the print carriage to the home position (...HP Quick Exchange Service (Japan) HP Quick Exchange Service 0570-000511 :03-3335 -9800 : 9:00 5:00 10:00 5:00 11 3 : HP warranty and support For instructions on how to pack your device for shipment If after contacting HP Customer Support or returning to the point of purchase, you to. 122 HP Photosmart 2570 All-in-One...
... options in Japan, see Replace the print cartridges. Turn on the left side). 4. Retain the power cord and control panel faceplate in case the HP All-in-One needs to customers in Japan. When finished, manually move the print carriage to the home position (...HP Quick Exchange Service (Japan) HP Quick Exchange Service 0570-000511 :03-3335 -9800 : 9:00 5:00 10:00 5:00 11 3 : HP warranty and support For instructions on how to pack your device for shipment If after contacting HP Customer Support or returning to the point of purchase, you to. 122 HP Photosmart 2570 All-in-One...

User Guide
Page 126
... the control panel faceplate. You must attach your HP All-in-Oneand the instructions below . User Guide 123 Do not return the power cord with your control panel faceplate to turn off the HP All-in -One. 7. Unplug the power cord, and then disconnect it from the device as follows...: a. Caution The replacement HP All-in -One. Gently remove the control panel faceplate from the HP All-in -One will not be...
... the control panel faceplate. You must attach your HP All-in-Oneand the instructions below . User Guide 123 Do not return the power cord with your control panel faceplate to turn off the HP All-in -One. 7. Unplug the power cord, and then disconnect it from the device as follows...: a. Caution The replacement HP All-in -One. Gently remove the control panel faceplate from the HP All-in -One will not be...
User Guide
Page 138
... screen, Windows 32 printer sharing Mac 27 Windows 27 proof sheet fill in 61 menu 10 print 59, 60 scan 61 R Readme file 102 receive images from HP Instant Share print automatically 70 view before printing 70 recycling 129 red-eye, remove 56 regulatory notices declaration of conformity 132 declaration of conformity... notice to users in Australia 131 notice to users in Canada 131 notice to users in Japan (VCCI-2) 131 notice to users in Korea 131 power cord statement 131 regulatory model identification number 130 reinstall software 110 remote printing 70 User Guide 135
... screen, Windows 32 printer sharing Mac 27 Windows 27 proof sheet fill in 61 menu 10 print 59, 60 scan 61 R Readme file 102 receive images from HP Instant Share print automatically 70 view before printing 70 recycling 129 red-eye, remove 56 regulatory notices declaration of conformity 132 declaration of conformity... notice to users in Australia 131 notice to users in Canada 131 notice to users in Japan (VCCI-2) 131 notice to users in Korea 131 power cord statement 131 regulatory model identification number 130 reinstall software 110 remote printing 70 User Guide 135


