User Guide
Page 7
... or display 58 A device driver must be reinstalled 58 Obtaining the latest HP device drivers 59 Obtaining the latest Windows device drivers 59 5 Power management ...60 Setting power options ...60 Using power-saving states 60 Initiating and exiting Sleep 60 Initiating and exiting Hibernation 61... Using the battery meter ...61 Using power plans ...61 Viewing the current power plan 62 Selecting a different power plan 62 Customizing power plans 62 Setting password protection upon exiting Sleep or Hibernation 62 Using external AC power ...63 Connecting the AC adapter 63 Testing an...
... or display 58 A device driver must be reinstalled 58 Obtaining the latest HP device drivers 59 Obtaining the latest Windows device drivers 59 5 Power management ...60 Setting power options ...60 Using power-saving states 60 Initiating and exiting Sleep 60 Initiating and exiting Hibernation 61... Using the battery meter ...61 Using power plans ...61 Viewing the current power plan 62 Selecting a different power plan 62 Customizing power plans 62 Setting password protection upon exiting Sleep or Hibernation 62 Using external AC power ...63 Connecting the AC adapter 63 Testing an...
User Guide
Page 8
...low battery levels 67 Identifying low battery levels 67 Resolving a low battery level 68 Resolving a low battery level when external power is available ....... 68 Resolving a low battery level when a charged battery is available 68 Resolving a low battery level when no...Disable Hibernation and Sleep 69 Step 3: Discharge the battery 69 Step 4: Fully recharge the battery 70 Step 5: Reenable Hibernation and Sleep 70 Conserving battery power 70 Storing a battery ...70 Disposing of a used battery 71 Replacing the battery ...71 Shutting down the computer ...71 6 Drives ...73 Handling drives ...
...low battery levels 67 Identifying low battery levels 67 Resolving a low battery level 68 Resolving a low battery level when external power is available ....... 68 Resolving a low battery level when a charged battery is available 68 Resolving a low battery level when no...Disable Hibernation and Sleep 69 Step 3: Discharge the battery 69 Step 4: Fully recharge the battery 70 Step 5: Reenable Hibernation and Sleep 70 Conserving battery power 70 Storing a battery ...70 Disposing of a used battery 71 Replacing the battery ...71 Shutting down the computer ...71 6 Drives ...73 Handling drives ...

User Guide
Page 9
... Windows 89 Setting passwords in Setup Utility 89 Administrator password 90 Managing an administrator password 90 Entering an administrator password 90 Power-on password 90 Managing a power-on password 91 Entering a power-on password 91 Using antivirus software ...92 Using firewall software ...93 Installing critical updates ...94 10 Setup Utility (BIOS) ...95 Starting...
... Windows 89 Setting passwords in Setup Utility 89 Administrator password 90 Managing an administrator password 90 Entering an administrator password 90 Power-on password 90 Managing a power-on password 91 Entering a power-on password 91 Using antivirus software ...92 Using firewall software ...93 Installing critical updates ...94 10 Setup Utility (BIOS) ...95 Starting...
User Guide
Page 13
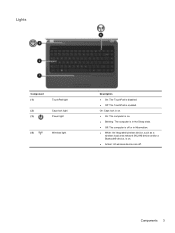
On: Caps lock is on. ● On: The computer is on. ● Blinking: The computer is in Hibernation. ● White: An integrated wireless device, such as a wireless local area network (WLAN) device and/or a Bluetooth® device, is enabled. Components 3 Lights Component (1) TouchPad light (2) Caps lock light (3) Power light (4) Wireless light Description ● On: The TouchPad is disabled. ● Off: The TouchPad is on. ● Amber: All wireless devices are off or in the Sleep state. ● Off: The computer is off .
On: Caps lock is on. ● On: The computer is on. ● Blinking: The computer is in Hibernation. ● White: An integrated wireless device, such as a wireless local area network (WLAN) device and/or a Bluetooth® device, is enabled. Components 3 Lights Component (1) TouchPad light (2) Caps lock light (3) Power light (4) Wireless light Description ● On: The TouchPad is disabled. ● Off: The TouchPad is on. ● Amber: All wireless devices are off or in the Sleep state. ● Off: The computer is off .
User Guide
Page 14
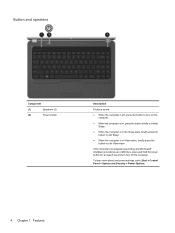
..., select Start > Control Panel > System and Security > Power Options. 4 Chapter 1 Features Button and speakers Component (1) Speakers (2) (2) Power button Description Produce sound. ● When the computer is off, press the button to turn on the computer. ● When the computer is on, press ... press the button to turn off the computer. If the computer has stopped responding and Windows® shutdown procedures are ineffective, press and hold the power button for at least 5 seconds to exit Hibernation.
..., select Start > Control Panel > System and Security > Power Options. 4 Chapter 1 Features Button and speakers Component (1) Speakers (2) (2) Power button Description Produce sound. ● When the computer is off, press the button to turn on the computer. ● When the computer is on, press ... press the button to turn off the computer. If the computer has stopped responding and Windows® shutdown procedures are ineffective, press and hold the power button for at least 5 seconds to exit Hibernation.
User Guide
Page 17
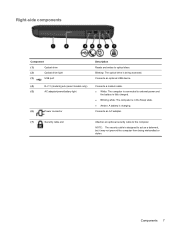
Connects a modem cable. ● White: The computer is connected to external power and the battery is fully charged. ● Blinking white: The computer is in the Sleep state. ● Amber: A battery is designed to act as a deterrent, ... security cable to optical discs. Right-side components Component (1) Optical drive (2) Optical drive light (3) USB port (4) RJ-11 (modem) jack (select models only) (5) AC adapter/power/battery light (6) Power connector Description Reads and writes to the computer.
Connects a modem cable. ● White: The computer is connected to external power and the battery is fully charged. ● Blinking white: The computer is in the Sleep state. ● Amber: A battery is designed to act as a deterrent, ... security cable to optical discs. Right-side components Component (1) Optical drive (2) Optical drive light (3) USB port (4) RJ-11 (modem) jack (select models only) (5) AC adapter/power/battery light (6) Power connector Description Reads and writes to the computer.
User Guide
Page 18
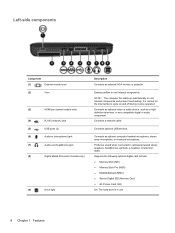
... Card (XD) On: The hard drive is normal for the internal fan to cool internal components. NOTE: The computer fan starts up automatically to optional powered stereo speakers, headphones, earbuds, a headset, or television audio. Connects an optional video or audio device, such as a highdefinition television, or any compatible digital or audio...
... Card (XD) On: The hard drive is normal for the internal fan to cool internal components. NOTE: The computer fan starts up automatically to optional powered stereo speakers, headphones, earbuds, a headset, or television audio. Connects an optional video or audio device, such as a highdefinition television, or any compatible digital or audio...
User Guide
Page 21
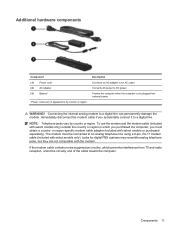
...included with select models only) outside the country or region in appearance by country or region. Powers the computer when the computer is not plugged into external power. NOTE: Telephone jacks vary by country or region. Description Connects an AC adapter to a ...cable contains noise suppression circuitry, which you purchased the computer, you accidentally connect it to DC power. Additional hardware components Component (1) Power cord* (2) AC adapter (3) Battery* *Power cords vary in which prevents interference from TV and radio reception, orient the circuitry end of the...
...included with select models only) outside the country or region in appearance by country or region. Powers the computer when the computer is not plugged into external power. NOTE: Telephone jacks vary by country or region. Description Connects an AC adapter to a ...cable contains noise suppression circuitry, which you purchased the computer, you accidentally connect it to DC power. Additional hardware components Component (1) Power cord* (2) AC adapter (3) Battery* *Power cords vary in which prevents interference from TV and radio reception, orient the circuitry end of the...
User Guide
Page 24
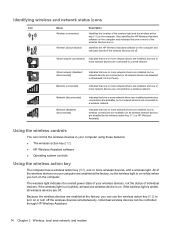
... network devices are connected (or all of the wireless devices are connected to turn off the wireless devices simultaneously. Identifies the HP Wireless Assistant software on the computer. Wired network (disabled/ disconnected) Network (connected) Indicates that one or more network drivers ...wireless action key (f12) to a wireless network. The wireless light indicates the overall power state of your computer using these features: ● The wireless action key (f12) ● HP Wireless Assistant software ● Operating system controls Using the wireless action key The computer ...
... network devices are connected (or all of the wireless devices are connected to turn off the wireless devices simultaneously. Identifies the HP Wireless Assistant software on the computer. Wired network (disabled/ disconnected) Network (connected) Indicates that one or more network drivers ...wireless action key (f12) to a wireless network. The wireless light indicates the overall power state of your computer using these features: ● The wireless action key (f12) ● HP Wireless Assistant software ● Operating system controls Using the wireless action key The computer ...
User Guide
Page 27
... and either connect to your network (uninvited) or capture information being developed by wireless manufacturers and hotspot service providers that make the public environment more powerful forms of your computer in a hotspot, limit your network activities to noncritical e-mail and basic Internet surfing. When you are vulnerable to well-known and...
... and either connect to your network (uninvited) or capture information being developed by wireless manufacturers and hotspot service providers that make the public environment more powerful forms of your computer in a hotspot, limit your network activities to noncritical e-mail and basic Internet surfing. When you are vulnerable to well-known and...

User Guide
Page 32
... to a WLAN, restart the wireless router. If you are trying to connect to the wireless router and are unsuccessful, reset the wireless router by removing power from the router for a network, and if you are not interfering. Click a network, and then click Remove. WLAN connection is very weak If the connection...
... to a WLAN, restart the wireless router. If you are trying to connect to the wireless router and are unsuccessful, reset the wireless router by removing power from the router for a network, and if you are not interfering. Click a network, and then click Remove. WLAN connection is very weak If the connection...
User Guide
Page 42
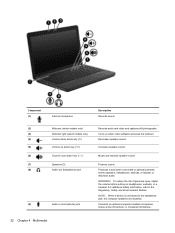
... speaker sound. (6) Volume mute action key (f11) Mutes and restores speaker sound. (7) Speakers (2) Produce sound. (8) Audio-out (headphone) jack Produces sound when connected to optional powered stereo speakers, headphones, earbuds, a headset, or television audio. For additional safety information, refer to the headphone jack, the computer speakers are disabled. (9) Audio-in (microphone...
... speaker sound. (6) Volume mute action key (f11) Mutes and restores speaker sound. (7) Speakers (2) Produce sound. (8) Audio-out (headphone) jack Produces sound when connected to optional powered stereo speakers, headphones, earbuds, a headset, or television audio. For additional safety information, refer to the headphone jack, the computer speakers are disabled. (9) Audio-in (microphone...

User Guide
Page 54
NOTE: For best results, be sure that your AC adapter is plugged into place. 6. If you want to use the media content. Close the disc tray. It prompts you to select how you have not yet configured AutoPlay, as described in the following section, an AutoPlay dialog box opens. Gently press the disc (3) down onto the tray spindle until the disc snaps into an external power source while playing a BD. 44 Chapter 4 Multimedia 5.
NOTE: For best results, be sure that your AC adapter is plugged into place. 6. If you want to use the media content. Close the disc tray. It prompts you to select how you have not yet configured AutoPlay, as described in the following section, an AutoPlay dialog box opens. Gently press the disc (3) down onto the tray spindle until the disc snaps into an external power source while playing a BD. 44 Chapter 4 Multimedia 5.
User Guide
Page 56
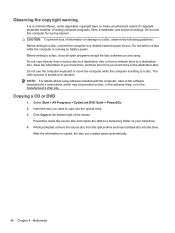
... laws, to make unauthorized copies of information or damage to a disc, observe the following guidelines: Before writing to a disc, connect the computer to a reliable external power source. Do not write to the destination disc. Save the information to your hard drive, and then burn from your hard drive. 4. Do not copy... computer is copied, the disc you want to the software manufacturer's instructions, which may be provided on disc, in the software Help, or on battery power. NOTE: For details about using . Click Copy at the bottom right of the screen.
... laws, to make unauthorized copies of information or damage to a disc, observe the following guidelines: Before writing to a disc, connect the computer to a reliable external power source. Do not write to the destination disc. Save the information to your hard drive, and then burn from your hard drive. 4. Do not copy... computer is copied, the disc you want to the software manufacturer's instructions, which may be provided on disc, in the software Help, or on battery power. NOTE: For details about using . Click Copy at the bottom right of the screen.
User Guide
Page 59
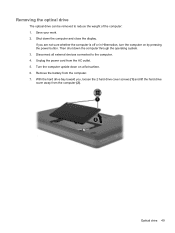
... hard drive bay toward you are not sure whether the computer is off or in Hibernation, turn the computer on a flat surface. 6. Unplug the power cord from the computer. 7. If you , loosen the 2 hard drive cover screws (1) and lift the hard drive cover away from the computer (2)....down the computer and close the display. Shut down the computer through the operating system. 3. Turn the computer upside down on by pressing the power button. Optical drive 49 Remove the battery from the AC outlet. 5. Disconnect all external devices connected to reduce the weight of the computer: ...
... hard drive bay toward you are not sure whether the computer is off or in Hibernation, turn the computer on a flat surface. 6. Unplug the power cord from the computer. 7. If you , loosen the 2 hard drive cover screws (1) and lift the hard drive cover away from the computer (2)....down the computer and close the display. Shut down the computer through the operating system. 3. Turn the computer upside down on by pressing the power button. Optical drive 49 Remove the battery from the AC outlet. 5. Disconnect all external devices connected to reduce the weight of the computer: ...

User Guide
Page 61
Reconnect external power and external devices. 13. Replace the security screw. 11. Align the tabs (1) on the hard drive cover with the notches on the computer. Replace the battery, turn the computer over, and turn on the computer, close the hard drive cover (2), and tighten the hard drive screws (3). 12. 10. Optical drive 51
Reconnect external power and external devices. 13. Replace the security screw. 11. Align the tabs (1) on the hard drive cover with the notches on the computer. Replace the battery, turn the computer over, and turn on the computer, close the hard drive cover (2), and tighten the hard drive screws (3). 12. 10. Optical drive 51
User Guide
Page 70
...: To prevent possible audio and video degradation, loss of audio or video playback functionality, or loss of the following ways: ● Briefly press the power button. ● If the display is in the Sleep state for an extended period or if the battery reaches a critical battery level while in the ... saved to memory, letting you can initiate Sleep in any of networking connection or perform any type of the following ways: ● Briefly press the power button. ● Close the display. ● Click Start, click the arrow next to the Shut down button, and then click Sleep...
...: To prevent possible audio and video degradation, loss of audio or video playback functionality, or loss of the following ways: ● Briefly press the power button. ● If the display is in the Sleep state for an extended period or if the battery reaches a critical battery level while in the ... saved to memory, letting you can initiate Sleep in any of networking connection or perform any type of the following ways: ● Briefly press the power button. ● Close the display. ● Click Start, click the arrow next to the Shut down button, and then click Sleep...
User Guide
Page 71
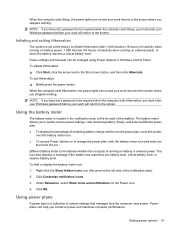
...battery has reached a low battery level, critical battery level, or reserve battery level. Using power plans A power plan is set at the factory to initiate Hibernation after 1,080 minutes (18 hours) of inactivity when running on external power, or when the battery reaches a critical battery level. Click Customize notification icons. 3. Click... turn on and your work returns to the screen where you have set a password to be changed using Power Options in the notification area, at the left side of the notification area). 2. To hide or display the battery meter icon: 1. NOTE: ...
...battery has reached a low battery level, critical battery level, or reserve battery level. Using power plans A power plan is set at the factory to initiate Hibernation after 1,080 minutes (18 hours) of inactivity when running on external power, or when the battery reaches a critical battery level. Click Customize notification icons. 3. Click... turn on and your work returns to the screen where you have set a password to be changed using Power Options in the notification area, at the left side of the notification area). 2. To hide or display the battery meter icon: 1. NOTE: ...
User Guide
Page 72
... wakeup. 3. Click Change Settings that are available: ● HP recommended ● High performance ● Power saver You can change additional settings, click Change advanced power settings and make your changes. Click Require a password (recommended). 5. Select Start > Control Panel > System and Security > Power Options, and then select a power plan from the list. - Select Start > Control Panel...
... wakeup. 3. Click Change Settings that are available: ● HP recommended ● High performance ● Power saver You can change additional settings, click Change advanced power settings and make your changes. Click Require a password (recommended). 5. Select Start > Control Panel > System and Security > Power Options, and then select a power plan from the list. - Select Start > Control Panel...
User Guide
Page 73
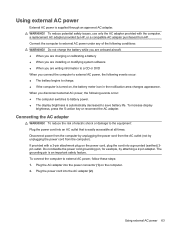
...decreased to charge. ● If the computer is easily accessible at all times. Disconnect power from the computer by unplugging the power cord from the AC outlet (not by unplugging the power cord from HP. If provided with the computer, a replacement AC adapter provided by attaching a 2-pin ...adapter. Do not disable the power cord grounding pin, for example, by HP, or a compatible AC adapter purchased from the computer). To reduce potential safety issues, use only the AC adapter provided with ...
...decreased to charge. ● If the computer is easily accessible at all times. Disconnect power from the computer by unplugging the power cord from the AC outlet (not by unplugging the power cord from HP. If provided with the computer, a replacement AC adapter provided by attaching a 2-pin ...adapter. Do not disable the power cord grounding pin, for example, by HP, or a compatible AC adapter purchased from the computer). To reduce potential safety issues, use only the AC adapter provided with ...


