User Guide
Page 6
... network ...22 3 Pointing devices and keyboard ...24 Using the TouchPad ...24 Turning the TouchPad on and off 24 Using TouchPad gestures 25 Scrolling ...25 Pinching ...26 Rotating ...26 Setting pointing device preferences 27 Connecting an external mouse 27 Using the keyboard ...27 Using the action keys ...27 Using the hotkey ...28 Cleaning the TouchPad and keyboard 30 4 Multimedia ...31 Multimedia features ...31 Identifying your multimedia components 31 Adjusting the volume ...33 Using the media activity action keys 34 Multimedia software...
... network ...22 3 Pointing devices and keyboard ...24 Using the TouchPad ...24 Turning the TouchPad on and off 24 Using TouchPad gestures 25 Scrolling ...25 Pinching ...26 Rotating ...26 Setting pointing device preferences 27 Connecting an external mouse 27 Using the keyboard ...27 Using the action keys ...27 Using the hotkey ...28 Cleaning the TouchPad and keyboard 30 4 Multimedia ...31 Multimedia features ...31 Identifying your multimedia components 31 Adjusting the volume ...33 Using the media activity action keys 34 Multimedia software...

User Guide
Page 9
... Utility (BIOS) ...95 Starting Setup Utility ...95 Using Setup Utility ...96 Changing the language of Setup Utility 96 Navigating and selecting in Setup Utility 96 Displaying system information 97 Restoring default settings in Setup Utility 97 Exiting Setup Utility ...98 Setup Utility menus ...98 Main menu ...98 Security menu ...98 System Configuration menu 99 Diagnostics menu ...99 11 Software updates ...100 Updating the BIOS ...101 Determining the BIOS version 101 Downloading a BIOS update 102 Updating programs and drivers ...103 12 Backup and recovery ...104 Creating recovery discs...
... Utility (BIOS) ...95 Starting Setup Utility ...95 Using Setup Utility ...96 Changing the language of Setup Utility 96 Navigating and selecting in Setup Utility 96 Displaying system information 97 Restoring default settings in Setup Utility 97 Exiting Setup Utility ...98 Setup Utility menus ...98 Main menu ...98 Security menu ...98 System Configuration menu 99 Diagnostics menu ...99 11 Software updates ...100 Updating the BIOS ...101 Determining the BIOS version 101 Downloading a BIOS update 102 Updating programs and drivers ...103 12 Backup and recovery ...104 Creating recovery discs...
User Guide
Page 18
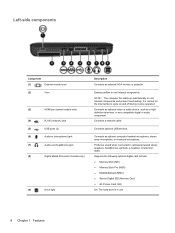
...; Memory Stick Pro (MSP) ● MultiMediaCard (MMC) ● Secure Digital (SD) Memory Card ● xD-Picture Card (XD) On: The hard drive is normal for the internal fan to cool internal components. Produces sound when connected to cool internal components and prevent overheating. Enables airflow to cycle on and off during routine operation. Left-side components Component (1) External monitor port (2) Vent (3) HDMI port (select models only) (4) RJ-45 (network) jack (5) USB ports (2) (6) Audio-in use. 8 Chapter 1 Features Connects optional USB devices.
...; Memory Stick Pro (MSP) ● MultiMediaCard (MMC) ● Secure Digital (SD) Memory Card ● xD-Picture Card (XD) On: The hard drive is normal for the internal fan to cool internal components. Produces sound when connected to cool internal components and prevent overheating. Enables airflow to cycle on and off during routine operation. Left-side components Component (1) External monitor port (2) Vent (3) HDMI port (select models only) (4) RJ-45 (network) jack (5) USB ports (2) (6) Audio-in use. 8 Chapter 1 Features Connects optional USB devices.
User Guide
Page 30
... disabled. ● Wireless device or router hardware has failed. ● Wireless device encountered interference from the Network adapters list. You may add wireless networking capability to expand the list and show all wireless devices. Click the arrow next to Network adapters to the computer by purchasing a wireless networking device. NOTE: Wireless networking devices are installed for the WLAN device is not properly installed. The listing for tasks such as installing software, running utilities, or changing Windows settings. Troubleshooting wireless connection problems...
... disabled. ● Wireless device or router hardware has failed. ● Wireless device encountered interference from the Network adapters list. You may add wireless networking capability to expand the list and show all wireless devices. Click the arrow next to Network adapters to the computer by purchasing a wireless networking device. NOTE: Wireless networking devices are installed for the WLAN device is not properly installed. The listing for tasks such as installing software, running utilities, or changing Windows settings. Troubleshooting wireless connection problems...
User Guide
Page 48
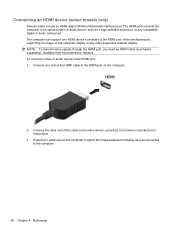
The HDMI port connects the computer to the HDMI port: 1. The computer can support one end of the cable to the video device, according to the device manufacturer's instructions. 3. To connect a video or audio device to an optional video or audio device, such as a high-definition television, or any other end of the HDMI cable to the computer. 38 Chapter 4 Multimedia Connect the other supported external display. NOTE: To transmit video signals through the HDMI port, you need an HDMI cable (purchased...
The HDMI port connects the computer to the HDMI port: 1. The computer can support one end of the cable to the video device, according to the device manufacturer's instructions. 3. To connect a video or audio device to an optional video or audio device, such as a high-definition television, or any other end of the HDMI cable to the computer. 38 Chapter 4 Multimedia Connect the other supported external display. NOTE: To transmit video signals through the HDMI port, you need an HDMI cable (purchased...
User Guide
Page 69
... location on -screen instructions. Troubleshooting 59 Click Install now to install. 7. This feature can be set up Windows Update, you will be prompted to enter settings before you have not previously set to your hard drive. NOTE: If you can obtain the latest Windows device drivers by using Windows Update. Click Download only to save the file to automatically check for and install updates for updates. 3. Open your Web browser, go to http://www.hp.com/support...
... location on -screen instructions. Troubleshooting 59 Click Install now to install. 7. This feature can be set up Windows Update, you will be prompted to enter settings before you have not previously set to your hard drive. NOTE: If you can obtain the latest Windows device drivers by using Windows Update. Click Download only to save the file to automatically check for and install updates for updates. 3. Open your Web browser, go to http://www.hp.com/support...
User Guide
Page 70
... initiated, your work is set at the factory: Sleep and Hibernation. Power settings and timeouts can be changed using Power Options in any of inactivity when running on battery power and 30 minutes of the following ways: ● Briefly press the power button. ● Close the display. ● Click Start, click the arrow next to a disc or an external media card. Initiating and exiting Sleep The system is saved to memory, letting...
... initiated, your work is set at the factory: Sleep and Hibernation. Power settings and timeouts can be changed using Power Options in any of inactivity when running on battery power and 30 minutes of the following ways: ● Briefly press the power button. ● Close the display. ● Click Start, click the arrow next to a disc or an external media card. Initiating and exiting Sleep The system is saved to memory, letting...
User Guide
Page 77
... , calibrate the battery instead of a full charge through normal use while on battery power. Maximizing battery discharge time Battery discharge time varies depending on the features you are charging a new battery, charge it . Some lowbattery alerts and system responses can be changed using Power Options do not affect lights. Managing low battery levels The information in Windows Control Panel. NOTE: If the computer is on while the battery is charging, the battery meter in...
... , calibrate the battery instead of a full charge through normal use while on battery power. Maximizing battery discharge time Battery discharge time varies depending on the features you are charging a new battery, charge it . Some lowbattery alerts and system responses can be changed using Power Options do not affect lights. Managing low battery levels The information in Windows Control Panel. NOTE: If the computer is on while the battery is charging, the battery meter in...
User Guide
Page 81
.... Replacing the battery Computer battery life varies, depending on power management settings, programs running on the computer, display brightness, external devices connected to replace the battery when an internal cell is possibly covered by an HP warranty, instructions include a warranty ID. Shut down the computer, follow these steps: NOTE: If the computer is less than 2 weeks, remove the battery and store it separately. Calibrate a battery before using it if it to a USB port...
.... Replacing the battery Computer battery life varies, depending on power management settings, programs running on the computer, display brightness, external devices connected to replace the battery when an internal cell is possibly covered by an HP warranty, instructions include a warranty ID. Shut down the computer, follow these steps: NOTE: If the computer is less than 2 weeks, remove the battery and store it separately. Calibrate a battery before using it if it to a USB port...
User Guide
Page 84
... connecting a powered drive, be added by connecting the drive to a USB port on the computer. USB drives include the following types: ● 1.44-megabyte diskette drive ● Hard drive module (a hard drive with an adapter attached) ● DVD-ROM Drive ● DVD/CD-RW Combo Drive ● DVD±RW and CD-RW Combo Drive NOTE: For more information about required software and drivers, or to learn which computer port to use, refer to the computer. 2. To disconnect a powered drive...
... connecting a powered drive, be added by connecting the drive to a USB port on the computer. USB drives include the following types: ● 1.44-megabyte diskette drive ● Hard drive module (a hard drive with an adapter attached) ● DVD-ROM Drive ● DVD/CD-RW Combo Drive ● DVD±RW and CD-RW Combo Drive NOTE: For more information about required software and drivers, or to learn which computer port to use, refer to the computer. 2. To disconnect a powered drive...
User Guide
Page 85
... > Disk Defragmenter. 2. Select Start > All Programs > Accessories > System Tools > Disk Cleanup. 2. You may be prompted for tasks such as installing software, running utilities, or changing Windows settings. Click Defragment disk. You may want to set Disk Defragmenter to improve the security of your computer manually at least once a month. To run Disk Defragmenter: 1. Follow the on the hard drive become fragmented. NOTE: Windows® includes the User Account Control...
... > Disk Defragmenter. 2. Select Start > All Programs > Accessories > System Tools > Disk Cleanup. 2. You may be prompted for tasks such as installing software, running utilities, or changing Windows settings. Click Defragment disk. You may want to set Disk Defragmenter to improve the security of your computer manually at least once a month. To run Disk Defragmenter: 1. Follow the on the hard drive become fragmented. NOTE: Windows® includes the User Account Control...
User Guide
Page 86
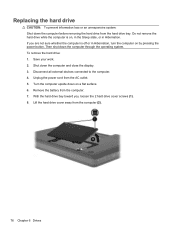
... the power cord from the computer. 7. Shut down the computer before removing the hard drive from the computer (2). 76 Chapter 6 Drives Remove the battery from the AC outlet. 5. Replacing the hard drive CAUTION: To prevent information loss or an unresponsive system: Shut down the computer and close the display. 3. Save your work. 2. Disconnect all external devices connected to the computer. 4. Lift the hard drive cover away from the hard drive...
... the power cord from the computer. 7. Shut down the computer before removing the hard drive from the computer (2). 76 Chapter 6 Drives Remove the battery from the AC outlet. 5. Replacing the hard drive CAUTION: To prevent information loss or an unresponsive system: Shut down the computer and close the display. 3. Save your work. 2. Disconnect all external devices connected to the computer. 4. Lift the hard drive cover away from the hard drive...
User Guide
Page 98
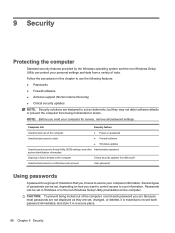
... security features provided by the Windows operating system and the non-Windows Setup Utility can protect your personal settings and data from Microsoft Unauthorized access to a Windows user account User password Using passwords A password is essential to record each password you want to control access to use of the computer Unauthorized access to data ● Power-on password ● Firewall software ● Windows updates Unauthorized access to Setup Utility, BIOS settings, and other Administrator password system identification information Ongoing or...
... security features provided by the Windows operating system and the non-Windows Setup Utility can protect your personal settings and data from Microsoft Unauthorized access to a Windows user account User password Using passwords A password is essential to record each password you want to control access to use of the computer Unauthorized access to data ● Power-on password ● Firewall software ● Windows updates Unauthorized access to Setup Utility, BIOS settings, and other Administrator password system identification information Ongoing or...
User Guide
Page 109
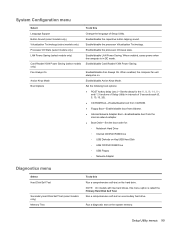
... network adapter. ● Boot Order―Set the boot order for: ◦ Notebook Hard Drive ◦ Internal CD/DVD ROM Drive ◦ USB Diskette on Key/USB Hard Disk ◦ USB CD/DVD ROM Drive ◦ USB Floppy ◦ Network Adapter Diagnostics menu Select Hard Disk Self Test Secondary Hard Disk Self Test (select models only) Memory Test To do this Run a comprehensive self-test on the hard drive. Enabled/disable Fan Always On. Enable/disable Card Reader/1394 Power Saving. Run a comprehensive self-test on a secondary hard drive. Enable/disable the capacitive button tapping sound...
... network adapter. ● Boot Order―Set the boot order for: ◦ Notebook Hard Drive ◦ Internal CD/DVD ROM Drive ◦ USB Diskette on Key/USB Hard Disk ◦ USB CD/DVD ROM Drive ◦ USB Floppy ◦ Network Adapter Diagnostics menu Select Hard Disk Self Test Secondary Hard Disk Self Test (select models only) Memory Test To do this Run a comprehensive self-test on the hard drive. Enabled/disable Fan Always On. Enable/disable Card Reader/1394 Power Saving. Run a comprehensive self-test on a secondary hard drive. Enable/disable the capacitive button tapping sound...
User Guide
Page 110
... of this guide: 1. The BIOS initializes the operating system, determines how the computer will interact with your computer. Most software and BIOS updates on the HP Web site. You may be prompted for your permission or password for a system BIOS update by identifying the BIOS version currently installed on the computer. Access the updates on the system ROM. Prepare for tasks such as installing software, running utilities, or changing Windows settings.
... of this guide: 1. The BIOS initializes the operating system, determines how the computer will interact with your computer. Most software and BIOS updates on the HP Web site. You may be prompted for your permission or password for a system BIOS update by identifying the BIOS version currently installed on the computer. Access the updates on the system ROM. Prepare for tasks such as installing software, running utilities, or changing Windows settings.
User Guide
Page 112
... recorded earlier, open the folder on the screen to download. 3. You will be downloaded. The BIOS installation begins. 5. At the download area, follow these steps: 1. You may need to access this information to locate the update later, after it has been downloaded to install the update. Follow any device, cable, or cord. Using the hard drive path you are ready to your computer: Select Start > Help and Support > Maintain > Software Updates. 2. Make a note of...
... recorded earlier, open the folder on the screen to download. 3. You will be downloaded. The BIOS installation begins. 5. At the download area, follow these steps: 1. You may need to access this information to locate the update later, after it has been downloaded to install the update. Follow any device, cable, or cord. Using the hard drive path you are ready to your computer: Select Start > Help and Support > Maintain > Software Updates. 2. Make a note of...
User Guide
Page 113
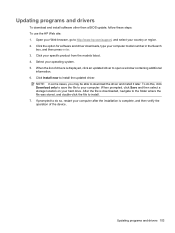
Open your country or region. 2. Updating programs and drivers 103 Click the option for software and driver downloads, type your hard drive. When the list of the device. NOTE: In some cases, you may be able to http://www.hp.com/support, and select your Web browser, go to download the driver and install it later. When prompted, click Save and then select a storage location on your computer model number in...
Open your country or region. 2. Updating programs and drivers 103 Click the option for software and driver downloads, type your hard drive. When the list of the device. NOTE: In some cases, you may be able to http://www.hp.com/support, and select your Web browser, go to download the driver and install it later. When prompted, click Save and then select a storage location on your computer model number in...
User Guide
Page 120
... 9 battery temperature 70 battery, identifying 11 bays battery 9 hard drive 9 BIOS, updating 101 Blu-ray Disc playing 43 removing 48 Bluetooth device 13, 19 Bluetooth label 12 boot options 99 boot order 99 button sound 99 buttons power 4 TouchPad right/left 2, 24 C cables LAN 22 USB 80 calibrating battery 68 caps lock light, identifying 3 Card Reader Power Saving 99 CD copying 46 playing 43 removing 48 CD drive 41, 74 changing the language of Setup Utility 96 charging batteries 66, 68 checking audio functions 36 compartments memory module 9 components additional hardware 11...
... 9 battery temperature 70 battery, identifying 11 bays battery 9 hard drive 9 BIOS, updating 101 Blu-ray Disc playing 43 removing 48 Bluetooth device 13, 19 Bluetooth label 12 boot options 99 boot order 99 button sound 99 buttons power 4 TouchPad right/left 2, 24 C cables LAN 22 USB 80 calibrating battery 68 caps lock light, identifying 3 Card Reader Power Saving 99 CD copying 46 playing 43 removing 48 CD drive 41, 74 changing the language of Setup Utility 96 charging batteries 66, 68 checking audio functions 36 compartments memory module 9 components additional hardware 11...
User Guide
Page 121
... Slot 8 optical drive 7 webcam 6 wireless 3 local area network (LAN) cable required 22 connecting cable 22 low battery level 67 M Main menu 98 maintenance Disk Cleanup 75 Disk Defragmenter 75 managing a power-on password 91 managing an administrator password 90 media controls, hotkeys 34 memory module inserting 85 removing 85 memory module compartment cover removing 85 replacing 86 memory module compartment, identifying 9 memory test 99 microphone (internal), identifying 6, 32 minimizing interference 22 modem approval label 12 modem cable noise suppression circuitry 11 monitor port, external...
... Slot 8 optical drive 7 webcam 6 wireless 3 local area network (LAN) cable required 22 connecting cable 22 low battery level 67 M Main menu 98 maintenance Disk Cleanup 75 Disk Defragmenter 75 managing a power-on password 91 managing an administrator password 90 media controls, hotkeys 34 memory module inserting 85 removing 85 memory module compartment cover removing 85 replacing 86 memory module compartment, identifying 9 memory test 99 microphone (internal), identifying 6, 32 minimizing interference 22 modem approval label 12 modem cable noise suppression circuitry 11 monitor port, external...

User Guide
Page 122
... battery 66 restore points 108 restoring default settings 97 RJ-11 (modem) jack, identifying 7 RJ-45 (network) jack, identifying 8 S secondary hard drive self test 99 security cable slot, identifying 7 Security menu 98 security, wireless 17 selecting in Setup Utility 96 serial number, computer 12 service tag 12 setup of WLAN 16 Setup Utility, passwords set in 89 shut down 71 Sleep exiting 60 initiating 60 slots Digital Media 8 memory module 9 security cable 7 software Disk Cleanup 75 Disk Defragmenter 75 multimedia 35 Windows Media Player 35 Wireless...
... battery 66 restore points 108 restoring default settings 97 RJ-11 (modem) jack, identifying 7 RJ-45 (network) jack, identifying 8 S secondary hard drive self test 99 security cable slot, identifying 7 Security menu 98 security, wireless 17 selecting in Setup Utility 96 serial number, computer 12 service tag 12 setup of WLAN 16 Setup Utility, passwords set in 89 shut down 71 Sleep exiting 60 initiating 60 slots Digital Media 8 memory module 9 security cable 7 software Disk Cleanup 75 Disk Defragmenter 75 multimedia 35 Windows Media Player 35 Wireless...


