User Guide
Page 8
... battery ...71 Shutting down the computer ...71 6 Drives ...73 Handling drives ...73 Using external drives ...74 Improving hard drive performance ...75 Using Disk Defragmenter 75 Using Disk Cleanup ...75 Replacing the hard drive ...76 7 External devices and external media cards 80 Using a USB device ...80 Connecting a USB device 80 Removing a USB device ...81 Using Digital Media Slot cards...
... battery ...71 Shutting down the computer ...71 6 Drives ...73 Handling drives ...73 Using external drives ...74 Improving hard drive performance ...75 Using Disk Defragmenter 75 Using Disk Cleanup ...75 Replacing the hard drive ...76 7 External devices and external media cards 80 Using a USB device ...80 Connecting a USB device 80 Removing a USB device ...81 Using Digital Media Slot cards...

User Guide
Page 19
... components Component (1) (2) Battery bay Battery release latch (3) Vents (4) (4) Memory module compartment (5) Hard drive bay Description Holds the battery. NOTE: The computer fan starts up automatically to cool internal components. If you replace the module and then receive a warning message, remove the module to cycle on select models, the wireless LAN (WLAN) device. It...
... components Component (1) (2) Battery bay Battery release latch (3) Vents (4) (4) Memory module compartment (5) Hard drive bay Description Holds the battery. NOTE: The computer fan starts up automatically to cool internal components. If you replace the module and then receive a warning message, remove the module to cycle on select models, the wireless LAN (WLAN) device. It...
User Guide
Page 56
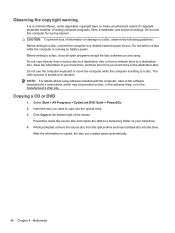
... may be provided on disc, in the software Help, or on battery power. Copying a CD or DVD 1. When prompted, remove the source disc from a network drive to a destination disc. Do not write to a disc while the computer is running on the manufacturer's Web site. The write... connect the computer to a reliable external power source. After the information is sensitive to vibration. Save the information to your hard drive, and then burn from your hard drive. 4. Observing the copyright warning It is writing to a disc. Do not use the computer keyboard or move the computer ...
... may be provided on disc, in the software Help, or on battery power. Copying a CD or DVD 1. When prompted, remove the source disc from a network drive to a destination disc. Do not write to a disc while the computer is running on the manufacturer's Web site. The write... connect the computer to a reliable external power source. After the information is sensitive to vibration. Save the information to your hard drive, and then burn from your hard drive. 4. Observing the copyright warning It is writing to a disc. Do not use the computer keyboard or move the computer ...
User Guide
Page 59
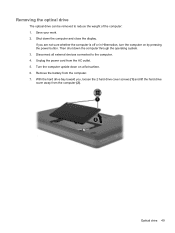
...the weight of the computer: 1. If you , loosen the 2 hard drive cover screws (1) and lift the hard drive cover away from the computer (2). Unplug the power cord from the computer. 7. Removing the optical drive The optical drive can be removed to the computer. 4. Turn the computer upside down on by ...pressing the power button. With the hard drive bay toward you are not sure whether the computer is off ...
...the weight of the computer: 1. If you , loosen the 2 hard drive cover screws (1) and lift the hard drive cover away from the computer (2). Unplug the power cord from the computer. 7. Removing the optical drive The optical drive can be removed to the computer. 4. Turn the computer upside down on by ...pressing the power button. With the hard drive bay toward you are not sure whether the computer is off ...

User Guide
Page 83
... fields. Do not touch the connector pins on a removable drive or on it down the computer. An external hard drive must be handled with care. Remove media from the drive bay, or traveling with cleaning products. Handle a drive carefully; do not drop a drive or place items on the computer. 6 Drives Handling drives Drives are fragile computer components that must be connected...
... fields. Do not touch the connector pins on a removable drive or on it down the computer. An external hard drive must be handled with care. Remove media from the drive bay, or traveling with cleaning products. Handle a drive carefully; do not drop a drive or place items on the computer. 6 Drives Handling drives Drives are fragile computer components that must be connected...
User Guide
Page 84
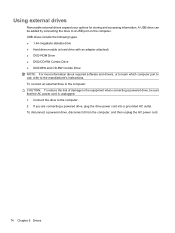
...drives Removable external drives expand your options for storing and accessing information. A USB drive can be sure that the AC power cord is unplugged. 1. To connect an external drive to the computer: CAUTION: To reduce the risk of damage to the equipment when connecting a powered drive, be added by connecting the drive.... 74 Chapter 6 Drives USB drives include the following types: ● 1.44-megabyte diskette drive ● Hard drive module (a hard drive with an adapter attached) ● DVD-ROM Drive ● DVD/CD-RW Combo Drive ● DVD±RW and CD-RW Combo Drive NOTE: For more ...
...drives Removable external drives expand your options for storing and accessing information. A USB drive can be sure that the AC power cord is unplugged. 1. To connect an external drive to the computer: CAUTION: To reduce the risk of damage to the equipment when connecting a powered drive, be added by connecting the drive.... 74 Chapter 6 Drives USB drives include the following types: ● 1.44-megabyte diskette drive ● Hard drive module (a hard drive with an adapter attached) ● DVD-ROM Drive ● DVD/CD-RW Combo Drive ● DVD±RW and CD-RW Combo Drive NOTE: For more ...
User Guide
Page 86
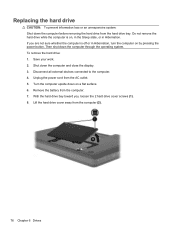
... an unresponsive system: Shut down the computer through the operating system. Remove the battery from the AC outlet. 5. Do not remove the hard drive while the computer is off or in Hibernation. Then shut down the computer before removing the hard drive from the computer (2). 76 Chapter 6 Drives Disconnect all external devices connected to the computer. 4. With the...
... an unresponsive system: Shut down the computer through the operating system. Remove the battery from the AC outlet. 5. Do not remove the hard drive while the computer is off or in Hibernation. Then shut down the computer before removing the hard drive from the computer (2). 76 Chapter 6 Drives Disconnect all external devices connected to the computer. 4. With the...
User Guide
Page 87
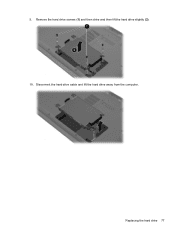
Replacing the hard drive 77 9. Remove the hard drive screws (1) and then drive and then lift the hard drive slightly (2). 10. Disconnect the hard drive cable and lift the hard drive away from the computer.
Replacing the hard drive 77 9. Remove the hard drive screws (1) and then drive and then lift the hard drive slightly (2). 10. Disconnect the hard drive cable and lift the hard drive away from the computer.
User Guide
Page 112
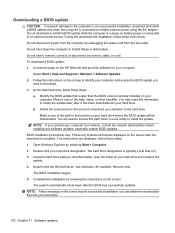
... insert, remove, connect, or disconnect any software updates, especially system BIOS updates. Follow any instructions that are displayed on the screen after the BIOS has successfully updated. NOTE: After a message on the screen to download your computer to the hard drive. At the...HP Web site that contains the update. 4. BIOS installation procedures vary. b. Make a note of the date, name, or other identifier. Do not download or install a BIOS update while the computer is running on battery power or connected to the location on the screen to identify your hard drive...
... insert, remove, connect, or disconnect any software updates, especially system BIOS updates. Follow any instructions that are displayed on the screen after the BIOS has successfully updated. NOTE: After a message on the screen to download your computer to the hard drive. At the...HP Web site that contains the update. 4. BIOS installation procedures vary. b. Make a note of the date, name, or other identifier. Do not download or install a BIOS update while the computer is running on battery power or connected to the location on the screen to identify your hard drive...
User Guide
Page 120
...64 battery release latch 65 battery release latch, identifying 9 battery temperature 70 battery, identifying 11 bays battery 9 hard drive 9 BIOS, updating 101 Blu-ray Disc playing 43 removing 48 Bluetooth device 13, 19 Bluetooth label 12 boot options 99 boot order 99 button sound 99 buttons power ... corporate WLAN connection 18 critical battery level 67 CyberLink PowerDVD 8 software 35 D device drivers HP drivers 59 Windows drivers 59 Diagnostics menu 99 digital card defined 82 inserting 82 removing 83 stopping 83 Digital Media Slot light, identifying 8 Digital Media Slot, identifying 8 Disk ...
...64 battery release latch 65 battery release latch, identifying 9 battery temperature 70 battery, identifying 11 bays battery 9 hard drive 9 BIOS, updating 101 Blu-ray Disc playing 43 removing 48 Bluetooth device 13, 19 Bluetooth label 12 boot options 99 boot order 99 button sound 99 buttons power ... corporate WLAN connection 18 critical battery level 67 CyberLink PowerDVD 8 software 35 D device drivers HP drivers 59 Windows drivers 59 Diagnostics menu 99 digital card defined 82 inserting 82 removing 83 stopping 83 Digital Media Slot light, identifying 8 Digital Media Slot, identifying 8 Disk ...
User Guide
Page 121
... 8, 37 F f11 109 fan always on 99 firewall 17 fn key, identifying 5, 28 full system recovery 104 function keys, identifying 5, 28 H hard drive installing 78 removing 76 replacing 76 hard drive bay, identifying 9 hard drive self test 99 HDMI 8, 38 headphone (audio-out) jack 32 Hibernation exiting 61 initiated during critical battery level 67 initiating 61 high...
... 8, 37 F f11 109 fan always on 99 firewall 17 fn key, identifying 5, 28 full system recovery 104 function keys, identifying 5, 28 H hard drive installing 78 removing 76 replacing 76 hard drive bay, identifying 9 hard drive self test 99 HDMI 8, 38 headphone (audio-out) jack 32 Hibernation exiting 61 initiated during critical battery level 67 initiating 61 high...

User Guide
Page 122
... 42 DVD±R 42 DVD±RW 42 LightScribe DVD+R 43 removing 48 using 41 optical drive identifying 7 removing 49 using 40 optical drive light, identifying 7 P passwords administrator 90 power-on 90 set in... 97 RJ-11 (modem) jack, identifying 7 RJ-45 (network) jack, identifying 8 S secondary hard drive self test 99 security cable slot, identifying 7 Security menu 98 security, wireless 17 selecting in Setup Utility...57 disc play 56 DVD movie play 57 external display 57 HP device drivers 59 optical disc tray 54 optical drive detection 55 Windows device drivers 59 turning off the computer 71 ...
... 42 DVD±R 42 DVD±RW 42 LightScribe DVD+R 43 removing 48 using 41 optical drive identifying 7 removing 49 using 40 optical drive light, identifying 7 P passwords administrator 90 power-on 90 set in... 97 RJ-11 (modem) jack, identifying 7 RJ-45 (network) jack, identifying 8 S secondary hard drive self test 99 security cable slot, identifying 7 Security menu 98 security, wireless 17 selecting in Setup Utility...57 disc play 56 DVD movie play 57 external display 57 HP device drivers 59 optical disc tray 54 optical drive detection 55 Windows device drivers 59 turning off the computer 71 ...


