Resolving Start Up and No Boot Problems Checklist
Page 1
... enter Windows Advanced Boot Options, and select Repair Computer option, or enter Safe Mode and run Memory Test and Hard Drive Test. If possible, turn on power, press Esc to enter UEFI mode, and run Memory Diagnostics. Disconnect all peripheral devices and remove all CD/DVDs, SD cards, USB devices, peripherals and do not glow, display is black, no power available to the notebook. Check AC adapter wiring and power connection to purchase a replacement battery or AC adapter. then restart notebook. Connect...
... enter Windows Advanced Boot Options, and select Repair Computer option, or enter Safe Mode and run Memory Test and Hard Drive Test. If possible, turn on power, press Esc to enter UEFI mode, and run Memory Diagnostics. Disconnect all peripheral devices and remove all CD/DVDs, SD cards, USB devices, peripherals and do not glow, display is black, no power available to the notebook. Check AC adapter wiring and power connection to purchase a replacement battery or AC adapter. then restart notebook. Connect...
Resolving Start Up and No Boot Problems Checklist
Page 2
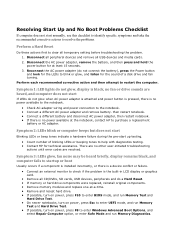
...; If possible, turn on power, press F8 to enter Windows Advanced Boot Options, and do the corrective actions listed under Symptom 3 to run memory and hard drive tests. Symptom 4: Computer may display an error message on a black screen during recovery. Symptom 5: Computer displays a blue screen or continually re-starts After an error message is displayed, you can usually bypass the error and continue to run the notebook in Safe mode to install an updated BIOS or driver. ...
...; If possible, turn on power, press F8 to enter Windows Advanced Boot Options, and do the corrective actions listed under Symptom 3 to run memory and hard drive tests. Symptom 4: Computer may display an error message on a black screen during recovery. Symptom 5: Computer displays a blue screen or continually re-starts After an error message is displayed, you can usually bypass the error and continue to run the notebook in Safe mode to install an updated BIOS or driver. ...
HP Notebook Reference Guide - Windows 7
Page 7
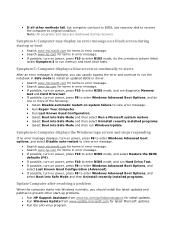
...card ...31 Using a USB device ...31 Connecting a USB device 31 Removing a USB device ...32 Using 1394 devices (select models only 32 Connecting a 1394 device 32 Removing a 1394 device 33 Using an eSATA device (select models only 33 Connecting an eSATA device 33 Removing an eSATA device 34 Using optional external devices ...34 Using optional external drives 34 Using the expansion port (select models only 34 6 Drives ...36 Handling drives ...36 Using hard drives ...37 Improving hard drive performance 37 Using Disk Defragmenter 37 Using Disk Cleanup 37 Using HP ProtectSmart Hard Drive...
...card ...31 Using a USB device ...31 Connecting a USB device 31 Removing a USB device ...32 Using 1394 devices (select models only 32 Connecting a 1394 device 32 Removing a 1394 device 33 Using an eSATA device (select models only 33 Connecting an eSATA device 33 Removing an eSATA device 34 Using optional external devices ...34 Using optional external drives 34 Using the expansion port (select models only 34 6 Drives ...36 Handling drives ...36 Using hard drives ...37 Improving hard drive performance 37 Using Disk Defragmenter 37 Using Disk Cleanup 37 Using HP ProtectSmart Hard Drive...
HP Notebook Reference Guide - Windows 7
Page 17
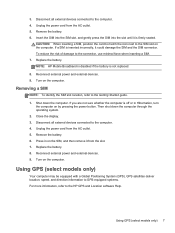
... card to match the icon next to the computer. 4. Reconnect external power and external devices. 9. Press in Hibernation, turn the computer on by pressing the power button. Using GPS (select models only) Your computer may be equipped with a Global Positioning System (GPS). Replace the battery. 8. GPS satellites deliver location, speed, and direction information to GPS-equipped systems. For more information, refer to the computer. 4. Remove...
... card to match the icon next to the computer. 4. Reconnect external power and external devices. 9. Press in Hibernation, turn the computer on by pressing the power button. Using GPS (select models only) Your computer may be equipped with a Global Positioning System (GPS). Replace the battery. 8. GPS satellites deliver location, speed, and direction information to GPS-equipped systems. For more information, refer to the computer. 4. Remove...
HP Notebook Reference Guide - Windows 7
Page 28
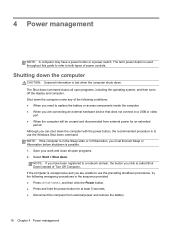
... power button is unresponsive and you have a power button or a power switch. Save your work and close all open programs. 2. Select Start > Shut down . If the computer is used throughout this guide to refer to a USB or video port ● When the computer will be unused and disconnected from external power and remove the battery. 18 Chapter 4 Power management NOTE: If you are connecting an external hardware device that does not connect to both types of Turn...
... power button is unresponsive and you have a power button or a power switch. Save your work and close all open programs. 2. Select Start > Shut down . If the computer is used throughout this guide to refer to a USB or video port ● When the computer will be unused and disconnected from external power and remove the battery. 18 Chapter 4 Power management NOTE: If you are connecting an external hardware device that does not connect to both types of Turn...
HP Notebook Reference Guide - Windows 7
Page 29
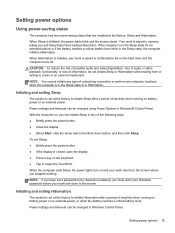
... TouchPad. NOTE: If you can be changed using Power Options in Windows® Control Panel. When Hibernation is initiated, your work will return to the screen. To exit Sleep: ● Briefly press the power button. ● If the display is initiated, the power lights blink and the screen clears. Power settings and timeouts can initiate Sleep in Hibernation. Setting power options 19 When Sleep is closed, open the display. ● Press a key on wakeup, you must enter your Windows password before your work...
... TouchPad. NOTE: If you can be changed using Power Options in Windows® Control Panel. When Hibernation is initiated, your work will return to the screen. To exit Sleep: ● Briefly press the power button. ● If the display is initiated, the power lights blink and the screen clears. Power settings and timeouts can initiate Sleep in Hibernation. Setting power options 19 When Sleep is closed, open the display. ● Press a key on wakeup, you must enter your Windows password before your work...
HP Notebook Reference Guide - Windows 7
Page 44
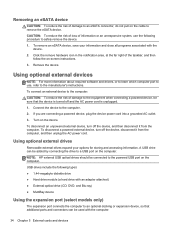
... cable to the computer. 2. Connect the device to remove the eSATA device. Using optional external devices NOTE: For more information about required software and drivers, or to learn which computer port to use the following types: ● 1.44-megabyte diskette drive ● Hard drive module (a hard drive with the device. 2. CAUTION: To reduce the risk of loss of information or an unresponsive system, use , refer to safely remove the device. 1. A USB drive can be added by connecting the drive...
... cable to the computer. 2. Connect the device to remove the eSATA device. Using optional external devices NOTE: For more information about required software and drivers, or to learn which computer port to use the following types: ● 1.44-megabyte diskette drive ● Hard drive module (a hard drive with the device. 2. CAUTION: To reduce the risk of loss of information or an unresponsive system, use , refer to safely remove the device. 1. A USB drive can be added by connecting the drive...
HP Notebook Reference Guide - Windows 7
Page 47
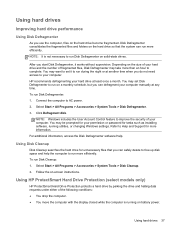
... set it works without supervision. Refer to AC power. 2. HP recommends defragmenting your permission or password for more efficiently. Connect the computer to Help and Support for tasks such as installing software, running on a monthly schedule, but you can safely delete to free up disk space and help the computer to run on battery power. NOTE: It is running utilities, or changing Windows settings. To run Disk Cleanup: 1. Using HP ProtectSmart Hard Drive...
... set it works without supervision. Refer to AC power. 2. HP recommends defragmenting your permission or password for more efficiently. Connect the computer to Help and Support for tasks such as installing software, running on a monthly schedule, but you can safely delete to free up disk space and help the computer to run on battery power. NOTE: It is running utilities, or changing Windows settings. To run Disk Cleanup: 1. Using HP ProtectSmart Hard Drive...
HP Notebook Reference Guide - Windows 7
Page 55
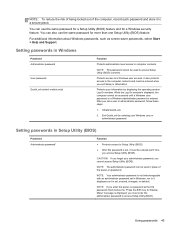
...: To reduce the risk of being locked out of the power-on password at the first password check before the "Press the ESC key for more than one Setup Utility (BIOS) feature. You can also use the same password for a Setup Utility (BIOS) feature and for a Windows security feature. NOTE: Your administrator password is not interchangeable with an administrator password set , it displayed as screen-saver passwords, select Start > Help and Support.
...: To reduce the risk of being locked out of the power-on password at the first password check before the "Press the ESC key for more than one Setup Utility (BIOS) feature. You can also use the same password for a Setup Utility (BIOS) feature and for a Windows security feature. NOTE: Your administrator password is not interchangeable with an administrator password set , it displayed as screen-saver passwords, select Start > Help and Support.
HP Notebook Reference Guide - Windows 7
Page 61
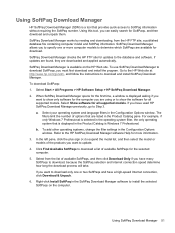
... time, a window is displayed asking if you have a high-speed Internet connection, click Download & Unpack. 6. To use SoftPaq Download Manager to Step 3. To download SoftPaqs: 1. Using SoftPaq Download Manager 51 Using this tool, you must first download and install the program. Select from the HP FTP site, a published database file containing computer model and SoftPaq information. a. To add other operating systems, change the filter settings in the Configuration Options window. Select Show software for...
... time, a window is displayed asking if you have a high-speed Internet connection, click Download & Unpack. 6. To use SoftPaq Download Manager to Step 3. To download SoftPaqs: 1. Using SoftPaq Download Manager 51 Using this tool, you must first download and install the program. Select from the HP FTP site, a published database file containing computer model and SoftPaq information. a. To add other operating systems, change the filter settings in the Configuration Options window. Select Show software for...
HP Notebook Reference Guide - Windows 7
Page 63
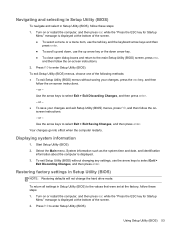
... to enter Setup Utility (BIOS). Select the Main menu. Restoring factory settings in Setup Utility (BIOS), follow the on -screen instructions. 2. Press f10 to enter Setup Utility (BIOS). Using Setup Utility (BIOS) 53 Use the arrow keys to select Exit > Exit Saving Changes, and then press enter. Use the arrow keys to select Exit > Exit Discarding Changes, and then press enter. - Turn on or restart the computer, and then press esc while the "Press the ESC key for Startup Menu" message is displayed at...
... to enter Setup Utility (BIOS). Select the Main menu. Restoring factory settings in Setup Utility (BIOS), follow the on -screen instructions. 2. Press f10 to enter Setup Utility (BIOS). Using Setup Utility (BIOS) 53 Use the arrow keys to select Exit > Exit Saving Changes, and then press enter. Use the arrow keys to select Exit > Exit Discarding Changes, and then press enter. - Turn on or restart the computer, and then press esc while the "Press the ESC key for Startup Menu" message is displayed at...
HP Notebook Reference Guide - Windows 7
Page 65
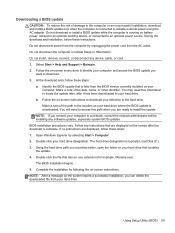
... your hard drive that are displayed on your hard drive where the BIOS update is later than the BIOS version currently installed on -screen instructions to download your hard drive. Do not download or install a BIOS update while the computer is typically Local Disk (C:). 3. Using Setup Utility (BIOS) 55 Do not shut down the computer or initiate Sleep or Hibernation. The hard drive designation is running on battery power, docked in an optional docking device, or connected to the location on the screen...
... your hard drive that are displayed on your hard drive where the BIOS update is later than the BIOS version currently installed on -screen instructions to download your hard drive. Do not download or install a BIOS update while the computer is typically Local Disk (C:). 3. Using Setup Utility (BIOS) 55 Do not shut down the computer or initiate Sleep or Hibernation. The hard drive designation is running on battery power, docked in an optional docking device, or connected to the location on the screen...
HP Notebook Reference Guide - Windows 7
Page 71
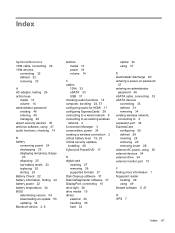
...displaying remaining charge 23 disposing 25 low battery levels 23 replacing 25 storing 24 Battery Check 22 battery information, finding 22 battery power 22 battery temperature 24 BIOS determining version 54 downloading an update 55 updating 54 Bluetooth device 2, 8 buttons media 13 power 18 volume 14 C cables 1394 32 eSATA 33 USB 31 checking audio functions 14 computer, traveling 24, 57 configuring audio for HDMI 17 configuring ExpressCards 28 connecting to a wired network 8 connecting to an existing wireless network 4 Connection Manager 3 conservation, power 24 creating a wireless connection...
...displaying remaining charge 23 disposing 25 low battery levels 23 replacing 25 storing 24 Battery Check 22 battery information, finding 22 battery power 22 battery temperature 24 BIOS determining version 54 downloading an update 55 updating 54 Bluetooth device 2, 8 buttons media 13 power 18 volume 14 C cables 1394 32 eSATA 33 USB 31 checking audio functions 14 computer, traveling 24, 57 configuring audio for HDMI 17 configuring ExpressCards 28 connecting to a wired network 8 connecting to an existing wireless network 4 Connection Manager 3 conservation, power 24 creating a wireless connection...
HP Notebook Reference Guide - Windows 7
Page 72
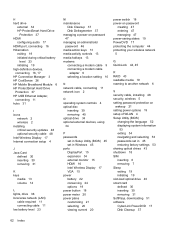
...9 connecting a modem cable adapter 9 selecting a location setting 10 N network cable, connecting 11 network icon 2 O operating system controls 4 optical disc inserting 39 removing 40 optical drive 34 optional external devices, using 34 P passwords set in Setup Utility (BIOS) 45 set in Windows 45 ports DisplayPort 15 expansion 34 external monitor 15 HDMI 16 Intel Wireless Display 17 VGA 15 power battery 22 conserving 24 options 19 power button 18 power meter 20 power plans customizing 21 selecting 20 viewing current 20 power switch 18 power-on password creating 47 entering 47 managing 47 power...
...9 connecting a modem cable adapter 9 selecting a location setting 10 N network cable, connecting 11 network icon 2 O operating system controls 4 optical disc inserting 39 removing 40 optical drive 34 optional external devices, using 34 P passwords set in Setup Utility (BIOS) 45 set in Windows 45 ports DisplayPort 15 expansion 34 external monitor 15 HDMI 16 Intel Wireless Display 17 VGA 15 power battery 22 conserving 24 options 19 power button 18 power meter 20 power plans customizing 21 selecting 20 viewing current 20 power switch 18 power-on password creating 47 entering 47 managing 47 power...

HP Limited Warranty and Techincal Support - 3-year - North America
Page 10
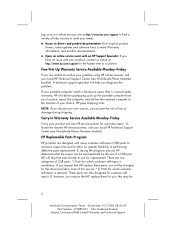
... sources to meet your needs: „ Access to drivers and product documentation: Find original product drivers, latest updates and software fixes, Limited Warranty information, and product documentation. „ Open an online service event with an HP Support Specialist: If you are two categories of loss or damage during the diagnosis period, HP determines that HP replace these parts, you will be charged for the travel and...
... sources to meet your needs: „ Access to drivers and product documentation: Find original product drivers, latest updates and software fixes, Limited Warranty information, and product documentation. „ Open an online service event with an HP Support Specialist: If you are two categories of loss or damage during the diagnosis period, HP determines that HP replace these parts, you will be charged for the travel and...

HP Limited Warranty and Technical Support - 90 day - North America
Page 10
... drivers, latest updates and software fixes, Limited Warranty information, and product documentation. „ Open an online service event with an HP Support Specialist: If you have an issue with many customer self-repair (CSR) parts to minimize repair time and to the location of a CSR part, HP will ship that is covered under warranty, HP will help you , this service.* 2) Parts for customer selfrepair. If you request that HP replace...
... drivers, latest updates and software fixes, Limited Warranty information, and product documentation. „ Open an online service event with an HP Support Specialist: If you have an issue with many customer self-repair (CSR) parts to minimize repair time and to the location of a CSR part, HP will ship that is covered under warranty, HP will help you , this service.* 2) Parts for customer selfrepair. If you request that HP replace...
HP Limited Warranty and Technical Support 1-yr - North America
Page 10
... part, HP will help sources to meet your needs: „ Access to drivers and product documentation: Find original product drivers, latest updates and software fixes, Limited Warranty information, and product documentation. „ Open an online service event with an HP Support Specialist: If you assume the risk of CSR parts: 1) Parts for which customer self-repair is optional. If your portable computer needs a hardware repair that HP replace these parts, you will be charged...
... part, HP will help sources to meet your needs: „ Access to drivers and product documentation: Find original product drivers, latest updates and software fixes, Limited Warranty information, and product documentation. „ Open an online service event with an HP Support Specialist: If you assume the risk of CSR parts: 1) Parts for which customer self-repair is optional. If your portable computer needs a hardware repair that HP replace these parts, you will be charged...
HP Limited Worldwide Warranty and Technical Support 3-yr - North America
Page 10
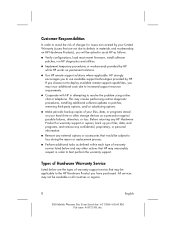
... the problem using online chat or telephone. This may not be available in order to use available support technologies provided by HP while HP works on your hard drive or other actions that may be applicable to the HP Hardware Product you have purchased. All services may involve performing routine diagnostic procedures, installing additional software updates or patches, removing third-party options, and/or substituting options. „ Make periodic backup copies...
... the problem using online chat or telephone. This may not be available in order to use available support technologies provided by HP while HP works on your hard drive or other actions that may be applicable to the HP Hardware Product you have purchased. All services may involve performing routine diagnostic procedures, installing additional software updates or patches, removing third-party options, and/or substituting options. „ Make periodic backup copies...

Worldwide Waranty and Technical Support - HP - 90day - North America
Page 10
... the repair or replacement process. „ Perform additional tasks as a precaution against possible failures, alteration, or loss. If you request HP or an HP authorized service provider to best perform the warranty support. Before returning any HP Hardware Product for warranty support or repairs, back up your hard drive or other storage devices as defined within each type of Hardware Warranty Service Listed below and any external options or...
... the repair or replacement process. „ Perform additional tasks as a precaution against possible failures, alteration, or loss. If you request HP or an HP authorized service provider to best perform the warranty support. Before returning any HP Hardware Product for warranty support or repairs, back up your hard drive or other storage devices as defined within each type of Hardware Warranty Service Listed below and any external options or...
Worldwide Waranty and Technical Support - HP - 90day - North America
Page 14
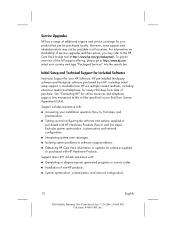
... service upgrades and their prices, you may not be purchased locally. See "Contacting HP" for your installation questions (how to, first steps, and prerequisites). „ Setting up and configuring the software and options supplied or purchased with HP Hardware Products (how-to software usage problems. „ Obtaining HP Care Pack information or updates for ninety (90) days from HP via multiple contact methods, including electronic media...
... service upgrades and their prices, you may not be purchased locally. See "Contacting HP" for your installation questions (how to, first steps, and prerequisites). „ Setting up and configuring the software and options supplied or purchased with HP Hardware Products (how-to software usage problems. „ Obtaining HP Care Pack information or updates for ninety (90) days from HP via multiple contact methods, including electronic media...


