HP Pavilion dv2000 Notebook PC Maintenance and Service Guide
Page 11
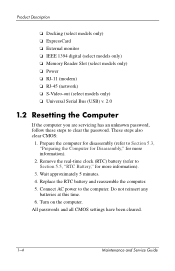
...; Memory Reader Slot (select models only) ❏ Power ❏ RJ-11 (modem) ❏ RJ-45 (network) ❏ S-Video-out (select models only) ❏ Universal Serial Bus (USB) v. 2.0 1.2 Resetting the Computer If the computer you are servicing has an unknown password, follow these steps to the computer. These steps also clear CMOS: 1. All passwords and all CMOS settings have been cleared. 1-4 Maintenance and Service Guide Replace the RTC battery and reassemble the computer. 5. Connect AC power to clear...
...; Memory Reader Slot (select models only) ❏ Power ❏ RJ-11 (modem) ❏ RJ-45 (network) ❏ S-Video-out (select models only) ❏ Universal Serial Bus (USB) v. 2.0 1.2 Resetting the Computer If the computer you are servicing has an unknown password, follow these steps to the computer. These steps also clear CMOS: 1. All passwords and all CMOS settings have been cleared. 1-4 Maintenance and Service Guide Replace the RTC battery and reassemble the computer. 5. Connect AC power to clear...
HP Pavilion dv2000 Notebook PC Maintenance and Service Guide
Page 17
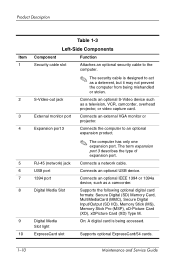
Digital Media Slot Supports the following optional digital card formats: Secure Digital (SD) Memory Card, MultiMediaCard (MMC), Secure Digital Input/Output (SD I/O), Memory Stick (MS), Memory Stick Pro (MSP), xD-Picture Card (XD), xDPicture Card (XD) Type M. ExpressCard slot Supports optional ExpressCard/54 cards. 1-10 Maintenance and Service Guide USB port Connects an optional USB device. 1394 port Connects an optional IEEE 1394 or 1394a device, such as a television, VCR, camcorder, overhead projector, or video capture card. Digital Media Slot light On: A digital card is ...
Digital Media Slot Supports the following optional digital card formats: Secure Digital (SD) Memory Card, MultiMediaCard (MMC), Secure Digital Input/Output (SD I/O), Memory Stick (MS), Memory Stick Pro (MSP), xD-Picture Card (XD), xDPicture Card (XD) Type M. ExpressCard slot Supports optional ExpressCard/54 cards. 1-10 Maintenance and Service Guide USB port Connects an optional USB device. 1394 port Connects an optional IEEE 1394 or 1394a device, such as a television, VCR, camcorder, overhead projector, or video capture card. Digital Media Slot light On: A digital card is ...
HP Pavilion dv2000 Notebook PC Maintenance and Service Guide
Page 19
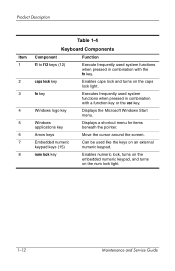
... turns on the caps lock light. Embedded numeric keypad keys (15) Can be used system functions when pressed in combination with the fn key. Windows applications key Displays a shortcut menu for items beneath the pointer. fn key Executes frequently used system functions when pressed in combination with a function key or the esc key. Arrow keys Move the cursor around the screen. caps lock key Enables caps lock and turns on the num lock light. 1-12 Maintenance and Service Guide...
... turns on the caps lock light. Embedded numeric keypad keys (15) Can be used system functions when pressed in combination with the fn key. Windows applications key Displays a shortcut menu for items beneath the pointer. fn key Executes frequently used system functions when pressed in combination with a function key or the esc key. Arrow keys Move the cursor around the screen. caps lock key Enables caps lock and turns on the num lock light. 1-12 Maintenance and Service Guide...
HP Pavilion dv2000 Notebook PC Maintenance and Service Guide
Page 28
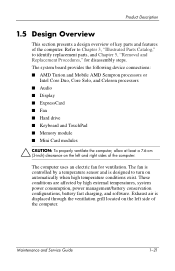
... identify replacement parts, and Chapter 5, "Removal and Replacement Procedures," for ventilation. Exhaust air is controlled by high external temperatures, system power consumption, power management/battery conservation configurations, battery fast charging, and software. The computer uses an electric fan for disassembly steps. Maintenance and Service Guide 1-21 The fan is displaced through the ventilation grill located on the left side of the computer. Product Description 1.5 Design Overview This section presents a design overview of key parts...
... identify replacement parts, and Chapter 5, "Removal and Replacement Procedures," for ventilation. Exhaust air is controlled by high external temperatures, system power consumption, power management/battery conservation configurations, battery fast charging, and software. The computer uses an electric fan for disassembly steps. Maintenance and Service Guide 1-21 The fan is displaced through the ventilation grill located on the left side of the computer. Product Description 1.5 Design Overview This section presents a design overview of key parts...

HP Pavilion dv2000 Notebook PC Maintenance and Service Guide
Page 32
... is started or restarted in Windows or restored from hibernation is in Windows or restored from hibernation is the prompt for advanced users only, refer to the Help and Support Center, which is accessible only when the computer is the prompt to change the boot order. 2-4 Maintenance and Service Guide The Setup Utility features available for advanced users include a hard drive self-test, a Network Service Boot, and settings for all users. Troubleshooting Using Advanced Setup Utility Features This guide...
... is started or restarted in Windows or restored from hibernation is in Windows or restored from hibernation is the prompt for advanced users only, refer to the Help and Support Center, which is accessible only when the computer is the prompt to change the boot order. 2-4 Maintenance and Service Guide The Setup Utility features available for advanced users include a hard drive self-test, a Network Service Boot, and settings for all users. Troubleshooting Using Advanced Setup Utility Features This guide...
HP Pavilion dv2000 Notebook PC Maintenance and Service Guide
Page 39
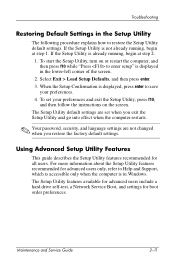
... advanced users only, refer to enter setup" is displayed in the lower-left corner of the screen. 2. When the Setup Confirmation is displayed, press enter to restore the Setup Utility default settings. Maintenance and Service Guide 2-11 Using Advanced Setup Utility Features This guide describes the Setup Utility features recommended for boot order preferences. Troubleshooting Restoring Default Settings in the Setup Utility The following procedure explains how to save your preferences and exit the Setup Utility, press f10, and then follow the instructions...
... advanced users only, refer to enter setup" is displayed in the lower-left corner of the screen. 2. When the Setup Confirmation is displayed, press enter to restore the Setup Utility default settings. Maintenance and Service Guide 2-11 Using Advanced Setup Utility Features This guide describes the Setup Utility features recommended for boot order preferences. Troubleshooting Restoring Default Settings in the Setup Utility The following procedure explains how to save your preferences and exit the Setup Utility, press f10, and then follow the instructions...
HP Pavilion dv2000 Notebook PC Maintenance and Service Guide
Page 42
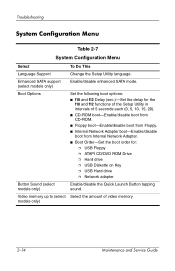
Troubleshooting System Configuration Menu Table 2-7 System Configuration Menu Select To Do This Language Support Change the Setup Utility language. Enhanced SATA support (select models only) Enable/disable enhanced SATA mode. Boot Options Set the following boot options: ■ f10 and f12 Delay (sec.)-Set the delay for : ❐ USB Floppy ❐ ATAPI CD/DVD ROM Drive ❐ Hard drive ❐ USB Diskette on Key ❐ USB Hard drive ❐ Network adapter Button Sound (select models only) Enable/disable the Quick Launch Button tapping sound. Video memory up to (...
Troubleshooting System Configuration Menu Table 2-7 System Configuration Menu Select To Do This Language Support Change the Setup Utility language. Enhanced SATA support (select models only) Enable/disable enhanced SATA mode. Boot Options Set the following boot options: ■ f10 and f12 Delay (sec.)-Set the delay for : ❐ USB Floppy ❐ ATAPI CD/DVD ROM Drive ❐ Hard drive ❐ USB Diskette on Key ❐ USB Hard drive ❐ Network adapter Button Sound (select models only) Enable/disable the Quick Launch Button tapping sound. Video memory up to (...
HP Pavilion dv2000 Notebook PC Maintenance and Service Guide
Page 57
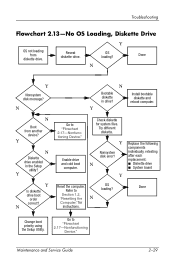
... board Y Reset the computer. Go to OS loading? OS loading? Y N Diskette drive enabled in drive? Refer to "Flowchart 2.17-Nonfunctioning Device." Troubleshooting Flowchart 2.13-No OS Loading, Diskette Drive OS not loading from another device? Y Y Is diskette drive boot order correct? Maintenance and Service Guide 2-29 Done N Y Nonsystem disk message? Y Replace the following components Nonsystem disk error? Install bootable diskette and reboot computer. Try different diskette. N N Boot from diskette drive. Check diskette for instructions...
... board Y Reset the computer. Go to OS loading? OS loading? Y N Diskette drive enabled in drive? Refer to "Flowchart 2.17-Nonfunctioning Device." Troubleshooting Flowchart 2.13-No OS Loading, Diskette Drive OS not loading from another device? Y Y Is diskette drive boot order correct? Maintenance and Service Guide 2-29 Done N Y Nonsystem disk message? Y Replace the following components Nonsystem disk error? Install bootable diskette and reboot computer. Try different diskette. N N Boot from diskette drive. Check diskette for instructions...
HP Pavilion dv2000 Notebook PC Maintenance and Service Guide
Page 93
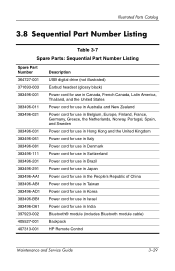
... Kingdom Power cord for use in Italy Power cord for use in Denmark Power cord for use in Switzerland Power cord for use in Brazil Power cord for use in Japan Power cord for use in the People's Republic of China Power cord for use in Taiwan Power cord for use in Korea Power cord for use in Israel Power cord for use in India Bluetooth® module (includes Bluetooth module cable) Backpack HP Remote Control Maintenance and Service Guide...
... Kingdom Power cord for use in Italy Power cord for use in Denmark Power cord for use in Switzerland Power cord for use in Brazil Power cord for use in Japan Power cord for use in the People's Republic of China Power cord for use in Taiwan Power cord for use in Korea Power cord for use in Israel Power cord for use in India Bluetooth® module (includes Bluetooth module cable) Backpack HP Remote Control Maintenance and Service Guide...
HP Pavilion dv2000 Notebook PC Maintenance and Service Guide
Page 116
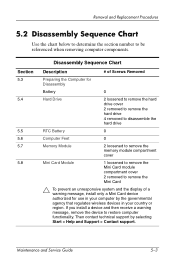
... Computer for Disassembly Battery 0 Hard Drive 2 loosened to remove the hard drive cover 2 removed to remove the hard drive 4 removed to disassemble the hard drive RTC Battery 0 Computer Feet 0 Memory Module 2 loosened to remove the memory module compartment cover Mini Card Module 1 loosened to remove the Mini Card module compartment cover 2 removed to remove the Mini Card Ä To prevent an unresponsive system and the display of a warning message, install only a Mini Card device authorized for use in your computer by selecting Start > Help and Support > Contact support.
... Computer for Disassembly Battery 0 Hard Drive 2 loosened to remove the hard drive cover 2 removed to remove the hard drive 4 removed to disassemble the hard drive RTC Battery 0 Computer Feet 0 Memory Module 2 loosened to remove the memory module compartment cover Mini Card Module 1 loosened to remove the Mini Card module compartment cover 2 removed to remove the Mini Card Ä To prevent an unresponsive system and the display of a warning message, install only a Mini Card device authorized for use in your computer by selecting Start > Help and Support > Contact support.
HP Pavilion dv2000 Notebook PC Maintenance and Service Guide
Page 197
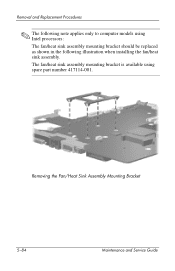
Removing the Fan/Heat Sink Assembly Mounting Bracket 5-84 Maintenance and Service Guide Removal and Replacement Procedures ✎ The following note applies only to computer models using spare part number 417114-001. The fan/heat sink assembly mounting bracket is available using Intel processors: The fan/heat sink assembly mounting bracket should be replaced as shown in the following illustration when installing the fan/heat sink assembly.
Removing the Fan/Heat Sink Assembly Mounting Bracket 5-84 Maintenance and Service Guide Removal and Replacement Procedures ✎ The following note applies only to computer models using spare part number 417114-001. The fan/heat sink assembly mounting bracket is available using Intel processors: The fan/heat sink assembly mounting bracket should be replaced as shown in the following illustration when installing the fan/heat sink assembly.
HP Pavilion dv2000 Notebook PC Maintenance and Service Guide
Page 198
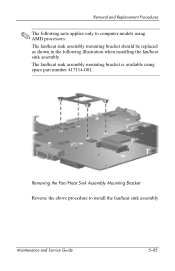
Maintenance and Service Guide 5-85 The fan/heat sink assembly mounting bracket is available using AMD processors: The fan/heat sink assembly mounting bracket should be replaced as shown in the following note applies only to install the fan/heat sink assembly. Removing the Fan/Heat Sink Assembly Mounting Bracket Reverse the above procedure to computer models using spare part number 417114-001. Removal and Replacement Procedures ✎ The following illustration when installing the fan/heat sink assembly.
Maintenance and Service Guide 5-85 The fan/heat sink assembly mounting bracket is available using AMD processors: The fan/heat sink assembly mounting bracket should be replaced as shown in the following note applies only to install the fan/heat sink assembly. Removing the Fan/Heat Sink Assembly Mounting Bracket Reverse the above procedure to computer models using spare part number 417114-001. Removal and Replacement Procedures ✎ The following illustration when installing the fan/heat sink assembly.
HP Pavilion dv2000 Notebook PC Maintenance and Service Guide
Page 274
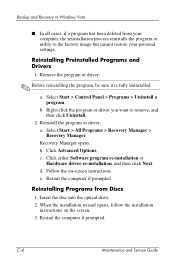
... re-installation or Hardware driver re-installation, and then click Next. Insert the disc into the optical drive. 2. C-6 Maintenance and Service Guide Select Start > Control Panel > Programs > Uninstall a program. Reinstall the program or driver: a. Select Start > All Programs > Recovery Manager > Recovery Manager. Click Advanced Options. c. Follow the on the screen. 3. Right-click the program or driver you want to the factory image but cannot restore your personal settings. b. When the installation wizard opens, follow the installation instructions on -screen instructions...
... re-installation or Hardware driver re-installation, and then click Next. Insert the disc into the optical drive. 2. C-6 Maintenance and Service Guide Select Start > Control Panel > Programs > Uninstall a program. Reinstall the program or driver: a. Select Start > All Programs > Recovery Manager > Recovery Manager. Click Advanced Options. c. Follow the on the screen. 3. Right-click the program or driver you want to the factory image but cannot restore your personal settings. b. When the installation wizard opens, follow the installation instructions on -screen instructions...
HP Pavilion dv2000 Notebook PC Maintenance and Service Guide
Page 308
... spare part number 3-27, 3-35 screw listing A-1 security cable slot 1-10 serial number 3-1, 5-2 service considerations 4-2 Setup Utility 2-1 speaker assembly removal 5-64 spare part number 3-7, 3-34, 5-64 speakers 1-14 specifications computer 6-1 display 6-3 DVD/CD-RW Combo Drive 6-6 DVD±RW/R and CD-RW Combo Drive 6-8, 6-9 hard drive 6-4 I/O addresses 6-13 interrupts 6-11 optical drive 6-8, 6-9 system DMA 6-10 static shielding materials 4-8 Stop button 1-17 S-Video-out jack location 1-10 pin assignments D-3 switch cover removal 5-28 spare part numbers 3-3, 3-34, 5-28 system board removal...
... spare part number 3-27, 3-35 screw listing A-1 security cable slot 1-10 serial number 3-1, 5-2 service considerations 4-2 Setup Utility 2-1 speaker assembly removal 5-64 spare part number 3-7, 3-34, 5-64 speakers 1-14 specifications computer 6-1 display 6-3 DVD/CD-RW Combo Drive 6-6 DVD±RW/R and CD-RW Combo Drive 6-8, 6-9 hard drive 6-4 I/O addresses 6-13 interrupts 6-11 optical drive 6-8, 6-9 system DMA 6-10 static shielding materials 4-8 Stop button 1-17 S-Video-out jack location 1-10 pin assignments D-3 switch cover removal 5-28 spare part numbers 3-3, 3-34, 5-28 system board removal...
Drives
Page 9
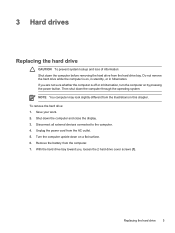
... this chapter. Disconnect all external devices connected to the computer. 4. Remove the battery from the AC outlet. 5. 3 Hard drives Replacing the hard drive CAUTION To prevent system lockup and loss of information: Shut down the computer before removing the hard drive from the illustrations in hibernation. If you , loosen the 2 hard drive cover screws (1). Save your work. 2. Then shut down the computer through the operating system. ENWW Replacing the hard drive 5
... this chapter. Disconnect all external devices connected to the computer. 4. Remove the battery from the AC outlet. 5. 3 Hard drives Replacing the hard drive CAUTION To prevent system lockup and loss of information: Shut down the computer before removing the hard drive from the illustrations in hibernation. If you , loosen the 2 hard drive cover screws (1). Save your work. 2. Then shut down the computer through the operating system. ENWW Replacing the hard drive 5

Drives
Page 19
Index A airport security devices 1 C CD inserting 10 removing, with power 11 removing, without power 12 CD drive 9 inserting 10 removing, with power 11 removing, without power 12 optical drive 9 S standby 13 D drive light 3 drives caring for 1 drive light 3 hard 5, 7 optical 9 See also hard drive, optical drive DVD inserting 10 removing, with power 11 removing, without power 12 DVD drive 9 H hard disk drive installing 7 removing 5 replacing 5 hard drive installing 7 removing 5 replacing 5 hibernation 13 L light, drive 3 O optical disc ENWW Index 15
Index A airport security devices 1 C CD inserting 10 removing, with power 11 removing, without power 12 CD drive 9 inserting 10 removing, with power 11 removing, without power 12 optical drive 9 S standby 13 D drive light 3 drives caring for 1 drive light 3 hard 5, 7 optical 9 See also hard drive, optical drive DVD inserting 10 removing, with power 11 removing, without power 12 DVD drive 9 H hard disk drive installing 7 removing 5 replacing 5 hard drive installing 7 removing 5 replacing 5 hibernation 13 L light, drive 3 O optical disc ENWW Index 15

Notebook Tour
Page 7
... has reached a lowbattery condition. Blinking: A battery that most closely matches your computer. On: Caps lock is on . Top components 3 Blinks once: The media button has been pressed. Off: The computer is on. Blinks once: The previous/rewind button has been pressed. Component (1) Power lights (2)* (2) Battery light (3) Drive light (4) Caps lock light (5) Media button light (6) DVD button light (7) Previous/rewind light (8) Play/pause light (9) Next/fast forward light (10) Stop light (11) Volume mute light ENWW Description On: The...
... has reached a lowbattery condition. Blinking: A battery that most closely matches your computer. On: Caps lock is on . Top components 3 Blinks once: The media button has been pressed. Off: The computer is on. Blinks once: The previous/rewind button has been pressed. Component (1) Power lights (2)* (2) Battery light (3) Drive light (4) Caps lock light (5) Media button light (6) DVD button light (7) Previous/rewind light (8) Play/pause light (9) Next/fast forward light (10) Stop light (11) Volume mute light ENWW Description On: The...

Notebook Tour
Page 8
... light Blinking: The volume scroll zone is turned off until the battery reaches a low-battery condition. Blinking: A battery that is charging. If the computer is not plugged into an external power source, the light is being accessed. Blinks once: The media button has been pressed. Blinking: The computer is on the front of the computer. There are fully charged. Blinking: The hard drive or optical drive is being used to increase speaker volume. (14) Num lock light...
... light Blinking: The volume scroll zone is turned off until the battery reaches a low-battery condition. Blinking: A battery that is charging. If the computer is not plugged into an external power source, the light is being accessed. Blinks once: The media button has been pressed. Blinking: The computer is on the front of the computer. There are fully charged. Blinking: The hard drive or optical drive is being used to increase speaker volume. (14) Num lock light...

Notebook Tour
Page 28
... 20 service tag 20 wireless certification 20 WLAN 20 latch, battery release 16 lights battery 3, 4 caps lock 3, 4 Digital Media Slot 14 drive 3, 4 DVD button 3 integrated camera 17 media button 3, 4 mute 3, 4 next/fast forward 3 num lock 4, 5 optical drive 13 play/pause 3 power 3, 4 previous/rewind 3 stop 3 TouchPad 2 volume down 4, 5 volume mute 3, 4 volume up 4, 5 wireless 11 M media activity buttons, identifying 7 media activity lights, identifying 3 media button light, identifying 3, 4 media button, identifying 6, 8 memory module compartment, identifying 16 microphone (audio-in) jack 11...
... 20 service tag 20 wireless certification 20 WLAN 20 latch, battery release 16 lights battery 3, 4 caps lock 3, 4 Digital Media Slot 14 drive 3, 4 DVD button 3 integrated camera 17 media button 3, 4 mute 3, 4 next/fast forward 3 num lock 4, 5 optical drive 13 play/pause 3 power 3, 4 previous/rewind 3 stop 3 TouchPad 2 volume down 4, 5 volume mute 3, 4 volume up 4, 5 wireless 11 M media activity buttons, identifying 7 media activity lights, identifying 3 media button light, identifying 3, 4 media button, identifying 6, 8 memory module compartment, identifying 16 microphone (audio-in) jack 11...
TouchPad and Keyboard
Page 16
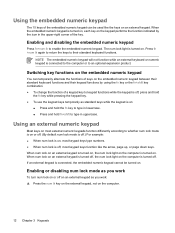
...; When num lock is turned on . Enabling or disabling num lock mode as you work To turn num lock on or off , press and hold the fn key while pressing the keypad key. ● To use the keypad keys temporarily as you work: ▲ Press the num lk key on the external keypad, not on the embedded numeric keypad between their standard keyboard functions and their standard keyboard functions. NOTE...
...; When num lock is turned on . Enabling or disabling num lock mode as you work To turn num lock on or off , press and hold the fn key while pressing the keypad key. ● To use the keypad keys temporarily as you work: ▲ Press the num lk key on the external keypad, not on the embedded numeric keypad between their standard keyboard functions and their standard keyboard functions. NOTE...


