HP LaserJet Printer Family - Print Media Specification Guide
Page 29
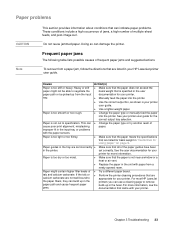
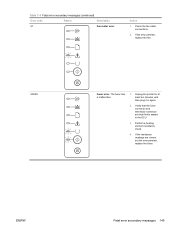
...smooth or too rough. Paper might not be picked up from a newly opened ream. q Perform the printer cleaning procedures that are listed for basis weight in the fuser. For most HP LaserJet printers you can use a cleaning page to remove build-up in the user paper path or be able ... heavy. Paper guides in the tray are not well-bound to specification. Chapter 3 Troubleshooting 23 q Manually feed the paper into the printer. q Replace the paper in the input tray, or problems with paper from the input documentation for more information, see the documentation that the paper ...
...smooth or too rough. Paper might not be picked up from a newly opened ream. q Perform the printer cleaning procedures that are listed for basis weight in the fuser. For most HP LaserJet printers you can use a cleaning page to remove build-up in the user paper path or be able ... heavy. Paper guides in the tray are not well-bound to specification. Chapter 3 Troubleshooting 23 q Manually feed the paper into the printer. q Replace the paper in the input tray, or problems with paper from the input documentation for more information, see the documentation that the paper ...

HP LaserJet P2015 - Software Technical Reference
Page 50
... ● Non-HP Black Cartridge ● Unauthorized Black Cartridge ● Replace Black Printer errors ● Black E-label Error ● Load Paper [TYPE] [SIZE] ● High Fuser Error ● Tray 1 Paper Out ● Fuser Driver Error 32 ...Chapter 2 Software description ENWW Set up Status Alerts Use the Set up Status Alerts screen to turn on the for HP ToolboxFX Pop-up Status Alerts screen Select the options under Show an alertto receive alerts like those in the following table. Table 2-1 Event alerts for the HP LaserJet P2015 printer...
... ● Non-HP Black Cartridge ● Unauthorized Black Cartridge ● Replace Black Printer errors ● Black E-label Error ● Load Paper [TYPE] [SIZE] ● High Fuser Error ● Tray 1 Paper Out ● Fuser Driver Error 32 ...Chapter 2 Software description ENWW Set up Status Alerts Use the Set up Status Alerts screen to turn on the for HP ToolboxFX Pop-up Status Alerts screen Select the options under Show an alertto receive alerts like those in the following table. Table 2-1 Event alerts for the HP LaserJet P2015 printer...

HP LaserJet P2015 - Software Technical Reference
Page 51
... In Cartridge Area ● Jam In Output Bin ● Printer Mispick ● Invalid Driver ● Fuser Error ● Low Fuser Error ● Slow Fuser Error E-mail alerts Event ● Cartridge Low ● Replace Cartridge ● Close doors/covers ● Insufficient memory ● Manual feed ● Non-HP print cartridge installed ● Unauthorized supply installed ● Paper...
... In Cartridge Area ● Jam In Output Bin ● Printer Mispick ● Invalid Driver ● Fuser Error ● Low Fuser Error ● Slow Fuser Error E-mail alerts Event ● Cartridge Low ● Replace Cartridge ● Close doors/covers ● Insufficient memory ● Manual feed ● Non-HP print cartridge installed ● Unauthorized supply installed ● Paper...

HP LaserJet P2015 - User Guide
Page 103
... the leading edge of the media, the media guides might be dirty. In your printer driver, make sure the appropriate media type is in place. ● Decrease the print density setting through HP ToolboxFX or the embedded Web server. See Replace the print cartridge for instructions. ● The fuser temperature might be too low.
... the leading edge of the media, the media guides might be dirty. In your printer driver, make sure the appropriate media type is in place. ● Decrease the print density setting through HP ToolboxFX or the embedded Web server. See Replace the print cartridge for instructions. ● The fuser temperature might be too low.

Service Manual
Page 7
...components ...71 Timing ...73 Engine control system ...74 Laser/scanner system ...76 Pickup/feed/delivery system ...77 Image-formation system ...79 6 Removal and replacement Introduction ...84 Removal and replacement strategy 84 Electrostatic discharge ...84 Required tools ...84 ...Laser/scanner ...98 Memory-tag-reader assembly ...99 Duplex-drive PCA (HP LaserJet P2015d, P2015dn, and P2015x printers only 101 Fuser ...103 Fan ...103 Duplex-drive gears (HP LaserJet P2015d, P2015dn, and P2015x printers only 104 Duplex solenoid (HP LaserJet P2015d, P2015dn, and P2015x printers only 106 Fuser...
...components ...71 Timing ...73 Engine control system ...74 Laser/scanner system ...76 Pickup/feed/delivery system ...77 Image-formation system ...79 6 Removal and replacement Introduction ...84 Removal and replacement strategy 84 Electrostatic discharge ...84 Required tools ...84 ...Laser/scanner ...98 Memory-tag-reader assembly ...99 Duplex-drive PCA (HP LaserJet P2015d, P2015dn, and P2015x printers only 101 Fuser ...103 Fan ...103 Duplex-drive gears (HP LaserJet P2015d, P2015dn, and P2015x printers only 104 Duplex solenoid (HP LaserJet P2015d, P2015dn, and P2015x printers only 106 Fuser...

Service Manual
Page 93
6 Removal and replacement ● Introduction ● Before performing service ● Covers ● Control panel ● Formatter ● Laser/scanner ● Memory-tag-reader assembly ● Duplex-drive PCA (HP LaserJet P2015d, P2015dn, and P2015x printers only) ● Fuser ● Interlock assembly ● ECU ● Main motor ● Pickup and feed assemblies ● Main gear assembly/tray 2 pickup solenoid ● Print-cartridge door ENWW 83
6 Removal and replacement ● Introduction ● Before performing service ● Covers ● Control panel ● Formatter ● Laser/scanner ● Memory-tag-reader assembly ● Duplex-drive PCA (HP LaserJet P2015d, P2015dn, and P2015x printers only) ● Fuser ● Interlock assembly ● ECU ● Main motor ● Pickup and feed assemblies ● Main gear assembly/tray 2 pickup solenoid ● Print-cartridge door ENWW 83
Service Manual
Page 118
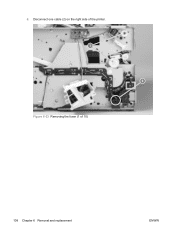
6. Disconnect one cable (2) on the right side of 10) 108 Chapter 6 Removal and replacement ENWW Figure 6-23 Removing the fuser (1 of the printer.
6. Disconnect one cable (2) on the right side of 10) 108 Chapter 6 Removal and replacement ENWW Figure 6-23 Removing the fuser (1 of the printer.
Service Manual
Page 120
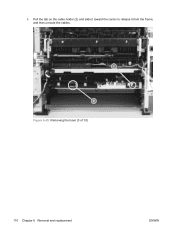
Figure 6-25 Removing the fuser (3 of 10) 110 Chapter 6 Removal and replacement ENWW Pull the tab on the cable holder (2) and slide it toward the center to release it from the frame, and then unroute the cables. 9.
Figure 6-25 Removing the fuser (3 of 10) 110 Chapter 6 Removal and replacement ENWW Pull the tab on the cable holder (2) and slide it toward the center to release it from the frame, and then unroute the cables. 9.
Service Manual
Page 122
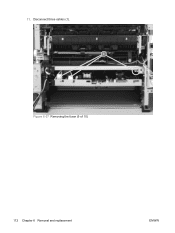
Figure 6-27 Removing the fuser (5 of 10) 112 Chapter 6 Removal and replacement ENWW 11. Disconnect three cables (1).
Figure 6-27 Removing the fuser (5 of 10) 112 Chapter 6 Removal and replacement ENWW 11. Disconnect three cables (1).
Service Manual
Page 124
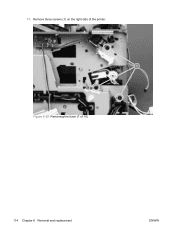
Figure 6-29 Removing the fuser (7 of the printer. 13. Remove three screws (1) on the right side of 10) 114 Chapter 6 Removal and replacement ENWW
Figure 6-29 Removing the fuser (7 of the printer. 13. Remove three screws (1) on the right side of 10) 114 Chapter 6 Removal and replacement ENWW
Service Manual
Page 126
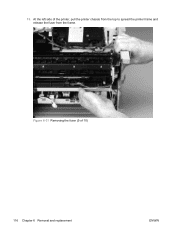
Figure 6-31 Removing the fuser (9 of the printer, pull the printer chassis from the top to spread the printer frame and release the fuser from the frame. At the left side of 10) 116 Chapter 6 Removal and replacement ENWW 15.
Figure 6-31 Removing the fuser (9 of the printer, pull the printer chassis from the top to spread the printer frame and release the fuser from the frame. At the left side of 10) 116 Chapter 6 Removal and replacement ENWW 15.
Service Manual
Page 136
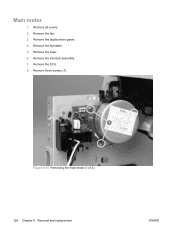
Remove the fan. 3. Remove the fuser. 6. Remove the ECU. 8. Remove the interlock assembly. 7. Figure 6-41 Removing the main motor (1 of 2) 126 Chapter 6 Removal and replacement ENWW Remove the formatter. 5. Remove three screws (1). Main motor 1. Remove the duplex-drive gears. 4. Remove all covers. 2.
Remove the fan. 3. Remove the fuser. 6. Remove the ECU. 8. Remove the interlock assembly. 7. Figure 6-41 Removing the main motor (1 of 2) 126 Chapter 6 Removal and replacement ENWW Remove the formatter. 5. Remove three screws (1). Main motor 1. Remove the duplex-drive gears. 4. Remove all covers. 2.
Service Manual
Page 159
... Description 57 Fan motor error Action 1. The fuser has a malfunction. 1. Unplug the printer for at least ten minutes, and then plug it in the ECU 3. Check the fan cable connections. 2. Verify that the fuser connector and thermistor connector are correct, but the error persists, replace the fuser. If the resistance readings are both firmly seated...
... Description 57 Fan motor error Action 1. The fuser has a malfunction. 1. Unplug the printer for at least ten minutes, and then plug it in the ECU 3. Check the fan cable connections. 2. Verify that the fuser connector and thermistor connector are correct, but the error persists, replace the fuser. If the resistance readings are both firmly seated...
Service Manual
Page 184
... print cartridge, handle it only on the ends of pins is damaged, replace the print cartridge. If one is measured, replace the fuser. Remove the heating element connector from the ECU. If no resistance is 25 ohms +/- 10 ohms for the 110 V printer and 80 ohms +/20 ohms for the electrophotographic processes. Checking the...
... print cartridge, handle it only on the ends of pins is damaged, replace the print cartridge. If one is measured, replace the fuser. Remove the heating element connector from the ECU. If no resistance is 25 ohms +/- 10 ohms for the 110 V printer and 80 ohms +/20 ohms for the electrophotographic processes. Checking the...
Service Manual
Page 189
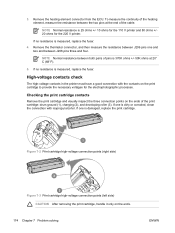
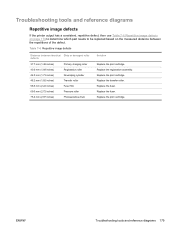
Replace the fuser. Replace the print cartridge. ENWW Troubleshooting tools and reference diagrams 179 Replace the transfer roller. Table 7-6 Repetitive image defects Distance between the repetitions of the defect. Replace the print cartridge. Replace the fuser. Troubleshooting tools and reference diagrams Repetitive image defects If the printer output has a consistent, repetitive defect, then use Table 7-6 Repetitive image defects on...
Replace the fuser. Replace the print cartridge. ENWW Troubleshooting tools and reference diagrams 179 Replace the transfer roller. Table 7-6 Repetitive image defects Distance between the repetitions of the defect. Replace the print cartridge. Replace the fuser. Troubleshooting tools and reference diagrams Repetitive image defects If the printer output has a consistent, repetitive defect, then use Table 7-6 Repetitive image defects on...

Service Manual
Page 291
...image-formation system 79 laser/scanner system 76 pickup/feed/delivery system 77 sequence of 73 optimizing print quality for media types 7 ordering parts 188 supplies 188 output bin location 4 removing jams in 165 output path, straight-through 14 output quality, HP ToolboxFX settings 32 overview, printer 4 P pages, ... assembly 222 covers 194 duplex-drive assembly 218 duplexer 224 ECU 210 fuser assembly 214 internal components 198 main drive assembly 212 supplies 252 top output bin gear assembly 220 parts ordering 188 removing and replacing 84, 85 PCL 5e 33 PCL 6 33 phone numbers, ordering ...
...image-formation system 79 laser/scanner system 76 pickup/feed/delivery system 77 sequence of 73 optimizing print quality for media types 7 ordering parts 188 supplies 188 output bin location 4 removing jams in 165 output path, straight-through 14 output quality, HP ToolboxFX settings 32 overview, printer 4 P pages, ... assembly 222 covers 194 duplex-drive assembly 218 duplexer 224 ECU 210 fuser assembly 214 internal components 198 main drive assembly 212 supplies 252 top output bin gear assembly 220 parts ordering 188 removing and replacing 84, 85 PCL 5e 33 PCL 6 33 phone numbers, ordering ...


