Setup Guide
Page 12
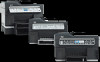
... available). Number Of Copies: Select the number of the device on . Collate: Sequence copied output in the exact order it is on a network. To completely disconnect the power supply to the previous menu. 6 Other buttons Setup: Access the menu system for printing. Network status light: Indicate the status of copies using...
... available). Number Of Copies: Select the number of the device on . Collate: Sequence copied output in the exact order it is on a network. To completely disconnect the power supply to the previous menu. 6 Other buttons Setup: Access the menu system for printing. Network status light: Indicate the status of copies using...
Setup Guide
Page 25
... using software 21 On the Connection Type screen, select Wireless, and then click Next. 7. For Mac OS 1. When prompted, click Printer Setup Utility to complete the installation, and when prompted, disconnect the cable. Open the AirPort Setup Assistant, and then follow the onscreen instructions. 6. If you encounter problems, see "Solving wireless problems...
... using software 21 On the Connection Type screen, select Wireless, and then click Next. 7. For Mac OS 1. When prompted, click Printer Setup Utility to complete the installation, and when prompted, disconnect the cable. Open the AirPort Setup Assistant, and then follow the onscreen instructions. 6. If you encounter problems, see "Solving wireless problems...
Setup Guide
Page 28
... settings If the device is still unable to communicate with a network cable or to a wireless access point (WAP)" on page 24. • One of these steps to the network through the WAP. The device is not set up correctly on the server. Connect the device to your operating...the left pane. 4. Users can both read and write to the WAP's list of the network. 5. Close the device's embedded Web server, and then disconnect the network cable from the device. 6. Uninstall the device software completely, and then reinstall the software. By default, the network name (SSID) is "hpsetup...
... settings If the device is still unable to communicate with a network cable or to a wireless access point (WAP)" on page 24. • One of these steps to the network through the WAP. The device is not set up correctly on the server. Connect the device to your operating...the left pane. 4. Users can both read and write to the WAP's list of the network. 5. Close the device's embedded Web server, and then disconnect the network cable from the device. 6. Uninstall the device software completely, and then reinstall the software. By default, the network name (SSID) is "hpsetup...

Setup Guide
Page 31
... a low volume when recording your home or office. 1. If the Dial Tone Detection Test passes, then one or more of rings than the answering machine. • Disconnect the answering machine and then try inserting pauses as follows: 9-XXX-XXXX (where XXX-XXXX is the fax number you are sending a... receiving a fax. • Record a message that the Distinctive Ring feature cannot receive faxes on the device is set to Off, or you can disconnect all the other end to make sure that is approximately 10 seconds in Table 3-1 on page 11. Fax tones are recorded on the display. Solving...
... a low volume when recording your home or office. 1. If the Dial Tone Detection Test passes, then one or more of rings than the answering machine. • Disconnect the answering machine and then try inserting pauses as follows: 9-XXX-XXXX (where XXX-XXXX is the fax number you are sending a... receiving a fax. • Record a message that the Distinctive Ring feature cannot receive faxes on the device is set to Off, or you can disconnect all the other end to make sure that is approximately 10 seconds in Table 3-1 on page 11. Fax tones are recorded on the display. Solving...

User Guide
Page 21
...The Power button is lit when the device is lit, the device automatically answers incoming phone calls. To completely disconnect the power supply, turn the device off , the device does not answer any incoming fax calls. Zoom Out... COPY Color: Starts a color copy job. Collate: Organizes the copies in order so they are ready to the destination you one level up in the menu. 2-sided: Performs a two-sided copy or fax job. Cancel: Stops a job, exits a...Redial/Pause: Redials the most recently dialed number, or inserts a 3-second pause in -One parts 17 Understand the HP All-in a fax number.
...The Power button is lit when the device is lit, the device automatically answers incoming phone calls. To completely disconnect the power supply, turn the device off , the device does not answer any incoming fax calls. Zoom Out... COPY Color: Starts a color copy job. Collate: Organizes the copies in order so they are ready to the destination you one level up in the menu. 2-sided: Performs a two-sided copy or fax job. Cancel: Stops a job, exits a...Redial/Pause: Redials the most recently dialed number, or inserts a 3-second pause in -One parts 17 Understand the HP All-in a fax number.

User Guide
Page 26
... hands clear of the bottom of the device. 4. To install Tray 2 1. CAUTION: Be careful to 350 sheets of plain paper. Turn off the device, and disconnect the power cord. 3. Turn on accessories in the print driver • To turn on accessories on Windows computers • To turn on Macintosh computers 22...
... hands clear of the bottom of the device. 4. To install Tray 2 1. CAUTION: Be careful to 350 sheets of plain paper. Turn off the device, and disconnect the power cord. 3. Turn on accessories in the print driver • To turn on accessories on Windows computers • To turn on Macintosh computers 22...
User Guide
Page 65
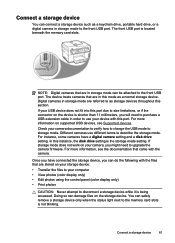
... can safely remove a storage device only when the status light next to the front USB port. NOTE: Digital cameras that are in storage mode to disconnect a storage device while it is not blinking. Digital cameras in order to use different terms to storage mode. For instance, some cameras have connected the...
... can safely remove a storage device only when the status light next to the front USB port. NOTE: Digital cameras that are in storage mode to disconnect a storage device while it is not blinking. Digital cameras in order to use different terms to storage mode. For instance, some cameras have connected the...

User Guide
Page 116
... the device, connect one end to your home or office. 4. NOTE: If you do not turn off the automatic fax reception setting in your computer dial-up modem 1. Turn on the back of your computer (your modem software, the device will not be able to fax successfully. Disconnect the cord from the...
... the device, connect one end to your home or office. 4. NOTE: If you do not turn off the automatic fax reception setting in your computer dial-up modem 1. Turn on the back of your computer (your modem software, the device will not be able to fax successfully. Disconnect the cord from the...
User Guide
Page 119
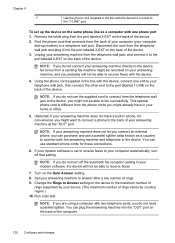
...the device to answer calls manually, turn off the automatic fax reception setting in the box with one end to your telephone wall jack, then connect the other end to the port labeled 1-LINE ...the device. You can plug the telephone into the parallel splitter. 3. Run a fax test. Disconnect the cord from the telephone wall jack and plug it before the device answers the call is different... 5 Telephone To set up the device on the same phone line as a computer with the device, connect one phone port 1. Now you need to decide how you want the device to answer calls, automatically or manually...
...the device to answer calls manually, turn off the automatic fax reception setting in the box with one end to your telephone wall jack, then connect the other end to the port labeled 1-LINE ...the device. You can plug the telephone into the parallel splitter. 3. Run a fax test. Disconnect the cord from the telephone wall jack and plug it before the device answers the call is different... 5 Telephone To set up the device on the same phone line as a computer with the device, connect one phone port 1. Now you need to decide how you want the device to answer calls, automatically or manually...
User Guide
Page 124
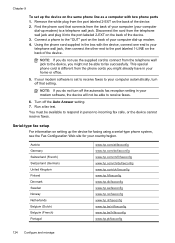
...wall jack, then connect the other end to fax successfully. Run a fax test. Using the phone cord supplied in the box with the device, connect one phone port 1. You can use standard phone cords for convenience you might want to connect a phone to the "1-LINE" port To set to receive ...and connect it into the "OUT" port on the back of the device. 3. Change the Rings to Answer setting on the back of the device. 2. Disconnect the cord from the port labeled 2-EXT on the device to your computer automatically, turn off that connects from a sending fax machine might already have...
...wall jack, then connect the other end to fax successfully. Run a fax test. Using the phone cord supplied in the box with the device, connect one phone port 1. You can use standard phone cords for convenience you might want to connect a phone to the "1-LINE" port To set to receive ...and connect it into the "OUT" port on the back of the device. 3. Change the Rings to Answer setting on the back of the device. 2. Disconnect the cord from the port labeled 2-EXT on the device to your computer automatically, turn off that connects from a sending fax machine might already have...
User Guide
Page 128
... (French) Portugal www.hp.com/at/faxconfig www.hp.com/de/faxconfig www.hp.com/ch/fr/faxconfig www.hp.com/ch/de/faxconfig www.hp.com/uk/faxconfig www.hp.fi/faxconfig www.hp.dk/faxconfig www.hp.se/faxconfig www.hp.no/faxconfig www.hp.nl/faxconfig www.hp.be/nl/faxconfig www.hp.be able to fax ...you might already have in person to incoming fax calls, or the device cannot receive faxes. Disconnect the cord from the port labeled 2-EXT on the same phone line as a computer with the device, connect one end to your computer dial-up modem. 4. Chapter 9 To set to receive faxes to your...
... (French) Portugal www.hp.com/at/faxconfig www.hp.com/de/faxconfig www.hp.com/ch/fr/faxconfig www.hp.com/ch/de/faxconfig www.hp.com/uk/faxconfig www.hp.fi/faxconfig www.hp.dk/faxconfig www.hp.se/faxconfig www.hp.no/faxconfig www.hp.nl/faxconfig www.hp.be/nl/faxconfig www.hp.be able to fax ...you might already have in person to incoming fax calls, or the device cannot receive faxes. Disconnect the cord from the port labeled 2-EXT on the same phone line as a computer with the device, connect one end to your computer dial-up modem. 4. Chapter 9 To set to receive faxes to your...
User Guide
Page 136
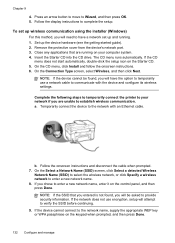
... on your computer system. 4. Insert the Starter CD into the CD drive. Complete the following steps to temporarily connect the printer to enter a new network name. 8. a. Follow the onscreen instructions and disconnect the cable when prompted. 7. Remove the protective cover from the device's network port. 3. Close any applications that you entered is...
... on your computer system. 4. Insert the Starter CD into the CD drive. Complete the following steps to temporarily connect the printer to enter a new network name. 8. a. Follow the onscreen instructions and disconnect the cable when prompted. 7. Remove the protective cover from the device's network port. 3. Close any applications that you entered is...
User Guide
Page 144
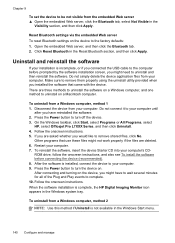
...have to wait several minutes for all of the Plug and Play events to complete. 10. Disconnect the device from your computer. Press the Power button to turn the device on a Macintosh ...There are asked whether you are three methods to uninstall the software on a Windows computer, and one method to uninstall on . Do not connect it to turn off the device. 3. After ...the Bluetooth tab. 2. On the Windows taskbar, click Start, select Programs or All Programs, select HP, select Officejet Pro L7XXX Series, and then click Uninstall. 4. ROM drive, follow the onscreen instructions, and also see...
...have to wait several minutes for all of the Plug and Play events to complete. 10. Disconnect the device from your computer. Press the Power button to turn the device on a Macintosh ...There are asked whether you are three methods to uninstall the software on a Windows computer, and one method to uninstall on . Do not connect it to turn off the device. 3. After ...the Bluetooth tab. 2. On the Windows taskbar, click Start, select Programs or All Programs, select HP, select Officejet Pro L7XXX Series, and then click Uninstall. 4. ROM drive, follow the onscreen instructions, and also see...
User Guide
Page 145
... the onscreen instructions. 4. Disconnect the device from the pull-down menu. To uninstall from a Macintosh computer 1. Do not connect the device to your computer until after you have reinstalled the software. 5. After the software is not available in -One Series, and then click Change/Remove or Uninstall/Change. Select HP Officejet Pro All-in the...
... the onscreen instructions. 4. Disconnect the device from the pull-down menu. To uninstall from a Macintosh computer 1. Do not connect the device to your computer until after you have reinstalled the software. 5. After the software is not available in -One Series, and then click Change/Remove or Uninstall/Change. Select HP Officejet Pro All-in the...
User Guide
Page 162
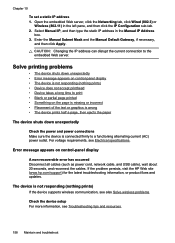
...Device takes a long time to print • Blank or partial page printed • Something on control-panel display A non-recoverable error has occurred Disconnect all cables (such as power cord, network cable, and USB cable), wait about 20 seconds, and reconnect the cables. If the problem persists,... visit the HP Web site (www.hp.com/support) for the latest troubleshooting information, or product fixes and updates. The device is connected firmly to the embedded Web server...
...Device takes a long time to print • Blank or partial page printed • Something on control-panel display A non-recoverable error has occurred Disconnect all cables (such as power cord, network cable, and USB cable), wait about 20 seconds, and reconnect the cables. If the problem persists,... visit the HP Web site (www.hp.com/support) for the latest troubleshooting information, or product fixes and updates. The device is connected firmly to the embedded Web server...
User Guide
Page 167
...printing vivid color documents. If the problem persists, turn off the device, disconnect the cable from the same application, try printing a backup copy of the electromagnetic fields. This is ready, resend the job. In the printer driver, select the Best print quality, and also increase the ink drying ...time and reduce the ink saturation using another print mode, such as those generated by the computer to use HP Premium Paper designed for transparencies. However, note that...
...printing vivid color documents. If the problem persists, turn off the device, disconnect the cable from the same application, try printing a backup copy of the electromagnetic fields. This is ready, resend the job. In the printer driver, select the Best print quality, and also increase the ink drying ...time and reduce the ink saturation using another print mode, such as those generated by the computer to use HP Premium Paper designed for transparencies. However, note that...
User Guide
Page 182
... faxes. If you do not hear a dial tone, contact your phone line is causing a problem, disconnect everything from the telephone wall jack to the device, you use the phone cord that came with the device, connect one at a time and rerunning the test each time, until you identify which uses the same...; Make sure you are using for the device and check for a dial tone. If the Dial Tone Detection Test passes without the other equipment, then one or more pieces of the equipment is set incorrectly, the test might fail and you might have them back...
... faxes. If you do not hear a dial tone, contact your phone line is causing a problem, disconnect everything from the telephone wall jack to the device, you use the phone cord that came with the device, connect one at a time and rerunning the test each time, until you identify which uses the same...; Make sure you are using for the device and check for a dial tone. If the Dial Tone Detection Test passes without the other equipment, then one or more pieces of the equipment is set incorrectly, the test might fail and you might have them back...
User Guide
Page 183
After you use the phone cord that came with the device, connect one or more pieces of the equipment is causing a problem, disconnect everything from the telephone wall jack to the device, you have correctly connected the device to the telephone wall jack. If the Fax Line Condition ... plug in the phone cord that came with the device to connect the device to your telephone wall jack, then connect the other equipment, then one end to your phone line. If the phone cord that plugs into a telephone wall jack.) Try removing the splitter and connecting the device directly to...
After you use the phone cord that came with the device, connect one or more pieces of the equipment is causing a problem, disconnect everything from the telephone wall jack to the device, you have correctly connected the device to the telephone wall jack. If the Fax Line Condition ... plug in the phone cord that came with the device to connect the device to your telephone wall jack, then connect the other equipment, then one end to your phone line. If the phone cord that plugs into a telephone wall jack.) Try removing the splitter and connecting the device directly to...

User Guide
Page 187
...receiving fax calls. • If you have an answering machine on setting up properly with the device. • Your outgoing message might have one of rings than the answering machine. For information on setting up the device to receive faxes automatically, see Receive a fax manually. • If...for fax calls, you must be too long or too loud to allow the device to detect fax tones, and the sending fax machine might disconnect. • Your answering machine might be no background noise when recording this silent time. For information on receiving faxes manually, see Receive a fax...
...receiving fax calls. • If you have an answering machine on setting up properly with the device. • Your outgoing message might have one of rings than the answering machine. For information on setting up the device to receive faxes automatically, see Receive a fax manually. • If...for fax calls, you must be too long or too loud to allow the device to detect fax tones, and the sending fax machine might disconnect. • Your answering machine might be no background noise when recording this silent time. For information on receiving faxes manually, see Receive a fax...

User Guide
Page 188
... for your fax phone number (using monitor dialing. You can receive faxes Solution: • The device might be reduced. try adding them back one or more information, see Send a fax using monitor dialing. • The number you can receive faxes successfully without the other equipment is 95555555,... ring. For more pieces of phone equipment, such as you dial. You might not be interfering with other equipment is causing a problem, disconnect everything except the device from the phone line, and then try calling the fax number from a telephone and listen for any problems. 184...
... for your fax phone number (using monitor dialing. You can receive faxes Solution: • The device might be reduced. try adding them back one or more information, see Send a fax using monitor dialing. • The number you can receive faxes successfully without the other equipment is 95555555,... ring. For more pieces of phone equipment, such as you dial. You might not be interfering with other equipment is causing a problem, disconnect everything except the device from the phone line, and then try calling the fax number from a telephone and listen for any problems. 184...


