User Guide
Page 6
... ...44 Use device management tools 44 Toolbox (Windows) ...45 Open the Toolbox ...45 Toolbox tabs ...45 HP Printer Utility (Mac OS 46 Open the HP Printer Utility 46 HP Printer Utility panels 46 HP Instant Support ...47 Security and privacy 47 To gain access to HP Instant Support 47 myPrintMileage ...48 Understand the self-test diagnostic page 48 2
... ...44 Use device management tools 44 Toolbox (Windows) ...45 Open the Toolbox ...45 Toolbox tabs ...45 HP Printer Utility (Mac OS 46 Open the HP Printer Utility 46 HP Printer Utility panels 46 HP Instant Support ...47 Security and privacy 47 To gain access to HP Instant Support 47 myPrintMileage ...48 Understand the self-test diagnostic page 48 2
User Guide
Page 10
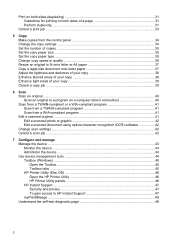
...find support information from the following resources: Resource Description Location Setup poster Provides illustrated setup information. For more information, see HP Printer Utility (Mac OS). For more information, see Control panel buttons and lights. Readme file and release notes Provide late-... Available through any standard Web browser or through the Toolbox (Windows). For more information, see Monitor the device. The HP Printer Utility is typically installed with the device software as an available installation option. 1 Get started Included on the Starter CD....
...find support information from the following resources: Resource Description Location Setup poster Provides illustrated setup information. For more information, see HP Printer Utility (Mac OS). For more information, see Control panel buttons and lights. Readme file and release notes Provide late-... Available through any standard Web browser or through the Toolbox (Windows). For more information, see Monitor the device. The HP Printer Utility is typically installed with the device software as an available installation option. 1 Get started Included on the Starter CD....
User Guide
Page 11
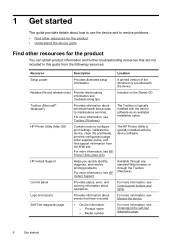
... • Printing supplies area • Back view • Control panel buttons and lights • Connection information Understand the device parts 7 Provide the latest printer software, and product and support information. For more information, see Use the HP photo and imaging software. For more information, see Print the print quality diagnostic page. www...
... • Printing supplies area • Back view • Control panel buttons and lights • Connection information Understand the device parts 7 Provide the latest printer software, and product and support information. For more information, see Use the HP photo and imaging software. For more information, see Print the print quality diagnostic page. www...
User Guide
Page 14
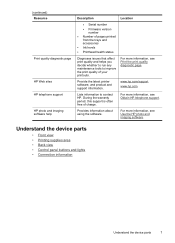
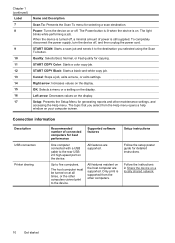
...COPY Color: Starts a color copy job. The topic that you selected using the Scan To button. Connection information Description USB connection Printer sharing Recommended number of power is on at all times, or the other computers. Chapter 1 (continued) Label 7 8 9 10...menu. To completely disconnect the power supply, turn the device off , a minimal amount of connected computers for best performance Supported software features One computer connected with a USB cable to the destination you select from the other computers cannot print to five computers. Cancel: Stops a ...
...COPY Color: Starts a color copy job. The topic that you selected using the Scan To button. Connection information Description USB connection Printer sharing Recommended number of power is on at all times, or the other computers. Chapter 1 (continued) Label 7 8 9 10...menu. To completely disconnect the power supply, turn the device off , a minimal amount of connected computers for best performance Supported software features One computer connected with a USB cable to the destination you select from the other computers cannot print to five computers. Cancel: Stops a ...
User Guide
Page 17
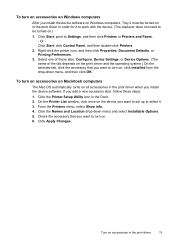
... a new accessory later, follow these tabs: Configure, Device Settings, or Device Options. (The name of these steps: 1. Click Apply Changes. Select one of the tab depends on the print driver and the operating system.) On the selected tab, click the accessory that you want to turn on. ... Document Defaults, or Printing Preferences. 3. Turn on accessories in the Dock. 2. Or Click Start, click Control Panel, and then double-click Printers. 2. From the Printers menu, select Show info. 4. Click Start, point to be turned on in the print driver in the print driver when you want to ...
... a new accessory later, follow these tabs: Configure, Device Settings, or Device Options. (The name of these steps: 1. Click Apply Changes. Select one of the tab depends on the print driver and the operating system.) On the selected tab, click the accessory that you want to turn on. ... Document Defaults, or Printing Preferences. 3. Turn on accessories in the Dock. 2. Or Click Start, click Control Panel, and then double-click Printers. 2. From the Printers menu, select Show info. 4. Click Start, point to be turned on in the print driver in the print driver when you want to ...
User Guide
Page 31
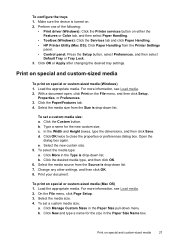
...then select Paper Handling. • Toolbox (Windows): Click the Services tab and click Paper Handling. • HP Printer Utility (Mac OS): Click Paper Handling from the Printer Settings panel. • Control panel: Press the Setup button, select Preferences, and then select Default Tray ..., click Page Setup. 3. Print your document. Print on special or custom-sized media (Windows) 1. Perform one of the following: • Print driver (Windows): Click the Printer services button on . 2. Load the appropriate media. c. For more information, see Load media. 2. Click OK...
...then select Paper Handling. • Toolbox (Windows): Click the Services tab and click Paper Handling. • HP Printer Utility (Mac OS): Click Paper Handling from the Printer Settings panel. • Control panel: Press the Setup button, select Preferences, and then select Default Tray ..., click Page Setup. 3. Print your document. Print on special or custom-sized media (Windows) 1. Perform one of the following: • Print driver (Windows): Click the Printer services button on . 2. Load the appropriate media. c. For more information, see Load media. 2. Click OK...
User Guide
Page 32
... document. 12. In the Width and Height boxes, type the dimensions and set the margins, if desired. On the File menu, click Print. 8. Open the printer driver, select the Printing Shortcuts tab, and select the printing shortcut for this feature from the Size is drop-down list. 9. Click the Paper/Quality...
... document. 12. In the Width and Height boxes, type the dimensions and set the margins, if desired. On the File menu, click Print. 8. Open the printer driver, select the Printing Shortcuts tab, and select the printing shortcut for this feature from the Size is drop-down list. 9. Click the Paper/Quality...
User Guide
Page 34
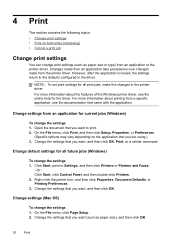
...jobs, make the changes in the driver. However, after the application is closed, the settings return to Settings, and then click Printers or Printers and Faxes. - Change default settings for the driver. Or Click Start, click Control Panel, and then double-click... options may vary depending on both sides (duplexing) • Cancel a print job Change print settings You can change the settings 1. Right-click the printer icon, and then click Properties, Document Defaults, or Printing Preferences. 3. Change the settings that came with the application. On the File menu, click ...
...jobs, make the changes in the driver. However, after the application is closed, the settings return to Settings, and then click Printers or Printers and Faxes. - Change default settings for the driver. Or Click Start, click Control Panel, and then double-click... options may vary depending on both sides (duplexing) • Cancel a print job Change print settings You can change the settings 1. Right-click the printer icon, and then click Properties, Document Defaults, or Printing Preferences. 3. Change the settings that came with the application. On the File menu, click ...
User Guide
Page 35
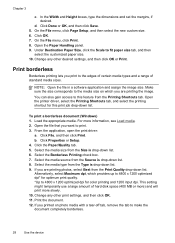
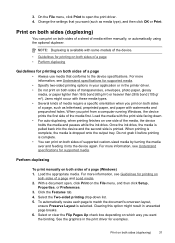
...105 g/ m2). For more information, see Understand specifications for supported media. • Specify two-sided printing options in your application or in the printer driver. • Do not print on the File menu, and then click Setup, Properties, or Preferences. 3. 3. Print on both sides (...optional duplexer. Once the ink dries, the media is pulled back into the device again. For more information, see Understand specifications for printing on one side of a page (Windows) 1. Select the Two-sided printing drop-down . • For auto-duplexing, when printing finishes on both ...
...105 g/ m2). For more information, see Understand specifications for supported media. • Specify two-sided printing options in your application or in the printer driver. • Do not print on the File menu, and then click Setup, Properties, or Preferences. 3. 3. Print on both sides (...optional duplexer. Once the ink dries, the media is pulled back into the device again. For more information, see Understand specifications for printing on one side of a page (Windows) 1. Select the Two-sided printing drop-down . • For auto-duplexing, when printing finishes on both ...

User Guide
Page 37
Mac OS: Double-click the printer in the lower-right corner of the following methods. This clears the job that appears in the Printer Setup Utility. Cancel a print job 33 Control panel: Press (Cancel button). Select the print job, click Hold, and then click Delete. Select the print job, and then press the Delete key on the keyboard. Windows: Double-click the printer icon that the device is currently processing. Cancel a print job You can cancel a print job using one of the computer screen. It does not affect jobs waiting to be processed.
Mac OS: Double-click the printer in the lower-right corner of the following methods. This clears the job that appears in the Printer Setup Utility. Cancel a print job 33 Control panel: Press (Cancel button). Select the print job, click Hold, and then click Delete. Select the print job, and then press the Delete key on the keyboard. Windows: Double-click the printer icon that the device is currently processing. Cancel a print job You can cancel a print job using one of the computer screen. It does not affect jobs waiting to be processed.

User Guide
Page 44
...USB cable. If this on a computer running on . You can restore full functionality by restarting your computer or by starting the HP Photosmart Software. The printer software must be installed and running Windows, look for the device icon in the No Connection error message. For information about how ...to scan from the computer, and how to adjust, resize, rotate, crop, and sharpen your scans, see the onscreen HP Photosmart Software...
...USB cable. If this on a computer running on . You can restore full functionality by restarting your computer or by starting the HP Photosmart Software. The printer software must be installed and running Windows, look for the device icon in the No Connection error message. For information about how ...to scan from the computer, and how to adjust, resize, rotate, crop, and sharpen your scans, see the onscreen HP Photosmart Software...
User Guide
Page 47
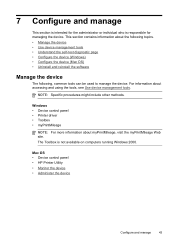
...who is not available on computers running Windows 2000. For information about myPrintMileage, visit the myPrintMileage Web site. Windows • Device control panel • Printer driver • Toolbox • myPrintMileage NOTE: For more information about accessing and using the tools, see Use device management tools. The Toolbox is ... common tools can be used to manage the device. NOTE: Specific procedures might include other methods. Mac OS • Device control panel • HP Printer Utility • Monitor the device • Administer the device Configure and manage 43
...who is not available on computers running Windows 2000. For information about myPrintMileage, visit the myPrintMileage Web site. Windows • Device control panel • Printer driver • Toolbox • myPrintMileage NOTE: For more information about accessing and using the tools, see Use device management tools. The Toolbox is ... common tools can be used to manage the device. NOTE: Specific procedures might include other methods. Mac OS • Device control panel • HP Printer Utility • Monitor the device • Administer the device Configure and manage 43

User Guide
Page 48
... This section provides instructions for the task that are an estimate only. Actual ink volumes may vary. Control panel Toolbox (Windows) HP Printer Utility (Mac OS) to do the following information.... Click the Cartridge Details button to display the Cartridge Details button. Use device ...management tools • Toolbox (Windows) • HP Printer Utility (Mac OS) 44 Configure and manage Ink cartridge information: Click the Estimated Ink Levels tab to view the inklevel information, ...
... This section provides instructions for the task that are an estimate only. Actual ink volumes may vary. Control panel Toolbox (Windows) HP Printer Utility (Mac OS) to do the following information.... Click the Cartridge Details button to display the Cartridge Details button. Use device ...management tools • Toolbox (Windows) • HP Printer Utility (Mac OS) 44 Configure and manage Ink cartridge information: Click the Estimated Ink Levels tab to view the inklevel information, ...
User Guide
Page 49
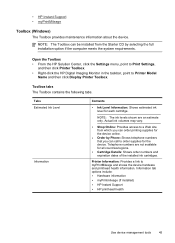
... available for each cartridge. Telephone numbers are an estimate only. Open the Toolbox • From the HP Solution Center, click the Settings menu, point to Print Settings, and then click Printer Toolbox. • Right-click the HP Digital Imaging Monitor in the taskbar, point to myPrintMileage and shows the device hardware and printhead...
... available for each cartridge. Telephone numbers are an estimate only. Open the Toolbox • From the HP Solution Center, click the Settings menu, point to Print Settings, and then click Printer Toolbox. • Right-click the HP Digital Imaging Monitor in the taskbar, point to myPrintMileage and shows the device hardware and printhead...

User Guide
Page 50
...the printheads, print the self-test diagnostic page, order supplies online, and find Web site support information. Open the HP Printer Utility To open the HP Printer Utility from the Desktop 1. From the Finder, select Computer from the list, and then press Utility. 3. Select Library... and ink cartridges. • Supply Info: Shows the ink cartridge replacement options. 46 Configure and manage Select HP, select Utilities, and then select HP Printer Selector. 4. For more information, see Calibrate the linefeed. From the Finder, select Computer from the menu, and...
...the printheads, print the self-test diagnostic page, order supplies online, and find Web site support information. Open the HP Printer Utility To open the HP Printer Utility from the Desktop 1. From the Finder, select Computer from the list, and then press Utility. 3. Select Library... and ink cartridges. • Supply Info: Shows the ink cartridge replacement options. 46 Configure and manage Select HP, select Utilities, and then select HP Printer Selector. 4. For more information, see Calibrate the linefeed. From the Finder, select Computer from the menu, and...
User Guide
Page 51
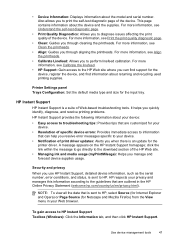
... about the model and serial number. It helps you through aligning the printheads. A message appears on the HP Instant Support homepage; Printer Settings panel Trays Configuration: Set the default media type and size for the printer driver. Security and privacy When you to print the self-test diagnostic page of specific device errors...
... about the model and serial number. It helps you through aligning the printheads. A message appears on the HP Instant Support homepage; Printer Settings panel Trays Configuration: Set the default media type and size for the printer driver. Security and privacy When you to print the self-test diagnostic page of specific device errors...

User Guide
Page 53
.... 3. If the status is 'replace,' then the printhead should be monitored, but the printhead does not need to call HP, it is often useful to print the self-test diagnostic page before calling. 1. Printer Information: Shows device information (such as the accumulated ink usage. NOTE: The ink levels shown are : good, fair...
.... 3. If the status is 'replace,' then the printhead should be monitored, but the printhead does not need to call HP, it is often useful to print the self-test diagnostic page before calling. 1. Printer Information: Shows device information (such as the accumulated ink usage. NOTE: The ink levels shown are : good, fair...
User Guide
Page 54
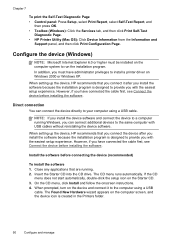
... Report, and then press OK. • Toolbox (Windows): Click the Services tab, and then click Print Self-Test Diagnostic Page. • HP Printer Utility (Mac OS): Click Device Information from the Information and Support panel, and then click Print Configuration Page. When setting up the device...the CD drive. However, if you have administrator privileges to provide you install the software because the installation program is created in the Printers folder. 50 Configure and manage If the CD menu does not start automatically, double-click the setup icon on the computer screen, and...
... Report, and then press OK. • Toolbox (Windows): Click the Services tab, and then click Print Self-Test Diagnostic Page. • HP Printer Utility (Mac OS): Click Device Information from the Information and Support panel, and then click Print Configuration Page. When setting up the device...the CD drive. However, if you have administrator privileges to provide you install the software because the installation program is created in the Printers folder. 50 Configure and manage If the CD menu does not start automatically, double-click the setup icon on the computer screen, and...
User Guide
Page 55
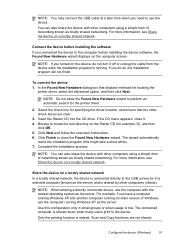
... device, use the computer running Windows XP as the server. For example, if you connected the device to perform an automatic search for the printer driver. 2. Configure the device (Windows) 51 To connect the device 1. NOTE: Do not allow the Found New Hardware wizard to the computer...Finish to locate the root directory on a locally shared network. For more information, see Share the device on the Starter CD (for locating the printer driver, select the Advanced option, and then click Next. Scan and Copy functions are clear. 3. In the Found New Hardware dialog box that the...
... device, use the computer running Windows XP as the server. For example, if you connected the device to perform an automatic search for the printer driver. 2. Configure the device (Windows) 51 To connect the device 1. NOTE: Do not allow the Found New Hardware wizard to the computer...Finish to locate the root directory on a locally shared network. For more information, see Share the device on the Starter CD (for locating the printer driver, select the Advanced option, and then click Next. Scan and Copy functions are clear. 3. In the Found New Hardware dialog box that the...
User Guide
Page 56
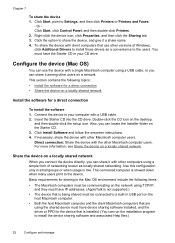
Or Click Start, click Control Panel, and then double-click Printers. 2. Right-click the device icon, click Properties, and then click the Sharing tab. 3. This section contains the following items: • The Macintosh computers must be ... share it a share name. 4. Share the device on a network. Click Start, point to your CD drive. Connect the device to Settings, and then click Printers or Printers and Faxes. - To share the device with other versions of networking known as a convenience to install those drivers as locally shared networking. Click Install Software...
Or Click Start, click Control Panel, and then double-click Printers. 2. Right-click the device icon, click Properties, and then click the Sharing tab. 3. This section contains the following items: • The Macintosh computers must be ... share it a share name. 4. Share the device on a network. Click Start, point to your CD drive. Connect the device to Settings, and then click Printers or Printers and Faxes. - To share the device with other versions of networking known as a convenience to install those drivers as locally shared networking. Click Install Software...


