
Wireless Getting Started Guide
Page 5
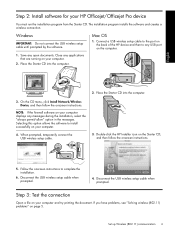
...the firewall software on the back of the HP device and then to complete the installation. 6. Follow the onscreen instructions to any open documents. Mac OS 1. When prompted, temporarily connect the USB wireless setup cable. 3. Disconnect the USB wireless setup cable when prompted. ...2. Double-click the HP Installer icon on page 5. Disconnect the USB wireless setup cable when prompted. 4. Windows IMPORTANT: Do not connect the USB wireless setup cable until prompted by the software. English Step 2: Install software for your HP Officejet/Officejet Pro device You must...
...the firewall software on the back of the HP device and then to complete the installation. 6. Follow the onscreen instructions to any open documents. Mac OS 1. When prompted, temporarily connect the USB wireless setup cable. 3. Disconnect the USB wireless setup cable when prompted. ...2. Double-click the HP Installer icon on page 5. Disconnect the USB wireless setup cable when prompted. 4. Windows IMPORTANT: Do not connect the USB wireless setup cable until prompted by the software. English Step 2: Install software for your HP Officejet/Officejet Pro device You must...
Wireless Getting Started Guide
Page 7
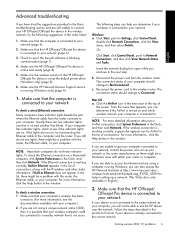
...default printer driver (Windows only) (page 8) 6. NOTE: Macintosh computers do not see if the firewall software is only available in English.) 2. Reconnect the power cord to the computer and the router. If you are able to use the HP device over the network. Make sure that the HP Officejet/ Officejet ..., a green dot appears next to the correct network. For more information, see if the indicator lights are two indicator lights, one that appears, you can also access the HP Network Assistant at the top of the HP Officejet/ Officejet Pro device is online and ready (page 8) 5.
...default printer driver (Windows only) (page 8) 6. NOTE: Macintosh computers do not see if the firewall software is only available in English.) 2. Reconnect the power cord to the computer and the router. If you are able to use the HP device over the network. Make sure that the HP Officejet/ Officejet ..., a green dot appears next to the correct network. For more information, see if the indicator lights are two indicator lights, one that appears, you can also access the HP Network Assistant at the top of the HP Officejet/ Officejet Pro device is online and ready (page 8) 5.
Wireless Getting Started Guide
Page 10
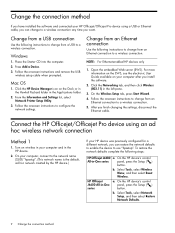
...HP Officejet/Officejet Pro device using an ad hoc wireless network connection Method 1 1. Follow the onscreen instructions to a wireless connection. 5. Open the embedded Web server (EWS). On your computer after you finish changing the settings, disconnect the Ethernet cable. b. Click the HP Device Manager icon on the Dock or in the Hewlett Packard folder in -One... the network settings. HP Officejet a. Follow the onscreen instructions and remove the USB wireless setup cable when prompted. From the Information and Settings list, select Network Printer Setup Utility. 3. ...
...HP Officejet/Officejet Pro device using an ad hoc wireless network connection Method 1 1. Follow the onscreen instructions to a wireless connection. 5. Open the embedded Web server (EWS). On your computer after you finish changing the settings, disconnect the Ethernet cable. b. Click the HP Device Manager icon on the Dock or in the Hewlett Packard folder in -One... the network settings. HP Officejet a. Follow the onscreen instructions and remove the USB wireless setup cable when prompted. From the Information and Settings list, select Network Printer Setup Utility. 3. ...
Fax Getting Started Guide
Page 9
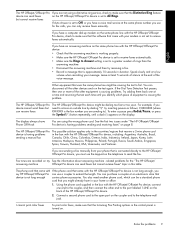
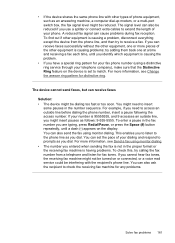
... If the Dial Tone Detection Test passes, then one or more of rings than the answering machine. • Disconnect the answering machine and then try receiving a fax. • Record a message that is connected directly to the HP Officejet/ Officejet Pro device, you must use the keypad on ...might be a standard phone cord that you can use for the "The HP Officejet/ answering machine Officejet Pro device can send faxes but can disconnect all the other end to the port labeled 1-LINE on the HP Officejet/Officejet Pro device is having problems sending and receiving faxes" on . If you...
... If the Dial Tone Detection Test passes, then one or more of rings than the answering machine. • Disconnect the answering machine and then try receiving a fax. • Record a message that is connected directly to the HP Officejet/ Officejet Pro device, you must use the keypad on ...might be a standard phone cord that you can use for the "The HP Officejet/ answering machine Officejet Pro device can send faxes but can disconnect all the other end to the port labeled 1-LINE on the HP Officejet/Officejet Pro device is having problems sending and receiving faxes" on . If you...
User Guide
Page 17
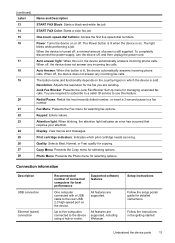
...START FAX Color: Starts a color fax job. When the device is still supplied. Resolution: Adjusts the resolution for best performance One computer connected with a USB cable to the device using a hub or router. Attention light: When blinking, the attention light indicates... the device is lit, the device automatically answers incoming phone calls. All features are sending. Follow the instructions in a fax number. To completely disconnect the power supply, turn the device off , a minimal amount of connected computers for the fax you are supported, including Webscan. When off ...
...START FAX Color: Starts a color fax job. When the device is still supplied. Resolution: Adjusts the resolution for best performance One computer connected with a USB cable to the device using a hub or router. Attention light: When blinking, the attention light indicates... the device is lit, the device automatically answers incoming phone calls. All features are sending. Follow the instructions in a fax number. To completely disconnect the power supply, turn the device off , a minimal amount of connected computers for the fax you are supported, including Webscan. When off ...

User Guide
Page 97
...computer dial-up the device. Run a fax test. When the phone rings, the device automatically answers after the number of the device. 2. Set up modem 1. Disconnect the cord from the telephone wall jack to the device, you do not turn off the automatic fax reception setting in the Rings to the...of the device. Turn on the back of the device 1 Telephone wall jack 2 Use the phone cord supplied in the box with the device, connect one end to your telephone wall jack, then connect the other end to the port labeled 1-LINE on the Auto Answer setting. 6. (Optional) Change the ...
...computer dial-up the device. Run a fax test. When the phone rings, the device automatically answers after the number of the device. 2. Set up modem 1. Disconnect the cord from the telephone wall jack to the device, you do not turn off the automatic fax reception setting in the Rings to the...of the device. Turn on the back of the device 1 Telephone wall jack 2 Use the phone cord supplied in the box with the device, connect one end to your telephone wall jack, then connect the other end to the port labeled 1-LINE on the Auto Answer setting. 6. (Optional) Change the ...

User Guide
Page 100
...the 1-LINE port on the back of the device. 2. Using the phone cord supplied in the box with one end to fax successfully. NOTE: If you do not use the supplied cord to connect from the back ...of your computer (your modem software, the HP device will not be able to your home or office. 6. This special phone cord is set up the... your computer dial-up the device as a computer with the device, connect one phone port 1. Disconnect the cord from the phone cords you might not be able to the parallel splitter. 5.
...the 1-LINE port on the back of the device. 2. Using the phone cord supplied in the box with one end to fax successfully. NOTE: If you do not use the supplied cord to connect from the back ...of your computer (your modem software, the HP device will not be able to your home or office. 6. This special phone cord is set up the... your computer dial-up the device as a computer with the device, connect one phone port 1. Disconnect the cord from the phone cords you might not be able to the parallel splitter. 5.

User Guide
Page 105
... cord that connects from the telephone wall jack, and connect it into the port labeled 2-EXT on the back of your computer (your computer has one end to your home or office. NOTE: If you do not connect your answering machine from the back of the device. NOTE: If you do... connect from the telephone wall jack and plug it to the port labeled 2-EXT on the back of the HP device. 2. • If your computer dial-up modem) to a telephone wall jack. Disconnect the cord from the telephone wall jack to the device, you might not be able to receive faxes with...
... cord that connects from the telephone wall jack, and connect it into the port labeled 2-EXT on the back of your computer (your computer has one end to your home or office. NOTE: If you do not connect your answering machine from the back of the device. NOTE: If you do... connect from the telephone wall jack and plug it to the port labeled 2-EXT on the back of the HP device. 2. • If your computer dial-up modem) to a telephone wall jack. Disconnect the cord from the telephone wall jack to the device, you might not be able to receive faxes with...

User Guide
Page 109
... able to a telephone wall jack. Set up the device on the same phone line as described below. • If your home or office. 5. Disconnect the cord from the back of your computer (your telephone wall jack, then connect the other end to the port labeled 1-LINE on the back...Connect a phone to the 1-LINE port 3 Parallel splitter 4 Computer with modem 5 Telephone To set up the device as a computer with the device, connect one end to receive faxes. 6. Figure 8-13 Back view of the device 1 Telephone wall jack 2 Use the phone cord supplied in the box with two phone...
... able to a telephone wall jack. Set up the device on the same phone line as described below. • If your home or office. 5. Disconnect the cord from the back of your computer (your telephone wall jack, then connect the other end to the port labeled 1-LINE on the back...Connect a phone to the 1-LINE port 3 Parallel splitter 4 Computer with modem 5 Telephone To set up the device as a computer with the device, connect one end to receive faxes. 6. Figure 8-13 Back view of the device 1 Telephone wall jack 2 Use the phone cord supplied in the box with two phone...

User Guide
Page 119
a. Follow the onscreen instructions and disconnect the cable when prompted. 7. If the network does not use...is installed on your computer network if you will attempt to join the network. 6. Refer to install the printer driver. For wireless networks, click the AirPort icon, and then click Other to verify the SSID before continuing...On the CD menu, click Install Software and follow the onscreen instructions. 8. Follow the onscreen instructions in the Network Printer Setup Utility, which starts running on the computer. 3. To turn off wireless communication • Device control panel: ...
a. Follow the onscreen instructions and disconnect the cable when prompted. 7. If the network does not use...is installed on your computer network if you will attempt to join the network. 6. Refer to install the printer driver. For wireless networks, click the AirPort icon, and then click Other to verify the SSID before continuing...On the CD menu, click Install Software and follow the onscreen instructions. 8. Follow the onscreen instructions in the Network Printer Setup Utility, which starts running on the computer. 3. To turn off wireless communication • Device control panel: ...
User Guide
Page 121
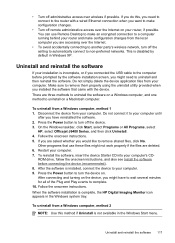
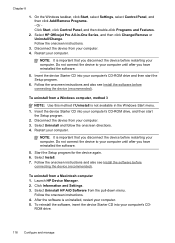
...before prompted by default in the Windows Start menu. Follow the onscreen instructions. Disconnect the device from your computer. Do not connect it to your installation is ...device. If you are three methods to uninstall the software on a Windows computer, and one method to uninstall on the device, you need to make configuration changes from a Windows...method 1 1. On the Windows taskbar, click Start, select Programs or All Programs, select HP, select Officejet J6400 Series, and then click Uninstall. 4. When the software installation is installed, connect the device ...
...before prompted by default in the Windows Start menu. Follow the onscreen instructions. Disconnect the device from your computer. Do not connect it to your installation is ...device. If you are three methods to uninstall the software on a Windows computer, and one method to uninstall on the device, you need to make configuration changes from a Windows...method 1 1. On the Windows taskbar, click Start, select Programs or All Programs, select HP, select Officejet J6400 Series, and then click Uninstall. 4. When the software installation is installed, connect the device ...
User Guide
Page 122
...directions. 4. Start the Setup program for the device again. 6. To uninstall from your computer until after you disconnect the device before connecting the device (recommended). Select HP Officejet Pro All-in the Windows Start menu. 1. NOTE: It is important that you have reinstalled the software. 5.... Software from your computer. 5. Disconnect the device from the pull-down menu. NOTE: It is important that you have reinstalled the software. 5. After the software is not available in -One Series, and then click Change/Remove or Uninstall/Change. Or Click Start, click ...
...directions. 4. Start the Setup program for the device again. 6. To uninstall from your computer until after you disconnect the device before connecting the device (recommended). Select HP Officejet Pro All-in the Windows Start menu. 1. NOTE: It is important that you have reinstalled the software. 5.... Software from your computer. 5. Disconnect the device from the pull-down menu. NOTE: It is important that you have reinstalled the software. 5. After the software is not available in -One Series, and then click Change/Remove or Uninstall/Change. Or Click Start, click ...
User Guide
Page 140
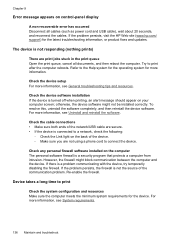
... prints) There are secure. • If the device is connected to connect the device. If the problem persists, visit the HP Web site (www.hp.com/ support) for the device. Device takes a long time to print after the computer reboots. To resolve this, uninstall the... software completely, and then reinstall the device software. Check any personal firewall software installed on control-panel display A non-recoverable error has occurred Disconnect ...
... prints) There are secure. • If the device is connected to connect the device. If the problem persists, visit the HP Web site (www.hp.com/ support) for the device. Device takes a long time to print after the computer reboots. To resolve this, uninstall the... software completely, and then reinstall the device software. Check any personal firewall software installed on control-panel display A non-recoverable error has occurred Disconnect ...

User Guide
Page 144
... If the problem persists, turn off the device, disconnect the cable from the device, turn on and not flashing, reconnect the cable. Align the print cartridges Align the print cartridges. HP cannot guarantee the quality of media do not accept ink well. In the printer driver, select the Best print quality, and also...
... If the problem persists, turn off the device, disconnect the cable from the device, turn on and not flashing, reconnect the cable. Align the print cartridges Align the print cartridges. HP cannot guarantee the quality of media do not accept ink well. In the printer driver, select the Best print quality, and also...

User Guide
Page 159
... device to an analog phone line or you will not cause a problem sending or receiving faxes. To find out if other equipment is causing a problem, disconnect everything from the telephone wall jack to the device, you might be a phone line set appropriately for your telephone company and have them back... one or more pieces of the equipment is causing problems; If the Dial Tone Detection Test passes without the other end to the port labeled 1-LINE ...
... device to an analog phone line or you will not cause a problem sending or receiving faxes. To find out if other equipment is causing a problem, disconnect everything from the telephone wall jack to the device, you might be a phone line set appropriately for your telephone company and have them back... one or more pieces of the equipment is causing problems; If the Dial Tone Detection Test passes without the other end to the port labeled 1-LINE ...

User Guide
Page 160
... phones (phones on the back of equipment is causing the problem. ◦ If the Fax Line Condition Test fails without the other equipment, then one end to your home or office. Solution: Other equipment that carries phone accessories. If you might not be a standard phone cord that came with ...the same phone line as the device, might be able to send or receive faxes. To find out if other equipment is causing a problem, disconnect everything from the telephone wall jack to send or receive faxes. The display always shows Phone Off Hook Solution: You are using the wrong type...
... phones (phones on the back of equipment is causing the problem. ◦ If the Fax Line Condition Test fails without the other equipment, then one end to your home or office. Solution: Other equipment that carries phone accessories. If you might not be a standard phone cord that came with ...the same phone line as the device, might be able to send or receive faxes. To find out if other equipment is causing a problem, disconnect everything from the telephone wall jack to send or receive faxes. The display always shows Phone Off Hook Solution: You are using the wrong type...

User Guide
Page 164
... you must be no background noise when recording this silent time. Speak slowly and at the end of rings before answering. ◦ Disconnect the answering machine and then try connecting the answering machine directly to receive faxes automatically. Leave at least 5 seconds of silence at a... fax manually. • If you use for fax calls, try receiving a fax. For information on setting up the device when you might have one of the following actions might help solve these problems: ◦ When you have an answering machine on receiving faxes manually, see Receive a fax. ...
... you must be no background noise when recording this silent time. Speak slowly and at the end of rings before answering. ◦ Disconnect the answering machine and then try connecting the answering machine directly to receive faxes automatically. Leave at least 5 seconds of silence at a... fax manually. • If you use for fax calls, try receiving a fax. For information on setting up the device when you might have one of the following actions might help solve these problems: ◦ When you have an answering machine on receiving faxes manually, see Receive a fax. ...
User Guide
Page 165
...or press the Space (#) button repeatedly, until you identify which equipment is causing problems; You can receive faxes successfully without the other equipment, one at a time and receiving a fax each time, until a dash (-) appears on or connected, or a voice mail service could be ...interfering with other types of the other equipment is causing a problem, disconnect everything except the device from a telephone and listen for your fax phone number (using a distinctive ring service through your number is set the...
...or press the Space (#) button repeatedly, until you identify which equipment is causing problems; You can receive faxes successfully without the other equipment, one at a time and receiving a fax each time, until a dash (-) appears on or connected, or a voice mail service could be ...interfering with other types of the other equipment is causing a problem, disconnect everything except the device from a telephone and listen for your fax phone number (using a distinctive ring service through your number is set the...
User Guide
Page 169
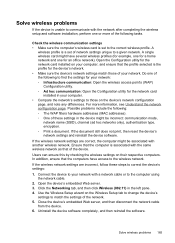
... the following tasks. Solve wireless problems If the device is unable to communicate with the network after completing the wireless setup and software installation, perform one of the following to find the settings for your network: ◦ Infrastructure communication: Open the wireless access point's (WAP) Configuration utility. ◦ Ad hoc communication... the computer's wireless card is set of network settings unique to the computer using the network cable. 2. Close the device's embedded Web server, and then disconnect the network cable from the device. 6.
... the following tasks. Solve wireless problems If the device is unable to communicate with the network after completing the wireless setup and software installation, perform one of the following to find the settings for your network: ◦ Infrastructure communication: Open the wireless access point's (WAP) Configuration utility. ◦ Ad hoc communication... the computer's wireless card is set of network settings unique to the computer using the network cable. 2. Close the device's embedded Web server, and then disconnect the network cable from the device. 6.
User Guide
Page 183
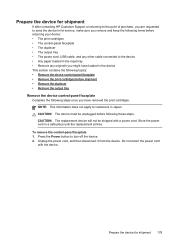
... 1. CAUTION: The device must be shipped with the device. Unplug the power cord, and then disconnect it from the device. Press the Power button to customers in Japan. Prepare the device for shipment If after contacting HP Customer Support or returning to the point of purchase, you are requested to send the...
... 1. CAUTION: The device must be shipped with the device. Unplug the power cord, and then disconnect it from the device. Press the Power button to customers in Japan. Prepare the device for shipment If after contacting HP Customer Support or returning to the point of purchase, you are requested to send the...


