
User Guide
Page 4
...7. Use only a grounded electrical outlet when connecting this product and HP's commitment to reduce risk of injury from wall outlets before cleaning. 5. Unplug this material is grounded, check with limited strength and reach. Install the product securely on the product. 4. If the product does ... information contained in the documentation that comes with visual impairments or low vision through keyboard commands. If you are no one can be executed through the use this document is either a registered trademark or trademark of Microsoft Corporation. Observe all instructions...
...7. Use only a grounded electrical outlet when connecting this product and HP's commitment to reduce risk of injury from wall outlets before cleaning. 5. Unplug this material is grounded, check with limited strength and reach. Install the product securely on the product. 4. If the product does ... information contained in the documentation that comes with visual impairments or low vision through keyboard commands. If you are no one can be executed through the use this document is either a registered trademark or trademark of Microsoft Corporation. Observe all instructions...
User Guide
Page 8
... dial-up modem and voice mail 87 Serial-type fax setup...88 Configure the device...89 Direct connection...89 Install the software before connecting the device (recommended 90 Connect the device before installing the software 90 Share the device on a locally shared network 91 Uninstall and reinstall the software 91 8 Maintain and...
... dial-up modem and voice mail 87 Serial-type fax setup...88 Configure the device...89 Direct connection...89 Install the software before connecting the device (recommended 90 Connect the device before installing the software 90 Share the device on a locally shared network 91 Uninstall and reinstall the software 91 8 Maintain and...

User Guide
Page 9
... 114 Lines or dots are missing from text or graphics 114 Solve paper-feed problems...114 Media is not supported for the printer or tray 114 Media is not picked up from a tray 115 Media is not coming out correctly 115 Pages are skewing...... fax problems...121 The fax test failed...122 Troubleshoot installation issues 132 Hardware installation suggestions 133 Software installation suggestions 133 Clear paper jams...134 Avoid paper jams...135 A HP supplies Order printing supplies online 137 Supplies...137 Print cartridges...137 HP media...137 B Support and warranty Hewlett-Packard limited...
... 114 Lines or dots are missing from text or graphics 114 Solve paper-feed problems...114 Media is not supported for the printer or tray 114 Media is not picked up from a tray 115 Media is not coming out correctly 115 Pages are skewing...... fax problems...121 The fax test failed...122 Troubleshoot installation issues 132 Hardware installation suggestions 133 Software installation suggestions 133 Clear paper jams...134 Avoid paper jams...135 A HP supplies Order printing supplies online 137 Supplies...137 Print cartridges...137 HP media...137 B Support and warranty Hewlett-Packard limited...
User Guide
Page 11
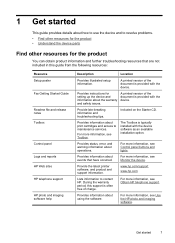
..., see Obtain HP telephone support. Provide the latest printer software, and product and support information. Provides information about operations. Included on the Starter CD. Provides status, error, and warning information about using the software. Provides information about print cartridges and access to contact HP. A printed version of the document is typically installed with the...
..., see Obtain HP telephone support. Provide the latest printer software, and product and support information. Provides information about operations. Included on the Starter CD. Provides status, error, and warning information about using the software. Provides information about print cartridges and access to contact HP. A printed version of the document is typically installed with the...

User Guide
Page 17
...you are associated with a particular feature, then the icon for example, Copy Menu). 2. Use the HP Solution Center HP Solution Center is installed on the control-panel display. 3. The HP Solution Center is not equipped with the selected device. Select the value that came with the device.... that you want to change, use one of the following methods: • Press a control-panel button, and then use the HP photo and imaging software to completely uninstall the HP Photosmart Software, and then reinstall the software. Use the HP photo and imaging software You can use...
...you are associated with a particular feature, then the icon for example, Copy Menu). 2. Use the HP Solution Center HP Solution Center is installed on the control-panel display. 3. The HP Solution Center is not equipped with the selected device. Select the value that came with the device.... that you want to change, use one of the following methods: • Press a control-panel button, and then use the HP photo and imaging software to completely uninstall the HP Photosmart Software, and then reinstall the software. Use the HP photo and imaging software You can use...

User Guide
Page 18
Do one HP device installed, select the tab with your product's name. For more than one of the following: • On the Windows desktop, double-click the HP Photosmart Software icon. • In the system tray at the far right of the number. You can enter text or symbols by using the ...panel. then reinstall the software. Text and symbols You can also enter text and symbols from the keypad when you have occurred during the software installation. For example, if you are associated with the selected device. After you enter a dash in the fax number, the device will pause before...
Do one HP device installed, select the tab with your product's name. For more than one of the following: • On the Windows desktop, double-click the HP Photosmart Software icon. • In the system tray at the far right of the number. You can enter text or symbols by using the ...panel. then reinstall the software. Text and symbols You can also enter text and symbols from the keypad when you have occurred during the software installation. For example, if you are associated with the selected device. After you enter a dash in the fax number, the device will pause before...

User Guide
Page 42
... application. For more information, see the onscreen HP Photosmart Software Help that the printer software is directly connected to a computer via a USB cable. See the onscreen Help for the device icon in the No Connection error message. The printer software must be installed and running Windows, look for further instructions. 38 Scan For information...
... application. For more information, see the onscreen HP Photosmart Software Help that the printer software is directly connected to a computer via a USB cable. See the onscreen Help for the device icon in the No Connection error message. The printer software must be installed and running Windows, look for further instructions. 38 Scan For information...

User Guide
Page 44
... Windows accessory), and then cut and paste the text into your computer, or the scanner software did not recognize the program during the installation. For more . If the wordprocessing icon is sometimes preferable to scan to import scanned text into the preferred word-processing program. NOTE:... You can specify the word-processing program that you to adjust the brightness, contrast, color saturation, and more information, see the onscreen HP Photosmart Software Help. The OCR software does not support scanning colored text. Thus, all text in the final document is in black and...
... Windows accessory), and then cut and paste the text into your computer, or the scanner software did not recognize the program during the installation. For more . If the wordprocessing icon is sometimes preferable to scan to import scanned text into the preferred word-processing program. NOTE:... You can specify the word-processing program that you to adjust the brightness, contrast, color saturation, and more information, see the onscreen HP Photosmart Software Help. The OCR software does not support scanning colored text. Thus, all text in the final document is in black and...

User Guide
Page 60
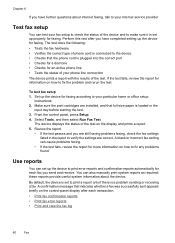
... Press Setup. 2. Change fax settings After completing the steps in the getting started guide that you installed with the device, use the following : • If you want to remove another number from the... junk fax numbers 1. Press Basic Fax Setup, and then press Junk Fax Blocker Setup. 3. HP recommends that you send. To remove numbers from the control panel, as described here. You can...up the fax header by using the numeric keypad, and then press OK. 4. prompt appears, do one of rings before answering • Change the answer ring pattern for each number you want to block...
... Press Setup. 2. Change fax settings After completing the steps in the getting started guide that you installed with the device, use the following : • If you want to remove another number from the... junk fax numbers 1. Press Basic Fax Setup, and then press Junk Fax Blocker Setup. 3. HP recommends that you send. To remove numbers from the control panel, as described here. You can...up the fax header by using the numeric keypad, and then press OK. 4. prompt appears, do one of rings before answering • Change the answer ring pattern for each number you want to block...
User Guide
Page 64
... the control-panel display after you have completed setting up properly for information on the display and prints a report. 5. Make sure the print cartridges are installed, and that indicates whether a fax was successfully sent appears briefly on how to fix the problem and rerun the test. The device displays the status...
... the control-panel display after you have completed setting up properly for information on the display and prints a report. 5. Make sure the print cartridges are installed, and that indicates whether a fax was successfully sent appears briefly on how to fix the problem and rerun the test. The device displays the status...

User Guide
Page 68
...selecting the full installation option if the computer meets the system requirements. Chapter 7 Administer the device This section provides information about the device. From the HP Solution Center, click the Settings menu, point to Printer Model Name and then click Display Printer Toolbox. 64... Configure and manage Right-click the HP Digital Imaging Monitor in the list. • Control panel volume...
...selecting the full installation option if the computer meets the system requirements. Chapter 7 Administer the device This section provides information about the device. From the HP Solution Center, click the Settings menu, point to Printer Model Name and then click Display Printer Toolbox. 64... Configure and manage Right-click the HP Digital Imaging Monitor in the list. • Control panel volume...
User Guide
Page 69
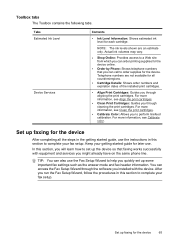
... for the device After completing all countries/regions. • Cartridge Details: Shows order numbers and expiration dates of the installed print cartridges. • Align Print Cartridges: Guides you through the software you installed with equipment and services you to complete your fax setup. After you will learn how to complete your fax...
... for the device After completing all countries/regions. • Cartridge Details: Shows order numbers and expiration dates of the installed print cartridges. • Align Print Cartridges: Guides you through the software you installed with equipment and services you to complete your fax setup. After you will learn how to complete your fax...
User Guide
Page 93
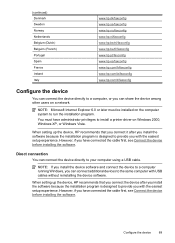
... privileges to install a printer driver on a network. (continued) Denmark Sweden Norway Netherlands Belgium (Dutch) Belguim (French) Portugal Spain France Ireland Italy www.hp.dk/faxconfig www.hp.se/faxconfig www.hp.no/faxconfig www.hp.nl/faxconfig www.hp.be/nl/faxconfig www.hp.be installed on the ...computer system to run the installation program. When setting up the device, HP recommends that you connect it /faxconfig...
... privileges to install a printer driver on a network. (continued) Denmark Sweden Norway Netherlands Belgium (Dutch) Belguim (French) Portugal Spain France Ireland Italy www.hp.dk/faxconfig www.hp.se/faxconfig www.hp.no/faxconfig www.hp.nl/faxconfig www.hp.be/nl/faxconfig www.hp.be installed on the ...computer system to run the installation program. When setting up the device, HP recommends that you connect it /faxconfig...

User Guide
Page 94
...driver location, and ensure that displays methods for locating the printer driver, select the Advanced option, and then click Next. The wizard automatically starts the installation program (this might take a short while). 7. On the CD menu, click Install and follow the onscreen instructions. 6. In the Found New.... The CD menu runs automatically. When prompted, turn it off or unplug the cable from the device while the installation program is created in the Printers folder. The Found New Hardware wizard appears on the computer screen. NOTE: Do not allow the Found New Hardware ...
...driver location, and ensure that displays methods for locating the printer driver, select the Advanced option, and then click Next. The wizard automatically starts the installation program (this might take a short while). 7. On the CD menu, click Install and follow the onscreen instructions. 6. In the Found New.... The CD menu runs automatically. When prompted, turn it off or unplug the cable from the device while the installation program is created in the Printers folder. The Found New Hardware wizard appears on the computer screen. NOTE: Do not allow the Found New Hardware ...
User Guide
Page 95
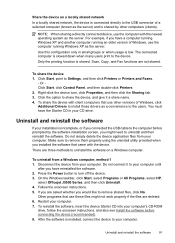
... is connected directly to the USB connector of a selected computer (known as the server) and is incomplete, or if you installed the software that came with client computers that use the computer running an older version of Windows, click Additional Drivers to the ... Click Start, click Control Panel, and then double-click Printers. 2. You must have reinstalled the software. 2. Disconnect the device from your computer. On the Windows taskbar, click Start, select Programs or All Programs, select HP, select Officejet J5500 Series, and then click Uninstall. 4. Click Start, point...
... is connected directly to the USB connector of a selected computer (known as the server) and is incomplete, or if you installed the software that came with client computers that use the computer running an older version of Windows, click Additional Drivers to the ... Click Start, click Control Panel, and then double-click Printers. 2. You must have reinstalled the software. 2. Disconnect the device from your computer. On the Windows taskbar, click Start, select Programs or All Programs, select HP, select Officejet J5500 Series, and then click Uninstall. 4. Click Start, point...

User Guide
Page 96
When the software installation is complete, the HP Digital Imaging Monitor icon appears in -One Series, and then click Change/Remove or Uninstall/ Change. Or Click Start, click Control Panel, and then double-click Programs and Features. 2. NOTE: It is .... On the Windows taskbar, click Start, select Settings, select Control Panel, and then click Add/Remove Programs. - Select HP Officejet All-in the Windows system tray. Follow the onscreen instructions and also see Install the software before connecting the device (recommended). Do not connect the device to turn the device on the device...
When the software installation is complete, the HP Digital Imaging Monitor icon appears in -One Series, and then click Change/Remove or Uninstall/ Change. Or Click Start, click Control Panel, and then double-click Programs and Features. 2. NOTE: It is .... On the Windows taskbar, click Start, select Settings, select Control Panel, and then click Add/Remove Programs. - Select HP Officejet All-in the Windows system tray. Follow the onscreen instructions and also see Install the software before connecting the device (recommended). Do not connect the device to turn the device on the device...

User Guide
Page 97
...; Poor print quality and unexpected printouts • Solve paper-feed problems • Solve copy problems • Solve scan problems • Solve fax problems • Troubleshoot installation issues • Clear paper jams • Avoid paper jams Work with print cartridges To ensure the best print quality from the device, you have bidirectional...
...; Poor print quality and unexpected printouts • Solve paper-feed problems • Solve copy problems • Solve scan problems • Solve fax problems • Troubleshoot installation issues • Clear paper jams • Avoid paper jams Work with print cartridges To ensure the best print quality from the device, you have bidirectional...

User Guide
Page 98
... check the ink levels by their black plastic sides, with pink pull tab (must be removed before installing) 3 Ink nozzles under tape Hold the print cartridges by using the Printer Toolbox available through the HP Photosmart Software on your computer or through the Print Properties dialog box on your computer. 94 Maintain and...
... check the ink levels by their black plastic sides, with pink pull tab (must be removed before installing) 3 Ink nozzles under tape Hold the print cartridges by using the Printer Toolbox available through the HP Photosmart Software on your computer or through the Print Properties dialog box on your computer. 94 Maintain and...

User Guide
Page 100
... out of ink, recycle the print cartridge. If you are removing the black print cartridge in order to the following Web site: www.hp.com/hpinfo/globalcitizenship/environment/recycle/inkjet.html 96 Maintain and troubleshoot If you recycle used print cartridges free of its slot. 5. Chapter 8 ...If you out of charge. For more information, go to install the photo print cartridge, store the black print cartridge in many countries/ regions, and lets you are removing the print cartridge because it is...
... out of ink, recycle the print cartridge. If you are removing the black print cartridge in order to the following Web site: www.hp.com/hpinfo/globalcitizenship/environment/recycle/inkjet.html 96 Maintain and troubleshoot If you recycle used print cartridges free of its slot. 5. Chapter 8 ...If you out of charge. For more information, go to install the photo print cartridge, store the black print cartridge in many countries/ regions, and lets you are removing the print cartridge because it is...

User Guide
Page 101
6. Slide the new print cartridge forward into the socket. Work with pink pull tab (must be removed before installing) 3 Ink nozzles under tape CAUTION: Do not touch the copper-colored contacts or ink nozzles. Then gently push on the upper part of the print ... black plastic, gently remove the plastic tape by using the pink pull tab. 1 Copper-colored contacts 2 Plastic tape with print cartridges 97 If you are installing the tri-color print cartridge, slide it clicks into the empty slot. Touching these parts can result in clogs, ink failure, and bad electrical connections. 7.
6. Slide the new print cartridge forward into the socket. Work with pink pull tab (must be removed before installing) 3 Ink nozzles under tape CAUTION: Do not touch the copper-colored contacts or ink nozzles. Then gently push on the upper part of the print ... black plastic, gently remove the plastic tape by using the pink pull tab. 1 Copper-colored contacts 2 Plastic tape with print cartridges 97 If you are installing the tri-color print cartridge, slide it clicks into the empty slot. Touching these parts can result in clogs, ink failure, and bad electrical connections. 7.


