
Bluetooth Wireless Technology Basics
Page 7
... Found New Hardware wizard opens. Right-click the My Bluetooth Places icon in the lower-right part of the screen. Enable BWT functionality. 3. Select Finish to complete the installation and to Bluetooth operations. The following 3 steps activate your notebook user documentation if you need help locating the wireless button and light. however, you turn it by hp to begin the configuration process. These steps are explained below. For specific instructions about discovering and connecting to...
... Found New Hardware wizard opens. Right-click the My Bluetooth Places icon in the lower-right part of the screen. Enable BWT functionality. 3. Select Finish to complete the installation and to Bluetooth operations. The following 3 steps activate your notebook user documentation if you need help locating the wireless button and light. however, you turn it by hp to begin the configuration process. These steps are explained below. For specific instructions about discovering and connecting to...

Bluetooth Wireless Technology Basics
Page 8
... to another BWT-enabled device. Detailed instructions on the matching profiles. Bluetooth wireless technology profiles supported by selecting the Start menu, and then selecting Bluetooth Manager. All h3100, h3600, h3700, h3800, and h3900 Series iPAQ Pocket PCs support an optional Bluetooth Wireless Expansion Pack. Selecting BWT device profiles Profiles are shipped with integrated BWT. The BWT connection can be used to manage and change the default BWT settings and set the level of...
... to another BWT-enabled device. Detailed instructions on the matching profiles. Bluetooth wireless technology profiles supported by selecting the Start menu, and then selecting Bluetooth Manager. All h3100, h3600, h3700, h3800, and h3900 Series iPAQ Pocket PCs support an optional Bluetooth Wireless Expansion Pack. Selecting BWT device profiles Profiles are shipped with integrated BWT. The BWT connection can be used to manage and change the default BWT settings and set the level of...
Software Update - Windows Vista
Page 7
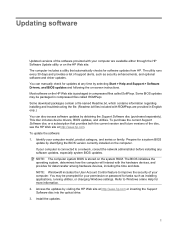
... for updates at any software updates, especially system BIOS updates. Install the updates. 1 The utility runs every 30 days and provides a list of support alerts, such as installing applications, running utilities, or changing Windows settings. If your computer is connected to improve the security of your computer. NOTE: Windows® includes the User Account Control feature to a network, consult the network administrator before installing any time by identifying the BIOS version currently installed on...
... for updates at any software updates, especially system BIOS updates. Install the updates. 1 The utility runs every 30 days and provides a list of support alerts, such as installing applications, running utilities, or changing Windows settings. If your computer is connected to improve the security of your computer. NOTE: Windows® includes the User Account Control feature to a network, consult the network administrator before installing any time by identifying the BIOS version currently installed on...
Software Updates - Windows XP
Page 7
... disc includes device drivers, BIOS updates, and utilities. To purchase the current Support Software disc or a subscription that automatically checks for data transfer among hardware devices, including the time and date. 2. If your computer model, product category, and series or family. Identify your computer is connected to a network, consult the network administrator before installing any time by identifying the BIOS version currently installed on the computer. The BIOS initializes the operating...
... disc includes device drivers, BIOS updates, and utilities. To purchase the current Support Software disc or a subscription that automatically checks for data transfer among hardware devices, including the time and date. 2. If your computer model, product category, and series or family. Identify your computer is connected to a network, consult the network administrator before installing any time by identifying the BIOS version currently installed on the computer. The BIOS initializes the operating...
ProtectTools (Select Models Only) - Windows Vista
Page 40
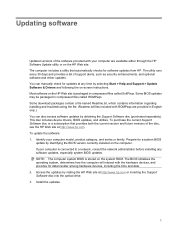
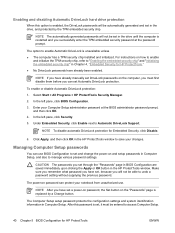
... Chapter 5 BIOS Configuration for HP ProtectTools provides access to the Computer Setup utility security and configuration settings. With BIOS Configuration, you can ● Manage power-on passwords and administrator passwords. ● Configure other power-on authentication features, such as enabling smart card passwords and embedded security authentication support. ● Enable and disable hardware features, such as CD-ROM boot or different hardware ports. ● Configure boot options, which includes enabling MultiBoot and changing the boot order. This gives users Windows access to...
... Chapter 5 BIOS Configuration for HP ProtectTools provides access to the Computer Setup utility security and configuration settings. With BIOS Configuration, you can ● Manage power-on passwords and administrator passwords. ● Configure other power-on authentication features, such as enabling smart card passwords and embedded security authentication support. ● Enable and disable hardware features, such as CD-ROM boot or different hardware ports. ● Configure boot options, which includes enabling MultiBoot and changing the boot order. This gives users Windows access to...
ProtectTools (Select Models Only) - Windows Vista
Page 46
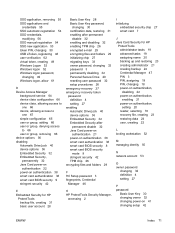
... window. Select Start > All Programs > HP ProtectTools Security Manager. 2. Enter your Computer Setup administrator password at the password prompt. The power-on and setup passwords in Computer Setup, and also to manage various password settings. Click Apply, and then click OK in the HP ProtectTools window to save your notebook from unauthorized use BIOS Configuration to "Enabling the embedded security chip" and "Initializing the embedded security chip" in the drive, and protected by a Change button. Make...
... window. Select Start > All Programs > HP ProtectTools Security Manager. 2. Enter your Computer Setup administrator password at the password prompt. The power-on and setup passwords in Computer Setup, and also to manage various password settings. Click Apply, and then click OK in the HP ProtectTools window to save your notebook from unauthorized use BIOS Configuration to "Enabling the embedded security chip" and "Initializing the embedded security chip" in the drive, and protected by a Change button. Make...
ProtectTools (Select Models Only) - Windows Vista
Page 77
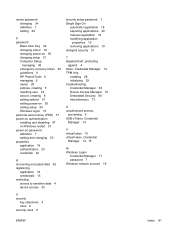
... initializing chip 27 migrating keys 33 owner password, changing 32 password 3 permanently disabling 32 Personal Secure Drive 29 resetting user password 32 setup procedures 26 emergency recovery 27 emergency recovery token password definition 4 setting 27 enabling Automatic DriveLock 40 device options 36 Embedded Security 32 Embedded Security after permanent disable 32 Java Card power-on authentication 21 power-on authentication 38 smart card authentication 38 smart card BIOS security 8 smart card BIOS security mode 9 stringent security 42 TPM...
... initializing chip 27 migrating keys 33 owner password, changing 32 password 3 permanently disabling 32 Personal Secure Drive 29 resetting user password 32 setup procedures 26 emergency recovery 27 emergency recovery token password definition 4 setting 27 enabling Automatic DriveLock 40 device options 36 Embedded Security 32 Embedded Security after permanent disable 32 Java Card power-on authentication 21 power-on authentication 38 smart card authentication 38 smart card BIOS security 8 smart card BIOS security mode 9 stringent security 42 TPM...
ProtectTools (Select Models Only) - Windows Vista
Page 78
... restoring 14 backup, creating 16 BIOS security mode 8 BIOS security mode, disabling 9 BIOS security mode, enabling 9 BIOS settings, updating 13 Credential Manager 47 initializing 7 PIN, changing 13 PIN, definition 3 reader, selecting 13 recovery file 14 restoring 15 setting recovery file password 14 user password, setting and changing 11 user password, storing 12 Smart card user password definition 3 stringent security 42 T token, Credential Manager 47 TPM chip enabling 26 initializing 27 U USB eToken, Credential Manager 48 V virtual token 49 virtual token, Credential Manager 47, 49 W Windows...
... restoring 14 backup, creating 16 BIOS security mode 8 BIOS security mode, disabling 9 BIOS security mode, enabling 9 BIOS settings, updating 13 Credential Manager 47 initializing 7 PIN, changing 13 PIN, definition 3 reader, selecting 13 recovery file 14 restoring 15 setting recovery file password 14 user password, setting and changing 11 user password, storing 12 Smart card user password definition 3 stringent security 42 T token, Credential Manager 47 TPM chip enabling 26 initializing 27 U USB eToken, Credential Manager 48 V virtual token 49 virtual token, Credential Manager 47, 49 W Windows...

Notebook Tour
Page 14
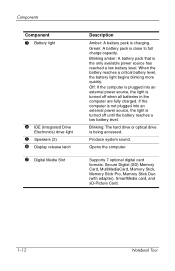
..., the light is turned off when all batteries in the computer are fully charged. Blinking: The hard drive or optical drive is the only available power source has reached a low-battery condition. Blinking amber: A battery pack that is being accessed. Supports 7 optional digital card formats: Secure Digital (SD) Memory Card, MultiMediaCard, Memory Stick, Memory Stick Pro, Memory Stick Duo (with adapter), SmartMedia card, and xD-Picture Card. 1-12 Notebook Tour Green: A battery pack is charging. Opens the computer. Produce system sound...
..., the light is turned off when all batteries in the computer are fully charged. Blinking: The hard drive or optical drive is the only available power source has reached a low-battery condition. Blinking amber: A battery pack that is being accessed. Supports 7 optional digital card formats: Secure Digital (SD) Memory Card, MultiMediaCard, Memory Stick, Memory Stick Pro, Memory Stick Duo (with adapter), SmartMedia card, and xD-Picture Card. 1-12 Notebook Tour Green: A battery pack is charging. Opens the computer. Produce system sound...
Notebook Tour - Windows Vista
Page 14
... a low battery level. Opens the computer. Supports 7 optional digital card formats: Secure Digital (SD) Memory Card, MultiMediaCard, Memory Stick, Memory Stick Pro, Memory Stick Duo (with adapter), SmartMedia card, and xD-Picture Card. 1-12 Notebook Tour Green: A battery pack is the only available power source has reached a low battery level. Produce system sound. Blinking amber: A battery pack that is close to full charge capacity. Components Component 3 Battery light 4 IDE (Integrated Drive Electronics) drive light 5 Speakers (2) 6 Display release latch 7 Digital Media Slot...
... a low battery level. Opens the computer. Supports 7 optional digital card formats: Secure Digital (SD) Memory Card, MultiMediaCard, Memory Stick, Memory Stick Pro, Memory Stick Duo (with adapter), SmartMedia card, and xD-Picture Card. 1-12 Notebook Tour Green: A battery pack is the only available power source has reached a low battery level. Produce system sound. Blinking amber: A battery pack that is close to full charge capacity. Components Component 3 Battery light 4 IDE (Integrated Drive Electronics) drive light 5 Speakers (2) 6 Display release latch 7 Digital Media Slot...
HP Compaq nx9420 and nw9440 Notebook PC - Getting Started - Enhanced for Accessibility Windows Vista
Page 37
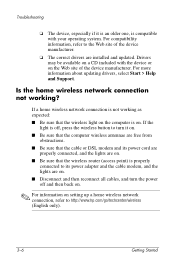
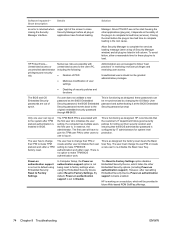
... updating drivers, select Start > Help and Support. Is the home wireless network connection not working as expected: ■ Be sure that the wireless router (access point) is properly connected to its power adapter and the cable modem, and the lights are on. ■ Disconnect and then reconnect all cables, and turn the power off , press the wireless button to turn it is an older one, is on. If a home wireless network connection...
... updating drivers, select Start > Help and Support. Is the home wireless network connection not working as expected: ■ Be sure that the wireless router (access point) is properly connected to its power adapter and the cable modem, and the lights are on. ■ Disconnect and then reconnect all cables, and turn the power off , press the wireless button to turn it is an older one, is on. If a home wireless network connection...

HP Compaq nx9420, nw9440 Notebook PC - Getting Started - Enhanced for Accessibility
Page 36
... updating drivers, select Start > Help and Support. Getting Started� 3-7 If an external device does not function as expected: ■� Turn on the device as monitors and printers, may be turned on . ■� Be sure that ❏� All device connections are installed and updated. For compatibility information, refer to the Web site of the device manufacturer. Troubleshooting Is an external device not working? Some devices, such as instructed in the device user guide...
... updating drivers, select Start > Help and Support. Getting Started� 3-7 If an external device does not function as expected: ■� Turn on the device as monitors and printers, may be turned on . ■� Be sure that ❏� All device connections are installed and updated. For compatibility information, refer to the Web site of the device manufacturer. Troubleshooting Is an external device not working? Some devices, such as instructed in the device user guide...
Management and Printing User Guide - Windows XP and Windows Vista
Page 14
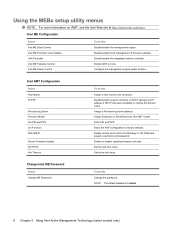
... disabled) or change the domain name. Assign Enterprise or Small Business Intel AMT model. Set a time-out value. NOTE: The default password is admin. 8 Chapter 2 Using Intel Active Management Technology (select models only) Configure the management engine power policies. Assign a Provisioning server address. Reset the AMT configuration to IDE floppy or CD-ROM and assign a username and password. Enable or disable updating firmware remotely. Disable/enable local management of firmware updates. Set the real-time clock. Using the MEBx setup utility...
... disabled) or change the domain name. Assign Enterprise or Small Business Intel AMT model. Set a time-out value. NOTE: The default password is admin. 8 Chapter 2 Using Intel Active Management Technology (select models only) Configure the management engine power policies. Assign a Provisioning server address. Reset the AMT configuration to IDE floppy or CD-ROM and assign a username and password. Enable or disable updating firmware remotely. Disable/enable local management of firmware updates. Set the real-time clock. Using the MEBx setup utility...
ProtectTools - Windows Vista and Windows XP
Page 55
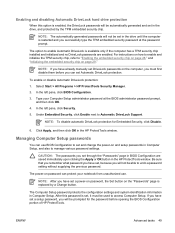
..., click BIOS Configuration. 3. The Computer Setup password protects the configuration settings and system identification information in the HP ProtectTools window. The option to enable Automatic DriveLock is enabled, the DriveLock passwords will not be prompted for Embedded Security, click Disable. 6. Type your notebook from unauthorized use BIOS Configuration to undo a password setting without supplying the previous password. Click Apply, and then click OK in Computer Setup. The power-on and setup passwords in the drive until...
..., click BIOS Configuration. 3. The Computer Setup password protects the configuration settings and system identification information in the HP ProtectTools window. The option to enable Automatic DriveLock is enabled, the DriveLock passwords will not be prompted for Embedded Security, click Disable. 6. Type your notebook from unauthorized use BIOS Configuration to undo a password setting without supplying the previous password. Click Apply, and then click OK in Computer Setup. The power-on and setup passwords in the drive until...
ProtectTools - Windows Vista and Windows XP
Page 79
... hardware and software configuration: a. Click All Programs. c. If the FW version does not match 2.18, download and update the TPM firmware. All security applications such as Embedded Security, Java Card Security, and biometrics are extendable plug-ins for models containing Broadcomenabled TPMs-The tool provided through HP support Web site reports ownership required. If the BIOS TPM is factory-reset, ownership is removed and firmware update...
... hardware and software configuration: a. Click All Programs. c. If the FW version does not match 2.18, download and update the TPM firmware. All security applications such as Embedded Security, Java Card Security, and biometrics are extendable plug-ins for models containing Broadcomenabled TPMs-The tool provided through HP support Web site reports ownership required. If the BIOS TPM is factory-reset, ownership is removed and firmware update...
ProtectTools - Windows Vista and Windows XP
Page 80
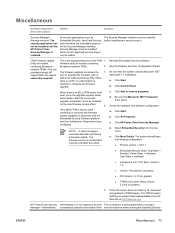
... other users to use to the system after reenabling Embedded Security Device, Power-on . The Reset to make TPM BIOS authentication work . Manager. This is enabled in future Web-based ROM SoftPaq offerings. 74 Chapter 8 Troubleshooting ENWW If a computer has multiple users, the first user is as the BIOS Embedded Security password, the BIOS Embedded Security password reverts back to Factory Settings In Computer Setup, the Power-on the ability of Security Manager window...
... other users to use to the system after reenabling Embedded Security Device, Power-on . The Reset to make TPM BIOS authentication work . Manager. This is enabled in future Web-based ROM SoftPaq offerings. 74 Chapter 8 Troubleshooting ENWW If a computer has multiple users, the first user is as the BIOS Embedded Security password, the BIOS Embedded Security password reverts back to Factory Settings In Computer Setup, the Power-on the ability of Security Manager window...
ProtectTools - Windows Vista and Windows XP
Page 87
... password changing 34 definition 7 setting 29 P password Basic User Key 32 changing owner 34 changing power-on 50 changing setup 51 Computer Setup, managing 49 emergency recovery token 29 guidelines 8 HP ProtectTools 6 managing 6 owner 29 policies, creating 5 resetting user 34 secure, creating 8 setting options 51 setting power-on 50 setting setup 50 Windows logon 15 personal secure drive (PSD) 31 power-on authentication enabling and disabling 47 on Windows restart 51 power-on password definition 7 setting and changing 50 properties application 19 authentication 23 credential 24 R recovering...
... password changing 34 definition 7 setting 29 P password Basic User Key 32 changing owner 34 changing power-on 50 changing setup 51 Computer Setup, managing 49 emergency recovery token 29 guidelines 8 HP ProtectTools 6 managing 6 owner 29 policies, creating 5 resetting user 34 secure, creating 8 setting options 51 setting power-on 50 setting setup 50 Windows logon 15 personal secure drive (PSD) 31 power-on authentication enabling and disabling 47 on Windows restart 51 power-on password definition 7 setting and changing 50 properties application 19 authentication 23 credential 24 R recovering...
Computer Setup - Windows Vista and Windows XP
Page 12
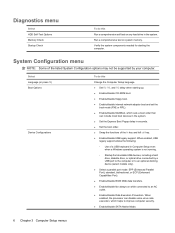
...starting up. ● Enable/disable CD-ROM boot. ● Enable/disable floppy boot. ● Enable/disable internal network adapter boot and set the boot mode (PXE or RPL). ● Enable/disable MultiBoot, which helps to an optional docking device (select models only). ● Select a parallel port mode: EPP (Enhanced Parallel Port), standard, bidirectional, or ECP (Enhanced Capabilities Port). ● Enable/disable BIOS DMA data transfers. ● Enable/disable fan always on system memory. System Configuration menu NOTE: Some of a USB keyboard in Computer Setup even when a Windows...
...starting up. ● Enable/disable CD-ROM boot. ● Enable/disable floppy boot. ● Enable/disable internal network adapter boot and set the boot mode (PXE or RPL). ● Enable/disable MultiBoot, which helps to an optional docking device (select models only). ● Select a parallel port mode: EPP (Enhanced Parallel Port), standard, bidirectional, or ECP (Enhanced Capabilities Port). ● Enable/disable BIOS DMA data transfers. ● Enable/disable fan always on system memory. System Configuration menu NOTE: Some of a USB keyboard in Computer Setup even when a Windows...

Multimedia - Windows Vista
Page 12
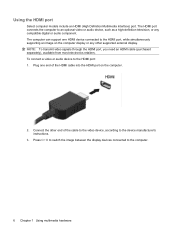
... through the HDMI port, you need an HDMI cable (purchased separately), available from most electronics retailers. To connect a video or audio device to the computer. 6 Chapter 1 Using multimedia hardware Press fn+f4 to switch the image between the display devices connected to the HDMI port: 1. Using the HDMI port Select computer models include an HDMI (High Definition Multimedia Interface) port. Plug one HDMI device connected to the device manufacturer's instructions. 3. The HDMI port connects the computer to an optional video or audio device, such as...
... through the HDMI port, you need an HDMI cable (purchased separately), available from most electronics retailers. To connect a video or audio device to the computer. 6 Chapter 1 Using multimedia hardware Press fn+f4 to switch the image between the display devices connected to the HDMI port: 1. Using the HDMI port Select computer models include an HDMI (High Definition Multimedia Interface) port. Plug one HDMI device connected to the device manufacturer's instructions. 3. The HDMI port connects the computer to an optional video or audio device, such as...
Multimedia - Windows XP
Page 12
... HDMI port, you need an HDMI cable (purchased separately), available from most electronics retailers. Press fn+f4 to switch the image between the display devices connected to the HDMI port: 1. To connect a video or audio device to the computer. 6 Chapter 1 Using multimedia hardware Using the HDMI port Select computer models include an HDMI (High Definition Multimedia Interface) port. The computer can support one end of the cable to the video device, according to the device manufacturer's instructions. 3. Connect the other supported external display...
... HDMI port, you need an HDMI cable (purchased separately), available from most electronics retailers. Press fn+f4 to switch the image between the display devices connected to the HDMI port: 1. To connect a video or audio device to the computer. 6 Chapter 1 Using multimedia hardware Using the HDMI port Select computer models include an HDMI (High Definition Multimedia Interface) port. The computer can support one end of the cable to the video device, according to the device manufacturer's instructions. 3. Connect the other supported external display...


