HP Mini User Guide - Windows XP
Page 7
Adjusting the volume ...39 Multimedia software ...40 Using other preinstalled multimedia software 40 Installing multimedia software from the Internet 40 Audio ...41 Connecting external audio devices 41 Checking your audio functions 41 Video ...43 Connecting an external monitor or projector 43 Webcam ...44 6 Security Protecting the computer ...45 Using passwords ...45 Passwords set in Windows 46 Passwords set in Setup Utility 46 Administrator password 47 Managing an administrator password 47 Entering an administrator password 47 Power-on password 47 Managing a power-on password 48 ...
Adjusting the volume ...39 Multimedia software ...40 Using other preinstalled multimedia software 40 Installing multimedia software from the Internet 40 Audio ...41 Connecting external audio devices 41 Checking your audio functions 41 Video ...43 Connecting an external monitor or projector 43 Webcam ...44 6 Security Protecting the computer ...45 Using passwords ...45 Passwords set in Windows 46 Passwords set in Setup Utility 46 Administrator password 47 Managing an administrator password 47 Entering an administrator password 47 Power-on password 47 Managing a power-on password 48 ...
HP Mini User Guide - Windows XP
Page 19
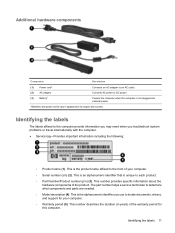
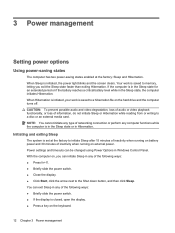
... needed. ◦ Model description (4). This is the alphanumeric identifier you troubleshoot system problems or travel internationally with the computer. ● Service tag-Provides important information including the following: ◦ Product name (1). Additional hardware components Component Description (1) Power cord* Connects an AC adapter to an AC outlet. (2) AC adapter Converts AC power to DC power. (3) Battery* Powers the computer when the computer is not plugged into external power. *Batteries...
... needed. ◦ Model description (4). This is the alphanumeric identifier you troubleshoot system problems or travel internationally with the computer. ● Service tag-Provides important information including the following: ◦ Product name (1). Additional hardware components Component Description (1) Power cord* Connects an AC adapter to an AC outlet. (2) AC adapter Converts AC power to DC power. (3) Battery* Powers the computer when the computer is not plugged into external power. *Batteries...
HP Mini User Guide - Windows XP
Page 31
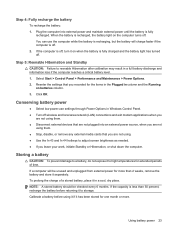
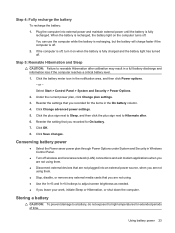
... Start > Control Panel > Performance and Maintenance > Power Options. 2. NOTE: A stored battery should be unused and unplugged from external power for the items in the Plugged in column and the Running on the computer turns off , turn it in a full battery discharge and information loss if the computer reaches a critical battery level. 1. Calibrate a battery before using . ● Use the fn+f3 and fn+f4 hotkeys to adjust screen brightness as needed. ●...
... Start > Control Panel > Performance and Maintenance > Power Options. 2. NOTE: A stored battery should be unused and unplugged from external power for the items in the Plugged in column and the Running on the computer turns off , turn it in a full battery discharge and information loss if the computer reaches a critical battery level. 1. Calibrate a battery before using . ● Use the fn+f3 and fn+f4 hotkeys to adjust screen brightness as needed. ●...

HP Mini User Guide - Windows XP
Page 32
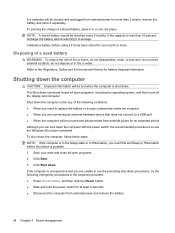
... water. To reduce the risk of a used battery WARNING! Save your work and close all open programs. 2. Refer to a USB port ● When the computer will be unused and disconnected from external power and remove the battery. 24 Chapter 3 Power management The Shut Down command closes all open programs, including the operating system, and then turns off the display and computer. Shut down the computer CAUTION...
... water. To reduce the risk of a used battery WARNING! Save your work and close all open programs. 2. Refer to a USB port ● When the computer will be unused and disconnected from external power and remove the battery. 24 Chapter 3 Power management The Shut Down command closes all open programs, including the operating system, and then turns off the display and computer. Shut down the computer CAUTION...

HP Mini User Guide - Windows XP
Page 53
...-Windows Setup Utility can protect your personal settings and data from being locked out of the computer, record each password immediately and store it is a group of characters that you choose to secure your computer for service, remove all password settings. CAUTION: To prevent being mishandled or stolen. Device risk Security feature Unauthorized use the following features: ● Passwords ● Firewall software ● Antivirus support...
...-Windows Setup Utility can protect your personal settings and data from being locked out of the computer, record each password immediately and store it is a group of characters that you choose to secure your computer for service, remove all password settings. CAUTION: To prevent being mishandled or stolen. Device risk Security feature Unauthorized use the following features: ● Passwords ● Firewall software ● Antivirus support...
HP Mini User Guide - Windows XP
Page 55
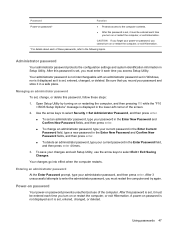
... password set in Windows, nor is it displayed as it in a safe place. Managing an administrator password To set, change an administrator password, type your current password in the Enter Current Password field, type a new password in the Enter Password field, and then press enter 4 times. 3. Use the arrow keys to select Security > Set Administrator Password, and then press enter. ● To set an administrator password, type your password in the Enter New Password and Confirm New Password fields, and then press enter. ● To change...
... password set in Windows, nor is it displayed as it in a safe place. Managing an administrator password To set, change an administrator password, type your current password in the Enter Current Password field, type a new password in the Enter Password field, and then press enter 4 times. 3. Use the arrow keys to select Security > Set Administrator Password, and then press enter. ● To set an administrator password, type your password in the Enter New Password and Confirm New Password fields, and then press enter. ● To change...
HP Mini User Guide - Windows XP
Page 64
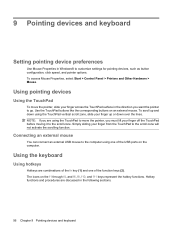
... pointer options. Using pointing devices Using the TouchPad To move the pointer, you want the pointer to the scroll zone will not activate the scrolling function. To scroll up or down using one of the USB ports on the computer. Connecting an external mouse You can connect an external USB mouse to the computer using the TouchPad vertical scroll zone, slide your finger from the TouchPad to go. To access Mouse Properties, select Start > Control Panel > Printers and Other Hardware > Mouse.
... pointer options. Using pointing devices Using the TouchPad To move the pointer, you want the pointer to the scroll zone will not activate the scrolling function. To scroll up or down using one of the USB ports on the computer. Connecting an external mouse You can connect an external USB mouse to the computer using the TouchPad vertical scroll zone, slide your finger from the TouchPad to go. To access Mouse Properties, select Start > Control Panel > Printers and Other Hardware > Mouse.

HP Mini User Guide - Windows XP
Page 84
... lock light, identifying 4 CD drive 61 changing Setup Utility language 72 charging batteries 18, 21 checking audio functions 41 compartments, memory module 10 components additional hardware 11 bottom 9 display 8 front 5 left-side 7 right-side 7 TouchPad 3 connecting to a WLAN 31 connection, external power 16 conservation, power 23 cord, power 11 corporate WLAN connection 31 critical battery level 20 D Diagnostics menu 75 digital card inserting 52 removing 53 stopping 53 Digital Media Slot, identifying 7 diskette drive 61 display image, switching 58 screen brightness hotkeys 58 display switch...
... lock light, identifying 4 CD drive 61 changing Setup Utility language 72 charging batteries 18, 21 checking audio functions 41 compartments, memory module 10 components additional hardware 11 bottom 9 display 8 front 5 left-side 7 right-side 7 TouchPad 3 connecting to a WLAN 31 connection, external power 16 conservation, power 23 cord, power 11 corporate WLAN connection 31 critical battery level 20 D Diagnostics menu 75 digital card inserting 52 removing 53 stopping 53 Digital Media Slot, identifying 7 diskette drive 61 display image, switching 58 screen brightness hotkeys 58 display switch...
HP Mini User Guide - Windows XP
Page 85
... battery 6 caps lock 4 drive 6 power 6 webcam 9 wireless 6 local area network (LAN) cable required 26 connecting cable 26 low battery level 19 M Main menu 74 managing a power-on password 48 managing an administrator password 47 memory module inserting 64 removing 64 memory module compartment cover removing 64 replacing 65 memory module compartment, identifying 10 memory test 75 microphone (audio-in) jack 8, 38 monitor, connecting 43 mouse, external connecting 56 setting preferences 56 multimedia components, identifying 37 multimedia software installing 40 using 40 mute button 39 mute hotkey...
... battery 6 caps lock 4 drive 6 power 6 webcam 9 wireless 6 local area network (LAN) cable required 26 connecting cable 26 low battery level 19 M Main menu 74 managing a power-on password 48 managing an administrator password 47 memory module inserting 64 removing 64 memory module compartment cover removing 64 replacing 65 memory module compartment, identifying 10 memory test 75 microphone (audio-in) jack 8, 38 monitor, connecting 43 mouse, external connecting 56 setting preferences 56 multimedia components, identifying 37 multimedia software installing 40 using 40 mute button 39 mute hotkey...
HP Mini User Guide - Windows XP
Page 86
... HP Mobile Broadband Module serial number 12 regulatory label 12 wireless 12 release latches battery 9, 18 restoring default settings 73 right TouchPad button, identifying 4 RJ-45 (network) jack, identifying 7 S screen brightness hotkeys 58 screen image, switching 58 security cable slot, identifying 7 Security menu 74 security, cable slot 7 security, wireless 30 selecting in Setup Utility 72 serial number, computer 11 service tag 11 setup of WLAN 30 Setup Utility, passwords set in 46 setup, computer 3 shut down 24 SIM inserting 33 removing 34 software installing 40 multimedia 40 Windows Media...
... HP Mobile Broadband Module serial number 12 regulatory label 12 wireless 12 release latches battery 9, 18 restoring default settings 73 right TouchPad button, identifying 4 RJ-45 (network) jack, identifying 7 S screen brightness hotkeys 58 screen image, switching 58 security cable slot, identifying 7 Security menu 74 security, cable slot 7 security, wireless 30 selecting in Setup Utility 72 serial number, computer 11 service tag 11 setup of WLAN 30 Setup Utility, passwords set in 46 setup, computer 3 shut down 24 SIM inserting 33 removing 34 software installing 40 multimedia 40 Windows Media...
Mini User Guide - Windows 7
Page 7
... 38 Adjusting the volume ...40 Multimedia software ...41 Using other preinstalled multimedia software 41 Installing multimedia software from the Internet 41 Audio ...42 Connecting external audio devices 42 Checking your audio functions 42 Video ...43 Connecting an external monitor or projector 43 Webcam ...44 6 Security Protecting the computer ...45 Using passwords ...45 Setting passwords in Windows 46 Setting passwords in Setup Utility 46 Administrator password 47 Managing an administrator password 47 Entering an administrator password 47 Power-on password 47 Managing a power-on...
... 38 Adjusting the volume ...40 Multimedia software ...41 Using other preinstalled multimedia software 41 Installing multimedia software from the Internet 41 Audio ...42 Connecting external audio devices 42 Checking your audio functions 42 Video ...43 Connecting an external monitor or projector 43 Webcam ...44 6 Security Protecting the computer ...45 Using passwords ...45 Setting passwords in Windows 46 Setting passwords in Setup Utility 46 Administrator password 47 Managing an administrator password 47 Entering an administrator password 47 Power-on password 47 Managing a power-on...
Mini User Guide - Windows 7
Page 22
... a disc or an external media card. If the computer is in the Sleep state or in any type of the following ways: ● Briefly slide the power switch. ● If the display is set at the factory: Sleep and Hibernation. You can be changed using Power Options in the Sleep state, the computer initiates Hibernation. Your work is initiated, the power light blinks and the screen clears. CAUTION: To prevent possible audio and video degradation...
... a disc or an external media card. If the computer is in the Sleep state or in any type of the following ways: ● Briefly slide the power switch. ● If the display is set at the factory: Sleep and Hibernation. You can be changed using Power Options in the Sleep state, the computer initiates Hibernation. Your work is initiated, the power light blinks and the screen clears. CAUTION: To prevent possible audio and video degradation...
Mini User Guide - Windows 7
Page 33
Select Start > Control Panel > System and Security > Power Options. 2. Click Save changes. You can use the computer while the battery is recharging, but the battery will charge faster if the computer is fully recharged. Click Change advanced power settings. 5. Reenter the setting that you are not using them. ● Stop, disable, or remove any external media cards that you recorded for On battery. 7. If the computer is fully charged and the battery light has turned off...
Select Start > Control Panel > System and Security > Power Options. 2. Click Save changes. You can use the computer while the battery is recharging, but the battery will charge faster if the computer is fully recharged. Click Change advanced power settings. 5. Reenter the setting that you are not using them. ● Stop, disable, or remove any external media cards that you recorded for On battery. 7. If the computer is fully charged and the battery light has turned off...
Mini User Guide - Windows 7
Page 34
Refer to a USB port ● When the computer will be unused and disconnected from external power and remove the battery. 24 Chapter 3 Power management Shutting down the computer CAUTION: Unsaved information will be checked every 6 months. Save your work and close all open programs. 2. Click Shut down the computer under any of in Hibernation, you are connecting an external hardware device that does not connect to...
Refer to a USB port ● When the computer will be unused and disconnected from external power and remove the battery. 24 Chapter 3 Power management Shutting down the computer CAUTION: Unsaved information will be checked every 6 months. Save your work and close all open programs. 2. Click Shut down the computer under any of in Hibernation, you are connecting an external hardware device that does not connect to...

Mini User Guide - Windows 7
Page 55
... security features provided by the Windows operating system and the non-Windows Setup Utility can protect your information. NOTE: Before you want to control access to secure your computer for service, remove all password settings. Computer risk Security feature Unauthorized use the following features: ● Passwords ● Firewall software ● Antivirus support (Norton Internet Security) ● Critical security updates NOTE: Security solutions are set, changed, or deleted, it is...
... security features provided by the Windows operating system and the non-Windows Setup Utility can protect your information. NOTE: Before you want to control access to secure your computer for service, remove all password settings. Computer risk Security feature Unauthorized use the following features: ● Passwords ● Firewall software ● Antivirus support (Norton Internet Security) ● Critical security updates NOTE: Security solutions are set, changed, or deleted, it is...

Mini User Guide - Windows 7
Page 66
... Chapter 9 Pointing devices and keyboard Connecting an external mouse You can connect an external USB mouse to go. The icons on an external mouse. To access Mouse Properties, select Start > Devices and Printers. Use the TouchPad buttons like the corresponding buttons on the f1 through f4, and f6, f8, f10, and f11 keys represent the hotkey functions. Hotkey functions and procedures are combinations of the fn key (1) and one of the function keys (2). Using pointing devices Using the TouchPad To move...
... Chapter 9 Pointing devices and keyboard Connecting an external mouse You can connect an external USB mouse to go. The icons on an external mouse. To access Mouse Properties, select Start > Devices and Printers. Use the TouchPad buttons like the corresponding buttons on the f1 through f4, and f6, f8, f10, and f11 keys represent the hotkey functions. Hotkey functions and procedures are combinations of the fn key (1) and one of the function keys (2). Using pointing devices Using the TouchPad To move...
Mini User Guide - Windows 7
Page 78
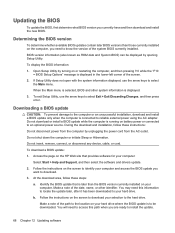
..., remove, connect, or disconnect any device, cable, or cord. Follow the instructions on the computer, you currently have and then download and install the new BIOS. You will need to access this information to locate the update later, after it has been downloaded to your computer: Select Start > Help and Support, and then select the software and drivers update. 2. To display the BIOS information: 1. If Setup Utility does not open with the system information displayed, use...
..., remove, connect, or disconnect any device, cable, or cord. Follow the instructions on the computer, you currently have and then download and install the new BIOS. You will need to access this information to locate the update later, after it has been downloaded to your computer: Select Start > Help and Support, and then select the software and drivers update. 2. To display the BIOS information: 1. If Setup Utility does not open with the system information displayed, use...
Mini User Guide - Windows 7
Page 86
... caps lock light, identifying 4 CD drive 61 changing Setup Utility language 72 charging batteries 17, 20 checking audio functions 42 compartments, memory module 9 components additional hardware 10 bottom 9 display 8 front 5 left-side 7 right-side 7 TouchPad 3 connecting to a WLAN 31 Connection Manager icon 27 connection, external power 15 conservation, power 23 cord, power 11 corporate WLAN connection 31 critical battery level 19 D Diagnostics menu 75 digital card inserting 52 removing 53 Digital Media Slot, identifying 7 diskette drive 61 display image, switching 58 screen brightness hotkeys...
... caps lock light, identifying 4 CD drive 61 changing Setup Utility language 72 charging batteries 17, 20 checking audio functions 42 compartments, memory module 9 components additional hardware 10 bottom 9 display 8 front 5 left-side 7 right-side 7 TouchPad 3 connecting to a WLAN 31 Connection Manager icon 27 connection, external power 15 conservation, power 23 cord, power 11 corporate WLAN connection 31 critical battery level 19 D Diagnostics menu 75 digital card inserting 52 removing 53 Digital Media Slot, identifying 7 diskette drive 61 display image, switching 58 screen brightness hotkeys...
Mini User Guide - Windows 7
Page 87
... enabling 71 Setup Utility 74 internal display switch, identifying 8 internal microphone, identifying 9, 39 Internet connection setup 30 J jacks audio-in (microphone) 8, 39 audio-out (headphone) 8, 39 RJ-45 (network) 7 K keyboard hotkeys, identifying 56 keys fn 5 function 5 Windows applications 5 Windows logo 5 L labels Microsoft Certificate of Authenticity 11 regulatory 11 service tag 11 language support 74 latches, battery release 9 left TouchPad button, identifying 3 lights battery 6 caps lock 4 drive 6 power 6 webcam 9 wireless 6 local area network (LAN) cable required 26 connecting cable...
... enabling 71 Setup Utility 74 internal display switch, identifying 8 internal microphone, identifying 9, 39 Internet connection setup 30 J jacks audio-in (microphone) 8, 39 audio-out (headphone) 8, 39 RJ-45 (network) 7 K keyboard hotkeys, identifying 56 keys fn 5 function 5 Windows applications 5 Windows logo 5 L labels Microsoft Certificate of Authenticity 11 regulatory 11 service tag 11 language support 74 latches, battery release 9 left TouchPad button, identifying 3 lights battery 6 caps lock 4 drive 6 power 6 webcam 9 wireless 6 local area network (LAN) cable required 26 connecting cable...
Mini User Guide - Windows 7
Page 88
... Broadband Module serial number 11 regulatory label 11 wireless 11 release latches battery 9, 17 restoring default settings 73 right TouchPad button, identifying 4 RJ-45 (network) jack, identifying 7 S screen brightness hotkeys 58 screen image, switching 58 security cable slot 7 Security menu 74 security, wireless 30 selecting in Setup Utility 72 serial number, computer 11 service tag 11 setup of WLAN 30 Setup Utility, passwords set in 46 setup, computer 3 shut down 24 SIM inserting 33 removing 34 Sleep exiting 12 initiating 12 Sleep hotkey 57 software HP Connection Manager 28 installing 41...
... Broadband Module serial number 11 regulatory label 11 wireless 11 release latches battery 9, 17 restoring default settings 73 right TouchPad button, identifying 4 RJ-45 (network) jack, identifying 7 S screen brightness hotkeys 58 screen image, switching 58 security cable slot 7 Security menu 74 security, wireless 30 selecting in Setup Utility 72 serial number, computer 11 service tag 11 setup of WLAN 30 Setup Utility, passwords set in 46 setup, computer 3 shut down 24 SIM inserting 33 removing 34 Sleep exiting 12 initiating 12 Sleep hotkey 57 software HP Connection Manager 28 installing 41...


