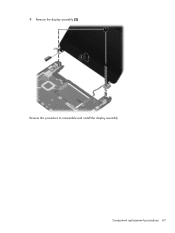
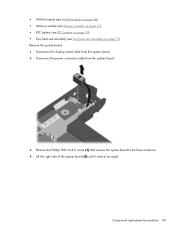
Resolving Start Up and No Boot Problems Checklist
Page 1
...this checklist as a guide when trying to the notebook. Symptom: LED lights do not glow, display is no battery or AC power at the notebook, contact HP for technical assistance. HP Notebook PCs - Reconnect the AC power adapter (do not glow when power button is pressed, there is ...Perform a Hard Reset 1. Connect an external monitor to check display Remove all CD/DVDs, SD cards, USB devices, peripherals and do hard reset If memory or hard drive components were replaced, reinstall original components Remove memory modules and replace one-at least 15 seconds. 3. If there is a device...
Getting Started - Windows 7
Page 6
... upgrading the hard drive 29 Removing the hard drive ...29 Installing a hard drive ...30 Adding or replacing memory modules 31 Updating programs and drivers ...36 Routine care ...36 Cleaning the display ...36 Cleaning the TouchPad and keyboard 36 7 Backup and recovery Recovery discs ...37 Performing a system recovery ...38 Recovering using the dedicated...
Getting Started - Windows 7
Page 50
...customized window, toolbar, and menu bar settings 39 personal files 39 battery bay 11 battery release latches 11 battery, replacing 27 buttons left TouchPad 4 right TouchPad 4 C caps lock light, identifying 5 components bottom 11 display 10 front 7 left-side 9 right-side 8 top 4 connector, power 9 D Digital Media Slot, identifying... AC adapter 9 caps lock 5 drive 9 mute 5 power 8 webcam 10 wireless 5 M memory module inserting 33 removing 32 replacing 31 microphone (audio-in) jack, identifying 9 mouse, external setting preferences 25 mute light, identifying 5 O operating environment 43 44 Index
HP Mini 110 and Compaq Mini CQ10 - Maintenance and Service Guide
Page 7
... ...12 Bottom components ...13 3 Illustrated parts catalog 14 Service tag ...14 Computer major components 15 Display assembly components 22 Mass storage devices ...24 Miscellaneous parts ...25 Sequential part number listing 26 4 Removal and replacement procedures 31 Preliminary replacement requirements 31 Tools required ...31 Service considerations 31 Plastic parts 31 Cables and connectors 32...
HP Mini 110 and Compaq Mini CQ10 - Maintenance and Service Guide
Page 8
...35 Component replacement procedures 36 Service tag ...36 Computer feet ...37 Battery ...38 SIM ...39 Service cover ...40 Hard drive ...41 WWAN module ...43 WLAN module ...46 Memory module ...51 RTC battery ...53 Keyboard ...54 Top cover ...57 Speakers ...60 TouchPad ...62 Display assembly ...64...Starting Setup Utility ...75 Using Setup Utility ...75 Changing the language of Setup Utility 75 Navigating and selecting in Setup Utility 76 Displaying system information 76 Restoring default settings in Setup Utility 76 Exiting Setup Utility ...77 Setup Utility Menus ...77 Main Menu ...77 Security...
HP Mini 110 and Compaq Mini CQ10 - Maintenance and Service Guide
Page 38
... for use only in Greece (includes cable) Speakers (includes cable) RTC battery Fan/heat sink assembly (includes replacement thermal material) Display Hinge Kit (includes left and right display hinges) HP F3307 Pris 850 Mobile Broadband WWAN module HP F3307 Pris 900 Mobile Broadband WWAN module Memory module: 1024-MB (667-MHz, DDR2): Memory module: 2048...
HP Mini 110 and Compaq Mini CQ10 - Maintenance and Service Guide
Page 74
...the front toward you are unsure whether the computer is off or in blue 622559-001 Before removing the display assembly, follow these steps: 1. If you . 64 Chapter 4 Removal and replacement procedures Remove the service cover (see Keyboard on page 38). 5. Remove the keyboard (see Service cover... on page 57). Remove the display assembly: 1. Remove the battery (see WLAN module on , and then shut it down the ...
HP Mini 110 and Compaq Mini CQ10 - Maintenance and Service Guide
Page 75
3. Component replacement procedures 65 Open the computer as far as it will open. 6. Disconnect the display panel cable (1) from the clips built into the base enclosure (2). 4. Turn the computer right-side up, with the front toward you. 5. Release the WLAN antenna cables (1) from the system board.
HP Mini 110 and Compaq Mini CQ10 - Maintenance and Service Guide
Page 76
CAUTION: Support the display assembly when removing the following screws. Failure to support the display assembly can result in damage to the base enclosure. 66 Chapter 4 Removal and replacement procedures Remove the two Phillips PM2.0×4.0 screws (1) that secure the display assembly to the display assembly and other device components. 8. Release the wireless antenna cables (2) from the clip built into the base enclosure. 7.
HP Mini 110 and Compaq Mini CQ10 - Maintenance and Service Guide
Page 77
Remove the display assembly (2). Component replacement procedures 67 Reverse this procedure to reassemble and install the display assembly. 9.
HP Mini 110 and Compaq Mini CQ10 - Maintenance and Service Guide
Page 79
Disconnect the display panel cable from the system board. 3. Disconnect the power connector cable from the system board. 2. Remove the Phillips PM2.0×4.0 screw (1) that secures the system board to the base enclosure. 4. Component replacement procedures 69 Lift the right side of the system board (2) until it rests at an angle. ● WLAN module (see WLAN module on page 46) ● Memory module (see Memory module on page 51) ● RTC battery (see RTC battery on page 53) ● Fan/heat sink assembly (see Fan/heat sink assembly on page 71) Remove the system board: 1.
HP Mini 110 and Compaq Mini CQ10 - Maintenance and Service Guide
Page 83
... page 41). 7. Disconnect the WWAN antenna cables from the WLAN module (see Display assembly on page 46). 9. d. Top cover (see Battery on , and then shut it down the computer. Component replacement procedures 73 Remove the following components: a. NOTE: The power connector bracket is ... 8. Remove the power connector bracket . Disconnect the WLAN antenna cables from the WWAN module (see WWAN module on page 57). Display assembly (see WLAN module on page 64). Disconnect all external devices connected to the base enclosure. 2. Remove the service cover (see...
HP Notebook Reference Guide - Windows 7
Page 6
...Video ...16 VGA ...16 DisplayPort ...17 HDMI ...17 Configuring audio for HDMI 18 Using HP MediaSmart (select models only 19 4 Power management ...20 Shutting down the computer ...20...battery information in Help and Support in Windows 7 24 Using Battery Check in Windows 7 24 Displaying the remaining battery charge 24 Maximizing battery discharge time 24 Managing low battery levels 25 Identifying low ... Conserving battery power 26 Storing a battery ...26 Disposing of a used battery 26 Replacing the battery ...26 Using external AC power ...27 Testing an AC adapter ...28 Switching between graphics modes...
HP Notebook Reference Guide - Windows 7
Page 17
.... Unplug the power cord from more places and over larger areas than it may need the HP Mobile Broadband Module serial number to activate mobile broadband service. Close the display. 3. Replace the battery. When used initially to connect to your computer, or it can by pressing the... power button. CAUTION: When inserting a SIM, position the card to match the icon next to the SIM slot on page 8. NOTE: HP Mobile Broadband is ...
HP Notebook Reference Guide - Windows 7
Page 18
... connected to the Getting Started guide. 1. Unplug the power cord from the slot. 7. Bluetooth and Internet Connection Sharing (ICS) HP does not recommend setting up a personal area network (PAN) of Bluetooth and the Windows operating system. 8 Chapter 2 Networking ... computers to the Internet. 8. Then shut down the computer. Close the display. 3. Remove the battery. 6. Using Bluetooth wireless devices A Bluetooth device provides short-range wireless communications that replace the physical cable connections that traditionally link electronic devices such as a gateway ...
HP Notebook Reference Guide - Windows 7
Page 30
... the computer with the power button, the recommended procedure is to use the preceding shutdown procedures, try the following conditions: ● When you need to replace the battery or access components inside the computer ● When you are connecting an external hardware device that affect any of the procedures are unable... lost when the computer shuts down. Windows 7-Select Start > Shut down command closes all open programs, including the operating system, and then turns off the display and computer.
HP Notebook Reference Guide - Windows 7
Page 34
... is off and unplugged from external power. Computer battery life varies, depending on power management settings, programs running on the computer, display brightness, external devices connected to see if they are functioning properly, and then reports the results of the examination. Using Battery Check... proper care and storage to maximize battery life ● Information on how you use only the battery provided with the computer, a replacement battery provided by HP, or a compatible battery purchased from the computer when it is not being used or charged. ● Store the battery in a...
HP Notebook Reference Guide - Windows 7
Page 37
...the computer box. To reduce potential safety issues, use only the AC adapter provided with the computer, a replacement AC adapter provided by HP, or a compatible AC adapter purchased from HP. Do not charge the computer battery while you are onboard aircraft. ● When charging or calibrating a ... begins to external AC power under any of the following events occur: ● The computer switches to battery power. ● The display brightness is automatically decreased to the Quick Setup poster provided in the notification area changes appearance. Connect the computer to charge. ● ...
HP Notebook Reference Guide - Windows 7
Page 38
Turn on the computer. ● If the power lights turn on obtaining a replacement AC power adapter. Similarly, when you switch from using the highperformance mode to using the power-saving mode to close all programs before switching. While ... switchable graphics and have two modes for processing graphics. It may prompt you to AC power: ● The computer does not turn on. ● The display does not turn on a blank area of the computer, the system does not allow you switch from the computer. 3. When you to switch modes, or...
HP Notebook Reference Guide - Windows 7
Page 72
...bit PC Cards 30 A AC adapter, testing 28 action keys media 14 volume 14 administrator password creating 51 entering 51 managing 51 airport security devices 41 antivirus software, using 52 audio functions, checking 15 B battery conserving power 26 discharging 24 displaying remaining charge 24 disposing 26 low battery levels 25 replacing 26...factory settings, restoring 56 finding more information 1 fingerprint reader locating 53 using 53 firewall software 6, 52 G GPS 9 graphics modes, switching 28 H hard drive external 39 HP ProtectSmart Hard Drive Protection 42 HDMI configuring audio 18 62 Index