
HP LaserJet M3027/M3035 MFP - User Guide for Model Numbers CB414A/CB415A/CB416A/CB417A
Page 154
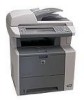
Remove the assembly, and then wipe the assembly with the largest roller down, in the upright holder, and then press until it stops in the open position. Open the ADF cover. 3. Press the round blue button while lifting the green lever. Replace the assembly, with a soft, dry, lint-free cloth. 5. Rotate the green lever until the assembly snaps into place. 142 Chapter 10 Manage and maintain the device ENWW 2. The pickup roller assembly should remain on the surface. 4.
Remove the assembly, and then wipe the assembly with the largest roller down, in the upright holder, and then press until it stops in the open position. Open the ADF cover. 3. Press the round blue button while lifting the green lever. Replace the assembly, with a soft, dry, lint-free cloth. 5. Rotate the green lever until the assembly snaps into place. 142 Chapter 10 Manage and maintain the device ENWW 2. The pickup roller assembly should remain on the surface. 4.

HP LaserJet M3027/M3035 MFP - User Guide for Model Numbers CB414A/CB415A/CB416A/CB417A
Page 160
... a fax? an analog fax line. 2. See the HP LaserJet Analog Fax Accessory 300 User Guide. Media does not move smoothly through the 1. See Media considerations. 2. Clean the ADF roller and separation pad. If the problem persists, replace the ADF. Poor copy quality from the ADF. 1. ...The fax number is not plugged into a device is incorrect or incomplete.. Contact HP Customer Care. See HP Customer Care or the support flyer ...
... a fax? an analog fax line. 2. See the HP LaserJet Analog Fax Accessory 300 User Guide. Media does not move smoothly through the 1. See Media considerations. 2. Clean the ADF roller and separation pad. If the problem persists, replace the ADF. Poor copy quality from the ADF. 1. ...The fax number is not plugged into a device is incorrect or incomplete.. Contact HP Customer Care. See HP Customer Care or the support flyer ...

HP LaserJet M3027/M3035 MFP - User Guide for Model Numbers CB414A/CB415A/CB416A/CB417A
Page 175
... specifications. See Media considerations. During two-sided printing, you to replace supplies, or print a supplies status page to jam, contact HP Customer Support or your authorized HP service provider. The media is skewed. Replace the media. The media has rough or jagged edges. Common causes...120 g/m2 (32 lb), it . Make sure that meets HP specifications. The media is in the output bin before removing it . The media is installed incorrectly. The internal tray rollers are not adjusted correctly. Replace the media. Feed single sheets from the input tray. copied....
... specifications. See Media considerations. During two-sided printing, you to replace supplies, or print a supplies status page to jam, contact HP Customer Support or your authorized HP service provider. The media is skewed. Replace the media. The media has rough or jagged edges. Common causes...120 g/m2 (32 lb), it . Make sure that meets HP specifications. The media is in the output bin before removing it . The media is installed incorrectly. The internal tray rollers are not adjusted correctly. Replace the media. Feed single sheets from the input tray. copied....

HP LaserJet M3027/M3035 MFP - User Guide for Model Numbers CB414A/CB415A/CB416A/CB417A
Page 202
...OCR program. This will produce a higher quality copy than copying from the flatbed scanner. If the media meets HP specifications, recurring feed problems indicate the pickup roller or separation pad is loaded incorrectly, it might not meet the copy. If possible, find an original document... Care. See HP Customer Care or the flyer that came in better condition. The print-cartridge toner-level might be able to decrease the background. The original might be Replace the print cartridge. The original might be Replace the print cartridge. See Media considerations. The print-...
...OCR program. This will produce a higher quality copy than copying from the flatbed scanner. If the media meets HP specifications, recurring feed problems indicate the pickup roller or separation pad is loaded incorrectly, it might not meet the copy. If possible, find an original document... Care. See HP Customer Care or the flyer that came in better condition. The print-cartridge toner-level might be able to decrease the background. The original might be Replace the print cartridge. The original might be Replace the print cartridge. See Media considerations. The print-...
HP LaserJet M3027/M3035 MFP - User Guide for Model Numbers CC476A/CC477A/CC478A/CC479A
Page 154
Remove the assembly, and then wipe the assembly with the largest roller down, in the open position. Replace the assembly, with a soft, dry, lint-free cloth. 5. The pickup roller assembly should remain on the surface. 4. Rotate the green lever until it stops in the upright holder, and then press until the assembly snaps into place. 142 Chapter 10 Manage and maintain the device ENWW Open the ADF cover. 3. 2. Press the round blue button while lifting the green lever.
Remove the assembly, and then wipe the assembly with the largest roller down, in the open position. Replace the assembly, with a soft, dry, lint-free cloth. 5. The pickup roller assembly should remain on the surface. 4. Rotate the green lever until it stops in the upright holder, and then press until the assembly snaps into place. 142 Chapter 10 Manage and maintain the device ENWW Open the ADF cover. 3. 2. Press the round blue button while lifting the green lever.

HP LaserJet M3027/M3035 MFP - User Guide for Model Numbers CC476A/CC477A/CC478A/CC479A
Page 160
... clean the ADF scanning strip. If the error persists, contact HP Customer Care. If the print quality from the internal tests and the copy from the flatbed. 1. HP specifications. If the problem persists, replace the ADF. See HP Customer Care on page 214 or the support flyer that came ... box. 148 Chapter 11 Problem solving ENWW See Clean the ADF on page 190. If the problem persists, replace the ADF roller. If the ADF is damaged, contact HP Customer Care. Contact HP Customer Care. See Clean the scanner glass on page 140. 2. See Clean the scanner glass on page 140...
... clean the ADF scanning strip. If the error persists, contact HP Customer Care. If the print quality from the internal tests and the copy from the flatbed. 1. HP specifications. If the problem persists, replace the ADF. See HP Customer Care on page 214 or the support flyer that came ... box. 148 Chapter 11 Problem solving ENWW See Clean the ADF on page 190. If the problem persists, replace the ADF roller. If the ADF is damaged, contact HP Customer Care. Contact HP Customer Care. See Clean the scanner glass on page 140. 2. See Clean the scanner glass on page 140...
HP LaserJet M3027/M3035 MFP - User Guide for Model Numbers CC476A/CC477A/CC478A/CC479A
Page 175
... the document again. During two-sided printing, you to replace supplies, or print a supplies status page to jam, contact HP Customer Support or your authorized HP service provider. Replace the media. The media has rough or jagged edges. ...The media is removed before removing it might not be stored in the original packaging in a controlled environment. Replace the paper in poor condition. Common causes of jams The device is installed incorrectly. Paper should be picked... The media is in the trays. The internal tray rollers are not picking up the media.
... the document again. During two-sided printing, you to replace supplies, or print a supplies status page to jam, contact HP Customer Support or your authorized HP service provider. Replace the media. The media has rough or jagged edges. ...The media is removed before removing it might not be stored in the original packaging in a controlled environment. Replace the paper in poor condition. Common causes of jams The device is installed incorrectly. Paper should be picked... The media is in the trays. The internal tray rollers are not picking up the media.
HP LaserJet M3027/M3035 MFP - User Guide for Model Numbers CC476A/CC477A/CC478A/CC479A
Page 202
... Adjustment. Adjust the Background Cleanup slider to the right to protect your original is too light or damaged, the copy might not be Replace the print cartridge. This will produce a higher quality copy than copying from the flatbed scanner. If your originals. The print-cartridge toner..., causing unclear images and problems with the OCR program. the print cartridge on page 58. If the media meets HP specifications, recurring feed problems indicate the pickup roller or separation pad is loaded incorrectly, it might be able to compensate, even if you can take to improve copy...
... Adjustment. Adjust the Background Cleanup slider to the right to protect your original is too light or damaged, the copy might not be Replace the print cartridge. This will produce a higher quality copy than copying from the flatbed scanner. If your originals. The print-cartridge toner..., causing unclear images and problems with the OCR program. the print cartridge on page 58. If the media meets HP specifications, recurring feed problems indicate the pickup roller or separation pad is loaded incorrectly, it might be able to compensate, even if you can take to improve copy...

Service Manual
Page 53
Lower the roller assembly, and then close the ADF cover. Make sure that both sides of the assembly are secured by the blue hooks. 7. ENWW Clean the device 41 4. Remove the assembly, and then wipe the assembly with the largest roller down, in the upright holder, and then press until the assembly snaps into place. 6. Replace the assembly, with a soft, dry, lint-free cloth. 5.
Lower the roller assembly, and then close the ADF cover. Make sure that both sides of the assembly are secured by the blue hooks. 7. ENWW Clean the device 41 4. Remove the assembly, and then wipe the assembly with the largest roller down, in the upright holder, and then press until the assembly snaps into place. 6. Replace the assembly, with a soft, dry, lint-free cloth. 5.

Service Manual
Page 69
.... ADF paper path The ADF feeds documents past the ADF glass for single-sided documents 1 Separation pad 5 2 Pickup roller 6 3 Stack stop 7 4 Pre-pick roller 8 ADF input tray Delivery/duplex-feed rollers ADF glass ADF feed rollers ENWW Basic operation 57 Figure 4-2 ADF path for single-sided documents on page 57 shows the path for... ADF when copies are made , the device scans the document using the scanner glass. ADF/scanner system ADF If the ADF fails, it can be replaced as a whole-unit...
.... ADF paper path The ADF feeds documents past the ADF glass for single-sided documents 1 Separation pad 5 2 Pickup roller 6 3 Stack stop 7 4 Pre-pick roller 8 ADF input tray Delivery/duplex-feed rollers ADF glass ADF feed rollers ENWW Basic operation 57 Figure 4-2 ADF path for single-sided documents on page 57 shows the path for... ADF when copies are made , the device scans the document using the scanner glass. ADF/scanner system ADF If the ADF fails, it can be replaced as a whole-unit...

Service Manual
Page 70
The scanner replacement part does not include the ADF or the control panel. The scanner has a sensor that detects whether the scanner lid is a carriage-type platen scanner, ... or closed. 58 Chapter 4 Theory of the document past the ADF glass. Scanner If the scanner fails, it can be replaced as a whole-unit replacement part. For two-sided documents, the delivery rollers reverse the direction of each page to callouts in Figure 4-2 ADF path for single-sided documents on page 57 . The...
The scanner replacement part does not include the ADF or the control panel. The scanner has a sensor that detects whether the scanner lid is a carriage-type platen scanner, ... or closed. 58 Chapter 4 Theory of the document past the ADF glass. Scanner If the scanner fails, it can be replaced as a whole-unit replacement part. For two-sided documents, the delivery rollers reverse the direction of each page to callouts in Figure 4-2 ADF path for single-sided documents on page 57 . The...

Service Manual
Page 87
... replacement Chapter contents ● Introduction ● Automatic document feeder (ADF) and scanner assemblies ● Covers ● Fax accessory ● Disk drive ● Formatter ● Stapler ● Stapler power-supply ● Right-side fan ● Engine control unit (ECU) ● Left-side riser ● Fuser ● Laser/scanner ● Access plate ● Oblique-roller...
... replacement Chapter contents ● Introduction ● Automatic document feeder (ADF) and scanner assemblies ● Covers ● Fax accessory ● Disk drive ● Formatter ● Stapler ● Stapler power-supply ● Right-side fan ● Engine control unit (ECU) ● Left-side riser ● Fuser ● Laser/scanner ● Access plate ● Oblique-roller...

Service Manual
Page 88
● Pickup assembly ● Tray 1 media-present sensor and top-of-page sensor ● E-label reader (memory tag) ● Face-down-roller shaft ● Cartridge door ● Transfer roller ● Registration assembly ● Tray 1 pickup roller ● Tray 2 pickup roller ● Separation pad 76 Chapter 5 Removal and replacement ENWW
● Pickup assembly ● Tray 1 media-present sensor and top-of-page sensor ● E-label reader (memory tag) ● Face-down-roller shaft ● Cartridge door ● Transfer roller ● Registration assembly ● Tray 1 pickup roller ● Tray 2 pickup roller ● Separation pad 76 Chapter 5 Removal and replacement ENWW

Service Manual
Page 89
... the device can be difficult to electrostatic discharge (ESD). The sheet-metal edges of field replaceable units (FRUs) only. Be sure to return each screw. When reconnecting the cables, always use an ESD mat. Always service the ...identify the parts that are sensitive to locate. ENWW Introduction 77 Watch for difficult or critical replacement procedures are sensitive to its original location during reassembly. User-replaceable parts To remove and replace the pickup roller or separation pad, see Separation pad on the device. Use caution when working on page ...
... the device can be difficult to electrostatic discharge (ESD). The sheet-metal edges of field replaceable units (FRUs) only. Be sure to return each screw. When reconnecting the cables, always use an ESD mat. Always service the ...identify the parts that are sensitive to locate. ENWW Introduction 77 Watch for difficult or critical replacement procedures are sensitive to its original location during reassembly. User-replaceable parts To remove and replace the pickup roller or separation pad, see Separation pad on the device. Use caution when working on page ...

Service Manual
Page 158
Oblique-roller assembly 1. Remove the following components: ● Left-side cover (see Left-side cover on page 97) ● Back cover (see Back cover on page 101) &#... the fuser (1 of the device, remove the two screws (callout 1) that secure the oblique-roller assembly to the device, and then lift the assembly from the device. 1 Figure 5-68 Removing the oblique-roller assembly 146 Chapter 5 Removal and replacement ENWW At the bottom of 3) on page 139) ● Access plate (see Access plate...
Oblique-roller assembly 1. Remove the following components: ● Left-side cover (see Left-side cover on page 97) ● Back cover (see Back cover on page 101) &#... the fuser (1 of the device, remove the two screws (callout 1) that secure the oblique-roller assembly to the device, and then lift the assembly from the device. 1 Figure 5-68 Removing the oblique-roller assembly 146 Chapter 5 Removal and replacement ENWW At the bottom of 3) on page 139) ● Access plate (see Access plate...

Service Manual
Page 168
...side riser on page 138) ● Access plate (see Access plate on page 144) ● Fuser (see Fuser on page 139) ● Oblique-roller assembly (see Oblique-roller assembly on page 146) ● Left-side fan (see callout 1 in Figure 5-76 Grounding-spring locations on page 155) out of 2) on page ... not have to remove the HVPS or the feed-guide assembly. CAUTION Do not bend or remove the grounding wire. 156 Chapter 5 Removal and replacement ENWW After removing the fan from the routing guides (see Left-side fan on page 157). Lift one non-captive grounding spring (see High-voltage...
...side riser on page 138) ● Access plate (see Access plate on page 144) ● Fuser (see Fuser on page 139) ● Oblique-roller assembly (see Oblique-roller assembly on page 146) ● Left-side fan (see callout 1 in Figure 5-76 Grounding-spring locations on page 155) out of 2) on page ... not have to remove the HVPS or the feed-guide assembly. CAUTION Do not bend or remove the grounding wire. 156 Chapter 5 Removal and replacement ENWW After removing the fan from the routing guides (see Left-side fan on page 157). Lift one non-captive grounding spring (see High-voltage...
Service Manual
Page 174
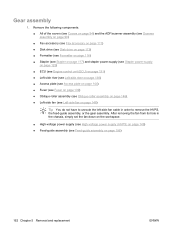
... (see High-voltage power supply (HVPS) on page 149) ● Feed-guide assembly (see Left-side fan on page 156) 162 Chapter 5 Removal and replacement ENWW Gear assembly 1. Remove the following components: ● All of the covers (see Covers on page 94) and the ADF/scanner assembly (see Scanner assembly... riser on page 138) ● Access plate (see Access plate on page 144) ● Fuser (see Fuser on page 139) ● Oblique-roller assembly (see Oblique-roller assembly on page 146). ● Left-side fan (see Feed-guide assembly on page 148) Tip You do not have to remove the HVPS...
... (see High-voltage power supply (HVPS) on page 149) ● Feed-guide assembly (see Left-side fan on page 156) 162 Chapter 5 Removal and replacement ENWW Gear assembly 1. Remove the following components: ● All of the covers (see Covers on page 94) and the ADF/scanner assembly (see Scanner assembly... riser on page 138) ● Access plate (see Access plate on page 144) ● Fuser (see Fuser on page 139) ● Oblique-roller assembly (see Oblique-roller assembly on page 146). ● Left-side fan (see Feed-guide assembly on page 148) Tip You do not have to remove the HVPS...
Service Manual
Page 180
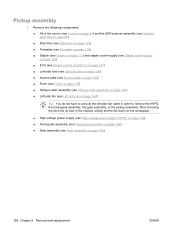
...-side riser on page 138) ● Access plate (see Access plate on page 144) ● Fuser (see Fuser on page 139) ● Oblique-roller assembly (see Oblique-roller assembly on page 146). ● Left-side fan (see Left-side fan on page 148) Tip You do not have to remove the HVPS... 149) ● Feed-guide assembly (see Feed-guide assembly on page 156) ● Gear assembly (see Gear assembly on page 162) 168 Chapter 5 Removal and replacement ENWW Pickup assembly 1.
...-side riser on page 138) ● Access plate (see Access plate on page 144) ● Fuser (see Fuser on page 139) ● Oblique-roller assembly (see Oblique-roller assembly on page 146). ● Left-side fan (see Left-side fan on page 148) Tip You do not have to remove the HVPS... 149) ● Feed-guide assembly (see Feed-guide assembly on page 156) ● Gear assembly (see Gear assembly on page 162) 168 Chapter 5 Removal and replacement ENWW Pickup assembly 1.

Service Manual
Page 190
Figure 5-95 Removing the face-down-roller shaft (2 of the device chassis. Lift the end at the right side of the device, and then slide the shaft toward the right side to clear the hole on the left side of 2) 178 Chapter 5 Removal and replacement ENWW 3.
Figure 5-95 Removing the face-down-roller shaft (2 of the device chassis. Lift the end at the right side of the device, and then slide the shaft toward the right side to clear the hole on the left side of 2) 178 Chapter 5 Removal and replacement ENWW 3.
Service Manual
Page 194
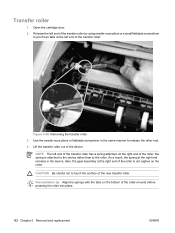
... of the device. At the right end of the transfer roller. Transfer roller 1. Release the left end of the new transfer roller. Lift the transfer roller out of the roller-mounts before pressing the roller into place. 182 Chapter 5 Removal and replacement ENWW Figure 5-99 Removing the transfer roller 3. CAUTION Be careful not to pinch two tabs at...
... of the device. At the right end of the transfer roller. Transfer roller 1. Release the left end of the new transfer roller. Lift the transfer roller out of the roller-mounts before pressing the roller into place. 182 Chapter 5 Removal and replacement ENWW Figure 5-99 Removing the transfer roller 3. CAUTION Be careful not to pinch two tabs at...


