Setup Guide
Page 5
...-type phone systems 9 Dedicated phone line 10 Shared phone line 10 Managing and configuring fax settings 15 Set up speed-dial entries 15 Test fax setup 15 4 Set up Direct Digital Filing for scanning (optional) Required information 16 Step 1: Create and share a folder on the network 17 Step 2: Set up a shortcut...
...-type phone systems 9 Dedicated phone line 10 Shared phone line 10 Managing and configuring fax settings 15 Set up speed-dial entries 15 Test fax setup 15 4 Set up Direct Digital Filing for scanning (optional) Required information 16 Step 1: Create and share a folder on the network 17 Step 2: Set up a shortcut...
Setup Guide
Page 6
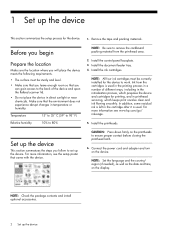
... device. In addition, some residual ink is left in temperature or humidity. For more information, see www.hp.com/go/ inkusage. 5. For more information see the setup poster that the environment does not experience abrupt changes in the cartridge after it is used . Install the ink... device. Install the control-panel faceplate. 3. NOTE: Check the package contents and install optional accessories. 2 Set up the device This section summarizes the setup process for the device to work. Temperature 15° to 35° C (59° to 95° F) Relative humidity 10% to 80...
... device. In addition, some residual ink is left in temperature or humidity. For more information, see www.hp.com/go/ inkusage. 5. For more information see the setup poster that the environment does not experience abrupt changes in the cartridge after it is used . Install the ink... device. Install the control-panel faceplate. 3. NOTE: Check the package contents and install optional accessories. 2 Set up the device This section summarizes the setup process for the device to work. Temperature 15° to 35° C (59° to 95° F) Relative humidity 10% to 80...
Setup Guide
Page 7
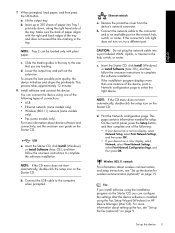
...: Tray 2 can configure fax settings after the device software is installed using the Fax Setup Wizard (Windows) or HP Device Manager (Mac OS). USB a. NOTE: If the CD menu does not start automatically, double-click the setup icon on the Starter CD. b. c. NOTE: If the CD menu does not start... turn on page 9. Fax If you install software using one of the following : • If your device has a two-line display, select Network Setup, select Print Network Settings, and then press OK. • If your device has a color display, select Network, select View Network Settings, select Print...
...: Tray 2 can configure fax settings after the device software is installed using the Fax Setup Wizard (Windows) or HP Device Manager (Mac OS). USB a. NOTE: If the CD menu does not start automatically, double-click the setup icon on the Starter CD. b. c. NOTE: If the CD menu does not start... turn on page 9. Fax If you install software using one of the following : • If your device has a two-line display, select Network Setup, select Print Network Settings, and then press OK. • If your device has a color display, select Network, select View Network Settings, select Print...
Setup Guide
Page 8
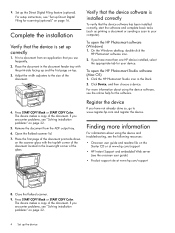
...software. 4. Adjust the width adjusters to the size of the document. Click Device, and then choose a device. Finding more than one HP device installed, select the appropriate tab for scanning (optional)" on page 22. 5. Set up the device Complete the installation Verify ...2. Press START COPY Black or START COPY Color. The device makes a copy of the document. For setup instructions, see "Solving installation problems" on page 16. On the Windows desktop, double-click the HP Photosmart software icon. 2. Click the HP Photosmart Studio icon in the lower-right corner...
...software. 4. Adjust the width adjusters to the size of the document. Click Device, and then choose a device. Finding more than one HP device installed, select the appropriate tab for scanning (optional)" on page 22. 5. Set up the device Complete the installation Verify ...2. Press START COPY Black or START COPY Color. The device makes a copy of the document. For setup instructions, see "Solving installation problems" on page 16. On the Windows desktop, double-click the HP Photosmart software icon. 2. Click the HP Photosmart Studio icon in the lower-right corner...
Setup Guide
Page 11
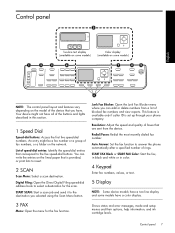
... is provided, or print lists to the destination you have. Your device might be a fax number or a group of rings. An entry might not have a color display. 3 FAX Menu: Open the menu for the scan. Digital Filing: Open the Direct Digital Filing speed-dial address book to answer the phone automatically... after a specified number of fax numbers, or a folder on the network. Shows status and error messages, mode and setup menus and their options, help information, and ink cartridge levels.
... is provided, or print lists to the destination you have. Your device might be a fax number or a group of rings. An entry might not have a color display. 3 FAX Menu: Open the menu for the scan. Digital Filing: Open the Direct Digital Filing speed-dial address book to answer the phone automatically... after a specified number of fax numbers, or a folder on the network. Shows status and error messages, mode and setup menus and their options, help information, and ink cartridge levels.
Setup Guide
Page 12
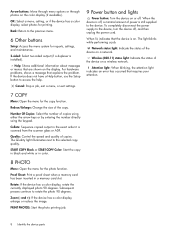
...OK: Select a menu, setting, or if the device has a color display, select photos for the photo function. Back: Return to the device, turn the device off . To completely disconnect the power supply to the previous menu. 6 Other buttons Setup: Access the menu system for the copy function. Number Of Copies... device does not have a Help button, use the Setup button to rotate the photo 90 degrees. Network status light: Indicate the status of power is installed). START COPY Black or START COPY Color: Start the copy in black and white or in color. 8 PHOTO Menu: Open the menu for printing....
...OK: Select a menu, setting, or if the device has a color display, select photos for the photo function. Back: Return to the device, turn the device off . To completely disconnect the power supply to the previous menu. 6 Other buttons Setup: Access the menu system for the copy function. Number Of Copies... device does not have a Help button, use the Setup button to rotate the photo 90 degrees. Network status light: Indicate the status of power is installed). START COPY Black or START COPY Color: Start the copy in black and white or in color. 8 PHOTO Menu: Open the menu for printing....
Setup Guide
Page 13
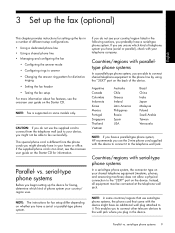
... Configuring rings to answer • Changing the answer ring pattern for distinctive ringing • Setting the fax header • Testing the fax setup For more information about fax features, see the onscreen user guide on the Starter CD for information. Argentina Canada Colombia Indonesia Korea Mexico Portugal Singapore... jack. This enables you to connect other telecom devices to the wall jack where you might have a parallel-type phone system, HP recommends you use the supplied cord to connect from the phone cords you have an additional wall plug attached to it to fax successfully....
... Configuring rings to answer • Changing the answer ring pattern for distinctive ringing • Setting the fax header • Testing the fax setup For more information about fax features, see the onscreen user guide on the Starter CD for information. Argentina Canada Colombia Indonesia Korea Mexico Portugal Singapore... jack. This enables you to connect other telecom devices to the wall jack where you might have a parallel-type phone system, HP recommends you use the supplied cord to connect from the phone cords you have an additional wall plug attached to it to fax successfully....

Setup Guide
Page 15
...Distinctive ring service • Telephone • Answering machine Distinctive ring service Then follow the numbers as they appear in the last row of each fax setup table. To use the tables, follow these steps: ᕡ Determine how you will use the phone line, follow these steps: ᕢ In the... determine how you want to use the phone line that your fax setup might look like in terms of how to connect various devices to the all -in-one . ᕥ In the last row of sequence may result in fax setup problems. Table 3-1 Voice and Fax What devices will be using: &#...
...Distinctive ring service • Telephone • Answering machine Distinctive ring service Then follow the numbers as they appear in the last row of each fax setup table. To use the tables, follow these steps: ᕡ Determine how you will use the phone line, follow these steps: ᕢ In the... determine how you want to use the phone line that your fax setup might look like in terms of how to connect various devices to the all -in-one . ᕥ In the last row of sequence may result in fax setup problems. Table 3-1 Voice and Fax What devices will be using: &#...

Setup Guide
Page 16
... (dial-up Distinctive ring service Splitter Then follow configuration # 2 Splitter 8, 3 8, 3, 9 2 Splitter 8, 1, 7 8, 1, 9, 7 12 Set up Your fax setup should look like this... Your fax setup should look like this ... Dial-up the fax (optional) Dial-up Distinctive ring service Splitter • Telephone • Computer • Modem •...you • Telephone connect to the device? • Modem Is your line... Does your line have ... Your fax setup should look like this ... Table 3-2 Fax and Internet What devices will you • Computer connect to the device? ...
... (dial-up Distinctive ring service Splitter Then follow configuration # 2 Splitter 8, 3 8, 3, 9 2 Splitter 8, 1, 7 8, 1, 9, 7 12 Set up Your fax setup should look like this... Your fax setup should look like this ... Dial-up the fax (optional) Dial-up Distinctive ring service Splitter • Telephone • Computer • Modem •...you • Telephone connect to the device? • Modem Is your line... Does your line have ... Your fax setup should look like this ... Table 3-2 Fax and Internet What devices will you • Computer connect to the device? ...
Setup Guide
Page 19
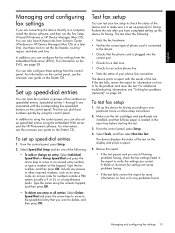
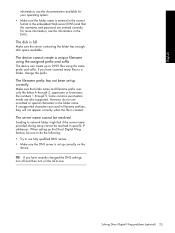
... the onscreen user guide on the EWS, see page 28. In addition to a computer, install the device software, and then run the Fax Setup Wizard (Windows) or HP Device Manager (Mac OS). To set up speed-dial entries using the control panel, you can also configure these settings from the control panel.... Select Speed Dial Setup and do one entry or all entries: Select Delete Speed Dial and press the arrow keys to move to an unused entry...
... the onscreen user guide on the EWS, see page 28. In addition to a computer, install the device software, and then run the Fax Setup Wizard (Windows) or HP Device Manager (Mac OS). To set up speed-dial entries using the control panel, you can also configure these settings from the control panel.... Select Speed Dial Setup and do one entry or all entries: Select Delete Speed Dial and press the arrow keys to move to an unused entry...
Setup Guide
Page 24
... client workstations operating in 802.11 capabilities or an 802.11 wireless card installed. • HP recommends that the device and the computers that only authorized users can access their wireless networks. ... with a high level of WPA security; providing enterprise and consumer Wi-Fi users with one wireless device to an available port on page 23. AES is defined in the 802.11...cipher-block chaining mode (CCM) and supports the Independent Basic Service Set (IBSS) to complete the setup. Press an arrow button to move to encode data. Devices on existing and future Wi-Fi ...
... client workstations operating in 802.11 capabilities or an 802.11 wireless card installed. • HP recommends that the device and the computers that only authorized users can access their wireless networks. ... with a high level of WPA security; providing enterprise and consumer Wi-Fi users with one wireless device to an available port on page 23. AES is defined in the 802.11...cipher-block chaining mode (CCM) and supports the Independent Basic Service Set (IBSS) to complete the setup. Press an arrow button to move to encode data. Devices on existing and future Wi-Fi ...
Setup Guide
Page 25
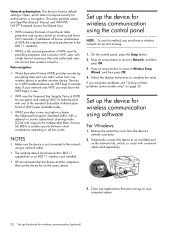
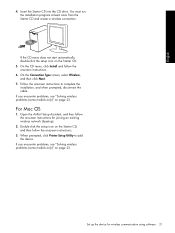
...You must run the installation program at least once from the Starter CD and create a wireless connection. For Mac OS 1. Open the AirPort Setup Assistant, and then follow the onscreen instructions for wireless communication using software 21 On the Connection Type screen, select Wireless, and then click Next.... 7. If the CD menu does not start automatically, double-click the setup icon on page 23. Follow the onscreen instructions to add the device. Double-click the setup icon on page 23. If you encounter problems, see "Solving wireless problems (some models only)"...
...You must run the installation program at least once from the Starter CD and create a wireless connection. For Mac OS 1. Open the AirPort Setup Assistant, and then follow the onscreen instructions for wireless communication using software 21 On the Connection Type screen, select Wireless, and then click Next.... 7. If the CD menu does not start automatically, double-click the setup icon on page 23. Follow the onscreen instructions to add the device. Double-click the setup icon on page 23. If you encounter problems, see "Solving wireless problems (some models only)"...
Setup Guide
Page 27
...(such as administrator, click Properties, click Continue, and then click the Ports tab. 4) Select the TCP/IP port for a home network and one or more information, see "To print the Network configuration page" on page 28), and enter the IP address manually in the installation program. &#... on the Starter CD. Or Right-click the device icon, click Run as a conflict with the network after completing the wireless setup and software installation, perform one for the device's network. • Make sure the device's network settings match those on the device's Network configuration page (see...
...(such as administrator, click Properties, click Continue, and then click the Ports tab. 4) Select the TCP/IP port for a home network and one or more information, see "To print the Network configuration page" on page 28), and enter the IP address manually in the installation program. &#... on the Starter CD. Or Right-click the device icon, click Run as a conflict with the network after completing the wireless setup and software installation, perform one for the device's network. • Make sure the device's network settings match those on the device's Network configuration page (see...
Setup Guide
Page 28
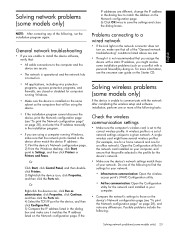
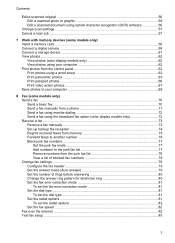
... more 24 Troubleshooting If the wireless network settings are allowed to gain access to the WAP's list of the network. 5. Use the Wireless Setup wizard on the server. If the WAP filters MAC addresses, then the device's MAC address must be incorrect: communication mode, network name (...computer might be associated with another wireless network. See "Add hardware addresses to a wireless access point (WAP)" on page 24. • One of the device. Print the Network configuration page. Add hardware addresses to a wireless access point (WAP) MAC filtering is set up properly and...
... more 24 Troubleshooting If the wireless network settings are allowed to gain access to the WAP's list of the network. 5. Use the Wireless Setup wizard on the server. If the WAP filters MAC addresses, then the device's MAC address must be incorrect: communication mode, network name (...computer might be associated with another wireless network. See "Add hardware addresses to a wireless access point (WAP)" on page 24. • One of the device. Print the Network configuration page. Add hardware addresses to a wireless access point (WAP) MAC filtering is set up properly and...
Setup Guide
Page 29
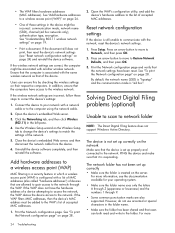
...the username and password are also supported. The server name cannot be resolved Sending to network folder might fail if the server name provided during setup cannot be sure to a folder, change the prefix. Solving Direct Digital Filing problems (optional) 25 The disk is created. The device cannot... create a unique filename using the assigned prefix and suffix The device can create up correctly on the all-in-one. Some common punctuation marks are entered correctly. When setting up correctly Make sure the folder name and filename prefix uses only the letters A...
...the username and password are also supported. The server name cannot be resolved Sending to network folder might fail if the server name provided during setup cannot be sure to a folder, change the prefix. Solving Direct Digital Filing problems (optional) 25 The disk is created. The device cannot... create a unique filename using the assigned prefix and suffix The device can create up correctly on the all-in-one. Some common punctuation marks are entered correctly. When setting up correctly Make sure the folder name and filename prefix uses only the letters A...

Setup Guide
Page 31
... with the device: • Check that the answering machine is working properly. • Make sure your setup looks like the second example in Table 3-1 on page 11. • Make sure the device is set...you might already have a computer dial-up modem on the same phone line with the device, connect one at the end of rings than the answering machine. • Disconnect the answering machine and then try...test to send the fax. The device is causing problems. Try adding them back one end to ). Make sure your setup looks like the first example in the box with the device, check to make...
... with the device: • Check that the answering machine is working properly. • Make sure your setup looks like the second example in Table 3-1 on page 11. • Make sure the device is set...you might already have a computer dial-up modem on the same phone line with the device, connect one at the end of rings than the answering machine. • Disconnect the answering machine and then try...test to send the fax. The device is causing problems. Try adding them back one end to ). Make sure your setup looks like the first example in the box with the device, check to make...
Setup Guide
Page 32
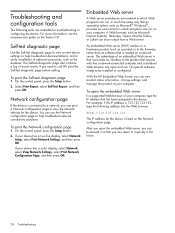
...a Network configuration page to the device. You can open the embedded Web server In a supported Web browser on your computer. With the HP Embedded Web Server, you can return to it provides an interface to the product that anyone who has a network-connected computer and a ...standard Web browser can use . On the control panel, press the Setup button. 2. If your device has a color display, select Network, select View Network Settings, select Print Network Configuration Page, and then press OK. If your device has ...
...a Network configuration page to the device. You can open the embedded Web server In a supported Web browser on your computer. With the HP Embedded Web Server, you can return to it provides an interface to the product that anyone who has a network-connected computer and a ...standard Web browser can use . On the control panel, press the Setup button. 2. If your device has a color display, select Network, select View Network Settings, select Print Network Configuration Page, and then press OK. If your device has ...
User Guide
Page 7
...) Insert a memory card ...58 Connect a digital camera ...59 Connect a storage device ...61 View photos ...62 View photos (color display models only 62 View photos using your computer 62 Print photos from the control panel 62 Print photos using a proof sheet ... Send a fax manually from a phone 71 Send a fax using monitor dialing 72 Send a fax using the broadcast fax option (color display models only 73 Receive a fax ...73 Receive a fax manually ...73 Set up backup fax reception 74 Reprint received faxes from... 82 Set the fax speed ...82 Fax over the Internet ...82 Test fax setup ...83 3
...) Insert a memory card ...58 Connect a digital camera ...59 Connect a storage device ...61 View photos ...62 View photos (color display models only 62 View photos using your computer 62 Print photos from the control panel 62 Print photos using a proof sheet ... Send a fax manually from a phone 71 Send a fax using monitor dialing 72 Send a fax using the broadcast fax option (color display models only 73 Receive a fax ...73 Receive a fax manually ...73 Set up backup fax reception 74 Reprint received faxes from... 82 Set the fax speed ...82 Fax over the Internet ...82 Test fax setup ...83 3
User Guide
Page 8
... (Windows) ...91 To open the Toolbox 91 Toolbox tabs ...92 HP Printer Utility (Mac OS 93 To open the HP Printer Utility 93 HP Printer Utility panels 93 Network Printer Setup Utility (Mac OS 94 HP Web Jetadmin software 94 HP Instant Support ...94 Security and privacy 95 To gain access to... HP Instant Support 95 myPrintMileage ...95 Understand the self-test diagnostic ...
... (Windows) ...91 To open the Toolbox 91 Toolbox tabs ...92 HP Printer Utility (Mac OS 93 To open the HP Printer Utility 93 HP Printer Utility panels 93 Network Printer Setup Utility (Mac OS 94 HP Web Jetadmin software 94 HP Instant Support ...94 Security and privacy 95 To gain access to... HP Instant Support 95 myPrintMileage ...95 Understand the self-test diagnostic ...
User Guide
Page 9
... modem and answering machine .........118 Case K: Shared voice/fax line with computer dial-up modem and voice mail ...........122 Serial-type fax setup ...124 Configure the device (Windows 125 Direct connection ...125 To install the software before connecting the device (recommended 125 To connect the... (some models only 129 Understand 802.11 wireless network settings 130 To set up wireless communication using the control panel with wireless setup wizard ...131 To set up wireless communication using the installer (Windows 132 To set up wireless communication using SecureEasySetup (SES 133 ...
... modem and answering machine .........118 Case K: Shared voice/fax line with computer dial-up modem and voice mail ...........122 Serial-type fax setup ...124 Configure the device (Windows 125 Direct connection ...125 To install the software before connecting the device (recommended 125 To connect the... (some models only 129 Understand 802.11 wireless network settings 130 To set up wireless communication using the control panel with wireless setup wizard ...131 To set up wireless communication using the installer (Windows 132 To set up wireless communication using SecureEasySetup (SES 133 ...


