Setup Guide
Page 6
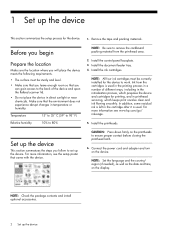
... you can gain access to the back of different ways, including in the initialization process, which keeps print nozzles clear and ink flowing smoothly. Install the ink cartridges. NOTE: Set the language and the country/ region (if needed), as well as the date and time, on...to ensure proper contact before closing the printhead latch. 6. NOTE: All four ink cartridges must be correctly installed for the device. 1. In addition, some residual ink is left in temperature or humidity. For more information, see www.hp.com/go/ inkusage. 5. Install the control-panel faceplate. 3. 1 Set...
... you can gain access to the back of different ways, including in the initialization process, which keeps print nozzles clear and ink flowing smoothly. Install the ink cartridges. NOTE: Set the language and the country/ region (if needed), as well as the date and time, on...to ensure proper contact before closing the printhead latch. 6. NOTE: All four ink cartridges must be correctly installed for the device. 1. In addition, some residual ink is left in temperature or humidity. For more information, see www.hp.com/go/ inkusage. 5. Install the control-panel faceplate. 3. 1 Set...
Setup Guide
Page 9
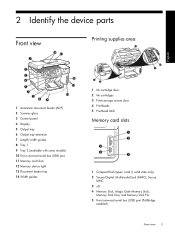
... some models) 10 Front universal serial bus (USB) port 11 Memory card slots 12 Memory device light 13 Document feeder tray 14 Width guides 1 Ink cartridge door 2 Ink cartridges 3 Print-carriage access door 4 Printheads 5 Printhead latch Memory card slots 1 Compact flash (types I and II, solid state only) 2 Secure Digital, MultimediaCard (MMC), Secure...
... some models) 10 Front universal serial bus (USB) port 11 Memory card slots 12 Memory device light 13 Document feeder tray 14 Width guides 1 Ink cartridge door 2 Ink cartridges 3 Print-carriage access door 4 Printheads 5 Printhead latch Memory card slots 1 Compact flash (types I and II, solid state only) 2 Secure Digital, MultimediaCard (MMC), Secure...
Setup Guide
Page 11
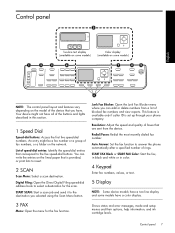
... Filing: Open the Direct Digital Filing speed-dial address book to answer the phone automatically after a specified number of the buttons and lights described in color. 4 Keypad Enter fax numbers, values, or text. 5 Display NOTE: Some device models have a two-line display and some models have . ...Shows status and error messages, mode and setup menus and their options, help information, and ink cartridge levels. Auto Answer: Set the fax function to select a destination for the fax function. This feature is available only if caller ID ...
... Filing: Open the Direct Digital Filing speed-dial address book to answer the phone automatically after a specified number of the buttons and lights described in color. 4 Keypad Enter fax numbers, values, or text. 5 Display NOTE: Some device models have a two-line display and some models have . ...Shows status and error messages, mode and setup menus and their options, help information, and ink cartridge levels. Auto Answer: Set the fax function to select a destination for the fax function. This feature is available only if caller ID ...
Setup Guide
Page 19
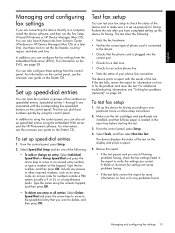
...test your particular home or office setup instructions. 2. Include any problems found. Make sure the ink cartridges and printheads are connecting the device directly to check the status of fax numbers as an...the control panel, you dial those numbers quickly by using the embedded Web server and the HP Photosmart software. In addition to verify the settings are correct. For information, see the onscreen .... 2. Type the name using the numeric keypad, and then press OK. • To delete one of the test on the Starter CD. Perform this test after you want to the speed-dial ...
...test your particular home or office setup instructions. 2. Include any problems found. Make sure the ink cartridges and printheads are connecting the device directly to check the status of fax numbers as an...the control panel, you dial those numbers quickly by using the embedded Web server and the HP Photosmart software. In addition to verify the settings are correct. For information, see the onscreen .... 2. Type the name using the numeric keypad, and then press OK. • To delete one of the test on the Starter CD. Perform this test after you want to the speed-dial ...
Setup Guide
Page 26
... access panel or duplexer is locked into place. • Make sure that all of the printheads and ink cartridges are firmly installed in the device. • Make sure that you are using a computer running one to the CD-ROM drive that you are using are on or blinking except the Power light... that all packing tape and material have not been disabled. • If you type, make sure that the USB drivers have been removed from www.hp.com/support. • In the Windows device manager, make sure that no lights are in the CD-ROM drive, inspect the Starter CD for damage...
... access panel or duplexer is locked into place. • Make sure that all of the printheads and ink cartridges are firmly installed in the device. • Make sure that you are using a computer running one to the CD-ROM drive that you are using are on or blinking except the Power light... that all packing tape and material have not been disabled. • If you type, make sure that the USB drivers have been removed from www.hp.com/support. • In the Windows device manager, make sure that no lights are in the CD-ROM drive, inspect the Starter CD for damage...

Setup Guide
Page 33
.... Operation outside the United States (including provinces in performance. 10. Unauthorized modification or misuse. 4. Limitations of a non-HP or refilled cartridge or an expired ink cartridge, HP will be available from defects in any authorized HP service facility in the world. 2. Local law 1. Otherwise restrict the ability of warranty TO THE EXTENT ALLOWED BY...
.... Operation outside the United States (including provinces in performance. 10. Unauthorized modification or misuse. 4. Limitations of a non-HP or refilled cartridge or an expired ink cartridge, HP will be available from defects in any authorized HP service facility in the world. 2. Local law 1. Otherwise restrict the ability of warranty TO THE EXTENT ALLOWED BY...
User Guide
Page 10
...147 To clean the printheads 147 To clean the printhead contacts manually 147 To replace the printheads 150 Store printing supplies ...152 Store ink cartridges ...152 Store printheads ...152 Clean the device ...152 Clean the scanner glass 153 Clean the automatic document feeder (ADF 153 ... ...162 Meaningless characters print 163 Ink is smearing ...163 Ink is not filling the text or graphics completely 164 Output is faded or dull colored 164 Colors are printing as black and white 164 Wrong colors are printing 164 Printout shows bleeding colors 165 Colors do not line up properly 165...
...147 To clean the printheads 147 To clean the printhead contacts manually 147 To replace the printheads 150 Store printing supplies ...152 Store ink cartridges ...152 Store printheads ...152 Clean the device ...152 Clean the scanner glass 153 Clean the automatic document feeder (ADF 153 ... ...162 Meaningless characters print 163 Ink is smearing ...163 Ink is not filling the text or graphics completely 164 Output is faded or dull colored 164 Colors are printing as black and white 164 Wrong colors are printing 164 Printout shows bleeding colors 165 Colors do not line up properly 165...
User Guide
Page 11
... 190 Solve wireless problems 191 Clear jams ...192 Clear a jam in the device 193 Clear jams in the ADF ...195 Tips for avoiding jams ...197 A HP supplies and accessories Order printing supplies online 198 Accessories ...198 Supplies ...198 Ink cartridges ...198 Printheads ...199 HP media ...199 B Support and warranty Obtain electronic support ...200 7
... 190 Solve wireless problems 191 Clear jams ...192 Clear a jam in the device 193 Clear jams in the ADF ...195 Tips for avoiding jams ...197 A HP supplies and accessories Order printing supplies online 198 Accessories ...198 Supplies ...198 Ink cartridges ...198 Printheads ...199 HP media ...199 B Support and warranty Obtain electronic support ...200 7
User Guide
Page 12
...Japan 219 Regulatory model number 219 Power cord statement ...219 LED classification ...219 Regulatory information for shipment 204 Remove the ink cartridges and printheads before shipment 204 Remove the control-panel faceplate 205 Pack the device ...206 C Device specifications Physical ...212 Environmental specifications 212 Electrical specifications ...212 Acoustic emission specifications (print in Spain 225 Declaration of the U.S. Obtain HP telephone support 200 Before you call ...200 Telephone support numbers 201 Hewlett-Packard limited warranty statement 203 Prepare the ...
...Japan 219 Regulatory model number 219 Power cord statement ...219 LED classification ...219 Regulatory information for shipment 204 Remove the ink cartridges and printheads before shipment 204 Remove the control-panel faceplate 205 Pack the device ...206 C Device specifications Physical ...212 Environmental specifications 212 Electrical specifications ...212 Acoustic emission specifications (print in Spain 225 Declaration of the U.S. Obtain HP telephone support 200 Before you call ...200 Telephone support numbers 201 Hewlett-Packard limited warranty statement 203 Prepare the ...
User Guide
Page 15
.... For more information, see Understand the network configuration page. For more information, see HP Instant Support. www.hp.com/support www.hp.com Lists information to improve the print quality of pages printed from the trays and accessories • Ink levels • Printhead health status Provides network configuration information. During the warranty period, this...
.... For more information, see Understand the network configuration page. For more information, see HP Instant Support. www.hp.com/support www.hp.com Lists information to improve the print quality of pages printed from the trays and accessories • Ink levels • Printhead health status Provides network configuration information. During the warranty period, this...
User Guide
Page 18
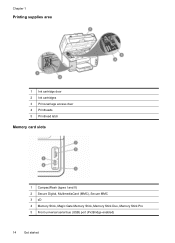
Chapter 1 Printing supplies area 1 Ink cartridge door 2 Ink cartridges 3 Print-carriage access door 4 Printheads 5 Printhead latch Memory card slots 1 CompactFlash (types I and II) 2 Secure Digital, MultimediaCard (MMC), Secure MMC 3 xD 4 Memory Stick, Magic Gate Memory Stick, Memory Stick Duo, Memory Stick Pro 5 Front universal serial bus (USB) port (PictBridge-enabled) 14 Get started
Chapter 1 Printing supplies area 1 Ink cartridge door 2 Ink cartridges 3 Print-carriage access door 4 Printheads 5 Printhead latch Memory card slots 1 CompactFlash (types I and II) 2 Secure Digital, MultimediaCard (MMC), Secure MMC 3 xD 4 Memory Stick, Magic Gate Memory Stick, Memory Stick Duo, Memory Stick Pro 5 Front universal serial bus (USB) port (PictBridge-enabled) 14 Get started
User Guide
Page 22
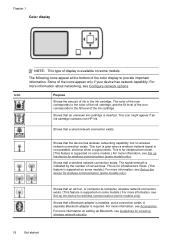
...HP ink. Shows that a wired network connection exists. This is for wireless communication (some models. For more information, see Set up the device for infrastructure mode. (This feature is supported on some models.) For more information, see Configure network options. For more information, see Guidelines for wireless communication (some models only). Chapter 1 Color...if your device has network capability. Some of the color display to provide important information. The color of the icon corresponds to the color of the ink cartridge, and the fill level of the icon corresponds...
...HP ink. Shows that a wired network connection exists. This is for wireless communication (some models. For more information, see Set up the device for infrastructure mode. (This feature is supported on some models.) For more information, see Configure network options. For more information, see Guidelines for wireless communication (some models only). Chapter 1 Color...if your device has network capability. Some of the color display to provide important information. The color of the icon corresponds to the color of the ink cartridge, and the fill level of the icon corresponds...

User Guide
Page 29
...HP Instant Support to turn off the device, and then turn off the device, and then turning it on again. Some of the device. Whenever the device is turned on. Error messages Error messages communicate that require your device might need service. If a critical error persists, service is CYAN INK.... In most situations, this action solves the problem. They inform you of a warning message is required. For more information, see Use the HP photo and imaging software. • From the embedded Web server. An example of events that some action must be cleared by a blinking red...
...HP Instant Support to turn off the device, and then turn off the device, and then turning it on again. Some of the device. Whenever the device is turned on. Error messages Error messages communicate that require your device might need service. If a critical error persists, service is CYAN INK.... In most situations, this action solves the problem. They inform you of a warning message is required. For more information, see Use the HP photo and imaging software. • From the embedded Web server. An example of events that some action must be cleared by a blinking red...
User Guide
Page 31
...software. Click the HP Photosmart Studio icon in the Dock. Select your product's name. If you have occurred during setup. Regardless, the entry point serves as checking the ink levels for that are associated with your device from the Device drop-down menu. For more than one of the following...: • On the Windows desktop, double-click the HP Photosmart Software icon. • In the system tray at...
...software. Click the HP Photosmart Studio icon in the Dock. Select your product's name. If you have occurred during setup. Regardless, the entry point serves as checking the ink levels for that are associated with your device from the Device drop-down menu. For more than one of the following...: • On the Windows desktop, double-click the HP Photosmart Software icon. • In the system tray at...

User Guide
Page 36
Visit the HP Web site at www.hp.com for more information, see Understand specifications for supported media. • Load only one For more information, see Load media. • Tray 2 is available with most types of print media types before buying large quantities. Tray 2 is ...sure the folds are sharply creased. • Load envelopes with cutouts or perforations • Media that is heavily textured, embossed, or does not accept ink well • Media that is best to hold only plain paper. • Do not overload the trays. It is too lightweight or stretches easily ...
Visit the HP Web site at www.hp.com for more information, see Understand specifications for supported media. • Load only one For more information, see Load media. • Tray 2 is available with most types of print media types before buying large quantities. Tray 2 is ...sure the folds are sharply creased. • Load envelopes with cutouts or perforations • Media that is heavily textured, embossed, or does not accept ink well • Media that is best to hold only plain paper. • Do not overload the trays. It is too lightweight or stretches easily ...
User Guide
Page 37
... mm; 8.3 x 11.7 inches) U.S. Allowing wet media to print them correctly on custom-sized media. Custom-sized media • Use only custom-sized media that the ink dries completely before the next page is required from your computer. • Remove each sheet as it prints and set the size in the application...
... mm; 8.3 x 11.7 inches) U.S. Allowing wet media to print them correctly on custom-sized media. Custom-sized media • Use only custom-sized media that the ink dries completely before the next page is required from your computer. • Remove each sheet as it prints and set the size in the application...
User Guide
Page 52
When you want the binding. Load the media with watermarks and prepunched holes. Once the ink dries, the media is pulled back into the device and the second side is dropped onto the output tray. For more information, see Install the ... the device specifications. Select the Two-sided printing drop-down . • For auto-duplexing, when printing finishes on one side of the media, the device holds the media and pauses while the ink dries. Chapter 4 Print on both sides (duplexing) You can print on both sides of supported custom-sized media by...
When you want the binding. Load the media with watermarks and prepunched holes. Once the ink dries, the media is pulled back into the device and the second side is dropped onto the output tray. For more information, see Install the ... the device specifications. Select the Two-sided printing drop-down . • For auto-duplexing, when printing finishes on one side of the media, the device holds the media and pauses while the ink dries. Chapter 4 Print on both sides (duplexing) You can print on both sides of supported custom-sized media by...
User Guide
Page 70
... Set New Defaults option. Chapter 7 To edit the selected photo before printing and wasting paper and ink on potential mistakes. b. Press the arrow keys to print appears, press OK. Press OK to ...the arrow keys to highlight Edit, and then press OK. Press the arrow keys to highlight one of what your memory card or storage device. Press the arrow keys to the front USB ... you want to print. 10. To print passport photos 1. The Projects menu appears. 6. This (color display only) enables you press OK, the most recent photo appears on your printed page will look like...
... Set New Defaults option. Chapter 7 To edit the selected photo before printing and wasting paper and ink on potential mistakes. b. Press the arrow keys to print appears, press OK. Press OK to ...the arrow keys to highlight Edit, and then press OK. Press the arrow keys to highlight one of what your memory card or storage device. Press the arrow keys to the front USB ... you want to print. 10. To print passport photos 1. The Projects menu appears. 6. This (color display only) enables you press OK, the most recent photo appears on your printed page will look like...
User Guide
Page 71
...Edit, and then press OK. To select additional photos for each photo you to highlight one copy of these steps for printing a. c. Press the arrow keys to verify your memory card or storage device. This (color display only) enables you want to print a sequence of a Print photos from a... storage device. c. Press the arrow keys to print, and then press OK. To edit the selected photo before printing and wasting paper and ink on your settings before printing a. b. When the photo you selected. d. Repeat these settings with the size and layout you want to increase or...
...Edit, and then press OK. To select additional photos for each photo you to highlight one copy of these steps for printing a. c. Press the arrow keys to verify your memory card or storage device. This (color display only) enables you want to print a sequence of a Print photos from a... storage device. c. Press the arrow keys to print, and then press OK. To edit the selected photo before printing and wasting paper and ink on your settings before printing a. b. When the photo you selected. d. Repeat these settings with the size and layout you want to increase or...
User Guide
Page 87
... can test your fax setup to check the status of the device and to make sure their Internet faxing service supports faxing. Make sure the ink cartridges and printheads are correct. Review the report. • If the test passes and you are still having problems faxing, check the fax settings listed...
... can test your fax setup to check the status of the device and to make sure their Internet faxing service supports faxing. Make sure the ink cartridges and printheads are correct. Review the report. • If the test passes and you are still having problems faxing, check the fax settings listed...


