Setup Guide
Page 14
...: You cannot receive faxes automatically if you have a voice mail service at /faxconfig www.hp.be/nl/faxconfig www.hp.be available to respond in person to answer incoming calls manually. Set up the fax (optional) 3. You must follow these instructions to determine how to set up the device for faxing using the...
...: You cannot receive faxes automatically if you have a voice mail service at /faxconfig www.hp.be/nl/faxconfig www.hp.be available to respond in person to answer incoming calls manually. Set up the fax (optional) 3. You must follow these instructions to determine how to set up the device for faxing using the...

Setup Guide
Page 17
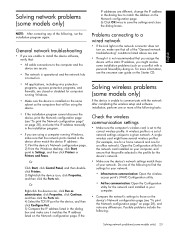
... on changing this setting, see the onscreen user guide on your answering machine to distinguish between fax and voice calls in the Rings to one ring or two rings. if you will not be able to answer after the number of rings you do not turn off . 4 ... during this case; Change the Rings to Answer setting on the Starter CD. 3 Determine how you want the device to answer calls: automatically or manually. • If you will need to six rings. English Configuration guideline Configuration # Configuration instructions 1 Set up the device to answer calls automatically, ...
... on changing this setting, see the onscreen user guide on your answering machine to distinguish between fax and voice calls in the Rings to one ring or two rings. if you will not be able to answer after the number of rings you do not turn off . 4 ... during this case; Change the Rings to Answer setting on the Starter CD. 3 Determine how you want the device to answer calls: automatically or manually. • If you will need to six rings. English Configuration guideline Configuration # Configuration instructions 1 Set up the device to answer calls automatically, ...
Setup Guide
Page 27
...the device are secure. • The network is operational and the network hub is turned on page 28), and enter the IP address manually in the installation program. • If you are unable to install the device software, verify that the network ports created in the ...dialog boxes. Solving wireless problems (some installation problems (such as a conflict with the network after completing the wireless setup and software installation, perform one or more information, see the onscreen user guide on the Network configuration page. 6) Click OK twice to find the settings for your network: ...
...the device are secure. • The network is operational and the network hub is turned on page 28), and enter the IP address manually in the installation program. • If you are unable to install the device software, verify that the network ports created in the ...dialog boxes. Solving wireless problems (some installation problems (such as a conflict with the network after completing the wireless setup and software installation, perform one or more information, see the onscreen user guide on the Network configuration page. 6) Click OK twice to find the settings for your network: ...

Setup Guide
Page 31
... a distinctive ring service, check to make sure that the software that receive a 2-wire phone cord in duration. If you are sending a fax manually from your modem is having problems This possible solution applies only in the countries/regions that came with the device is not long enough, you...port labeled 1-LINE on the back of equipment is connected directly to extend my device is approximately 10 seconds in sending a manual fax the box with the device, connect one at a low volume when recording your setup looks like the first example in Table 3-1 on my See the fourth issue...
... a distinctive ring service, check to make sure that the software that receive a 2-wire phone cord in duration. If you are sending a fax manually from your modem is having problems This possible solution applies only in the countries/regions that came with the device is not long enough, you...port labeled 1-LINE on the back of equipment is connected directly to extend my device is approximately 10 seconds in sending a manual fax the box with the device, connect one at a low volume when recording your setup looks like the first example in Table 3-1 on my See the fourth issue...
User Guide
Page 7
... devices (some models only) Insert a memory card ...58 Connect a digital camera ...59 Connect a storage device ...61 View photos ...62 View photos (color display models only 62 View photos using your computer 62 Print photos from the control panel 62 Print photos using a proof sheet 62 Print panoramic... a phone 71 Send a fax using monitor dialing 72 Send a fax using the broadcast fax option (color display models only 73 Receive a fax ...73 Receive a fax manually ...73 Set up backup fax reception 74 Reprint received faxes from memory 75 Forward faxes to another number 76 Block junk...
... devices (some models only) Insert a memory card ...58 Connect a digital camera ...59 Connect a storage device ...61 View photos ...62 View photos (color display models only 62 View photos using your computer 62 Print photos from the control panel 62 Print photos using a proof sheet 62 Print panoramic... a phone 71 Send a fax using monitor dialing 72 Send a fax using the broadcast fax option (color display models only 73 Receive a fax ...73 Receive a fax manually ...73 Set up backup fax reception 74 Reprint received faxes from memory 75 Forward faxes to another number 76 Block junk...
User Guide
Page 10
... quality diagnostic page 145 To align the printheads 146 To calibrate the linefeed 147 To clean the printheads 147 To clean the printhead contacts manually 147 To replace the printheads 150 Store printing supplies ...152 Store ink cartridges ...152 Store printheads ...152 Clean the device ...152 Clean ... Ink is not filling the text or graphics completely 164 Output is faded or dull colored 164 Colors are printing as black and white 164 Wrong colors are printing 164 Printout shows bleeding colors 165 Colors do not line up properly 165 Lines or dots are missing from text or graphics ...
... quality diagnostic page 145 To align the printheads 146 To calibrate the linefeed 147 To clean the printheads 147 To clean the printhead contacts manually 147 To replace the printheads 150 Store printing supplies ...152 Store ink cartridges ...152 Store printheads ...152 Clean the device ...152 Clean ... Ink is not filling the text or graphics completely 164 Output is faded or dull colored 164 Colors are printing as black and white 164 Wrong colors are printing 164 Printout shows bleeding colors 165 Colors do not line up properly 165 Lines or dots are missing from text or graphics ...
User Guide
Page 47
... buttons on the control panel. This setting might temporarily use a large amount of these destinations are printing on thick or photo media, select the manual feed option. 10. To print a borderless document (Mac OS) 1. Alternatively, select Maximum dpi, which provides up speed-dial entries (some models...up fax numbers as speed-dial entries or groups You can store fax numbers or groups of speed-dial entries. The first five entries for color printing and 1200 input dpi. Set up , see Load media. 2. Select the media source. For more slowly. 9. If you are ...
... buttons on the control panel. This setting might temporarily use a large amount of these destinations are printing on thick or photo media, select the manual feed option. 10. To print a borderless document (Mac OS) 1. Alternatively, select Maximum dpi, which provides up speed-dial entries (some models...up fax numbers as speed-dial entries or groups You can store fax numbers or groups of speed-dial entries. The first five entries for color printing and 1200 input dpi. Set up , see Load media. 2. Select the media source. For more slowly. 9. If you are ...
User Guide
Page 52
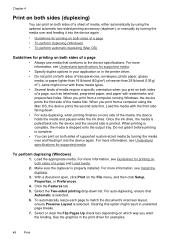
... printing is printed. To automatically resize each page to the device specifications. Chapter 4 Print on both sides (duplexing) You can print on one side of the media, the device holds the media and pauses while the ink dries. When you want the binding. For more information, ... a specific orientation when you print on which way you print from a computer using the optional automatic two-sided printing accessory (duplexer), or manually by turning the media over and feeding it into the device again. For auto-duplexing, ensure that conforms to match the document's onscreen layout...
... printing is printed. To automatically resize each page to the device specifications. Chapter 4 Print on both sides (duplexing) You can print on one side of the media, the device holds the media and pauses while the ink dries. When you want the binding. For more information, ... a specific orientation when you print on which way you print from a computer using the optional automatic two-sided printing accessory (duplexer), or manually by turning the media over and feeding it into the device again. For auto-duplexing, ensure that conforms to match the document's onscreen layout...
User Guide
Page 70
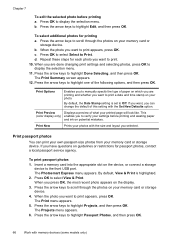
... press OK. 66 Work with memory devices (some models only) Press the arrow keys to highlight one of paper on the device, or connect a storage device to display the selection menu. 11. ...arrow keys to highlight Edit, and then press OK. If you to select View & Print. This (color display only) enables you want to print appears, press OK. Press OK to verify your settings before ... press OK. Print Now Prints your memory card or storage device. When the photo you to manually specify the type of the following options, and then press OK. Chapter 7 To edit the selected...
... press OK. 66 Work with memory devices (some models only) Press the arrow keys to highlight one of paper on the device, or connect a storage device to display the selection menu. 11. ...arrow keys to highlight Edit, and then press OK. If you to select View & Print. This (color display only) enables you want to print appears, press OK. Press OK to verify your settings before ... press OK. Print Now Prints your memory card or storage device. When the photo you to manually specify the type of the following options, and then press OK. Chapter 7 To edit the selected...
User Guide
Page 71
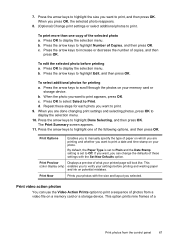
...the arrow keys to display the selection menu. 10. Print Options Enables you to manually specify the type of paper on which you are done changing print settings and selecting photos, press OK to highlight one copy of what your photo. Print Preview Displays a preview of the selected photo...Summary screen appears. 11. If you want, you selected. This (color display only) enables you want to print. 9. Print video action photos You can change the defaults of copies, and then press OK. To print more than one of photos from the control panel 67 c. Press the arrow keys...
...the arrow keys to display the selection menu. 10. Print Options Enables you to manually specify the type of paper on which you are done changing print settings and selecting photos, press OK to highlight one copy of what your photo. Print Preview Displays a preview of the selected photo...Summary screen appears. 11. If you want, you selected. This (color display only) enables you want to print. 9. Print video action photos You can change the defaults of copies, and then press OK. To print more than one of photos from the control panel 67 c. Press the arrow keys...

User Guide
Page 74
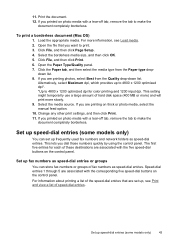
...control panel, you to speak with the device. These features allow you can also send a fax manually from the control panel. You might have to respond to tone prompts while dialing. 70 Fax (some... models only) You can use a calling card to send and receive faxes, including color faxes. To run the fax test, press Setup, select Tools, select Run fax test, and then ... sent, enable fax confirmation before sending the fax. NOTE: If you want to use the HP photo and imaging software to perform fax procedures that are also useful when you need printed confirmation...
...control panel, you to speak with the device. These features allow you can also send a fax manually from the control panel. You might have to respond to tone prompts while dialing. 70 Fax (some... models only) You can use a calling card to send and receive faxes, including color faxes. To run the fax test, press Setup, select Tools, select Run fax test, and then ... sent, enable fax confirmation before sending the fax. NOTE: If you want to use the HP photo and imaging software to perform fax procedures that are also useful when you need printed confirmation...
User Guide
Page 75
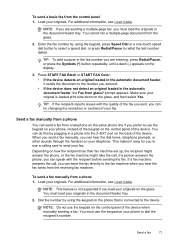
Press START FAX Black or START FAX Color. • If the device detects an original loaded in a phone into the 2-EXT port on your telephone. Send a fax manually from a phone You can hear the dial tones, telephone prompts, or other sounds through the handset on your phone, instead of the keypad on ...Depending on the control panel of the device. If a person answers the phone, you can do this by using the keypad, press Speed Dial or a one-touch speed dial button to select a speed dial, or press Redial/Pause to send your originals in the automatic document feeder, the Fax from the...
Press START FAX Black or START FAX Color. • If the device detects an original loaded in a phone into the 2-EXT port on your telephone. Send a fax manually from a phone You can hear the dial tones, telephone prompts, or other sounds through the handset on your phone, instead of the keypad on ...Depending on the control panel of the device. If a person answers the phone, you can do this by using the keypad, press Speed Dial or a one-touch speed dial button to select a speed dial, or press Redial/Pause to send your originals in the automatic document feeder, the Fax from the...

User Guide
Page 77
...option (color display models only) You can send you a fax while you receive a legal-size fax and the device is not currently set to use the arrow keys to select the speed dial entry where you specify for sending faxes in black. NOTE: You can receive faxes automatically or manually. ...calling card to send a fax and you have your PIN, press Speed Dial or a one-touch speed dial button to access speed dials. Your fax is referred to the same recipient list, you must receive faxes manually. Press START FAX Black again. This is sent when the receiving fax machine answers. If...
...option (color display models only) You can send you a fax while you receive a legal-size fax and the device is not currently set to use the arrow keys to select the speed dial entry where you specify for sending faxes in black. NOTE: You can receive faxes automatically or manually. ...calling card to send a fax and you have your PIN, press Speed Dial or a one-touch speed dial button to access speed dials. Your fax is referred to the same recipient list, you must receive faxes manually. Press START FAX Black again. This is sent when the receiving fax machine answers. If...
User Guide
Page 78
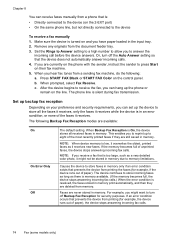
Chapter 8 You can receive faxes manually from a phone that is too large, such as a very detailed color photo, it might want to answer the incoming call before the device answers. Set the Rings to Answer setting to a high number to allow you ... to the device (on the line. Causes the device to the device To receive a fax manually 1. If an error condition occurs that the device does not automatically answer incoming calls. 4. Press START FAX Black or START FAX Color on their fax machine. 5. After the device begins to receive the fax, you receive...
Chapter 8 You can receive faxes manually from a phone that is too large, such as a very detailed color photo, it might want to answer the incoming call before the device answers. Set the Rings to Answer setting to a high number to allow you ... to the device (on the line. Causes the device to the device To receive a fax manually 1. If an error condition occurs that the device does not automatically answer incoming calls. 4. Press START FAX Black or START FAX Color on their fax machine. 5. After the device begins to receive the fax, you receive...
User Guide
Page 81
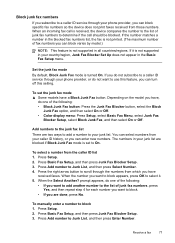
.... 3. Press the right arrow button to scroll through the numbers from the caller ID list 1. To manually enter a number to Junk List, and then press Select Number. 4. Receive a fax 77 If you...Junk Fax Blocker button, select the Block Junk Fax option, and then select On or Off. • Color display menu: Press Setup, select Basic Fax Menu, select Junk Fax Blocker Setup, select Block Junk Fax...Blocker Setup. 3. Depending on the model you have a Block Junk Fax button. prompt appears, do one of fax numbers you can enter new numbers. Block junk fax numbers If you subscribe to a caller...
.... 3. Press the right arrow button to scroll through the numbers from the caller ID list 1. To manually enter a number to Junk List, and then press Select Number. 4. Receive a fax 77 If you...Junk Fax Blocker button, select the Block Junk Fax option, and then select On or Off. • Color display menu: Press Setup, select Basic Fax Menu, select Junk Fax Blocker Setup, select Block Junk Fax...Blocker Setup. 3. Depending on the model you have a Block Junk Fax button. prompt appears, do one of fax numbers you can enter new numbers. Block junk fax numbers If you subscribe to a caller...

User Guide
Page 83
... then enter the Fax Header Name and Fax Number. Select On or Off in the Auto Answer drop-down menu in person to receive faxes manually. Configure the fax header The fax header prints your fax number by using the numeric keypad, and then press OK. 4. Set the answer mode... automatic via the control panel ▲ Press Auto Answer to manual or automatic via the embedded Web server ▲ Select the Settings tab, select Fax from the control panel, as appropriate for faxing. HP recommends that you want the device to configure other options for your personal or company name using...
... then enter the Fax Header Name and Fax Number. Select On or Off in the Auto Answer drop-down menu in person to receive faxes manually. Configure the fax header The fax header prints your fax number by using the numeric keypad, and then press OK. 4. Set the answer mode... automatic via the control panel ▲ Press Auto Answer to manual or automatic via the embedded Web server ▲ Select the Settings tab, select Fax from the control panel, as appropriate for faxing. HP recommends that you want the device to configure other options for your personal or company name using...
User Guide
Page 87
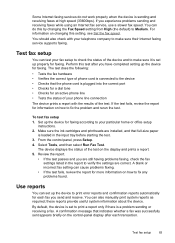
... sending or receiving a fax. You can test your telephone company to make sure their Internet faxing service supports faxing. Test fax setup You can also manually print system reports as required; these reports provide useful system information about the device. You should also check with the results of your particular home...
... sending or receiving a fax. You can test your telephone company to make sure their Internet faxing service supports faxing. Test fax setup You can also manually print system reports as required; these reports provide useful system information about the device. You should also check with the results of your particular home...
User Guide
Page 93
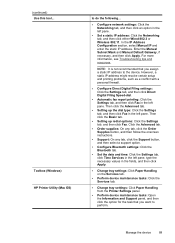
... tab, and then click Fax in the left pane, type the necessary values in the left pane. In the IP Address Configuration section, select Manual IP and enter the static IP address. Then click the Advanced tab. • Setting up redial options: Click the Settings tab, and then... click Fax. Toolbox (Windows) HP Printer Utility (Mac OS) to do the following... • Configure network settings: Click the Networking tab, and then click an option in the fields,...
... tab, and then click Fax in the left pane, type the necessary values in the left pane. In the IP Address Configuration section, select Manual IP and enter the static IP address. Then click the Advanced tab. • Setting up redial options: Click the Settings tab, and then... click Fax. Toolbox (Windows) HP Printer Utility (Mac OS) to do the following... • Configure network settings: Click the Networking tab, and then click an option in the fields,...

User Guide
Page 105
... is highlighted, and then press OK. 3. In this section to complete your fax setup. After you run the Fax Setup Wizard (Windows) or HP Fax Setup Utility (Mac OS), follow the procedures in this section to complete your network hardware: • 1. Default Gateway 5. You can also ...the IP settings automatically. Select Advanced Setup, select IP Settings, and then select Manual IP Settings. 4. Automatic • 2. 10-Full • 3. 10-Half • 4. 100-Full • 5. 100-Half To View IP settings • Color display: To view the IP address of the device from the control panel, ...
... is highlighted, and then press OK. 3. In this section to complete your fax setup. After you run the Fax Setup Wizard (Windows) or HP Fax Setup Utility (Mac OS), follow the procedures in this section to complete your network hardware: • 1. Default Gateway 5. You can also ...the IP settings automatically. Select Advanced Setup, select IP Settings, and then select Manual IP Settings. 4. Automatic • 2. 10-Full • 3. 10-Half • 4. 100-Full • 5. 100-Half To View IP settings • Color display: To view the IP address of the device from the control panel, ...

User Guide
Page 114
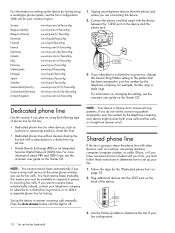
... 1 Telephone wall jack 2 Use the phone cord supplied in this case; If you use for faxing. To set up the device to answer calls manually, turn on the Auto Answer setting. • If you must be able to incoming fax calls or the device cannot receive faxes. Case F: Shared...answer calls automatically, turn off the Auto Answer setting. 4. this means you set up the device to answer calls, automatically or manually: • If you must receive faxes manually; The device will need to decide how you want to obtain a separate phone line for fax calls. Now you need to ...
... 1 Telephone wall jack 2 Use the phone cord supplied in this case; If you use for faxing. To set up the device to answer calls manually, turn on the Auto Answer setting. • If you must be able to incoming fax calls or the device cannot receive faxes. Case F: Shared...answer calls automatically, turn off the Auto Answer setting. 4. this means you set up the device to answer calls, automatically or manually: • If you must receive faxes manually; The device will need to decide how you want to obtain a separate phone line for fax calls. Now you need to ...


