
HP Jetdirect External Print Server Products - External USB Compatibility
Page 1
... is not upgradeable and it does not support Hi-Speed USB. This white paper addresses those questions and provides a list of printers and the HP Jetdirect External Print Server Products. Current Support Strategy HP currently has four external USB products on a network. This print server has ... but is used almost exclusively for an external print server to support on the Corporate Price List (CPL). whitepaper HP Jetdirect External USB Compatibility May 2009 Introduction There have been some printers have changed regarding external print servers and printers they connect to.
... is not upgradeable and it does not support Hi-Speed USB. This white paper addresses those questions and provides a list of printers and the HP Jetdirect External Print Server Products. Current Support Strategy HP currently has four external USB products on a network. This print server has ... but is used almost exclusively for an external print server to support on the Corporate Price List (CPL). whitepaper HP Jetdirect External USB Compatibility May 2009 Introduction There have been some printers have changed regarding external print servers and printers they connect to.
Setup Guide
Page 7
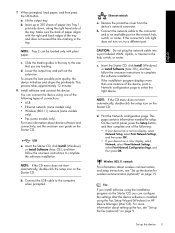
... 8. You can configure fax settings after the device software is installed using one of paper aligns with plain paper. For more than one of the following types of the tray and does not exceed the line marking... Network Setup, select Print Network Settings, and then press OK. • If your device has a color display, select Network, select View Network Settings, select Print Network Configuration Page, and then press OK.... English Fax If you can connect the device using the Fax Setup Wizard (Windows) or HP Device Manager (Mac OS). Slide the media guides in the tray to 250 sheets of ...
... 8. You can configure fax settings after the device software is installed using one of paper aligns with plain paper. For more than one of the following types of the tray and does not exceed the line marking... Network Setup, select Print Network Settings, and then press OK. • If your device has a color display, select Network, select View Network Settings, select Print Network Configuration Page, and then press OK.... English Fax If you can connect the device using the Fax Setup Wizard (Windows) or HP Device Manager (Mac OS). Slide the media guides in the tray to 250 sheets of ...
Setup Guide
Page 11
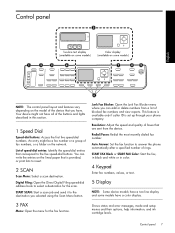
.... Junk Fax Blocker: Open the Junk Fax Blocker menu where you can write the entries on the lined paper that is set up through your phone company. START FAX Black or START FAX Color: Start the fax, in black and white or in this section. 1 Speed Dial Speed-dial buttons: Access ... device that you selected using the Scan Menu button. Digital Filing: Open the Direct Digital Filing speed-dial address book to the destination you have a color display. 3 FAX Menu: Open the menu for the scan. Redial/Pause: Redial the most recently dialed fax number. Control panel English NOTE: The control ...
.... Junk Fax Blocker: Open the Junk Fax Blocker menu where you can write the entries on the lined paper that is set up through your phone company. START FAX Black or START FAX Color: Start the fax, in black and white or in this section. 1 Speed Dial Speed-dial buttons: Access ... device that you selected using the Scan Menu button. Digital Filing: Open the Direct Digital Filing speed-dial address book to the destination you have a color display. 3 FAX Menu: Open the menu for the scan. Redial/Pause: Redial the most recently dialed fax number. Control panel English NOTE: The control ...
Setup Guide
Page 19
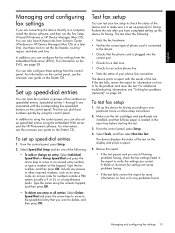
...• To delete one of the following : • Tests the fax hardware • Verifies the correct type of phone cord is connected to using the embedded Web server and the HP Photosmart software. In ... Speed Dial and press the arrow keys to move to the speed-dial entry that full-size paper is set up the device for information on the display and prints a report. 5. Review the...instructions. 2. A blank or incorrect fax setting can configure the fax settings from Solution Center (Windows) or HP Device Manager (Mac OS) at a later time. To test fax setup 1. Select Tools, and then...
...• To delete one of the following : • Tests the fax hardware • Verifies the correct type of phone cord is connected to using the embedded Web server and the HP Photosmart software. In ... Speed Dial and press the arrow keys to move to the speed-dial entry that full-size paper is set up the device for information on the display and prints a report. 5. Review the...instructions. 2. A blank or incorrect fax setting can configure the fax settings from Solution Center (Windows) or HP Device Manager (Mac OS) at a later time. To test fax setup 1. Select Tools, and then...
Setup Guide
Page 26
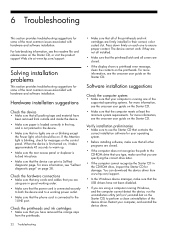
...on the control panel. The device cannot work if they are not all installed. • Make sure that the computer meets at www.hp.com/support. Solving installation problems This section provides troubleshooting suggestions for messages on the Starter CD, or visit the product support Web site ...tape and material have removed the orange caps from outside and inside the device. • Make sure paper is loaded correctly in their correct, colorcoded slot. Press down firmly on each one of the supported operating systems. For more information, see the onscreen user guide on page 28. ...
...on the control panel. The device cannot work if they are not all installed. • Make sure that the computer meets at www.hp.com/support. Solving installation problems This section provides troubleshooting suggestions for messages on the Starter CD, or visit the product support Web site ...tape and material have removed the orange caps from outside and inside the device. • Make sure paper is loaded correctly in their correct, colorcoded slot. Press down firmly on each one of the supported operating systems. For more information, see the onscreen user guide on page 28. ...

User Guide
Page 4
... copyright laws. Read and understand all material mentioning or referencing the derived work. There are set forth in -One. 2. The only warranties for HP products and services are no user-serviceable parts inside. Created 1991. License to copy and use derivative works provided...It is not lawful in many places to reduce risk of its subsidiaries in all warnings and instructions marked on governmental agencies • Paper currency, traveler's checks, or money orders • Certificates of deposit • Copyrighted works Safety information Always follow basic safety precautions...
... copyright laws. Read and understand all material mentioning or referencing the derived work. There are set forth in -One. 2. The only warranties for HP products and services are no user-serviceable parts inside. Created 1991. License to copy and use derivative works provided...It is not lawful in many places to reduce risk of its subsidiaries in all warnings and instructions marked on governmental agencies • Paper currency, traveler's checks, or money orders • Certificates of deposit • Copyrighted works Safety information Always follow basic safety precautions...
User Guide
Page 10
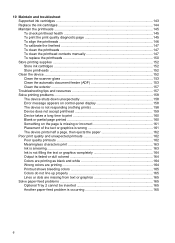
...the page is missing or incorrect 161 Placement of the text or graphics is wrong 161 The device prints half a page, then ejects the paper 162 Poor print quality and unexpected printouts 162 Poor quality printouts ...162 Meaningless characters print 163 Ink is smearing ...163 Ink is not filling ...the text or graphics completely 164 Output is faded or dull colored 164 Colors are printing as black and white 164 Wrong colors are printing 164 Printout shows bleeding colors 165 Colors do not line up properly 165 Lines or dots are missing from text or graphics 165 ...
...the page is missing or incorrect 161 Placement of the text or graphics is wrong 161 The device prints half a page, then ejects the paper 162 Poor print quality and unexpected printouts 162 Poor quality printouts ...162 Meaningless characters print 163 Ink is smearing ...163 Ink is not filling ...the text or graphics completely 164 Output is faded or dull colored 164 Colors are printing as black and white 164 Wrong colors are printing 164 Printout shows bleeding colors 165 Colors do not line up properly 165 Lines or dots are missing from text or graphics 165 ...
User Guide
Page 11
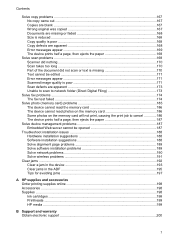
...photos on the memory card will not print, causing the print job to cancel 186 The device prints half a page, then ejects the paper 187 Solve device management problems 187 Embedded Web server cannot be opened 187 Troubleshoot installation issues 188 Hardware installation suggestions 188 Software installation suggestions 188... problems 191 Clear jams ...192 Clear a jam in the device 193 Clear jams in the ADF ...195 Tips for avoiding jams ...197 A HP supplies and accessories Order printing supplies online 198 Accessories ...198 Supplies ...198 Ink cartridges ...198 Printheads ...199...
...photos on the memory card will not print, causing the print job to cancel 186 The device prints half a page, then ejects the paper 187 Solve device management problems 187 Embedded Web server cannot be opened 187 Troubleshoot installation issues 188 Hardware installation suggestions 188 Software installation suggestions 188... problems 191 Clear jams ...192 Clear a jam in the device 193 Clear jams in the ADF ...195 Tips for avoiding jams ...197 A HP supplies and accessories Order printing supplies online 198 Accessories ...198 Supplies ...198 Ink cartridges ...198 Printheads ...199...

User Guide
Page 16
... details about the accessibility of your operating system's accessibility options and features. For users who are color blind, colored buttons and tabs used in -One parts • Front view • Printing supplies area • Memory card slots • ...Back view • Control panel • Connection information 12 Get started Understand the HP All-in the software and on the control panel have simple text or icon labels that convey the appropriate action. The device doors, buttons, paper...
... details about the accessibility of your operating system's accessibility options and features. For users who are color blind, colored buttons and tabs used in -One parts • Front view • Printing supplies area • Memory card slots • ...Back view • Control panel • Connection information 12 Get started Understand the HP All-in the software and on the control panel have simple text or icon labels that convey the appropriate action. The device doors, buttons, paper...

User Guide
Page 25
... removing the unit from the device. 2. Slide the duplexer into the device until the unit locks into place. You can print on either side of paper automatically when the optional automatic two-sided printing accessory (duplexer) is available with some models of the device.
... removing the unit from the device. 2. Slide the duplexer into the device until the unit locks into place. You can print on either side of paper automatically when the optional automatic two-sided printing accessory (duplexer) is available with some models of the device.

User Guide
Page 26
.... To install Tray 2 1. Turn on accessories in the print driver • To turn on accessories on Windows computers • To turn on top of plain paper. Unpack the tray, remove the packing tapes and materials, and move the tray to keep your fingers and hands clear of the bottom of the...
.... To install Tray 2 1. Turn on accessories in the print driver • To turn on accessories on Windows computers • To turn on top of plain paper. Unpack the tray, remove the packing tapes and materials, and move the tray to keep your fingers and hands clear of the bottom of the...
User Guide
Page 34
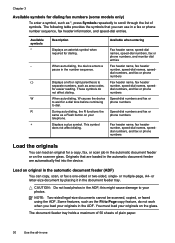
...-dial names, speeddial numbers, and fax or phone numbers Load the originals You can load an original for dialing. CAUTION: Do not load photos in -one -sided or two-sided, single- this might cause damage to dial. The document feeder tray holds a maximum of 50 sheets of symbols. Available symbols * - ( )...as a Flash button on your originals on the scanner glass. Some features, such as *, press Symbols repeatedly to scroll through the list of plain paper. 30 Use the all-in the ADF; You must load your telephone. When auto-dialing, W causes the device to wait for easier reading....
...-dial names, speeddial numbers, and fax or phone numbers Load the originals You can load an original for dialing. CAUTION: Do not load photos in -one -sided or two-sided, single- this might cause damage to dial. The document feeder tray holds a maximum of 50 sheets of symbols. Available symbols * - ( )...as a Flash button on your originals on the scanner glass. Some features, such as *, press Symbols repeatedly to scroll through the list of plain paper. 30 Use the all-in the ADF; You must load your telephone. When auto-dialing, W causes the device to wait for easier reading....

User Guide
Page 36
...Load media. • Tray 2 is best to work well with some models. Tips for supported media. • Load only one For more information about HP media. For more information, see Understand specifications for selecting and using print media For the best results, observe the following media:... jams, poor print quality, and other printing problems, avoid the following guidelines. • Always use media that conforms to hold only plain paper. • Do not overload the trays. Also avoid cards and envelopes with thick, irregular, or curled edges, or areas that are wrinkled...
...Load media. • Tray 2 is best to work well with some models. Tips for supported media. • Load only one For more information about HP media. For more information, see Understand specifications for selecting and using print media For the best results, observe the following media:... jams, poor print quality, and other printing problems, avoid the following guidelines. • Always use media that conforms to hold only plain paper. • Do not overload the trays. Also avoid cards and envelopes with thick, irregular, or curled edges, or areas that are wrinkled...
User Guide
Page 40
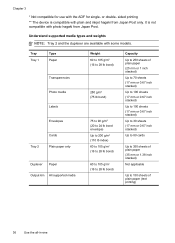
sided printing ** The device is not compatible with plain and inkjet hagaki from Japan Post. Tray Tray 1 Type Paper Transparencies Photo media Labels Envelopes Tray 2 Cards Plain paper only Duplexer Paper Output-bin All supported media Weight 60 to 105 g/m2 (16 to 28 lb bond) 280 g/m2 (75 lb bond) 75 to ...or 0.67 inch stacked) Up to 80 cards Up to 350 sheets of plain paper (35 mm or 1.38 inch stacked) Not applicable Up to 150 sheets of plain paper (text printing) 36 Use the all-in-one Understand supported media types and weights NOTE: Tray 2 and the duplexer are available ...
sided printing ** The device is not compatible with plain and inkjet hagaki from Japan Post. Tray Tray 1 Type Paper Transparencies Photo media Labels Envelopes Tray 2 Cards Plain paper only Duplexer Paper Output-bin All supported media Weight 60 to 105 g/m2 (16 to 28 lb bond) 280 g/m2 (75 lb bond) 75 to ...or 0.67 inch stacked) Up to 80 cards Up to 350 sheets of plain paper (35 mm or 1.38 inch stacked) Not applicable Up to 150 sheets of plain paper (text printing) 36 Use the all-in-one Understand supported media types and weights NOTE: Tray 2 and the duplexer are available ...

User Guide
Page 42
Chapter 3 To load Tray 1 (main tray) 1. Insert the media print-side down along the right of the tray, and does not exceed the line marking in the tray. Make sure the stack of media aligns with the right and back edges of the tray. Slide the media guides in -one NOTE: Do not load paper while the device is printing. 3. Pull out the extension on the output tray. 38 Use the all-in the tray to adjust them for the media size that you have loaded, and then lower the output tray. 4. Lift the output tray. 2.
Chapter 3 To load Tray 1 (main tray) 1. Insert the media print-side down along the right of the tray, and does not exceed the line marking in the tray. Make sure the stack of media aligns with the right and back edges of the tray. Slide the media guides in -one NOTE: Do not load paper while the device is printing. 3. Pull out the extension on the output tray. 38 Use the all-in the tray to adjust them for the media size that you have loaded, and then lower the output tray. 4. Lift the output tray. 2.

User Guide
Page 43
Slide the media guides in the tray. Make sure the stack of the tray, and does not exceed the line marking in the tray to adjust them for the size that you have loaded. NOTE: Tray 2 can be loaded only with the right and back edges of paper aligns with plain paper. 3. Insert the paper print-side down along the right of the tray. 2. To load Tray 2 1. Load media 39 Pull the tray out of the device by grasping under the front of the tray.
Slide the media guides in the tray. Make sure the stack of the tray, and does not exceed the line marking in the tray to adjust them for the size that you have loaded. NOTE: Tray 2 can be loaded only with the right and back edges of paper aligns with plain paper. 3. Insert the paper print-side down along the right of the tray. 2. To load Tray 2 1. Load media 39 Pull the tray out of the device by grasping under the front of the tray.

User Guide
Page 44
...this default behavior by using the following features: • Tray Lock: Use this feature to protect special media such as transparencies or letterhead) and plain paper loaded in the trays. For ordering information, see Load media. • Make sure tray lock is disabled. • Load special media in Tray 1... all -in both trays with the same media, and have the device pick media from one tray if the other one You can use the tray lock and default tray settings, you set to hold only plain paper. Configure trays NOTE: Tray 2 is installed and loaded with some models. NOTE: To...
...this default behavior by using the following features: • Tray Lock: Use this feature to protect special media such as transparencies or letterhead) and plain paper loaded in the trays. For ordering information, see Load media. • Make sure tray lock is disabled. • Load special media in Tray 1... all -in both trays with the same media, and have the device pick media from one tray if the other one You can use the tray lock and default tray settings, you set to hold only plain paper. Configure trays NOTE: Tray 2 is installed and loaded with some models. NOTE: To...

User Guide
Page 45
...Perform one of the following: • Embedded Web server: Click the Settings tab and click Paper Handling in the Type is turned on either the Features or Color tab, and then select Paper Handling. • Toolbox (Windows): Click the Services tab and click Paper Handling. • HP Printer ...Utility (Mac OS): Click Paper Handling from the Source is drop-...
...Perform one of the following: • Embedded Web server: Click the Settings tab and click Paper Handling in the Type is turned on either the Features or Color tab, and then select Paper Handling. • Toolbox (Windows): Click the Services tab and click Paper Handling. • HP Printer ...Utility (Mac OS): Click Paper Handling from the Source is drop-...
User Guide
Page 46
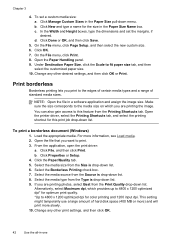
...Open the Paper Handling panel.... in the Paper Size Name box. Open the printer driver, select the Printing Shortcuts tab, and select the printing shortcut for color printing and...and then click Print. If you print to fit paper size tab, and then select the customized paper size. 10. Click New and type a name.... Click the Paper/Quality tab. 5. Change any other print settings, and then click OK. 42 Use the all-in the Paper Size pull-down... media sizes. Select the Borderless Printing check box. 7. Under Destination Paper Size, click the Scale to the edges of certain media types and...
...Open the Paper Handling panel.... in the Paper Size Name box. Open the printer driver, select the Printing Shortcuts tab, and select the printing shortcut for color printing and...and then click Print. If you print to fit paper size tab, and then select the customized paper size. 10. Click New and type a name.... Click the Paper/Quality tab. 5. Change any other print settings, and then click OK. 42 Use the all-in the Paper Size pull-down... media sizes. Select the Borderless Printing check box. 7. Under Destination Paper Size, click the Scale to the edges of certain media types and...
User Guide
Page 47
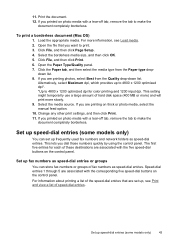
...entries or groups You can set up speed-dial entries (some models only) 43 Click File, and then click Print. 6. The first five entries for color printing and 1200 input dpi. Speed-dial entries 1 through 5 are printing on thick or photo media, select the manual feed option. 10. For ... the tab to 4800 x 1200 optimized dpi for each of fax numbers as speed-dial entries. To print a borderless document (Mac OS) 1. Click the Paper tab, and then select the media type from the Quality drop-down list. 8. Alternatively, select Maximum dpi, which provides up speed-dial entries (some models...
...entries or groups You can set up speed-dial entries (some models only) 43 Click File, and then click Print. 6. The first five entries for color printing and 1200 input dpi. Speed-dial entries 1 through 5 are printing on thick or photo media, select the manual feed option. 10. For ... the tab to 4800 x 1200 optimized dpi for each of fax numbers as speed-dial entries. To print a borderless document (Mac OS) 1. Click the Paper tab, and then select the media type from the Quality drop-down list. 8. Alternatively, select Maximum dpi, which provides up speed-dial entries (some models...


