

L2105tm / 2209t LCD Touch Monitors - User Guide
Page 6
Table of Contents Safety Instructions ...2 Recycling Information ...3 System components and accessories 4 Connection instructions ...5 Installing the display...5 Packaging procedures ...5 Adjusting the viewing angle ...5 Connection instructions...6 Using the display...7 Turning on the display...7 Function controls...7 Installing the Touch Driver (for Windows XP only 8 Control of the Touch Function...10 OSD selection ...11 OSD Menu ...11 Troubleshooting ...13 Production Specifications 14 Preset Modes ...15 Appendix ...16 Connector pin assignment ...16 1
Table of Contents Safety Instructions ...2 Recycling Information ...3 System components and accessories 4 Connection instructions ...5 Installing the display...5 Packaging procedures ...5 Adjusting the viewing angle ...5 Connection instructions...6 Using the display...7 Turning on the display...7 Function controls...7 Installing the Touch Driver (for Windows XP only 8 Control of the Touch Function...10 OSD selection ...11 OSD Menu ...11 Troubleshooting ...13 Production Specifications 14 Preset Modes ...15 Appendix ...16 Connector pin assignment ...16 1
L2105tm / 2209t LCD Touch Monitors - User Guide
Page 13
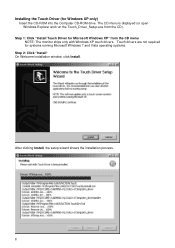
Installing the Touch Driver (for systems running Microsoft Windows 7 and Vista operating systems. Step 2: Click "Install" On Welcome installation window, click Install. Touch drivers are not required for Windows XP only) Insert the CD-ROM into the Computer CD-ROM drive. After clicking Install, the setup wizard shows the installation process. 8 Step 1: Click "Install Touch Driver for Microsoft Windows XP" from the CD). The CD menu is displayed (or open Windows Explorer and run the Touch_Driver_Setup.exe from the CD menu NOTE: The monitor ships only with Windows XP touch drivers.
Installing the Touch Driver (for systems running Microsoft Windows 7 and Vista operating systems. Step 2: Click "Install" On Welcome installation window, click Install. Touch drivers are not required for Windows XP only) Insert the CD-ROM into the Computer CD-ROM drive. After clicking Install, the setup wizard shows the installation process. 8 Step 1: Click "Install Touch Driver for Microsoft Windows XP" from the CD). The CD menu is displayed (or open Windows Explorer and run the Touch_Driver_Setup.exe from the CD menu NOTE: The monitor ships only with Windows XP touch drivers.
L2105tm / 2209t LCD Touch Monitors - User Guide
Page 15
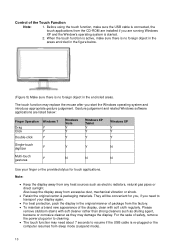
...sources such as they may replace the mouse after you start the Windows operating system and introduce appropriate gesture judgement. Control of the display, clean with soft cleaner rather than strong cleaners such as diluting agent...click Windows 7 Y Y Y Windows Vista Y Y Y Windows XP Tablet Y Y Y Windows XP Y Y Y Single-touch digitizer Y Y Y N Multi-touch gestures Y N N N Use your display again. • For best protection, pack the display in the encircled areas. Gesture judgement and related Windows software applications are running Windows XP and the Window's ...
...sources such as they may replace the mouse after you start the Windows operating system and introduce appropriate gesture judgement. Control of the display, clean with soft cleaner rather than strong cleaners such as diluting agent...click Windows 7 Y Y Y Windows Vista Y Y Y Windows XP Tablet Y Y Y Windows XP Y Y Y Single-touch digitizer Y Y Y N Multi-touch gestures Y N N N Use your display again. • For best protection, pack the display in the encircled areas. Gesture judgement and related Windows software applications are running Windows XP and the Window's ...
L2105tm / 2209t LCD Touch Monitors - User Guide
Page 17
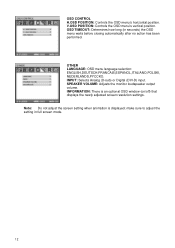
... Adjusts the monitor loudspeaker output volume. Note: Do not adjust the screen setting when animation is an optional OSD window (on/off) that displays the newly adjusted screen resolution settings. OSD CONTROL H.OSD POSITION: Controls the OSD menu's horizontal position. OTHER LANGUAGE:... OSD menu language selection: ENGLISH,DEUTSCH,FRANCAIS,ESPANOL,ITALIANO,POLSKI, NEDERLANDS,PYCCKO. INFORMATION: There is displayed; OSD TIMEOUT: Determines how long (in full screen mode. 12 INPUT: Selects Analog (D-sub) or Digital (DVI-D) input. V.OSD ...
... Adjusts the monitor loudspeaker output volume. Note: Do not adjust the screen setting when animation is an optional OSD window (on/off) that displays the newly adjusted screen resolution settings. OSD CONTROL H.OSD POSITION: Controls the OSD menu's horizontal position. OTHER LANGUAGE:... OSD menu language selection: ENGLISH,DEUTSCH,FRANCAIS,ESPANOL,ITALIANO,POLSKI, NEDERLANDS,PYCCKO. INFORMATION: There is displayed; OSD TIMEOUT: Determines how long (in full screen mode. 12 INPUT: Selects Analog (D-sub) or Digital (DVI-D) input. V.OSD ...
Customization of APR Settings in HP Business Touchscreen Monitors
Page 1
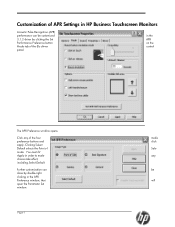
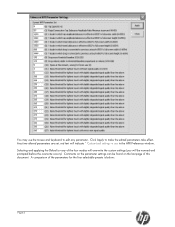
... of the four preference buttons and apply. You must hit Apply in the APR on the control The APR Preference window opens. Further customization can be will Customization of APR Settings in HP Business Touchscreen Monitors Acoustic Pulse Recognition (APR) performance can done by clicking the Set Performance Preference button Mode tab...
... of the four preference buttons and apply. You must hit Apply in the APR on the control The APR Preference window opens. Further customization can be will Customization of APR Settings in HP Business Touchscreen Monitors Acoustic Pulse Recognition (APR) performance can done by clicking the Set Performance Preference button Mode tab...
Customization of APR Settings in HP Business Touchscreen Monitors
Page 2
You may use in the APR Preference window. A comparison of this document. Click Apply to edit any of the four modes will overwrite the custom settings (you will indicate * Customized settings in use the mouse and keyboard to make the edited parameters take effect. Comments on the last page of the parameters for the four selectable presets is below: Page-2 Any time altered parameters are set, red text will be found on the parameter settings can be warned and prompted before the overwrite occurs). Selecting and applying the Default or any parameter.
You may use in the APR Preference window. A comparison of this document. Click Apply to edit any of the four modes will overwrite the custom settings (you will indicate * Customized settings in use the mouse and keyboard to make the edited parameters take effect. Comments on the last page of the parameters for the four selectable presets is below: Page-2 Any time altered parameters are set, red text will be found on the parameter settings can be warned and prompted before the overwrite occurs). Selecting and applying the Default or any parameter.
Customization of APR Settings in HP Business Touchscreen Monitors
Page 3
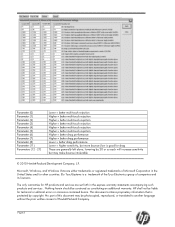
...HP products and services are either trademarks or registered trademarks of this document may make bounce intolerable © 2010 Hewlett-Packard Development Company, L.P. No part of Microsoft Corporation in the express warranty statements accompanying such products and services . Microsoft, Windows, and Windows..., reproduced, or translated to another language without the prior written consent of companies and its licensors. lowering by copyright. HP shall not be liable for drag These are generally left alone; Parameter (0) Parameter (1) Parameter (2) Parameter (3) Parameter (4)...
...HP products and services are either trademarks or registered trademarks of this document may make bounce intolerable © 2010 Hewlett-Packard Development Company, L.P. No part of Microsoft Corporation in the express warranty statements accompanying such products and services . Microsoft, Windows, and Windows..., reproduced, or translated to another language without the prior written consent of companies and its licensors. lowering by copyright. HP shall not be liable for drag These are generally left alone; Parameter (0) Parameter (1) Parameter (2) Parameter (3) Parameter (4)...


