

L2105tm / 2209t LCD Touch Monitors - User Guide
Page 6
Table of Contents Safety Instructions ...2 Recycling Information ...3 System components and accessories 4 Connection instructions ...5 Installing the display...5 Packaging procedures ...5 Adjusting the viewing angle ...5 Connection instructions...6 Using the display...7 Turning on the display...7 Function controls...7 Installing the Touch Driver (for Windows XP only 8 Control of the Touch Function...10 OSD selection ...11 OSD Menu ...11 Troubleshooting ...13 Production Specifications 14 Preset Modes ...15 Appendix ...16 Connector pin assignment ...16 1
Table of Contents Safety Instructions ...2 Recycling Information ...3 System components and accessories 4 Connection instructions ...5 Installing the display...5 Packaging procedures ...5 Adjusting the viewing angle ...5 Connection instructions...6 Using the display...7 Turning on the display...7 Function controls...7 Installing the Touch Driver (for Windows XP only 8 Control of the Touch Function...10 OSD selection ...11 OSD Menu ...11 Troubleshooting ...13 Production Specifications 14 Preset Modes ...15 Appendix ...16 Connector pin assignment ...16 1
L2105tm / 2209t LCD Touch Monitors - User Guide
Page 10
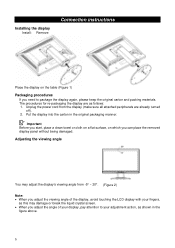
...1) Packaging procedures If you can place the removed display panel without being damaged. Unplug the power cord from -5° ~ 20°. (Figure 2) Note: • When you adjust the viewing angle of the display, avoid touching the LCD display with your fingers, as this may damage or ...break the liquid crystal screen. • When you adjust the angle of your display, pay attention to package the display again, please keep the original carton and...
...1) Packaging procedures If you can place the removed display panel without being damaged. Unplug the power cord from -5° ~ 20°. (Figure 2) Note: • When you adjust the viewing angle of the display, avoid touching the LCD display with your fingers, as this may damage or ...break the liquid crystal screen. • When you adjust the angle of your display, pay attention to package the display again, please keep the original carton and...
L2105tm / 2209t LCD Touch Monitors - User Guide
Page 12
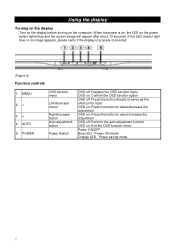
... 7 When the power is properly connected. (Figure 4) Function controls 1 MENU 2 < 3 > 4 AUTO 5 POWER OSD function menu Left/decrease button Right/increase button Auto adjustment button Power Switch OSD off: Displays the OSD function menu OSD on: Confirm the OSD function option OSD off: Press this button directly to serve as the shortcut for...
... 7 When the power is properly connected. (Figure 4) Function controls 1 MENU 2 < 3 > 4 AUTO 5 POWER OSD function menu Left/decrease button Right/increase button Auto adjustment button Power Switch OSD off: Displays the OSD function menu OSD on: Confirm the OSD function option OSD off: Press this button directly to serve as the shortcut for...
L2105tm / 2209t LCD Touch Monitors - User Guide
Page 16
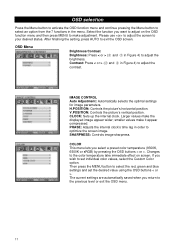
...OSD menu. 11 Larger values make it appear compressed. The current settings are automatically saved when you wish to make adjustment. Please use to adjust the screen to adjust the contrast. Contrast: Press < or > (○2 and ○3 in the menu. After finishing the setting...Figure 4) to your desired status. COLOR This menu lets you want to adjust on screen. IMAGE CONTROL Auto Adjustment: Automatically selects the optimal settings for image parameters. smaller values make the displayed image appear wider; OSD selection Press the Menu button to activate the ...
...OSD menu. 11 Larger values make it appear compressed. The current settings are automatically saved when you wish to make adjustment. Please use to adjust the screen to adjust the contrast. Contrast: Press < or > (○2 and ○3 in the menu. After finishing the setting...Figure 4) to your desired status. COLOR This menu lets you want to adjust on screen. IMAGE CONTROL Auto Adjustment: Automatically selects the optimal settings for image parameters. smaller values make the displayed image appear wider; OSD selection Press the Menu button to activate the ...
L2105tm / 2209t LCD Touch Monitors - User Guide
Page 17
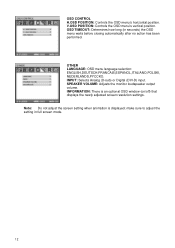
... screen setting when animation is an optional OSD window (on/off) that displays the newly adjusted screen resolution settings. V.OSD POSITION: Controls the OSD menu's vertical position. SPEAKER VOLUME: Adjusts the monitor loudspeaker output volume. make sure to adjust the setting in seconds) the OSD menu waits before closing automatically after no action has... H.OSD POSITION: Controls the OSD menu's horizontal position. OTHER LANGUAGE: OSD menu language selection: ENGLISH,DEUTSCH,FRANCAIS,ESPANOL,ITALIANO,POLSKI, NEDERLANDS,PYCCKO. INFORMATION: There is displayed;
... screen setting when animation is an optional OSD window (on/off) that displays the newly adjusted screen resolution settings. V.OSD POSITION: Controls the OSD menu's vertical position. SPEAKER VOLUME: Adjusts the monitor loudspeaker output volume. make sure to adjust the setting in seconds) the OSD menu waits before closing automatically after no action has... H.OSD POSITION: Controls the OSD menu's horizontal position. OTHER LANGUAGE: OSD menu language selection: ENGLISH,DEUTSCH,FRANCAIS,ESPANOL,ITALIANO,POLSKI, NEDERLANDS,PYCCKO. INFORMATION: There is displayed;

L2105tm / 2209t LCD Touch Monitors - User Guide
Page 18
...ON position • Make sure the power cord is properly connected • Make sure the signal cable is securely connected • When the display is in use, it will automatically turn off to the troubleshooting guidelines, please contact your problem cannot be causing electrical interference. • Check... the signal cable and make sure the pins are not bent. • Press the Auto button to automatically optimize the display status. • Refer to the "Image Control section". Please press any key to see if the image resumes. • Please refer to the...
...ON position • Make sure the power cord is properly connected • Make sure the signal cable is securely connected • When the display is in use, it will automatically turn off to the troubleshooting guidelines, please contact your problem cannot be causing electrical interference. • Check... the signal cable and make sure the pins are not bent. • Press the Auto button to automatically optimize the display status. • Refer to the "Image Control section". Please press any key to see if the image resumes. • Please refer to the...


