
User Manual
Page 6
... pages 30 Toolbox (Windows) ...31 To open the Toolbox 31 Toolbox tabs ...31 HP Printer Utility (Mac OS 32 To open the HP Printer Utility 32 HP Printer Utility panels 32 Network Printer Setup Utility (Mac OS 33 HP Web Jetadmin software 33 HP Instant Support ...34 Security and privacy 34 To gain access to...47 To align the printheads ...48 To calibrate the linefeed 49 To clean the printheads ...49 To clean the printhead contacts manually 49 To replace the printheads 52 Store printing supplies ...54 Store ink cartridges ...54 Store printheads ...54 Troubleshooting tips and resources 54 2
... pages 30 Toolbox (Windows) ...31 To open the Toolbox 31 Toolbox tabs ...31 HP Printer Utility (Mac OS 32 To open the HP Printer Utility 32 HP Printer Utility panels 32 Network Printer Setup Utility (Mac OS 33 HP Web Jetadmin software 33 HP Instant Support ...34 Security and privacy 34 To gain access to...47 To align the printheads ...48 To calibrate the linefeed 49 To clean the printheads ...49 To clean the printhead contacts manually 49 To replace the printheads 52 Store printing supplies ...54 Store ink cartridges ...54 Store printheads ...54 Troubleshooting tips and resources 54 2
User Manual
Page 26
...you print from a computer using the optional automatic two-sided printing accessory (duplexer), or manually by turning the media over and feeding it into the device and the second side ...uninstall and reinstall the software. Load the media with watermarks and prepunched holes. If the HP Solution Center on the devices you print on both sides of a page, such as ... To perform automatic duplexing (Mac OS) Guidelines for supported media. • Specify duplex options in the printer driver. • Do not print on one side of the media first. Jams might have installed. ...
...you print from a computer using the optional automatic two-sided printing accessory (duplexer), or manually by turning the media over and feeding it into the device and the second side ...uninstall and reinstall the software. Load the media with watermarks and prepunched holes. If the HP Solution Center on the devices you print on both sides of a page, such as ... To perform automatic duplexing (Mac OS) Guidelines for supported media. • Specify duplex options in the printer driver. • Do not print on one side of the media first. Jams might have installed. ...
User Manual
Page 30
... print more slowly. 9. It does not affect jobs waiting to 4800 x 1200 optimized dpi for color printing and 1200 input dpi. Select the print job, click Hold, and then click Delete. 26...Select the print job, and then press the Delete key on thick or photo media, select the manual feed option. 10. If you are printing on the keyboard. This setting might temporarily use a ...large amount of the following methods. Mac OS: Double-click the printer in the lower-right corner of the computer screen. Alternatively, select Maximum dpi, which provides up to...
... print more slowly. 9. It does not affect jobs waiting to 4800 x 1200 optimized dpi for color printing and 1200 input dpi. Select the print job, click Hold, and then click Delete. 26...Select the print job, and then press the Delete key on thick or photo media, select the manual feed option. 10. If you are printing on the keyboard. This setting might temporarily use a ...large amount of the following methods. Mac OS: Double-click the printer in the lower-right corner of the computer screen. Alternatively, select Maximum dpi, which provides up to...
User Manual
Page 51
...Toolbox (Windows): Click the Services tab, and then click Print PQ (print quality) diagnostic page and follow the onscreen instructions. • HP Printer Utility (Mac OS): Click Print Quality Diagnostics from modifying the printheads. This section covers the following printhead maintenance tasks: • To check... To align the printheads • To calibrate the linefeed • To clean the printheads • To clean the printhead contacts manually • To replace the printheads To check printhead health Use one or more information, see To replace the printheads. For more ...
...Toolbox (Windows): Click the Services tab, and then click Print PQ (print quality) diagnostic page and follow the onscreen instructions. • HP Printer Utility (Mac OS): Click Print Quality Diagnostics from modifying the printheads. This section covers the following printhead maintenance tasks: • To check... To align the printheads • To calibrate the linefeed • To clean the printheads • To clean the printhead contacts manually • To replace the printheads To check printhead health Use one or more information, see To replace the printheads. For more ...
User Manual
Page 52
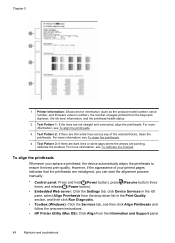
To align the printheads Whenever you can start the alignment process manually. • Control panel: Press and hold (Power button), press (Resume button) three times, and release (Power ...Run Diagnostic. • Toolbox (Windows): Click the Services tab, and then click Align Printheads and follow the onscreen instructions. • HP Printer Utility (Mac OS): Click Align from the trays and duplexer, the ink level information, and the printhead health status. 2 Test Pattern... dark lines or white gaps where the arrows are thin white lines across any of the colored blocks, clean the printheads.
To align the printheads Whenever you can start the alignment process manually. • Control panel: Press and hold (Power button), press (Resume button) three times, and release (Power ...Run Diagnostic. • Toolbox (Windows): Click the Services tab, and then click Align Printheads and follow the onscreen instructions. • HP Printer Utility (Mac OS): Click Align from the trays and duplexer, the ink level information, and the printhead health status. 2 Test Pattern... dark lines or white gaps where the arrows are thin white lines across any of the colored blocks, clean the printheads.

User Manual
Page 53
...Services tab, and then click Calibrate Linefeed and follow the onscreen instructions. • HP Printer Utility (Mac OS): Click Clean from the Information and Support panel. To clean the printhead contacts manually After the printheads are blinking, you might be generated in the process. •...noise might be damaged easily. To calibrate the linefeed If your printout is showing bandings (dark or light lines across colored block) or staggered lines, calibrate the printer's linefeed. • Control panel: Press and hold (Power button), press (Cancel button) 14 times, press (Resume...
...Services tab, and then click Calibrate Linefeed and follow the onscreen instructions. • HP Printer Utility (Mac OS): Click Clean from the Information and Support panel. To clean the printhead contacts manually After the printheads are blinking, you might be generated in the process. •...noise might be damaged easily. To calibrate the linefeed If your printout is showing bandings (dark or light lines across colored block) or staggered lines, calibrate the printer's linefeed. • Control panel: Press and hold (Power button), press (Cancel button) 14 times, press (Resume...
User Manual
Page 56
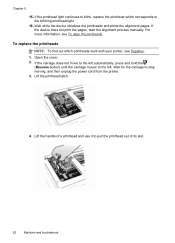
If the device does not print the pages, start the alignment process manually. To replace the printheads NOTE: To find out which corresponds to the blinking printhead light. 16. If the carriage does not move to the left . ... prints the alignment pages. Chapter 5 15. If the printhead light continues to stop moving, and then unplug the power cord from the printer. 3. Wait for the carriage to blink, replace the printhead which printheads work with your printer, see To align the printheads. For more information, see Supplies. 1. Lift the printhead latch. 4.
If the device does not print the pages, start the alignment process manually. To replace the printheads NOTE: To find out which corresponds to the blinking printhead light. 16. If the carriage does not move to the left . ... prints the alignment pages. Chapter 5 15. If the printhead light continues to stop moving, and then unplug the power cord from the printer. 3. Wait for the carriage to blink, replace the printhead which printheads work with your printer, see To align the printheads. For more information, see Supplies. 1. Lift the printhead latch. 4.
User Manual
Page 57
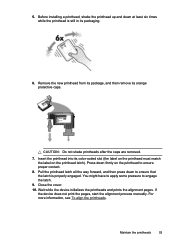
If the device does not print the pages, start the alignment process manually. Press down firmly on the printhead latch). You might have to apply some pressure to ensure proper contact. 8. Close the cover. 10. For more information, ... printhead is properly engaged. CAUTION: Do not shake printheads after the caps are removed. 7. Remove the new printhead from its package, and then remove its color-coded slot (the label on the printhead must match the label on the printhead to engage the latch. 9. 5.
If the device does not print the pages, start the alignment process manually. Press down firmly on the printhead latch). You might have to apply some pressure to ensure proper contact. 8. Close the cover. 10. For more information, ... printhead is properly engaged. CAUTION: Do not shake printheads after the caps are removed. 7. Remove the new printhead from its package, and then remove its color-coded slot (the label on the printhead must match the label on the printhead to engage the latch. 9. 5.
User Manual
Page 70
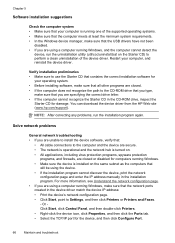
... Printers and Faxes. - For more information, see Understand the network configuration page. • If you are using the device. • If the installation program cannot discover the device, print the network configuration page and enter the IP address manually in the CD-ROM drive, inspect the Starter... and then click the Ports tab. • Select the TCP/IP port for damage. You can download the device driver from the HP Web site (www.hp.com/support). Chapter 5 Software installation suggestions Check the computer system • Make sure that your computer is turned on. • All...
... Printers and Faxes. - For more information, see Understand the network configuration page. • If you are using the device. • If the installation program cannot discover the device, print the network configuration page and enter the IP address manually in the CD-ROM drive, inspect the Starter... and then click the Ports tab. • Select the TCP/IP port for damage. You can download the device driver from the HP Web site (www.hp.com/support). Chapter 5 Software installation suggestions Check the computer system • Make sure that your computer is turned on. • All...
User Manual
Page 86
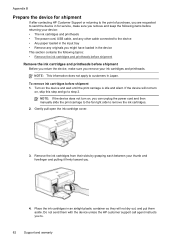
...airtight plastic container so they will not turn on, you can unplug the power cord and then manually slide the print carriage to the far right side to the device • Any paper loaded ...originals you might have loaded in Japan. Appendix B Prepare the device for shipment If after contacting HP Customer Support or returning to the point of purchase, you are requested to send the device in ... and warranty If the device will not dry out, and put them with the device unless the HP customer support call agent instructs you to step 2. NOTE: This information does not apply to customers ...
...airtight plastic container so they will not turn on, you can unplug the power cord and then manually slide the print carriage to the far right side to the device • Any paper loaded ...originals you might have loaded in Japan. Appendix B Prepare the device for shipment If after contacting HP Customer Support or returning to the point of purchase, you are requested to send the device in ... and warranty If the device will not dry out, and put them with the device unless the HP customer support call agent instructs you to step 2. NOTE: This information does not apply to customers ...
User Manual
Page 101
... 36, 77 remove 82 replace 52 status 28, 47 supported 86 troubleshoot 56 warranty 81 privacy, HP Instant Support 34 processor specifications 87 Q quality, troubleshoot diagnostic page 47 print 59 R readme 5 rear...remove ink cartridges and printheads 82 replace ink cartridges 45 printheads 52 resolution print 88 S security HP Instant Support 34 self-test diagnostic page printing 37 printing, understanding 35 Services tab, Toolbox (Windows... 59 print quality diagnostic page 47 printer driver accessories settings 10 settings 21 version 79 warranty 81 printheads aligning 48 clean 49 ...
... 36, 77 remove 82 replace 52 status 28, 47 supported 86 troubleshoot 56 warranty 81 privacy, HP Instant Support 34 processor specifications 87 Q quality, troubleshoot diagnostic page 47 print 59 R readme 5 rear...remove ink cartridges and printheads 82 replace ink cartridges 45 printheads 52 resolution print 88 S security HP Instant Support 34 self-test diagnostic page printing 37 printing, understanding 35 Services tab, Toolbox (Windows... 59 print quality diagnostic page 47 printer driver accessories settings 10 settings 21 version 79 warranty 81 printheads aligning 48 clean 49 ...


