Wireless (Select Models Only) - Windows 7
Page 18
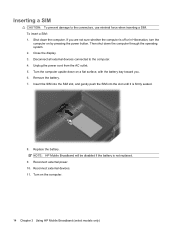
... shut down on a flat surface, with the battery bay toward you are not sure whether the computer is off or in Hibernation, turn the computer on the computer. 14 Chapter 3 Using HP Mobile Broadband (select models only) Turn on by pressing the power button. Shut down the computer. Insert the ...SIM into the SIM slot, and gently push the SIM into the slot until it is not replaced. 9. NOTE: HP Mobile Broadband will be disabled if the battery is firmly seated. 8. Reconnect external power. 10. To insert a SIM: 1. Unplug the power cord from the AC outlet...
... shut down on a flat surface, with the battery bay toward you are not sure whether the computer is off or in Hibernation, turn the computer on the computer. 14 Chapter 3 Using HP Mobile Broadband (select models only) Turn on by pressing the power button. Shut down the computer. Insert the ...SIM into the SIM slot, and gently push the SIM into the slot until it is not replaced. 9. NOTE: HP Mobile Broadband will be disabled if the battery is firmly seated. 8. Reconnect external power. 10. To insert a SIM: 1. Unplug the power cord from the AC outlet...
Wireless (Select Models Only) - Windows 7
Page 19
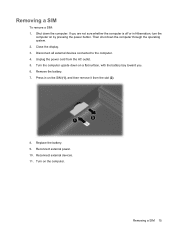
Shut down the computer through the operating system. 2. Then shut down the computer. Replace the battery. 9. Reconnect external devices. 11. Removing a SIM 15 Removing a SIM To remove a SIM: 1. Remove the battery. 7. Disconnect all external devices connected to the computer. 4. Unplug the power cord from the slot (2).... 8. Turn the computer upside down on the computer. Turn on a flat surface, with the battery bay toward you are not sure whether the computer is off or in on by pressing the power button. Press in Hibernation, turn...
Shut down the computer through the operating system. 2. Then shut down the computer. Replace the battery. 9. Reconnect external devices. 11. Removing a SIM 15 Removing a SIM To remove a SIM: 1. Remove the battery. 7. Disconnect all external devices connected to the computer. 4. Unplug the power cord from the slot (2).... 8. Turn the computer upside down on the computer. Turn on a flat surface, with the battery bay toward you are not sure whether the computer is off or in on by pressing the power button. Press in Hibernation, turn...
Drives - Windows 7
Page 17
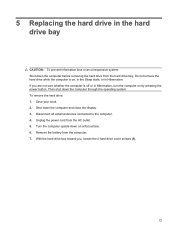
... down the computer through the operating system. Shut down the computer before removing the hard drive from the hard drive bay. Remove the battery from the AC outlet. 5. 5 Replacing the hard drive in the hard drive bay CAUTION: To prevent information loss or an unresponsive system: Shut down the computer and close...
... down the computer through the operating system. Shut down the computer before removing the hard drive from the hard drive bay. Remove the battery from the AC outlet. 5. 5 Replacing the hard drive in the hard drive bay CAUTION: To prevent information loss or an unresponsive system: Shut down the computer and close...

Memory Modules - Windows Vista and Windows 7
Page 7
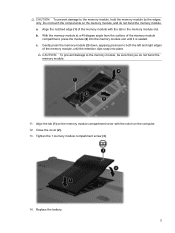
...the risk of the computer. Unplug the power cord from the computer. 7. Loosen the memory module compartment screw (1). 1 To add or replace a memory module: 1. The memory capacity of static electricity by touching a grounded metal object. Shut down on by upgrading the existing ...memory module in Hibernation, turn the computer on a flat surface. 6. WARNING! Disconnect all batteries before installing a memory module. Turn the computer upside down the computer and close the display. NOTE: To use a dual-channel configuration ...
...the risk of the computer. Unplug the power cord from the computer. 7. Loosen the memory module compartment screw (1). 1 To add or replace a memory module: 1. The memory capacity of static electricity by touching a grounded metal object. Shut down on by upgrading the existing ...memory module in Hibernation, turn the computer on a flat surface. 6. WARNING! Disconnect all batteries before installing a memory module. Turn the computer upside down the computer and close the display. NOTE: To use a dual-channel configuration ...
Memory Modules - Windows Vista and Windows 7
Page 9
... clips snap into the memory module slot until it is seated. Do not touch the components on the computer. 12. Close the cover (2). 13. Replace the battery. 3 CAUTION: To prevent damage to both the left and right edges of the memory module with the notch on the memory module, and do not...
... clips snap into the memory module slot until it is seated. Do not touch the components on the computer. 12. Close the cover (2). 13. Replace the battery. 3 CAUTION: To prevent damage to both the left and right edges of the memory module with the notch on the memory module, and do not...
Notebook Tour - Windows 7
Page 16
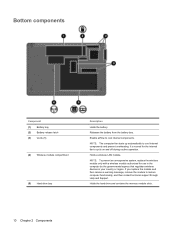
... (5) Hard drive bay Description Holds the battery. Releases the battery from the battery bay. It is normal for use in the computer by the governmental agency that regulates wireless devices in your country or region. NOTE: To prevent an unresponsive system, replace the wireless module only with a wireless ...internal fan to restore computer functionality, and then contact technical support through Help and Support. Holds a wireless LAN module. If you replace the module and then receive a warning message, remove the module to cycle on and off during routine operation. Holds the hard ...
... (5) Hard drive bay Description Holds the battery. Releases the battery from the battery bay. It is normal for use in the computer by the governmental agency that regulates wireless devices in your country or region. NOTE: To prevent an unresponsive system, replace the wireless module only with a wireless ...internal fan to restore computer functionality, and then contact technical support through Help and Support. Holds a wireless LAN module. If you replace the module and then receive a warning message, remove the module to cycle on and off during routine operation. Holds the hard ...
Power Management - Windows 7
Page 3
... Resolving a low battery level when the computer cannot exit Hibernation ....... 14 Calibrating a battery ...15 Step 1: Fully charge the battery 15 Step 2: Disable Hibernation and Sleep 15 Step 3: Discharge the battery 16 Step 4: Fully recharge the battery 16 Step 5: Reenable Hibernation and Sleep 17 Conserving battery power ...18 Storing a battery ...18 Disposing of a used battery ...18 Replacing the battery ...18 iii
... Resolving a low battery level when the computer cannot exit Hibernation ....... 14 Calibrating a battery ...15 Step 1: Fully charge the battery 15 Step 2: Disable Hibernation and Sleep 15 Step 3: Discharge the battery 16 Step 4: Fully recharge the battery 16 Step 5: Reenable Hibernation and Sleep 17 Conserving battery power ...18 Storing a battery ...18 Disposing of a used battery ...18 Replacing the battery ...18 iii
Power Management - Windows 7
Page 9
... are writing information to a CD or DVD When you disconnect external AC power, the following events occur: ● The computer switches to battery power. ● The display brightness is supplied through one of the following conditions: WARNING! 2 Using external AC power External AC power is... the following devices: WARNING! To reduce potential safety issues, use only the AC adapter provided with the computer, a replacement AC adapter provided by HP, or a compatible AC adapter purchased from HP. ● Approved AC adapter ● Optional expansion product Connect the computer to save...
... are writing information to a CD or DVD When you disconnect external AC power, the following events occur: ● The computer switches to battery power. ● The display brightness is supplied through one of the following conditions: WARNING! 2 Using external AC power External AC power is... the following devices: WARNING! To reduce potential safety issues, use only the AC adapter provided with the computer, a replacement AC adapter provided by HP, or a compatible AC adapter purchased from HP. ● Approved AC adapter ● Optional expansion product Connect the computer to save...
Power Management - Windows 7
Page 11
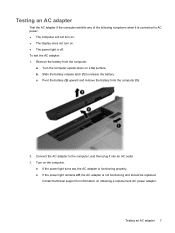
... If the power light remains off, the AC adapter is off. Turn the computer upside down on obtaining a replacement AC power adapter. Remove the battery from the computer (3). 2. Slide the battery release latch (1) to the computer, and then plug it is connected to AC power: ● The computer ...The power light is not functioning and should be replaced. b. Testing an AC adapter Test the AC adapter if the computer exhibits any of the following symptoms when it into an AC outlet. 3. Pivot the battery (2) upward and remove the battery from the computer. Testing an AC adapter 7 To...
... If the power light remains off, the AC adapter is off. Turn the computer upside down on obtaining a replacement AC power adapter. Remove the battery from the computer (3). 2. Slide the battery release latch (1) to the computer, and then plug it is connected to AC power: ● The computer ...The power light is not functioning and should be replaced. b. Testing an AC adapter Test the AC adapter if the computer exhibits any of the following symptoms when it into an AC outlet. 3. Pivot the battery (2) upward and remove the battery from the computer. Testing an AC adapter 7 To...
Power Management - Windows 7
Page 12
... settings, programs running on AC power. To increase display brightness, use only the battery provided with the computer, a replacement battery provided by HP, or a compatible battery purchased from the computer. Keeping the battery in the computer whenever the computer is plugged into AC power charges the battery and also protects your work . If the computer contains a charged...
... settings, programs running on AC power. To increase display brightness, use only the battery provided with the computer, a replacement battery provided by HP, or a compatible battery purchased from the computer. Keeping the battery in the computer whenever the computer is plugged into AC power charges the battery and also protects your work . If the computer contains a charged...
Power Management - Windows 7
Page 22
... for one month or more information about ordering a replacement battery. do not disassemble, crush, or puncture; A message refers you to replace the battery when an internal cell is possibly covered by an HP warranty, instructions include a warranty ID. If the battery is not charging properly, or when the battery storage capacity has reached a "weak" condition. To prolong...
... for one month or more information about ordering a replacement battery. do not disassemble, crush, or puncture; A message refers you to replace the battery when an internal cell is possibly covered by an HP warranty, instructions include a warranty ID. If the battery is not charging properly, or when the battery storage capacity has reached a "weak" condition. To prolong...
Power Management - Windows 7
Page 23
... turns off the display and computer. The Shut down . Shut down the computer under any of the following conditions: ● When you need to replace the battery or access components inside the computer ● When you are unable to use the preceding shutdown procedures, try the following emergency procedures in Hibernation, you... the power button, the recommended procedure is to a USB port ● When the computer will be unused and disconnected from external power and remove the battery. 19
... turns off the display and computer. The Shut down . Shut down the computer under any of the following conditions: ● When you need to replace the battery or access components inside the computer ● When you are unable to use the preceding shutdown procedures, try the following emergency procedures in Hibernation, you... the power button, the recommended procedure is to a USB port ● When the computer will be unused and disconnected from external power and remove the battery. 19

Power Management - Windows 7
Page 24
... conserving power 18 discharging 12 disposing 18 inserting 10 low battery levels 13 recharging 16 removing 10 replacing 18 storing 18 Battery Check 9 battery light 12, 13 battery power 8 battery release latch 10 battery temperature 18 C calibrating battery 15 charging batteries 12, 15 connection, external power 6 conservation, power 18 critical battery level 13 D drive media 1 H Hibernation exiting 2 initiated during critical...
... conserving power 18 discharging 12 disposing 18 inserting 10 low battery levels 13 recharging 16 removing 10 replacing 18 storing 18 Battery Check 9 battery light 12, 13 battery power 8 battery release latch 10 battery temperature 18 C calibrating battery 15 charging batteries 12, 15 connection, external power 6 conservation, power 18 critical battery level 13 D drive media 1 H Hibernation exiting 2 initiated during critical...


