Backup and Recovery - Windows 7
Page 5
... recovery (Recovery Manager software feature). This feature helps you to reverse undesirable changes to your system on the hard drive or from recovery discs you with a solid-state drive (SSD) may not have a partition. With Recovery Manager, you can recover your full factory image if you...a system failure: ● Creating a set of system failure or instability. ● Backing up your computer by the operating system and HP Recovery Manager software are designed to an earlier state. ● Recovering a program or driver (Recovery Manager software feature). As you add new...
... recovery (Recovery Manager software feature). This feature helps you to reverse undesirable changes to your system on the hard drive or from recovery discs you with a solid-state drive (SSD) may not have a partition. With Recovery Manager, you can recover your full factory image if you...a system failure: ● Creating a set of system failure or instability. ● Backing up your computer by the operating system and HP Recovery Manager software are designed to an earlier state. ● Recovering a program or driver (Recovery Manager software feature). As you add new...
Backup and Recovery - Windows 7
Page 7
The screen shot can back up your information to an optional external hard drive, a network drive, or discs. ● When backing up to reset your preferences. Copy the screen: To copy only the active window, press alt+fn+prt sc. Save ... Edit > Paste. 4. 3 Backing up your information As you add new software and data files, you should back up your system on the type of optical drive installed in a window, toolbar, or menu bar by taking a screen shot of your settings. The discs you use any of the following when backing up...
The screen shot can back up your information to an optional external hard drive, a network drive, or discs. ● When backing up to reset your preferences. Copy the screen: To copy only the active window, press alt+fn+prt sc. Save ... Edit > Paste. 4. 3 Backing up your information As you add new software and data files, you should back up your system on the type of optical drive installed in a window, toolbar, or menu bar by taking a screen shot of your settings. The discs you use any of the following when backing up...
Backup and Recovery - Windows 7
Page 9
.... Click the System Protection tab. 4. In the left pane, click System Protection. 3. Using system restore points 5 NOTE: Recovering to save and name a snapshot of your hard drive at a previous date and time), when the computer was functioning optimally, follow these steps: 1. Create a system restore point 1. Select Start > Control Panel > System and Security...
.... Click the System Protection tab. 4. In the left pane, click System Protection. 3. Using system restore points 5 NOTE: Recovering to save and name a snapshot of your hard drive at a previous date and time), when the computer was functioning optimally, follow these steps: 1. Create a system restore point 1. Select Start > Control Panel > System and Security...
Backup and Recovery - Windows 7
Page 10
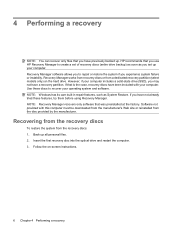
...from a dedicated recovery partition (select models only) on -screen instructions. 6 Chapter 4 Performing a recovery Insert the first recovery disc into the optical drive and restart the computer. 3. Recovery Manager works from recovery discs or from the recovery discs: 1. However, if your computer. Back up your ...a set up all personal files. 2. 4 Performing a recovery NOTE: You can recover only files that you have a recovery partition. HP recommends that was preinstalled at the factory. If you experience system failure or instability. Follow the on the hard drive.
...from a dedicated recovery partition (select models only) on -screen instructions. 6 Chapter 4 Performing a recovery Insert the first recovery disc into the optical drive and restart the computer. 3. Recovery Manager works from recovery discs or from the recovery discs: 1. However, if your computer. Back up your ...a set up all personal files. 2. 4 Performing a recovery NOTE: You can recover only files that you have a recovery partition. HP recommends that was preinstalled at the factory. If you experience system failure or instability. Follow the on the hard drive.
Backup and Recovery - Windows 7
Page 11
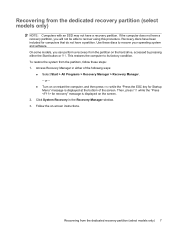
... to recover using this procedure. Then, press f11 while the "Press for computers that do not have a recovery partition. Recovering from the partition on the hard drive, accessed by pressing either of the screen.
... to recover using this procedure. Then, press f11 while the "Press for computers that do not have a recovery partition. Recovering from the partition on the hard drive, accessed by pressing either of the screen.

Setup Utility - Windows Vista and Windows 7
Page 10
...; USB Floppy ◦ Internal CD/DVD ROM drive ◦ USB CD/DVD ROM drive ◦ Hard drive ◦ USB Diskette on Key ◦ USB Hard drive ◦ Network adapter Diagnostics menu Select Hard Disk Self Test Secondary Hard Disk Self Test (select models only) Memory Test.../disable the processor Virtualization Technology. Enable/disable LAN Power Saving. When enabled, the computer fan will always be on a secondary hard drive. Run a comprehensive self-test on . System Configuration menu Select Language Support Button Sound (select models only) Virtualization Technology (select...
...; USB Floppy ◦ Internal CD/DVD ROM drive ◦ USB CD/DVD ROM drive ◦ Hard drive ◦ USB Diskette on Key ◦ USB Hard drive ◦ Network adapter Diagnostics menu Select Hard Disk Self Test Secondary Hard Disk Self Test (select models only) Memory Test.../disable the processor Virtualization Technology. Enable/disable LAN Power Saving. When enabled, the computer fan will always be on a secondary hard drive. Run a comprehensive self-test on . System Configuration menu Select Language Support Button Sound (select models only) Virtualization Technology (select...
Setup Utility - Windows Vista and Windows 7
Page 11
... Reader Power Saving 6 changing the Setup Utility language 2 D Diagnostics menu 6 displaying system information 3 drives, boot order 6 E exiting the Setup Utility 4 F fan always on 6 fingerprint reader 1 H hard drive self test 6 L LAN Power Saving 6 language support 6 M Main menu 5 memory test 6 ...N navigating in the Setup Utility 2 P passwords 5 power-on password 5 Processor C6 State 6 R restoring default settings 3 S secondary hard drive self test 6 Security menu 5 selecting in the Setup Utility 2 starting the Setup Utility 1 System Configuration menu 6 system information 5 U using ...
... Reader Power Saving 6 changing the Setup Utility language 2 D Diagnostics menu 6 displaying system information 3 drives, boot order 6 E exiting the Setup Utility 4 F fan always on 6 fingerprint reader 1 H hard drive self test 6 L LAN Power Saving 6 language support 6 M Main menu 5 memory test 6 ...N navigating in the Setup Utility 2 P passwords 5 power-on password 5 Processor C6 State 6 R restoring default settings 3 S secondary hard drive self test 6 Security menu 5 selecting in the Setup Utility 2 starting the Setup Utility 1 System Configuration menu 6 system information 5 U using ...

Software Update - Windows Vista and Windows 7
Page 6
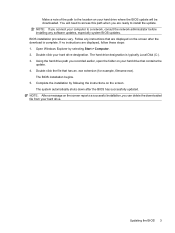
...outlet. To exit the Setup Utility, use the arrow keys to an optional power source. Identify the BIOS update that provides software for your hard drive. When the Main menu is selected, BIOS and other identifier. Do not shut down the computer or initiate Sleep or Hibernation. Do not ..., or cord. Determining the BIOS version To determine whether available BIOS updates contain later BIOS versions than the BIOS version currently installed on the HP Web site that is displayed. 3. You may need to know the version of the date, name, or other system information is later than...
...outlet. To exit the Setup Utility, use the arrow keys to an optional power source. Identify the BIOS update that provides software for your hard drive. When the Main menu is selected, BIOS and other identifier. Do not shut down the computer or initiate Sleep or Hibernation. Do not ..., or cord. Determining the BIOS version To determine whether available BIOS updates contain later BIOS versions than the BIOS version currently installed on the HP Web site that is displayed. 3. You may need to know the version of the date, name, or other system information is later than...
Software Update - Windows Vista and Windows 7
Page 7
...begins. 5. NOTE: After a message on the screen reports a successful installation, you recorded earlier, open the folder on your hard drive where the BIOS update will need to access this path when you connect your computer to install the update. The system automatically shuts... down after the download is typically Local Disk (C:). 3. Double-click your hard drive designation. Double-click the file that has an .exe extension (for example, filename.exe). Complete the installation by selecting Start > ...
...begins. 5. NOTE: After a message on the screen reports a successful installation, you recorded earlier, open the folder on your hard drive where the BIOS update will need to access this path when you connect your computer to install the update. The system automatically shuts... down after the download is typically Local Disk (C:). 3. Double-click your hard drive designation. Double-click the file that has an .exe extension (for example, filename.exe). Complete the installation by selecting Start > ...
Software Update - Windows Vista and Windows 7
Page 8
... operating system. 5. Updating programs and drivers To download and install software other than a BIOS update, follow the instructions provided. Select your hard drive. If you may be able to your computer. Click the option for software and driver downloads, type your specific product from the models listed...containing additional information. 6. or - Click your computer model number in the Search box, press enter, and follow these steps: To use the HP Web site: 1. Open your Internet browser, go to do this, click Download only to save the file to download the driver and install...
... operating system. 5. Updating programs and drivers To download and install software other than a BIOS update, follow the instructions provided. Select your hard drive. If you may be able to your computer. Click the option for software and driver downloads, type your specific product from the models listed...containing additional information. 6. or - Click your computer model number in the Search box, press enter, and follow these steps: To use the HP Web site: 1. Open your Internet browser, go to do this, click Download only to save the file to download the driver and install...
Drives - Windows 7
Page 3
... a CD, DVD, or BD ...8 Creating or "burning" a CD or DVD ...9 Removing a CD, DVD, or BD ...10 3 Using external drives 4 Improving hard drive performance Using Disk Defragmenter ...12 Using Disk Cleanup ...12 5 Replacing the hard drive in the hard drive bay 6 Troubleshooting The optical disc tray does not open for removal of a CD, DVD, or BD 16 The... Windows Media Player produces no sound or display 19 A device driver must be reinstalled ...19 Obtaining the latest Windows device drivers 20 Obtaining the latest HP device drivers 20 iii
... a CD, DVD, or BD ...8 Creating or "burning" a CD or DVD ...9 Removing a CD, DVD, or BD ...10 3 Using external drives 4 Improving hard drive performance Using Disk Defragmenter ...12 Using Disk Cleanup ...12 5 Replacing the hard drive in the hard drive bay 6 Troubleshooting The optical disc tray does not open for removal of a CD, DVD, or BD 16 The... Windows Media Player produces no sound or display 19 A device driver must be reinstalled ...19 Obtaining the latest Windows device drivers 20 Obtaining the latest HP device drivers 20 iii
Drives - Windows 7
Page 5
...the battery is writing to clear, or properly disconnect the external hard drive. Avoid exposing a drive to magnetic fields. Do not spray the drive with , shipping, or storing a drive. Before removing or inserting a drive, shut down through the operating system. If you move the... to an external hard drive, initiate Sleep and allow the screen to a disc. Avoid exposing a drive to the following cautions before removing the drive from the drive bay, or traveling with cleaning products. Remove media from a drive before handling drives. 1 Handling drives Drives are unsure whether ...
...the battery is writing to clear, or properly disconnect the external hard drive. Avoid exposing a drive to magnetic fields. Do not spray the drive with , shipping, or storing a drive. Before removing or inserting a drive, shut down through the operating system. If you move the... to an external hard drive, initiate Sleep and allow the screen to a disc. Avoid exposing a drive to the following cautions before removing the drive from the drive bay, or traveling with cleaning products. Remove media from a drive before handling drives. 1 Handling drives Drives are unsure whether ...
Drives - Windows 7
Page 8
...large amounts of information. DVDs and BDs are convenient for commercial audio recordings and are the same form factor as needed. NOTE: The optical drive on your hard drive to erase or write over data that can be shared as CDs but have a much higher storage capacity. Typical uses include the following :... up disk space After data is recorded, it cannot be erased or written over . CD-RW discs Use a CD-RW disc (a rewritable version of hard drive files ● Updating photos, video, audio, and data continuously DVD±R discs Use blank DVD±R discs to a CD or DVD that must ...
...large amounts of information. DVDs and BDs are convenient for commercial audio recordings and are the same form factor as needed. NOTE: The optical drive on your hard drive to erase or write over data that can be shared as CDs but have a much higher storage capacity. Typical uses include the following :... up disk space After data is recorded, it cannot be erased or written over . CD-RW discs Use a CD-RW disc (a rewritable version of hard drive files ● Updating photos, video, audio, and data continuously DVD±R discs Use blank DVD±R discs to a CD or DVD that must ...
Drives - Windows 7
Page 12
Do not use the computer keyboard or move the computer while the computer is writing to your hard drive, and then burn from your hard drive. 4. Save the information to a disc. Copying a CD, DVD, or BD 1. After the information is copied, the disc you want to make unauthorized... computer to the destination disc. NOTE: For details about using . Power2Go reads the source disc and copies the data to a temporary folder on your hard drive to a reliable external power source. CAUTION: To prevent loss of the screen. The write process is sensitive to a destination disc. Do not copy...
Do not use the computer keyboard or move the computer while the computer is writing to your hard drive, and then burn from your hard drive. 4. Save the information to a disc. Copying a CD, DVD, or BD 1. After the information is copied, the disc you want to make unauthorized... computer to the destination disc. NOTE: For details about using . Power2Go reads the source disc and copies the data to a temporary folder on your hard drive to a reliable external power source. CAUTION: To prevent loss of the screen. The write process is sensitive to a destination disc. Do not copy...
Drives - Windows 7
Page 13
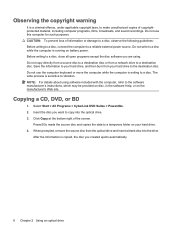
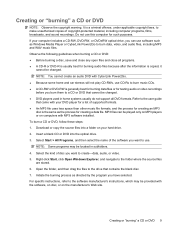
... DVD-RW is generally best for burning data files or for creating a data file. Right-click Start, click Open Windows Explorer, and navigate to the drive that contains the blank disc. 7. Creating or "burning" a CD or DVD NOTE: Observe the copyright warning. Refer to the user guide that cannot ... select the name of disc you want to the software manufacturer's instructions, which may be played only on MP3 players or on computers with your hard drive. 2. Select the kind of the software you have selected. NOTE: You cannot create an audio DVD with the software, on disc, or on ...
... DVD-RW is generally best for burning data files or for creating a data file. Right-click Start, click Open Windows Explorer, and navigate to the drive that contains the blank disc. 7. Creating or "burning" a CD or DVD NOTE: Observe the copyright warning. Refer to the user guide that cannot ... select the name of disc you want to the software manufacturer's instructions, which may be played only on MP3 players or on computers with your hard drive. 2. Select the kind of the software you have selected. NOTE: You cannot create an audio DVD with the software, on disc, or on ...
Drives - Windows 7
Page 15
... damage to the computer. 2. Connect the drive to the equipment when connecting a powered drive, be added by connecting the drive to the manufacturer's instructions. USB drives include the following types: ● 1.44-megabyte diskette drive ● Hard drive module (a hard drive with an adapter attached) ● DVD-ROM Drive ● DVD/CD-RW Combo Drive ● DVD±RW and CD...
... damage to the computer. 2. Connect the drive to the equipment when connecting a powered drive, be added by connecting the drive to the manufacturer's instructions. USB drives include the following types: ● 1.44-megabyte diskette drive ● Hard drive module (a hard drive with an adapter attached) ● DVD-ROM Drive ● DVD/CD-RW Combo Drive ● DVD±RW and CD...
Drives - Windows 7
Page 16
...Defragmenter software Help. Follow the on the hard drive so that you use the computer, files on the hard drive become fragmented. Disk Defragmenter consolidates the fragmented files and folders on -screen instructions. 12 Chapter 4 Improving hard drive performance You may be prompted for your ... Defragmenter. 2. NOTE: Windows® includes the User Account Control feature to Help and Support for more information. 4 Improving hard drive performance Using Disk Defragmenter As you can run more efficiently. Refer to improve the security of your permission or password for unnecessary...
...Defragmenter software Help. Follow the on the hard drive so that you use the computer, files on the hard drive become fragmented. Disk Defragmenter consolidates the fragmented files and folders on -screen instructions. 12 Chapter 4 Improving hard drive performance You may be prompted for your ... Defragmenter. 2. NOTE: Windows® includes the User Account Control feature to Help and Support for more information. 4 Improving hard drive performance Using Disk Defragmenter As you can run more efficiently. Refer to improve the security of your permission or password for unnecessary...
Drives - Windows 7
Page 17
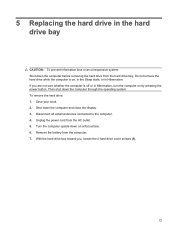
...button. Then shut down the computer and close the display. 3. If you , loosen the 4 hard drive cover screws (1). 13 To remove the hard drive: 1. Unplug the power cord from the hard drive bay. With the hard drive bay toward you are not sure whether the computer is on, in the Sleep state, or ... a flat surface. 6. Disconnect all external devices connected to the computer. 4. Shut down the computer through the operating system. 5 Replacing the hard drive in the hard drive bay CAUTION: To prevent information loss or an unresponsive system: Shut down the computer before removing the...
...button. Then shut down the computer and close the display. 3. If you , loosen the 4 hard drive cover screws (1). 13 To remove the hard drive: 1. Unplug the power cord from the hard drive bay. With the hard drive bay toward you are not sure whether the computer is on, in the Sleep state, or ... a flat surface. 6. Disconnect all external devices connected to the computer. 4. Shut down the computer through the operating system. 5 Replacing the hard drive in the hard drive bay CAUTION: To prevent information loss or an unresponsive system: Shut down the computer before removing the...
Drives - Windows 7
Page 18
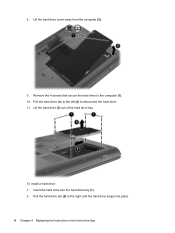
Insert the hard drive into place. 14 Chapter 5 Replacing the hard drive in the hard drive bay Lift the hard drive cover away from the computer (2). 9. Pull the hard drive tab to the left (2) to the computer (1). 10. 8. To install a hard drive: 1. Pull the hard drive tab (2) to the right until the hard drive snaps into the hard drive bay (1). 2. Lift the hard drive (3) out of the hard drive bay. Remove the 4 screws that secure the hard drive to disconnect the hard drive. 11.
Insert the hard drive into place. 14 Chapter 5 Replacing the hard drive in the hard drive bay Lift the hard drive cover away from the computer (2). 9. Pull the hard drive tab to the left (2) to the computer (1). 10. 8. To install a hard drive: 1. Pull the hard drive tab (2) to the right until the hard drive snaps into the hard drive bay (1). 2. Lift the hard drive (3) out of the hard drive bay. Remove the 4 screws that secure the hard drive to disconnect the hard drive. 11.
Drives - Windows 7
Page 19
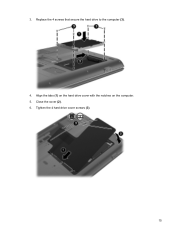
Close the cover (2). 6. Align the tabs (1) on the hard drive cover with the notches on the computer. 5. 3. Replace the 4 screws that secure the hard drive to the computer (3). 4. Tighten the 4 hard drive cover screws (3). 15
Close the cover (2). 6. Align the tabs (1) on the hard drive cover with the notches on the computer. 5. 3. Replace the 4 screws that secure the hard drive to the computer (3). 4. Tighten the 4 hard drive cover screws (3). 15


