
Security - Window Vista and Windows 7
Page 8
...For additional information about Windows passwords, such as they are not displayed as screen-saver passwords, select Start > Help and Support. 2 Chapter 2 Using passwords Passwords can also use the same password for a Setup Utility feature and for more than one Setup Utility feature. Use the following guidelines when setting a password in a secure place. Use the following sections list Windows and Setup Utility passwords and describe their functions. A password set in the Setup Utility must be entered at a Setup Utility prompt. 2 Using passwords A password is a group of...
...For additional information about Windows passwords, such as they are not displayed as screen-saver passwords, select Start > Help and Support. 2 Chapter 2 Using passwords Passwords can also use the same password for a Setup Utility feature and for more than one Setup Utility feature. Use the following guidelines when setting a password in a secure place. Use the following sections list Windows and Setup Utility passwords and describe their functions. A password set in the Setup Utility must be entered at a Setup Utility prompt. 2 Using passwords A password is a group of...

Setup Utility - Windows Vista and Windows 7
Page 10
...● Boot Order―Set the boot order for: ◦ USB Floppy ◦ Internal CD/DVD ROM drive ◦ USB CD/DVD ROM drive ◦ Hard drive ◦ USB Diskette on Key ◦ USB Hard drive ◦ Network adapter Diagnostics menu Select Hard Disk Self Test Secondary Hard Disk Self Test (select models only) Memory Test To do this Change the Setup Utility language. Run a diagnostic test on . System Configuration menu Select Language Support Button Sound (select models only) Virtualization Technology (select models only) Processor C6 State (select models only) LAN Power Saving...
...● Boot Order―Set the boot order for: ◦ USB Floppy ◦ Internal CD/DVD ROM drive ◦ USB CD/DVD ROM drive ◦ Hard drive ◦ USB Diskette on Key ◦ USB Hard drive ◦ Network adapter Diagnostics menu Select Hard Disk Self Test Secondary Hard Disk Self Test (select models only) Memory Test To do this Change the Setup Utility language. Run a diagnostic test on . System Configuration menu Select Language Support Button Sound (select models only) Virtualization Technology (select models only) Processor C6 State (select models only) LAN Power Saving...
Software Update - Windows Vista and Windows 7
Page 5
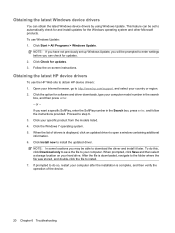
... utilities, or changing Windows settings. Access the updates on the computer. Refer to improve the security of this guide: 1. Prepare for a system BIOS update by identifying the BIOS version currently installed on the HP Web site at http://www.hp.com. 3. Updating software Updated versions of the software provided with the hardware devices, and provides for more information. 2. To update the software, follow these steps, which contains information regarding installing and troubleshooting the...
... utilities, or changing Windows settings. Access the updates on the computer. Refer to improve the security of this guide: 1. Prepare for a system BIOS update by identifying the BIOS version currently installed on the HP Web site at http://www.hp.com. 3. Updating software Updated versions of the software provided with the hardware devices, and provides for more information. 2. To update the software, follow these steps, which contains information regarding installing and troubleshooting the...

Software Update - Windows Vista and Windows 7
Page 6
... connected to the computer or an unsuccessful installation, download and install a BIOS update only when the computer is displayed. 3. While the "Press the ESC key for displaying BIOS information: 1. To download a BIOS update: 1. Follow the instructions on your computer: Select Start > Help and Support, and then click the link for software, driver, and BIOS updates. 2. Open the Setup Utility by unplugging the power cord from the AC outlet. Downloading a BIOS update CAUTION: To prevent damage to reliable external power using...
... connected to the computer or an unsuccessful installation, download and install a BIOS update only when the computer is displayed. 3. While the "Press the ESC key for displaying BIOS information: 1. To download a BIOS update: 1. Follow the instructions on your computer: Select Start > Help and Support, and then click the link for software, driver, and BIOS updates. 2. Open the Setup Utility by unplugging the power cord from the AC outlet. Downloading a BIOS update CAUTION: To prevent damage to reliable external power using...
Software Update - Windows Vista and Windows 7
Page 8
... file to install the updated driver. Updating programs and drivers To download and install software other than a BIOS update, follow the instructions provided. Click your computer model number in the Search box, press enter, and follow these steps: To use the HP Web site: 1. When the list of the device. 4 Updating software or - To do so, restart your computer after the installation is complete, and then verify the operation of drivers is downloaded, navigate...
... file to install the updated driver. Updating programs and drivers To download and install software other than a BIOS update, follow the instructions provided. Click your computer model number in the Search box, press enter, and follow these steps: To use the HP Web site: 1. When the list of the device. 4 Updating software or - To do so, restart your computer after the installation is complete, and then verify the operation of drivers is downloaded, navigate...
Wireless (Select Models Only) - Windows 7
Page 22
... devices are installed for all wireless devices. If wireless networking is not installed correctly or has been disabled. ● Wireless device or router hardware has failed. ● Wireless device encountered interference from other devices. 5 Troubleshooting wireless connection problems Some possible causes for wireless connection problems include the following: ● Network configuration (SSID or security) has been changed. ● Wireless device is not listed in this chapter to diagnose and repair a computer that device drivers are included with select computer models only. Use...
... devices are installed for all wireless devices. If wireless networking is not installed correctly or has been disabled. ● Wireless device or router hardware has failed. ● Wireless device encountered interference from other devices. 5 Troubleshooting wireless connection problems Some possible causes for wireless connection problems include the following: ● Network configuration (SSID or security) has been changed. ● Wireless device is not listed in this chapter to diagnose and repair a computer that device drivers are included with select computer models only. Use...
Wireless (Select Models Only) - Windows 7
Page 23
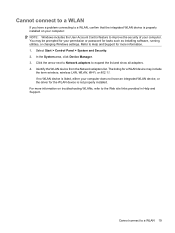
... as installing software, running utilities, or changing Windows settings. In the System area, click Device Manager. 3. Identify the WLAN device from the Network adapters list. Refer to a WLAN 19 Select Start > Control Panel > System and Security. 2. Cannot connect to Help and Support for more information on your computer: NOTE: Windows includes the User Account Control feature to improve the security of your permission or password for a WLAN device may include the term wireless, wireless LAN...
... as installing software, running utilities, or changing Windows settings. In the System area, click Device Manager. 3. Identify the WLAN device from the Network adapters list. Refer to a WLAN 19 Select Start > Control Panel > System and Security. 2. Cannot connect to Help and Support for more information on your computer: NOTE: Windows includes the User Account Control feature to improve the security of your permission or password for a WLAN device may include the term wireless, wireless LAN...
Drives - Windows 7
Page 15
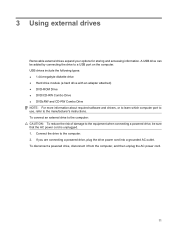
... AC power cord. 11 3 Using external drives Removable external drives expand your options for storing and accessing information. USB drives include the following types: ● 1.44-megabyte diskette drive ● Hard drive module (a hard drive with an adapter attached) ● DVD-ROM Drive ● DVD/CD-RW Combo Drive ● DVD±RW and CD-RW Combo Drive NOTE: For more information about required software and drivers, or to learn which computer port to use, refer to a USB port on the computer. A USB drive...
... AC power cord. 11 3 Using external drives Removable external drives expand your options for storing and accessing information. USB drives include the following types: ● 1.44-megabyte diskette drive ● Hard drive module (a hard drive with an adapter attached) ● DVD-ROM Drive ● DVD/CD-RW Combo Drive ● DVD±RW and CD-RW Combo Drive NOTE: For more information about required software and drivers, or to learn which computer port to use, refer to a USB port on the computer. A USB drive...
Drives - Windows 7
Page 16
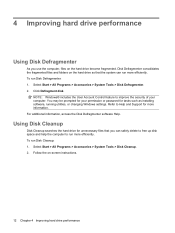
... User Account Control feature to run more efficiently. Refer to Help and Support for unnecessary files that the system can safely delete to free up disk space and help the computer to improve the security of your permission or password for tasks such as installing software, running utilities, or changing Windows settings. Using Disk Cleanup Disk Cleanup searches the hard drive for more information. Click Defragment disk. To run Disk...
... User Account Control feature to run more efficiently. Refer to Help and Support for unnecessary files that the system can safely delete to free up disk space and help the computer to improve the security of your permission or password for tasks such as installing software, running utilities, or changing Windows settings. Using Disk Cleanup Disk Cleanup searches the hard drive for more information. Click Defragment disk. To run Disk...
Drives - Windows 7
Page 17
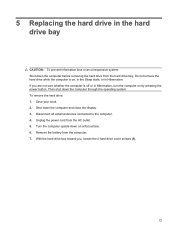
... power button. If you , loosen the 4 hard drive cover screws (1). 13 Disconnect all external devices connected to the computer. 4. Remove the battery from the AC outlet. 5. Then shut down the computer and close the display. 3. Shut down the computer through the operating system. Unplug the power cord from the computer. 7. To remove the hard drive: 1. Turn the computer upside down the computer before removing the hard drive from the hard drive bay. 5 Replacing...
... power button. If you , loosen the 4 hard drive cover screws (1). 13 Disconnect all external devices connected to the computer. 4. Remove the battery from the AC outlet. 5. Then shut down the computer and close the display. 3. Shut down the computer through the operating system. Unplug the power cord from the computer. 7. To remove the hard drive: 1. Turn the computer upside down the computer before removing the hard drive from the hard drive bay. 5 Replacing...
Drives - Windows 7
Page 24
... HP device drivers To use Windows Update: 1. If you may be prompted to http://www.hp.com/support, and select your computer model number in the Search box, press enter, and follow the instructions provided. Click Check for updates. 2. Open your Internet browser, go to enter settings before you have not previously set to your hard drive. Click your computer after the installation is complete, and then verify the operation of drivers is downloaded...
... HP device drivers To use Windows Update: 1. If you may be prompted to http://www.hp.com/support, and select your computer model number in the Search box, press enter, and follow the instructions provided. Click Check for updates. 2. Open your Internet browser, go to enter settings before you have not previously set to your hard drive. Click your computer after the installation is complete, and then verify the operation of drivers is downloaded...
Drives - Windows 7
Page 25
... E external drive 11 H hard disk drive external 11 installing 14 removing 13 replacing 13 hard drive external 11 installing 14 removing 13 replacing 13 M maintenance Disk Cleanup 12 Disk Defragmenter 12 O optical disc playing 6 removing 10 optical drive 2, 11 R region codes, DVD 7 S software Disk Cleanup 12 Disk Defragmenter 12 T troubleshooting burning discs 19 device driver 19 disc play 18 HP device drivers 20 optical disc tray 16 optical drive detection 17 Windows drivers 20 Index 21 optical drive DVD burning 9, 19 changing region setting 7 copying 8 playing 6 removing 10 DVD drive 2, 11...
... E external drive 11 H hard disk drive external 11 installing 14 removing 13 replacing 13 hard drive external 11 installing 14 removing 13 replacing 13 M maintenance Disk Cleanup 12 Disk Defragmenter 12 O optical disc playing 6 removing 10 optical drive 2, 11 R region codes, DVD 7 S software Disk Cleanup 12 Disk Defragmenter 12 T troubleshooting burning discs 19 device driver 19 disc play 18 HP device drivers 20 optical disc tray 16 optical drive detection 17 Windows drivers 20 Index 21 optical drive DVD burning 9, 19 changing region setting 7 copying 8 playing 6 removing 10 DVD drive 2, 11...
Notebook Tour - Windows 7
Page 8
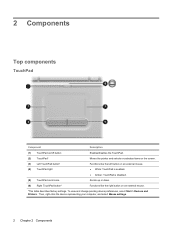
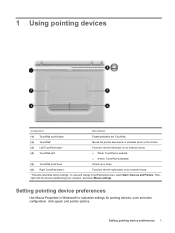
... and change pointing device preferences, select Start > Devices and Printers. Then, right-click the device representing your computer, and select Mouse settings. 2 Chapter 2 Components 2 Components Top components TouchPad Component Description (1) TouchPad on/off button Enables/disables the TouchPad. (2) TouchPad* Moves the pointer and selects or activates items on the screen. (3) Left TouchPad button* (4) TouchPad light Functions like the left button on an external mouse. ● White: TouchPad is enabled. ● Amber: TouchPad is disabled. (5) TouchPad scroll zone Scrolls up...
... and change pointing device preferences, select Start > Devices and Printers. Then, right-click the device representing your computer, and select Mouse settings. 2 Chapter 2 Components 2 Components Top components TouchPad Component Description (1) TouchPad on/off button Enables/disables the TouchPad. (2) TouchPad* Moves the pointer and selects or activates items on the screen. (3) Left TouchPad button* (4) TouchPad light Functions like the left button on an external mouse. ● White: TouchPad is enabled. ● Amber: TouchPad is disabled. (5) TouchPad scroll zone Scrolls up...
Notebook Tour - Windows 7
Page 15
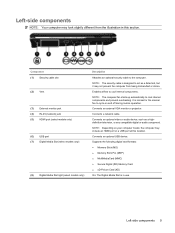
...; Secure Digital (SD) Memory Card ● xD-Picture Card (XD) On: The Digital Media Slot is designed to cool internal components and prevent overheating. Component (1) Security cable slot (2) Vent (3) External monitor port (4) RJ-45 (network) jack (5) HDMI port (select models only) (6) USB port (7) Digital Media Slot (select models only) (8) Digital Media Slot light (select models only) Description Attaches an optional security cable to cool internal components. Connects an optional USB device. NOTE: Depending on and off during routine operation. Left-side components NOTE...
...; Secure Digital (SD) Memory Card ● xD-Picture Card (XD) On: The Digital Media Slot is designed to cool internal components and prevent overheating. Component (1) Security cable slot (2) Vent (3) External monitor port (4) RJ-45 (network) jack (5) HDMI port (select models only) (6) USB port (7) Digital Media Slot (select models only) (8) Digital Media Slot light (select models only) Description Attaches an optional security cable to cool internal components. Connects an optional USB device. NOTE: Depending on and off during routine operation. Left-side components NOTE...
Notebook Tour - Windows 7
Page 20
... may need the Product Key to update or troubleshoot the operating system. Have this information when traveling internationally. An optional device may need this information available when you troubleshoot system problems or travel internationally with the computer. ● Service tag-Provides important information, including the following: ◦ Product name (1). If your notebook. ◦ Serial number (s/n) (2). This is an alphanumeric identifier that is the alphanumeric identifier used to...
... may need the Product Key to update or troubleshoot the operating system. Have this information when traveling internationally. An optional device may need this information available when you troubleshoot system problems or travel internationally with the computer. ● Service tag-Provides important information, including the following: ◦ Product name (1). If your notebook. ◦ Serial number (s/n) (2). This is an alphanumeric identifier that is the alphanumeric identifier used to...
Pointing Devices and Keyboard - Windows 7
Page 5
... Use Mouse Properties in Windows® to customize settings for pointing devices, such as button configuration, click speed, and pointer options. Functions like the right button on an external mouse. ● White: TouchPad is enabled. ● Amber: TouchPad is disabled. To view and change TouchPad preferences, select Start > Devices and Printers. Moves the pointer and selects or activates items on /off button (2) TouchPad* (3) Left TouchPad button* (4) TouchPad light (5) TouchPad scroll zone Enables/disables the TouchPad. Scrolls up or down. (6) Right TouchPad button* Functions...
... Use Mouse Properties in Windows® to customize settings for pointing devices, such as button configuration, click speed, and pointer options. Functions like the right button on an external mouse. ● White: TouchPad is enabled. ● Amber: TouchPad is disabled. To view and change TouchPad preferences, select Start > Devices and Printers. Moves the pointer and selects or activates items on /off button (2) TouchPad* (3) Left TouchPad button* (4) TouchPad light (5) TouchPad scroll zone Enables/disables the TouchPad. Scrolls up or down. (6) Right TouchPad button* Functions...
Pointing Devices and Keyboard - Windows 7
Page 6
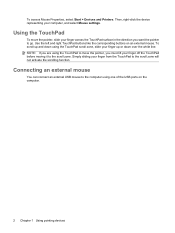
... pointer, you want the pointer to the scroll zone will not activate the scrolling function. To scroll up or down over the white line. Connecting an external mouse You can connect an external USB mouse to the scroll zone. Use the left and right TouchPad buttons like the corresponding buttons on the computer. 2 Chapter 1 Using pointing devices NOTE: If you are using the TouchPad scroll zone, slide your finger up and down...
... pointer, you want the pointer to the scroll zone will not activate the scrolling function. To scroll up or down over the white line. Connecting an external mouse You can connect an external USB mouse to the scroll zone. Use the left and right TouchPad buttons like the corresponding buttons on the computer. 2 Chapter 1 Using pointing devices NOTE: If you are using the TouchPad scroll zone, slide your finger up and down...
Multimedia - Windows 7
Page 29
... Start > Control Panel > System and Security. Try to install the updated driver. Click your specific product from the optical drive. 2. Click Install now to use your computer model number in the Search box, press enter, and follow the instructions provided. When prompted, click Save and then select a storage location on ). 4. Reopen Device Manager, if necessary, and then verify that you want to install. 7. Obtaining the latest HP device drivers 1. Click the option...
... Start > Control Panel > System and Security. Try to install the updated driver. Click your specific product from the optical drive. 2. Click Install now to use your computer model number in the Search box, press enter, and follow the instructions provided. When prompted, click Save and then select a storage location on ). 4. Reopen Device Manager, if necessary, and then verify that you want to install. 7. Obtaining the latest HP device drivers 1. Click the option...
Power Management - Windows 7
Page 16
... battery light displays charge status: ● On: The battery is charging. ● Blinking: The battery has reached a low battery level or critical battery level and is not charging. ● Off: The battery is not being used or charged. ● Store the battery in a cool, dry location. 12 Chapter 3 Using battery power Do not charge the computer battery while you are charging a new battery, charge it fully before turning on the display. ● Check the Power saver setting in Power Options. ● Remove...
... battery light displays charge status: ● On: The battery is charging. ● Blinking: The battery has reached a low battery level or critical battery level and is not charging. ● Off: The battery is not being used or charged. ● Store the battery in a cool, dry location. 12 Chapter 3 Using battery power Do not charge the computer battery while you are charging a new battery, charge it fully before turning on the display. ● Check the Power saver setting in Power Options. ● Remove...
Power Management - Windows 7
Page 19
.... 4. Select Start > Control Panel > System and Security > Power Options. 2. Click the plus sign next to Sleep, and then click the plus sign next to an AC adapter, optional power adapter, or optional expansion product, and then plug the adapter or device into external power until the battery is fully charged. Record the On battery setting under the following conditions: ● When battery charge displays seem inaccurate ● When you observe a significant change in...
.... 4. Select Start > Control Panel > System and Security > Power Options. 2. Click the plus sign next to Sleep, and then click the plus sign next to an AC adapter, optional power adapter, or optional expansion product, and then plug the adapter or device into external power until the battery is fully charged. Record the On battery setting under the following conditions: ● When battery charge displays seem inaccurate ● When you observe a significant change in...


