
HP Notebook Hard Drives & Solid State Drives Identifying, Preventing, Diagnosing and Recovering from Drive Failures Care and Mai
Page 6
...://www8.hp.com/us/en/support-drivers.html Installing SATA drivers SATA Native Mode is a storage interface technology that provides up to address known issues. Updates to the Intel Matrix Storage Manager driver are configured with Intel® Application Accelerator drivers. The latest device driver versions address multiple known issues that could affect hard disk drive performance and reliability. Procedures for adding SATA drivers to RIS (Remote Installation Service) installation...
...://www8.hp.com/us/en/support-drivers.html Installing SATA drivers SATA Native Mode is a storage interface technology that provides up to address known issues. Updates to the Intel Matrix Storage Manager driver are configured with Intel® Application Accelerator drivers. The latest device driver versions address multiple known issues that could affect hard disk drive performance and reliability. Procedures for adding SATA drivers to RIS (Remote Installation Service) installation...

Regulatory, Safety and Environmental Notices User Guide
Page 33
... and work habits for Safety of used with the user-accessible surface temperature limits defined by the International Standard for computer users, and provides important electrical and mechanical safety information. Use the computer only on your lap or obstruct the computer air vents. Potential safety conditions notice If you notice any of in a safe and controlled manner. This guide is located...
... and work habits for Safety of used with the user-accessible surface temperature limits defined by the International Standard for computer users, and provides important electrical and mechanical safety information. Use the computer only on your lap or obstruct the computer air vents. Potential safety conditions notice If you notice any of in a safe and controlled manner. This guide is located...

Regulatory, Safety and Environmental Notices User Guide
Page 37
... not disassemble, crush, puncture, short external contacts, or dispose of in accordance with the HP spare designated for this combination is the same. For information about removing a battery, refer to higher volume and should comply with a proper AC protective earth (PE) ground connection. Changing the default audio or equalizer settings might lead to your own safety, before re-energizing the equipment. Replace...
... not disassemble, crush, puncture, short external contacts, or dispose of in accordance with the HP spare designated for this combination is the same. For information about removing a battery, refer to higher volume and should comply with a proper AC protective earth (PE) ground connection. Changing the default audio or equalizer settings might lead to your own safety, before re-energizing the equipment. Replace...
User Guide
Page 6
... features ...24 Using the webcam ...25 Using audio ...26 Connecting speakers ...26 Connecting headphones and microphones 26 Using Beats Audio (select models only 26 Accessing Beats Audio Control Panel 26 Enabling and disabling Beats Audio 26 Testing your audio features 27 Using HP Connected Music ...27 Using video ...27 Connecting video devices by using an HDMI cable 28 Setting up HDMI audio 28 Discovering and connecting to Miracast-compatible wireless displays (select models only) ...29 6 Navigating the screen ...30 Using the TouchPad and gestures ...30 Tapping ...31 Scrolling ...32...
... features ...24 Using the webcam ...25 Using audio ...26 Connecting speakers ...26 Connecting headphones and microphones 26 Using Beats Audio (select models only 26 Accessing Beats Audio Control Panel 26 Enabling and disabling Beats Audio 26 Testing your audio features 27 Using HP Connected Music ...27 Using video ...27 Connecting video devices by using an HDMI cable 28 Setting up HDMI audio 28 Discovering and connecting to Miracast-compatible wireless displays (select models only) ...29 6 Navigating the screen ...30 Using the TouchPad and gestures ...30 Tapping ...31 Scrolling ...32...
User Guide
Page 8
... Setup Utility (BIOS) ...62 Updating the BIOS ...62 Determining the BIOS version 62 Downloading a BIOS update 63 Using HP PC Hardware Diagnostics (UEFI 63 Downloading HP PC Hardware Diagnostics (UEFI) to a USB device 64 11 Backing up, restoring, and recovering ...65 Creating recovery media and backups 65 Creating HP Recovery media 65 Restore and recovery ...66 Recovering using HP Recovery Manager 67 What you need to know 67 Using the HP Recovery partition (select models only 67 Using HP Recovery media to recover 68 Changing the tablet boot order 68 Removing the HP Recovery partition...
... Setup Utility (BIOS) ...62 Updating the BIOS ...62 Determining the BIOS version 62 Downloading a BIOS update 63 Using HP PC Hardware Diagnostics (UEFI 63 Downloading HP PC Hardware Diagnostics (UEFI) to a USB device 64 11 Backing up, restoring, and recovering ...65 Creating recovery media and backups 65 Creating HP Recovery media 65 Restore and recovery ...66 Recovering using HP Recovery Manager 67 What you need to know 67 Using the HP Recovery partition (select models only 67 Using HP Recovery media to recover 68 Changing the tablet boot order 68 Removing the HP Recovery partition...
User Guide
Page 30
... a disc like a DVD movie or game is part of a network, you to set up a connection or network, connect to a network, and diagnose and repair network problems. To use operating system controls: 1. Using operating system controls The Network and Sharing Center allows you are not limited to using only the information that is stored in your tablet communicates with a wireless router or a wireless access point. ● HP Mobile Broadband Module (select models only)-A wireless wide area network (WWAN) device that...
... a disc like a DVD movie or game is part of a network, you to set up a connection or network, connect to a network, and diagnose and repair network problems. To use operating system controls: 1. Using operating system controls The Network and Sharing Center allows you are not limited to using only the information that is stored in your tablet communicates with a wireless router or a wireless access point. ● HP Mobile Broadband Module (select models only)-A wireless wide area network (WWAN) device that...

User Guide
Page 52
... follow the instructions at the factory. Using the keys You can quickly access information or perform functions by pressing the fn key in Setup Utility (BIOS). The action key feature is connected to the tablet, repeatedly pressing this feature. 42 Chapter 6 Navigating the screen Help and Support also provides automated troubleshooting tools and access to the system. f4 Switches the screen image between display devices connected to support. CAUTION: Use extreme care when making changes in...
... follow the instructions at the factory. Using the keys You can quickly access information or perform functions by pressing the fn key in Setup Utility (BIOS). The action key feature is connected to the tablet, repeatedly pressing this feature. 42 Chapter 6 Navigating the screen Help and Support also provides automated troubleshooting tools and access to the system. f4 Switches the screen image between display devices connected to support. CAUTION: Use extreme care when making changes in...
User Guide
Page 59
..., the power lights turn on and your work returns to the screen. Click Save changes. Initiating Sleep and Hibernation 49 Click Change Settings that are currently unavailable. 4. If you need to create or change a user account password, go to prompt for a password when the tablet exits Sleep or Hibernation, follow the on wakeup, you must enter your Windows password before your current user account password, click Create or change other power settings and timeouts using Power Options. 1. Manually initiating...
..., the power lights turn on and your work returns to the screen. Click Save changes. Initiating Sleep and Hibernation 49 Click Change Settings that are currently unavailable. 4. If you need to create or change a user account password, go to prompt for a password when the tablet exits Sleep or Hibernation, follow the on wakeup, you must enter your Windows password before your current user account password, click Create or change other power settings and timeouts using Power Options. 1. Manually initiating...

User Guide
Page 63
... to your updated information. ▲ To enable this feature or manually adjust the settings, from external power. Smart Connect also syncs content that does not connect to a USB or video port ● When the tablet will be unused and disconnected from external power for at least 5 seconds. ● Disconnect the tablet from the Start screen, type smart, and then select Intel® Smart Connect Technology. Shutting down (turning off...
... to your updated information. ▲ To enable this feature or manually adjust the settings, from external power. Smart Connect also syncs content that does not connect to a USB or video port ● When the tablet will be unused and disconnected from external power for at least 5 seconds. ● Disconnect the tablet from the Start screen, type smart, and then select Intel® Smart Connect Technology. Shutting down (turning off...
User Guide
Page 69
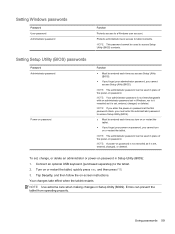
...2. Connect an optional USB keyboard (purchased separately) to tablet contents. NOTE: Use extreme care when making changes in place of the power-on password. Errors can be used in Setup Utility (BIOS): 1. Your changes take effect when the tablet restarts. NOTE: This password cannot be used to a Windows user account. NOTE: The administrator password can prevent the tablet from operating properly. Setting Windows passwords Password User password Administrator password Function Protects access to access Setup Utility (BIOS) contents. NOTE: A power-on password is...
...2. Connect an optional USB keyboard (purchased separately) to tablet contents. NOTE: Use extreme care when making changes in place of the power-on password. Errors can be used in Setup Utility (BIOS): 1. Your changes take effect when the tablet restarts. NOTE: This password cannot be used to a Windows user account. NOTE: The administrator password can prevent the tablet from operating properly. Setting Windows passwords Password User password Administrator password Function Protects access to access Setup Utility (BIOS) contents. NOTE: A power-on password is...
User Guide
Page 70
... you use your tablet to access email, a network, or the Internet, you upgrade the security software trial offer or purchase the software of your choice in order to fully protect your tablet. You can disable programs, utilities, or the operating system, or cause them , and in most viruses, destroy them to function abnormally. To change the settings, from the Start screen, type support, and then select the HP Support Assistant...
... you use your tablet to access email, a network, or the Internet, you upgrade the security software trial offer or purchase the software of your choice in order to fully protect your tablet. You can disable programs, utilities, or the operating system, or cause them , and in most viruses, destroy them to function abnormally. To change the settings, from the Start screen, type support, and then select the HP Support Assistant...
User Guide
Page 73
... before installing any device, cable, or cord. 1. If the update is more recent than your BIOS, make a note of the path to the location on the screen reports a successful installation, you connect your hard drive where the BIOS update is downloaded. Double-click the file that contains the update. 4. From the Start screen, type support, and then select the HP Support Assistant app. 2. NOTE: After a message on your tablet to your hard drive. Using HP PC Hardware...
... before installing any device, cable, or cord. 1. If the update is more recent than your BIOS, make a note of the path to the location on the screen reports a successful installation, you connect your hard drive where the BIOS update is downloaded. Double-click the file that contains the update. 4. From the Start screen, type support, and then select the HP Support Assistant app. 2. NOTE: After a message on your tablet to your hard drive. Using HP PC Hardware...

User Guide
Page 74
..., quickly press the Windows button on -screen instructions. There are provided in the following order: a. To start HP PC Hardware Diagnostics UEFI: 1. Connected USB drive NOTE: To download the HP PC Hardware Diagnostics (UEFI) tool to a USB drive, see Downloading HP PC Hardware Diagnostics (UEFI) to http://hp.com/go/techcenter/pcdiags. 2. BIOS 2. or - Click Find Now to stop a diagnostic test, tap anywhere on page 64. Hard drive c. When the diagnostic tool opens, use the keyboard arrow keys...
..., quickly press the Windows button on -screen instructions. There are provided in the following order: a. To start HP PC Hardware Diagnostics UEFI: 1. Connected USB drive NOTE: To download the HP PC Hardware Diagnostics (UEFI) tool to a USB drive, see Downloading HP PC Hardware Diagnostics (UEFI) to http://hp.com/go/techcenter/pcdiags. 2. BIOS 2. or - Click Find Now to stop a diagnostic test, tap anywhere on page 64. Hard drive c. When the diagnostic tool opens, use the keyboard arrow keys...
User Guide
Page 76
... create recovery discs, or you can obtain recovery discs for your tablet from the HP Recovery partition (select models only) or HP Recovery media. See the Worldwide Telephone Numbers booklet included with a preinstalled application or driver, use the HP Recovery media that best matches your situation and level of the recovery DVDs. From the Start screen, type recovery, and then select HP Recovery Manager. 2. If you can choose the HP Minimized Image Recovery option from support. From the Start screen, type recovery, select HP Recovery Manager, select Drivers and...
... create recovery discs, or you can obtain recovery discs for your tablet from the HP Recovery partition (select models only) or HP Recovery media. See the Worldwide Telephone Numbers booklet included with a preinstalled application or driver, use the HP Recovery media that best matches your situation and level of the recovery DVDs. From the Start screen, type recovery, and then select HP Recovery Manager. 2. If you can choose the HP Minimized Image Recovery option from support. From the Start screen, type recovery, select HP Recovery Manager, select Drivers and...

User Guide
Page 77
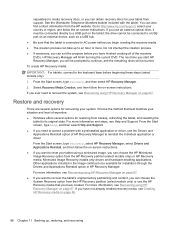
...: HP Recovery Manager does not automatically provide backups of recovery can obtain recovery media for your system from one of HP Recovery media to restore the factory image to the replacement drive. Recovering using the HP Recovery partition (select models only). This type of your country or region, and follow the on page 65. ● If the HP Recovery media does not work, you created or by deleting all hardware-related drivers and software, but not other software applications. ● Factory Reset-Restores...
...: HP Recovery Manager does not automatically provide backups of recovery can obtain recovery media for your system from one of HP Recovery media to restore the factory image to the replacement drive. Recovering using the HP Recovery partition (select models only). This type of your country or region, and follow the on page 65. ● If the HP Recovery media does not work, you created or by deleting all hardware-related drivers and software, but not other software applications. ● Factory Reset-Restores...
User Guide
Page 78
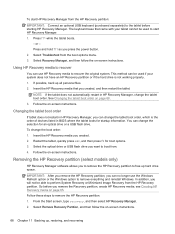
... hard drive is the order of devices listed in BIOS where the tablet looks for startup information. Follow the on -screen instructions. Follow the on -screen instructions. Removing the HP Recovery partition (select models only) HP Recovery Manager software allows you can use the Windows Refresh option or the Windows option to free up hard drive space. IMPORTANT: After you remove the HP Recovery partition, you to remove the HP Recovery partition to remove everything and reinstall Windows. See Changing the tablet boot order on page 65. see Creating HP Recovery media...
... hard drive is the order of devices listed in BIOS where the tablet looks for startup information. Follow the on -screen instructions. Follow the on -screen instructions. Removing the HP Recovery partition (select models only) HP Recovery Manager software allows you can use the Windows Refresh option or the Windows option to free up hard drive space. IMPORTANT: After you remove the HP Recovery partition, you to remove the HP Recovery partition to remove everything and reinstall Windows. See Changing the tablet boot order on page 65. see Creating HP Recovery media...
User Guide
Page 81
... low battery levels 51 battery information, finding 50 battery power 50 Beats Audio 26 Beats Audio Control Panel 26 Beats Audio hot key 26 BIOS determining version 62 downloading an update 63 updating 62 Bluetooth device 23 Bluetooth label 11 boot order changing HP Recovery Manager 68 bottom 11 brightness adjusting 13 buttons volume 7, 25 C caps lock light, identifying 15 caring for your tablet 55 cleaning your tablet 55 components bottom 10 display 8 front 9 keyboard base 14 left side 7 rear 9 right side 6 connecting to...
... low battery levels 51 battery information, finding 50 battery power 50 Beats Audio 26 Beats Audio Control Panel 26 Beats Audio hot key 26 BIOS determining version 62 downloading an update 63 updating 62 Bluetooth device 23 Bluetooth label 11 boot order changing HP Recovery Manager 68 bottom 11 brightness adjusting 13 buttons volume 7, 25 C caps lock light, identifying 15 caring for your tablet 55 cleaning your tablet 55 components bottom 10 display 8 front 9 keyboard base 14 left side 7 rear 9 right side 6 connecting to...
User Guide
Page 82
... recovery partition removing 68 regulatory information regulatory label 11 wireless certification labels 11 restore Windows File History 66 right-edge swipe 40 S scrolling TouchPad gesture 32 security, wireless 22 serial number 11 serial number, tablet 11 service labels locating 11 setting password protection on wakeup 49 settings autorotate lock 13 brightness 13 changing 13 landscape view 13 portrait view 13 tablet orientation 13 setup of WLAN 21 Setup Utility (BIOS) passwords 59 shipping the tablet 56 shutdown 53 Sleep exiting 49 initiating 49 slots memory card reader 6 software Disk...
... recovery partition removing 68 regulatory information regulatory label 11 wireless certification labels 11 restore Windows File History 66 right-edge swipe 40 S scrolling TouchPad gesture 32 security, wireless 22 serial number 11 serial number, tablet 11 service labels locating 11 setting password protection on wakeup 49 settings autorotate lock 13 brightness 13 changing 13 landscape view 13 portrait view 13 tablet orientation 13 setup of WLAN 21 Setup Utility (BIOS) passwords 59 shipping the tablet 56 shutdown 53 Sleep exiting 49 initiating 49 slots memory card reader 6 software Disk...
HP ENVY x2 (model numbers 13- j000 through 13-j099) Maintenance and Service Guide
Page 35
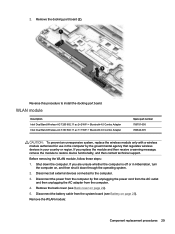
If you replace the module and then receive a warning message, remove the module to restore device functionality, and then contact technical support. Remove the back cover (see Battery on page 25). Remove the WLAN module: Component replacement procedures 29 Remove the docking port board (2). WLAN module Description Intel Dual Band Wireless-AC 7265 802.11 ac 2×2 WiFi + Bluetooth 4.0 Combo Adapter Intel Dual Band Wireless-AC 3160 802.11 ac 1×1 WiFi + Bluetooth 4.0 Combo Adapter Spare part number 756751...
If you replace the module and then receive a warning message, remove the module to restore device functionality, and then contact technical support. Remove the back cover (see Battery on page 25). Remove the WLAN module: Component replacement procedures 29 Remove the docking port board (2). WLAN module Description Intel Dual Band Wireless-AC 7265 802.11 ac 2×2 WiFi + Bluetooth 4.0 Combo Adapter Intel Dual Band Wireless-AC 3160 802.11 ac 1×1 WiFi + Bluetooth 4.0 Combo Adapter Spare part number 756751...

HP ENVY x2 (model numbers 13- j000 through 13-j099) Maintenance and Service Guide
Page 48
... from your BIOS, make a note of the path to the location on your hard drive where the BIOS update is more recent than your hard drive. 42 Chapter 6 Using Setup Utility (BIOS) and HP PC Hardware Diagnostics (UEFI) The BIOS installation begins. 5. NOTE: After a message on the screen reports a successful installation, you connect your hard drive that contains the update. 4. Follow the on-screen instructions to download your hard drive designation. Complete the installation by unplugging the power cord from...
... from your BIOS, make a note of the path to the location on your hard drive where the BIOS update is more recent than your hard drive. 42 Chapter 6 Using Setup Utility (BIOS) and HP PC Hardware Diagnostics (UEFI) The BIOS installation begins. 5. NOTE: After a message on the screen reports a successful installation, you connect your hard drive that contains the update. 4. Follow the on-screen instructions to download your hard drive designation. Complete the installation by unplugging the power cord from...


