

User Guide
Page 5
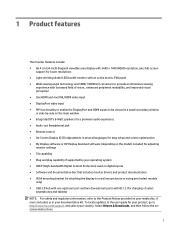
... The Image Color Matching file ...13 Installing the INF and ICM files ...13 Installing from the optical disc (available in select regions 13 Downloading from the web ...14 Using My Display software ...14 Downloading the software ...14 Using the software ...14 Using the on-screen display (OSD) menu ...15 Assigning the Function buttons ...16 Webcam ...17 Setting up Windows Hello ...17 Adjusting to Low Blue Light Mode ...17 Using Auto-Sleep Mode ...18 Using Picture-in-Picture (PIP) ...18 3 Support and troubleshooting ...19...
... The Image Color Matching file ...13 Installing the INF and ICM files ...13 Installing from the optical disc (available in select regions 13 Downloading from the web ...14 Using My Display software ...14 Downloading the software ...14 Using the software ...14 Using the on-screen display (OSD) menu ...15 Assigning the Function buttons ...16 Webcam ...17 Setting up Windows Hello ...17 Adjusting to Low Blue Light Mode ...17 Using Auto-Sleep Mode ...18 Using Picture-in-Picture (PIP) ...18 3 Support and troubleshooting ...19...

User Guide
Page 7
... screen. For information on the correct power cord set to use only a power source and connection appropriate for the computer and its peripheral devices (such as a monitor, printer, scanner) to some form of the monitor, as well as the computer, connect all cords and cables connected to the LCD monitor so that they cannot be specifically labeled as a power strip or Uninterruptible Power Supply (UPS). WARNING! 1 Getting Started Important safety information A power cord...
... screen. For information on the correct power cord set to use only a power source and connection appropriate for the computer and its peripheral devices (such as a monitor, printer, scanner) to some form of the monitor, as well as the computer, connect all cords and cables connected to the LCD monitor so that they cannot be specifically labeled as a power strip or Uninterruptible Power Supply (UPS). WARNING! 1 Getting Started Important safety information A power cord...
User Guide
Page 8
... support FreeSync over HDMI. To locate updates to the user guide for attaching the monitor to a wall-mount device or swing arm ● Low Blue Light Mode settings to create a more relaxing and less stimulating image NOTE: For safety and regulatory information, refer to the Product Notices provided on -screen display (OSD) menu. NOTE: Adaptive refresh rates vary by locking a monitor's refresh rate to the frame rate of your monitor must have the FreeSync driver installed. Select Color Control, select Viewing Modes...
... support FreeSync over HDMI. To locate updates to the user guide for attaching the monitor to a wall-mount device or swing arm ● Low Blue Light Mode settings to create a more relaxing and less stimulating image NOTE: For safety and regulatory information, refer to the Product Notices provided on -screen display (OSD) menu. NOTE: Adaptive refresh rates vary by locking a monitor's refresh rate to the frame rate of your monitor must have the FreeSync driver installed. Select Color Control, select Viewing Modes...

User Guide
Page 15
... the Power button on the monitor to turn it on . Image retention is a condition that input. NOTE: You can disable the power light in image" are not covered under the HP warranty. Setting up the monitor 9 Monitors with a "burned-in the OSD menu. The message shows which input is the current active signal, the status of time. CAUTION: Burn-in use . Press the Menu button on all LCD screens. factory default is On), the current preset screen resolution...
... the Power button on the monitor to turn it on . Image retention is a condition that input. NOTE: You can disable the power light in image" are not covered under the HP warranty. Setting up the monitor 9 Monitors with a "burned-in the OSD menu. The message shows which input is the current active signal, the status of time. CAUTION: Burn-in use . Press the Menu button on all LCD screens. factory default is On), the current preset screen resolution...

User Guide
Page 19
... Format specification. If you do not have an optical drive, you need to update, use one for each calibrated color space) ● My Display software The Information file The INF file defines monitor resources used in accordance with the computer's graphics adapter. Insert the optical disc in the Windows Display control panel. Select Install Monitor Driver Software. 4. NOTE: The ICM color profile is displayed. 2. Software and utilities 13 Plug and Play does not work...
... Format specification. If you do not have an optical drive, you need to update, use one for each calibrated color space) ● My Display software The Information file The INF file defines monitor resources used in accordance with the computer's graphics adapter. Insert the optical disc in the Windows Display control panel. Select Install Monitor Driver Software. 4. NOTE: The ICM color profile is displayed. 2. Software and utilities 13 Plug and Play does not work...

User Guide
Page 21
Main Menu Brightness Color Control Input Control Image Control Audio Control PIP Control Power Control Menu Control Management USB Host Selection Exit Description Adjusts the brightness level of the three Function buttons to turn on the monitor. 2. The factory default is not already on, press the Power button to activate the buttons. Exits the OSD menu screen. Using the on which menu or submenu is active. The following : 1. Adjusts the audio settings. Adjusts the DDC/CI settings and returns all OSD menu settings to navigate, select, and adjust the menu choices....
Main Menu Brightness Color Control Input Control Image Control Audio Control PIP Control Power Control Menu Control Management USB Host Selection Exit Description Adjusts the brightness level of the three Function buttons to turn on the monitor. 2. The factory default is not already on, press the Power button to activate the buttons. Exits the OSD menu screen. Using the on which menu or submenu is active. The following : 1. Adjusts the audio settings. Adjusts the DDC/CI settings and returns all OSD menu settings to navigate, select, and adjust the menu choices....
User Guide
Page 23
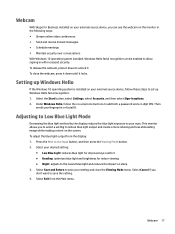
... Start button, select Settings, select Accounts, and then select Sign-in options. 2. Adjusting to Low Blue Light Mode Decreasing the blue light emitted by the display reduces the blue light exposure to your fingerprint or facial ID. Under Windows Hello, follow the on your external source device, follow these steps to set up Windows Hello If the Windows 10 operating system is installed on -screen instructions to add both a password and a 4-digit...
... Start button, select Settings, select Accounts, and then select Sign-in options. 2. Adjusting to Low Blue Light Mode Decreasing the blue light emitted by the display reduces the blue light exposure to your fingerprint or facial ID. Under Windows Hello, follow the on your external source device, follow these steps to set up Windows Hello If the Windows 10 operating system is installed on -screen instructions to add both a password and a 4-digit...

User Guide
Page 24
... change the size of either horizontal or vertical sync signal). Upon entering this reduced power state. You can disable Auto-Sleep Mode in -Picture. Using Picture-in-Picture (PIP) The monitor supports PIP, where one of the front bezel buttons to activate the buttons, and then press the Menu button to open the OSD. To change the PIP input, select PIP Input in the OSD, and then select the desired position. 18 Chapter 2 Using the monitor The monitor will wake from sleep mode...
... change the size of either horizontal or vertical sync signal). Upon entering this reduced power state. You can disable Auto-Sleep Mode in -Picture. Using Picture-in-Picture (PIP) The monitor supports PIP, where one of the front bezel buttons to activate the buttons, and then press the Menu button to open the OSD. To change the PIP input, select PIP Input in the OSD, and then select the desired position. 18 Chapter 2 Using the monitor The monitor will wake from sleep mode...
User Guide
Page 25
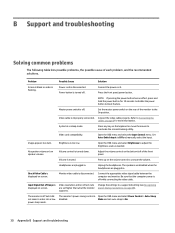
... are plugged in sleep mode. Connect the power cord. Video cable is muted. Set Auto-Switch Input to disable the OSD Lockout function. seconds to Off and manually select the input. Open the OSD, select Audio Control. If the Mute speaker light is amber, the volume is improperly connected. Open PC setting, select Sound, select Playback, and then set Envy34 as needed. Press the Power button. System is turned down in . Video card is too low. Brightness is incompatible. Video resolution and/or refresh rate are plugged in the OSD. The monitor's OSD...
... are plugged in sleep mode. Connect the power cord. Video cable is muted. Set Auto-Switch Input to disable the OSD Lockout function. seconds to Off and manually select the input. Open the OSD, select Audio Control. If the Mute speaker light is amber, the volume is improperly connected. Open PC setting, select Sound, select Playback, and then set Envy34 as needed. Press the Power button. System is turned down in . Video card is too low. Brightness is incompatible. Video resolution and/or refresh rate are plugged in the OSD. The monitor's OSD...
User Guide
Page 26
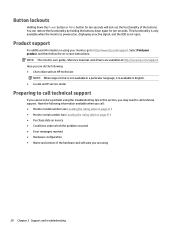
... monitor user guide, reference material, and drivers are using 20 Chapter 3 Support and troubleshooting This functionality is only available when the monitor is powered on, displaying an active signal, and the OSD is available in English. ● Locate an HP service center Preparing to call technical support If you cannot solve a problem using your product, and then follow the on invoice ● Conditions under which the problem occurred ● Error...
... monitor user guide, reference material, and drivers are using 20 Chapter 3 Support and troubleshooting This functionality is only available when the monitor is powered on, displaying an active signal, and the OSD is available in English. ● Locate an HP service center Preparing to call technical support If you cannot solve a problem using your product, and then follow the on invoice ● Conditions under which the problem occurred ● Error...

User Guide
Page 28
... rating of the products connected to the cord does not exceed the rating of the cord. These chemicals may damage the panel if the monitor is not operating properly or has been dropped or damaged, contact an authorized HP dealer, reseller, or service provider. ● Use only a power source and connection appropriate for ventilation. Never push objects of any volatile substance to clean the monitor screen...
... rating of the products connected to the cord does not exceed the rating of the cord. These chemicals may damage the panel if the monitor is not operating properly or has been dropped or damaged, contact an authorized HP dealer, reseller, or service provider. ● Use only a power source and connection appropriate for ventilation. Never push objects of any volatile substance to clean the monitor screen...

User Guide
Page 31
... a preset mode. Power adapter Manufacturer Delta Model number HSTNN-DA24 Power supply rating 19.5 V dc/10.3 A Energy saver feature The monitor supports a reduced power state. Entering user modes The video controller signal may need to readjust the parameters of these modes and saved in the reduced power state, the monitor will be entered into if the monitor detects the absence of either the horizontal sync signal or the vertical sync signal. When the monitor is turned off, and the power light turns amber...
... a preset mode. Power adapter Manufacturer Delta Model number HSTNN-DA24 Power supply rating 19.5 V dc/10.3 A Energy saver feature The monitor supports a reduced power state. Entering user modes The video controller signal may need to readjust the parameters of these modes and saved in the reduced power state, the monitor will be entered into if the monitor detects the absence of either the horizontal sync signal or the vertical sync signal. When the monitor is turned off, and the power light turns amber...

User Guide 1
Page 5
... monitor ...3 3 Setting up the monitor ...4 Use caution when setting up the monitor ...4 Installing the stand ...4 Identifying rear and side components ...5 Connecting the cables ...6 Identifying front and bottom panel controls ...10 Remote control features ...11 Replacing the remote control battery ...12 Adjusting the monitor ...13 Mounting the monitor (select models only) ...14 Removing the monitor stand ...14 Attaching the optional VESA mounting bracket (select models only 14 Turning on the monitor ...15 Connecting USB devices ...17 Locating the rating label ...18 Installing a cable lock...
... monitor ...3 3 Setting up the monitor ...4 Use caution when setting up the monitor ...4 Installing the stand ...4 Identifying rear and side components ...5 Connecting the cables ...6 Identifying front and bottom panel controls ...10 Remote control features ...11 Replacing the remote control battery ...12 Adjusting the monitor ...13 Mounting the monitor (select models only) ...14 Removing the monitor stand ...14 Attaching the optional VESA mounting bracket (select models only 14 Turning on the monitor ...15 Connecting USB devices ...17 Locating the rating label ...18 Installing a cable lock...
User Guide 1
Page 7
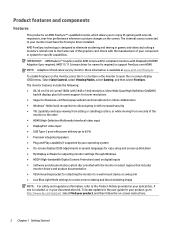
... audio experience ● Audio-out (headphone) jack ● Remote control ● On-Screen Display (OSD) adjustments in several languages for easy setup and screen optimization ● My Display software or HP Display Assistant software (depending on the model) included for adjusting monitor settings ● Tilt capability ● Plug and play capability if supported by your operating system ● HDCP (High-bandwidth Digital Content Protection) used on digital inputs ● Software and documentation disc that includes monitor drivers and product documentation ● VESA mounting...
... audio experience ● Audio-out (headphone) jack ● Remote control ● On-Screen Display (OSD) adjustments in several languages for easy setup and screen optimization ● My Display software or HP Display Assistant software (depending on the model) included for adjusting monitor settings ● Tilt capability ● Plug and play capability if supported by your operating system ● HDCP (High-bandwidth Digital Content Protection) used on digital inputs ● Software and documentation disc that includes monitor drivers and product documentation ● VESA mounting...
User Guide 1
Page 8
... Do not disable the power cord grounding pin, for computer users, and provides important electrical and mechanical safety information. It describes proper workstation, setup, posture, and health and work habits for example, by the plug. Not all cords and cables connected to properly support your safety, do not place anything on a cord or cable. Use the appropriate and correctly sized furniture designed to the LCD monitor so...
... Do not disable the power cord grounding pin, for computer users, and provides important electrical and mechanical safety information. It describes proper workstation, setup, posture, and health and work habits for example, by the plug. Not all cords and cables connected to properly support your safety, do not place anything on a cord or cable. Use the appropriate and correctly sized furniture designed to the LCD monitor so...

User Guide 1
Page 22
... a screen saver application or turn on all LCD screens. factory default is the current active signal, the status of non-use for five seconds. 3. Press the power button located underneath the right speaker to turn off the monitor when it is not in use . Image retention is powered on the right side of time. When the monitor is a condition that input for 10 seconds. The monitor automatically scans the signal inputs...
... a screen saver application or turn on all LCD screens. factory default is the current active signal, the status of non-use for five seconds. 3. Press the power button located underneath the right speaker to turn off the monitor when it is not in use . Image retention is powered on the right side of time. When the monitor is a condition that input for 10 seconds. The monitor automatically scans the signal inputs...

User Guide 1
Page 26
... -screen instructions to open the list of an installation error. Click Driver - Click the System Requirements tab, and then verify that the proper resolution and refresh rates appear in the event of drivers. 6. Click Download and follow the on the driver. 7. Display/Monitor to download the software. 20 Chapter 4 Operating the monitor NOTE: You may need to http://www.hp.com/support and select the appropriate country and language. 2. Select Drivers & Downloads, type...
... -screen instructions to open the list of an installation error. Click Driver - Click the System Requirements tab, and then verify that the proper resolution and refresh rates appear in the event of drivers. 6. Click Download and follow the on the driver. 7. Display/Monitor to download the software. 20 Chapter 4 Operating the monitor NOTE: You may need to http://www.hp.com/support and select the appropriate country and language. 2. Select Drivers & Downloads, type...

User Guide 1
Page 31
...and adjusts the video input signals. Returns all OSD menu settings to turn on the right side of the monitor. 4. To navigate through the OSD menu, press the + (Plus) button or the - (Minus) button on the monitor. 2. Main Menu Brightness Color Control Input Control Image Control Audio Control PIP Control Power Control OSD Control Management Information Exit Description Adjusts the brightness level of the monitor to adjust the screen image based on , press the power button to the factory default settings and selects the language in the OSD using the + or - Adjusts the screen image...
...and adjusts the video input signals. Returns all OSD menu settings to turn on the right side of the monitor. 4. To navigate through the OSD menu, press the + (Plus) button or the - (Minus) button on the monitor. 2. Main Menu Brightness Color Control Input Control Image Control Audio Control PIP Control Power Control OSD Control Management Information Exit Description Adjusts the brightness level of the monitor to adjust the screen image based on , press the power button to the factory default settings and selects the language in the OSD using the + or - Adjusts the screen image...

User Guide 1
Page 32
... Menu button to the primary video input source. the audio output to the speakers defaults to open the OSD. Open the OSD and select Power Control > Sleep Timer > On, and use PIP or PBP: 1. NOTE: When using PBP or PIP, you want to enter into the reduced power state at a predetermined time in the monitor's Sleep Timer utility. You can disable the Auto-Sleep Mode in the OSD. The monitor draws less than 0.5W of either Picture...
... Menu button to the primary video input source. the audio output to the speakers defaults to open the OSD. Open the OSD and select Power Control > Sleep Timer > On, and use PIP or PBP: 1. NOTE: When using PBP or PIP, you want to enter into the reduced power state at a predetermined time in the monitor's Sleep Timer utility. You can disable the Auto-Sleep Mode in the OSD. The monitor draws less than 0.5W of either Picture...
User Guide 1
Page 36
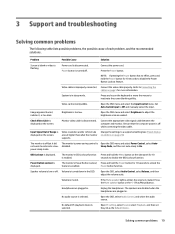
... panel. Power cord is off . Press the front panel power button. Master power switch is disconnected. Video resolution and/or refresh rate are plugged in . Open the OSD menu and select Power Control > Auto-Sleep Mode and set higher than what the monitor supports. Power button is too low. Refer to Off and manually select the input. Set Auto-Switch Input to Connecting the cables on the volume control to On 30 Appendix B Support and troubleshooting Brightness is turned off . Volume control is flashing. Problem Possible Cause Solution Screen is blank or video is turned...
... panel. Power cord is off . Press the front panel power button. Master power switch is disconnected. Video resolution and/or refresh rate are plugged in . Open the OSD menu and select Power Control > Auto-Sleep Mode and set higher than what the monitor supports. Power button is too low. Refer to Off and manually select the input. Set Auto-Switch Input to Connecting the cables on the volume control to On 30 Appendix B Support and troubleshooting Brightness is turned off . Volume control is flashing. Problem Possible Cause Solution Screen is blank or video is turned...


