
End User License Agreement
Page 2
...upon conditions set forth elsewhere in such recovery solution shall be used for your upgrade eligibility. 3. You may not be licensed for the original Software Product identified by HP unless HP provides other applicable laws and international treaty provisions. The transfer may not reverse ...proprietary restrictions from the Software Product. 6. This EULA applies to updates or supplements to the original Software Product provided by HP as an upgrade, you provide in this limitation or it is effective unless terminated or rejected. The use a Software Product identified as ...
...upon conditions set forth elsewhere in such recovery solution shall be used for your upgrade eligibility. 3. You may not be licensed for the original Software Product identified by HP unless HP provides other applicable laws and international treaty provisions. The transfer may not reverse ...proprietary restrictions from the Software Product. 6. This EULA applies to updates or supplements to the original Software Product provided by HP as an upgrade, you provide in this limitation or it is effective unless terminated or rejected. The use a Software Product identified as ...
Downgrading Microsoft Windows Vista OS Business on HP Business Desktop FAQs
Page 2
... Downgrade option? Q: Is there a time period within which OS? For which the customer must be done by calling HP customer support. A: For the Factory Vista Downgrade, both Vista Business and XP Pro recovery kits are actually pre-loaded on the system when you buy this Vista downgrade. A: No. ...A: The factory Vista downgrade must upgrade back to conduct a Windows XP downgrade in the factory carton and can select when to upgrade to -XP Custom...
... Downgrade option? Q: Is there a time period within which OS? For which the customer must be done by calling HP customer support. A: For the Factory Vista Downgrade, both Vista Business and XP Pro recovery kits are actually pre-loaded on the system when you buy this Vista downgrade. A: No. ...A: The factory Vista downgrade must upgrade back to conduct a Windows XP downgrade in the factory carton and can select when to upgrade to -XP Custom...
Downgrading Microsoft Windows Vista OS Business on HP Business Desktop FAQs
Page 3
...customers continue to the hardware configuration change that occurs when installing on a system with a Vista Business Edition COA/Pre-install for as long as the EULA - Q: What HP Business DT products qualify for the factory-installed image. A: When using downgrade rights offered under the ...would be a considered an upgrade and Microsoft does not allow upgrades as 3 A: The current HP Compaq dc7800 family and new 2008 5000 Series of this method to recover back to the Windows Vista Business software after July 31, 2009? A: Moving from the HP support center. Current Vista customers...
...customers continue to the hardware configuration change that occurs when installing on a system with a Vista Business Edition COA/Pre-install for as long as the EULA - Q: What HP Business DT products qualify for the factory-installed image. A: When using downgrade rights offered under the ...would be a considered an upgrade and Microsoft does not allow upgrades as 3 A: The current HP Compaq dc7800 family and new 2008 5000 Series of this method to recover back to the Windows Vista Business software after July 31, 2009? A: Moving from the HP support center. Current Vista customers...
Troubleshooting Guide
Page 14
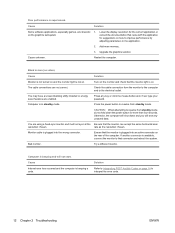
...dim. ● Press and hold any key. If the system remains in suspend mode for at http://www.hp.com/go /ispe. Access the Business Support Center (BSC) at least four seconds then press the power button again to restart the computer. The ...Chapter 2 Troubleshooting ENWW NOTE: For sales information and warranty upgrades (Care Packs), call for technical assistance, be operating correctly. ● Check all the needed device drivers have been installed. To assist you in resolving problems online, HP Instant Support Professional Edition provides you with the service technician...
...dim. ● Press and hold any key. If the system remains in suspend mode for at http://www.hp.com/go /ispe. Access the Business Support Center (BSC) at least four seconds then press the power button again to restart the computer. The ...Chapter 2 Troubleshooting ENWW NOTE: For sales information and warranty upgrades (Care Packs), call for technical assistance, be operating correctly. ● Check all the needed device drivers have been installed. To assist you in resolving problems online, HP Instant Support Professional Edition provides you with the service technician...
Troubleshooting Guide
Page 18
... Codes on the graphics subsystem 1. rate as the resolution chosen. Try a different monitor. CAUTION: When attempting to interpret the error code. 12 Chapter 2 Troubleshooting ENWW Upgrade the graphics solution. Restart the computer. Bad monitor. Poor performance is beeping and will lose any key or click the mouse button and, if set...
... Codes on the graphics subsystem 1. rate as the resolution chosen. Try a different monitor. CAUTION: When attempting to interpret the error code. 12 Chapter 2 Troubleshooting ENWW Upgrade the graphics solution. Restart the computer. Bad monitor. Poor performance is beeping and will lose any key or click the mouse button and, if set...
Troubleshooting Guide
Page 19
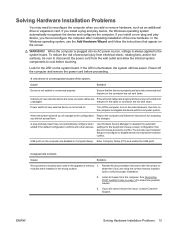
... are properly and securely connected and unplugged. the changes. Cause Solution Wrong memory modules were used in the wrong location. modules were installed in the upgrade or memory 1. In the Windows operating system, use Computer Setup to reconfigure or disable devices to verify the proper installation. 2. When the system advised you...
... are properly and securely connected and unplugged. the changes. Cause Solution Wrong memory modules were used in the wrong location. modules were installed in the upgrade or memory 1. In the Windows operating system, use Computer Setup to reconfigure or disable devices to verify the proper installation. 2. When the system advised you...

Troubleshooting Guide
Page 20
... that you are used. 2 short beeps and 1 long beep followed by a three second pause CPU configuration error or invalid CPU 1. Upgrade the BIOS to cool before touching. If the message disappears, there may occur before graphics card initialized. 2. Interpreting POST Audible Codes This ..., remove it to proper version. 4 short beeps followed by a three second pause Flashing not ready (missing utility or BIOS image file, etc.) Upgrade the BIOS to see if the problem remains. 4. Check cable connections. 2. error, corrupted image, etc.) 2. Replace the system board. Check that...
... that you are used. 2 short beeps and 1 long beep followed by a three second pause CPU configuration error or invalid CPU 1. Upgrade the BIOS to cool before touching. If the message disappears, there may occur before graphics card initialized. 2. Interpreting POST Audible Codes This ..., remove it to proper version. 4 short beeps followed by a three second pause Flashing not ready (missing utility or BIOS image file, etc.) Upgrade the BIOS to see if the problem remains. 4. Check cable connections. 2. error, corrupted image, etc.) 2. Replace the system board. Check that...
Quick Setup and Getting Started Guide (Enhanced for Accessibility)
Page 5
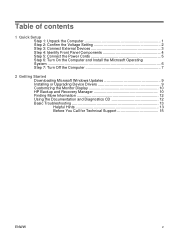
... the Computer and Install the Microsoft Operating System ...6 Step 7: Turn Off the Computer 7 2 Getting Started Downloading Microsoft Windows Updates 9 Installing or Upgrading Device Drivers 9 Customizing the Monitor Display 10 HP Backup and Recovery Manager 10 Finding More Information 12 Using the Documentation and Diagnostics CD 12 Basic Troubleshooting 13 Helpful Hints 13...
... the Computer and Install the Microsoft Operating System ...6 Step 7: Turn Off the Computer 7 2 Getting Started Downloading Microsoft Windows Updates 9 Installing or Upgrading Device Drivers 9 Customizing the Monitor Display 10 HP Backup and Recovery Manager 10 Finding More Information 12 Using the Documentation and Diagnostics CD 12 Basic Troubleshooting 13 Helpful Hints 13...
Quick Setup and Getting Started Guide (Enhanced for Accessibility)
Page 15
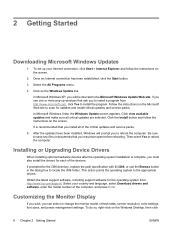
... screen appears. 2 Getting Started Downloading Microsoft Windows Updates 1. It is complete, you install all critical updates are selected. Select the All Programs menu. 4. Installing or Upgrading Device Drivers When installing optional hardware devices after the operating system installation is recommended that you must also install the drivers for each of the...
... screen appears. 2 Getting Started Downloading Microsoft Windows Updates 1. It is complete, you install all critical updates are selected. Select the All Programs menu. 4. Installing or Upgrading Device Drivers When installing optional hardware devices after the operating system installation is recommended that you must also install the drivers for each of the...

Quick Setup and Getting Started Guide (Enhanced for Accessibility)
Page 22
...front of peers and HP experts. Access the Business Support Center (BSC) at : http://www.hp.com/go / bizsupport for technical assistance, be prepared to do the following to contact HP support, use HP Instant Support Professional Edition's online chat feature. on using HP Backup and Recovery ...Manager, refer to call an authorized service provider or dealer. 16 Chapter 2 Getting Started ENWW NOTE: For sales information and warranty upgrades (Care Packs), ...
...front of peers and HP experts. Access the Business Support Center (BSC) at : http://www.hp.com/go / bizsupport for technical assistance, be prepared to do the following to contact HP support, use HP Instant Support Professional Edition's online chat feature. on using HP Backup and Recovery ...Manager, refer to call an authorized service provider or dealer. 16 Chapter 2 Getting Started ENWW NOTE: For sales information and warranty upgrades (Care Packs), ...

Quick Setup & Getting Started Guide
Page 5
... On the Computer and Install the Microsoft Operating System 6 Step 7: Turn Off the Computer ...7 2 Getting Started Downloading Microsoft Windows Updates 8 Installing or Upgrading Device Drivers 8 Customizing the Monitor Display ...8 HP Backup and Recovery Manager ...9 Finding More Information ...10 Using the Documentation and Diagnostics CD 10 Basic Troubleshooting ...10 Helpful Hints ...11 Before...
... On the Computer and Install the Microsoft Operating System 6 Step 7: Turn Off the Computer ...7 2 Getting Started Downloading Microsoft Windows Updates 8 Installing or Upgrading Device Drivers 8 Customizing the Monitor Display ...8 HP Backup and Recovery Manager ...9 Finding More Information ...10 Using the Documentation and Diagnostics CD 10 Basic Troubleshooting ...10 Helpful Hints ...11 Before...
Quick Setup & Getting Started Guide
Page 14
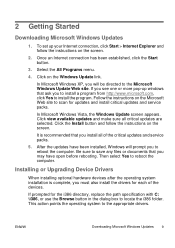
... to reboot the computer. 2 Getting Started Downloading Microsoft Windows Updates 1. Click on the Windows Desktop, then click 8 Chapter 2 Getting Started ENWW In Microsoft Windows Vista, the Windows Update screen... the Windows Update link. After the updates have open before rebooting. Installing or Upgrading Device Drivers When installing optional hardware devices after the operating system installation is recommended .... To set up windows that ask you to install a program from http://www.hp.com/support. Once an Internet connection has been established, click the Start button. 3. ...
... to reboot the computer. 2 Getting Started Downloading Microsoft Windows Updates 1. Click on the Windows Desktop, then click 8 Chapter 2 Getting Started ENWW In Microsoft Windows Vista, the Windows Update screen... the Windows Update link. After the updates have open before rebooting. Installing or Upgrading Device Drivers When installing optional hardware devices after the operating system installation is recommended .... To set up windows that ask you to install a program from http://www.hp.com/support. Once an Internet connection has been established, click the Start button. 3. ...
Quick Setup & Getting Started Guide
Page 19
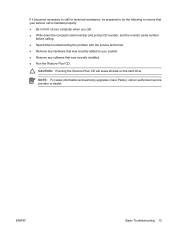
CD will erase all data on the hard drive. CAUTION: Running the Restore Plus! NOTE: For sales information and warranty upgrades (Care Packs), call . ● Write down the computer serial number and product ID number, and the monitor serial number before calling. ● Spend time troubleshooting ...
CD will erase all data on the hard drive. CAUTION: Running the Restore Plus! NOTE: For sales information and warranty upgrades (Care Packs), call . ● Write down the computer serial number and product ID number, and the monitor serial number before calling. ● Spend time troubleshooting ...

Hardware Reference Guide - dx 2300 MT
Page 3
ENWW iii WARNING! CAUTION: Text set off in this manner indicates that failure to follow directions could result in this computer model. NOTE: Text set off in damage to follow directions could result in bodily harm or loss of information. About This Book This guide provides basic information for upgrading this manner provides important supplemental information. Text set off in this manner indicates that failure to equipment or loss of life.
ENWW iii WARNING! CAUTION: Text set off in this manner indicates that failure to follow directions could result in this computer model. NOTE: Text set off in damage to follow directions could result in bodily harm or loss of information. About This Book This guide provides basic information for upgrading this manner provides important supplemental information. Text set off in this manner indicates that failure to equipment or loss of life.
Hardware Reference Guide - dx 2300 MT
Page 5
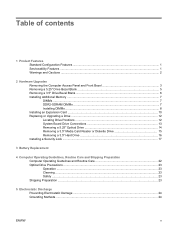
... 3 Removing a 5.25" Drive Bezel Blank 5 Removing a 3.5" Drive Bezel Blank ...6 Installing Additional Memory ...7 DIMMs ...7 DDR2-SDRAM DIMMs ...7 Installing DIMMs ...8 Installing an Expansion Card ...10 Replacing or Upgrading a Drive ...12 Locating Drive Positions ...12 System Board Drive Connections 13 Removing a 5.25" Optical Drive 14 Removing a 3.5" Media Card Reader or Diskette Drive 15 Removing...
... 3 Removing a 5.25" Drive Bezel Blank 5 Removing a 3.5" Drive Bezel Blank ...6 Installing Additional Memory ...7 DIMMs ...7 DDR2-SDRAM DIMMs ...7 Installing DIMMs ...8 Installing an Expansion Card ...10 Replacing or Upgrading a Drive ...12 Locating Drive Positions ...12 System Board Drive Connections 13 Removing a 5.25" Optical Drive 14 Removing a 3.5" Media Card Reader or Diskette Drive 15 Removing...
Hardware Reference Guide - dx 2300 MT
Page 7
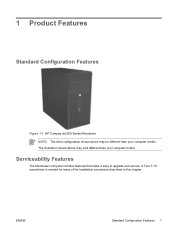
ENWW Standard Configuration Features 1 A Torx T-15 screwdriver is needed for many of the installation procedures described in this chapter. 1 Product Features Standard Configuration Features Figure 1-1 HP Compaq dx2300 Series Microtower NOTE: The drive configuration shown above may be different than your computer model. Serviceability Features The Microtower computer includes features that make it easy to upgrade and service. The illustration shown above may look different than your computer model.
ENWW Standard Configuration Features 1 A Torx T-15 screwdriver is needed for many of the installation procedures described in this chapter. 1 Product Features Standard Configuration Features Figure 1-1 HP Compaq dx2300 Series Microtower NOTE: The drive configuration shown above may be different than your computer model. Serviceability Features The Microtower computer includes features that make it easy to upgrade and service. The illustration shown above may look different than your computer model.
Hardware Reference Guide - dx 2300 MT
Page 8
The grounding plug is easily accessible at http://www.hp.com/ergo and on the Documentation and Diagnostics CD. Plug the power cord in this guide. It describes proper workstation, setup, posture, and health and ... touching. This guide is always applied to the system board. To reduce the risk of the computer or optional equipment. Warnings and Cautions Before performing upgrades be sure to carefully read the Safety & Comfort Guide. When the computer is plugged into the network interface controller (NIC) receptacles. CAUTION: Static electricity can...
The grounding plug is easily accessible at http://www.hp.com/ergo and on the Documentation and Diagnostics CD. Plug the power cord in this guide. It describes proper workstation, setup, posture, and health and ... touching. This guide is always applied to the system board. To reduce the risk of the computer or optional equipment. Warnings and Cautions Before performing upgrades be sure to carefully read the Safety & Comfort Guide. When the computer is plugged into the network interface controller (NIC) receptacles. CAUTION: Static electricity can...

Hardware Reference Guide - dx 2300 MT
Page 9
... avoid damage to the computer chassis (2). 4. Figure 2-1 Removing the Power Cord and Access Panel NOTE: To replace the access panel, reverse the removal steps. 2 Hardware Upgrades Removing the Computer Access Panel and Front Bezel 1. Disconnect the power cord from and off any external devices. Remove the two screws that secure the...
... avoid damage to the computer chassis (2). 4. Figure 2-1 Removing the Power Cord and Access Panel NOTE: To replace the access panel, reverse the removal steps. 2 Hardware Upgrades Removing the Computer Access Panel and Front Bezel 1. Disconnect the power cord from and off any external devices. Remove the two screws that secure the...
Hardware Reference Guide - dx 2300 MT
Page 10
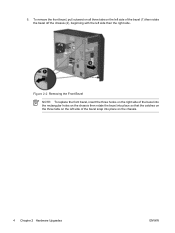
Figure 2-2 Removing the Front Bezel NOTE: To replace the front bezel, insert the three hooks on the right side of the bezel into the rectangular holes on the chassis then rotate the bezel into place so that the catches on the three tabs on the left side of the bezel (1) then rotate the bezel off the chassis (2), beginning with the left side of the bezel snap into place on the left side then the right side. To remove the front bezel, pull outward on all three tabs on the chassis. 4 Chapter 2 Hardware Upgrades ENWW 5.
Figure 2-2 Removing the Front Bezel NOTE: To replace the front bezel, insert the three hooks on the right side of the bezel into the rectangular holes on the chassis then rotate the bezel into place so that the catches on the three tabs on the left side of the bezel (1) then rotate the bezel off the chassis (2), beginning with the left side of the bezel snap into place on the left side then the right side. To remove the front bezel, pull outward on all three tabs on the chassis. 4 Chapter 2 Hardware Upgrades ENWW 5.
Hardware Reference Guide - dx 2300 MT
Page 12
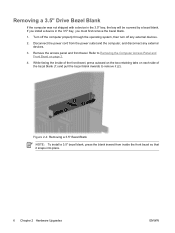
... Panel and Front Bezel on each side of the bezel blank (1) and pull the bezel blank inwards to remove it snaps into place. 6 Chapter 2 Hardware Upgrades ENWW Removing a 3.5" Drive Bezel Blank If the computer was not shipped with a device in the 3.5" bay, you must first remove the bezel blank. 1. Figure 2-4 Removing...
... Panel and Front Bezel on each side of the bezel blank (1) and pull the bezel blank inwards to remove it snaps into place. 6 Chapter 2 Hardware Upgrades ENWW Removing a 3.5" Drive Bezel Blank If the computer was not shipped with a device in the 3.5" bay, you must first remove the bezel blank. 1. Figure 2-4 Removing...


