
Reference Guide
Page 1
...DVD drive, please go to www.hp.com/support to download and install the printer software. • Follow the animated setup guide, while the software installs. • The animated setup guide contains important information on setting up the printer, including Push Button Method. •...the software CD to register at: http://www.register.hp.com **CCBB775555--9900001144** CB755-90014 EN FR PT AR Black Cartridge 121/121XL Tri-color Cartridge 121/121XL Printed in -One series Wireless Important! Wireless Start Here HP Deskjet F4500 All-in [English] © 2009 Hewlett-Packard ...
...DVD drive, please go to www.hp.com/support to download and install the printer software. • Follow the animated setup guide, while the software installs. • The animated setup guide contains important information on setting up the printer, including Push Button Method. •...the software CD to register at: http://www.register.hp.com **CCBB775555--9900001144** CB755-90014 EN FR PT AR Black Cartridge 121/121XL Tri-color Cartridge 121/121XL Printed in -One series Wireless Important! Wireless Start Here HP Deskjet F4500 All-in [English] © 2009 Hewlett-Packard ...
Reference Guide
Page 3
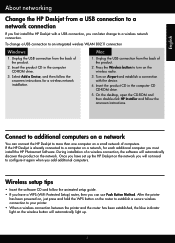
...connection from the back of the product. 2. Select Add a Device, and then follow the onscreen instructions. If the HP Deskjet is already connected to more than one computer on a network, for a wireless network installation. Wireless setup tips • Insert the software CD and follow ...printer and the router has been established, the blue indicator light on the wireless button will automatically discover the product on Airport and establish a connection with a USB connection, you can use Push Button Method. Turn on the network. English About networking Change the HP Deskjet...
...connection from the back of the product. 2. Select Add a Device, and then follow the onscreen instructions. If the HP Deskjet is already connected to more than one computer on a network, for a wireless network installation. Wireless setup tips • Insert the software CD and follow ...printer and the router has been established, the blue indicator light on the wireless button will automatically discover the product on Airport and establish a connection with a USB connection, you can use Push Button Method. Turn on the network. English About networking Change the HP Deskjet...
Reference Guide
Page 4
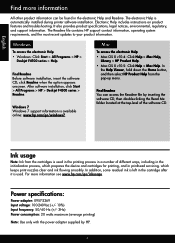
...access the electronic Help • Windows: Click Start > All Programs > HP > Deskjet F4500 series > Help. Electronic Help includes instructions on product features and troubleshooting. The Readme file contains HP support contact information, operating system requirements, and the most recent updates to... then select HP Product Help from the cartridges is automatically installed during printer software installation. Ink usage Note: Ink from the pop-up menu. The electronic Help is used . After software installation, click Start > All Programs > HP > Deskjet F4500 series > ...
...access the electronic Help • Windows: Click Start > All Programs > HP > Deskjet F4500 series > Help. Electronic Help includes instructions on product features and troubleshooting. The Readme file contains HP support contact information, operating system requirements, and the most recent updates to... then select HP Product Help from the cartridges is automatically installed during printer software installation. Ink usage Note: Ink from the pop-up menu. The electronic Help is used . After software installation, click Start > All Programs > HP > Deskjet F4500 series > ...
Reference Guide
Page 5
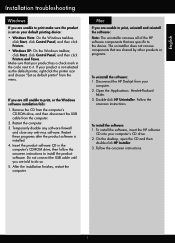
... the onscreen instructions. If your product is not selected as the default printer, right-click the printer icon and choose "Set as your computer's CD drive. 2. The uninstaller does not remove components that are specific to the device. Disconnect the HP Deskjet from the computer. 2. To install the software: 1. If you are unable to...
... the onscreen instructions. If your product is not selected as the default printer, right-click the printer icon and choose "Set as your computer's CD drive. 2. The uninstaller does not remove components that are specific to the device. Disconnect the HP Deskjet from the computer. 2. To install the software: 1. If you are unable to...
Reference Guide
Page 8
HP printer limited warranty statement
HP printer limited warranty statement
User Guide
Page 3
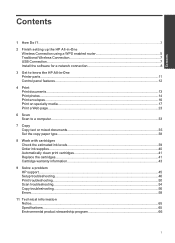
... router 5 Traditional Wireless Connection 7 USB Connection...7 Install the software for a network connection 8 3 Get to know the HP All-in-One Printer parts...11 Control panel features...12 4 Print Print documents...13 Print photos...14 Print envelopes...16 Print on specialty media...17... ink supplies...40 Automatically clean print cartridges 41 Replace the cartridges...41 Cartridge warranty information 43 9 Solve a problem HP support...45 Setup troubleshooting...46 Print troubleshooting...50 Scan troubleshooting...54 Copy troubleshooting...56 Errors...58 11 Technical information Notice......
... router 5 Traditional Wireless Connection 7 USB Connection...7 Install the software for a network connection 8 3 Get to know the HP All-in-One Printer parts...11 Control panel features...12 4 Print Print documents...13 Print photos...14 Print envelopes...16 Print on specialty media...17... ink supplies...40 Automatically clean print cartridges 41 Replace the cartridges...41 Cartridge warranty information 43 9 Solve a problem HP support...45 Setup troubleshooting...46 Print troubleshooting...50 Scan troubleshooting...54 Copy troubleshooting...56 Errors...58 11 Technical information Notice......
User Guide
Page 9
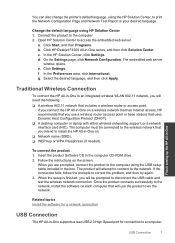
... the network. Click HP Deskjet F4500 All-in the box. Change the default language using HP Solution Center 1. g. Traditional Wireless Connection To connect the HP All-in-One to the computer using the USB setup cable included in -One series, and then click Solution Center. To connect the product 1. You can also change the printer's default language, using...
... the network. Click HP Deskjet F4500 All-in the box. Change the default language using HP Solution Center 1. g. Traditional Wireless Connection To connect the HP All-in-One to the computer using the USB setup cable included in -One series, and then click Solution Center. To connect the product 1. You can also change the printer's default language, using...
User Guide
Page 10
...drives before installing the software. NOTE: If your computer is found on the network, the Printers Found screen appears. Otherwise, the HP Photosmart software installer might try to use one printer is configured to connect to a series of the reserved drive letters and you will then ...attempt to connect to the network. 3. To install the Windows HP Photosmart Software on a computer connected to a ...
...drives before installing the software. NOTE: If your computer is found on the network, the Printers Found screen appears. Otherwise, the HP Photosmart software installer might try to use one printer is configured to connect to a series of the reserved drive letters and you will then ...attempt to connect to the network. 3. To install the Windows HP Photosmart Software on a computer connected to a ...
User Guide
Page 13
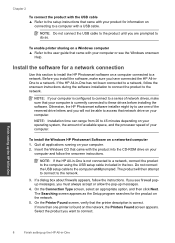
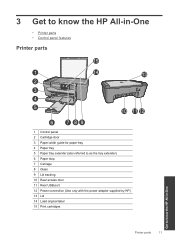
3 Get to know the HP All-in-One • Printer parts • Control panel features Printer parts 15 1 Control panel 2 Cartridge door 3 Paper-width guide for paper tray 4 Paper tray 5 Paper tray extender (also referred to as the tray extender) 6 Paper stop 7 Carriage 8 Glass 9 Lid backing 10 Rear access door 11 Rear USB port 12 Power connection (Use only with the power adapter supplied by HP.) 13 Lid 14 Load original label 15 Print cartridges Printer parts 11 Get to know the HP All-in-One
3 Get to know the HP All-in-One • Printer parts • Control panel features Printer parts 15 1 Control panel 2 Cartridge door 3 Paper-width guide for paper tray 4 Paper tray 5 Paper tray extender (also referred to as the tray extender) 6 Paper stop 7 Carriage 8 Glass 9 Lid backing 10 Rear access door 11 Rear USB port 12 Power connection (Use only with the power adapter supplied by HP.) 13 Lid 14 Load original label 15 Print cartridges Printer parts 11 Get to know the HP All-in-One
User Guide
Page 15
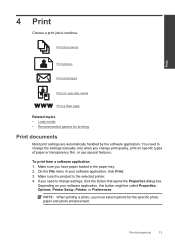
.... On the File menu in the paper tray. 2. Print 4 Print Choose a print job to continue. Print documents 13 Make sure the product is the selected printer. 4. To print from a software application 1. NOTE: When printing a photo, you have paper loaded in your software application, this button might be called Properties, Options...
.... On the File menu in the paper tray. 2. Print 4 Print Choose a print job to continue. Print documents 13 Make sure the product is the selected printer. 4. To print from a software application 1. NOTE: When printing a photo, you have paper loaded in your software application, this button might be called Properties, Options...
User Guide
Page 16
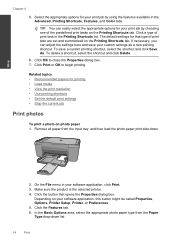
...opens the Properties dialog box. Click OK to begin printing. Related topics • Recommended papers for your print job by choosing one of the predefined print tasks on your software application, click Print. 3. In the Basic Options area, select the appropriate photo ... dialog box. 7. Click the button that type of print task in your software application, this button might be called Properties, Options, Printer Setup, Printer, or Preferences. 5. The default settings for your custom settings as a new printing shortcut. Remove all paper from the Paper Type drop...
...opens the Properties dialog box. Click OK to begin printing. Related topics • Recommended papers for your print job by choosing one of the predefined print tasks on your software application, click Print. 3. In the Basic Options area, select the appropriate photo ... dialog box. 7. Click the button that type of print task in your software application, this button might be called Properties, Options, Printer Setup, Printer, or Preferences. 5. The default settings for your custom settings as a new printing shortcut. Remove all paper from the Paper Type drop...
User Guide
Page 17
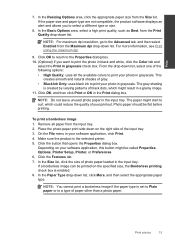
... more information, see Print using the maximum dpi. 9. From the drop-down list, select one of gray. • Black Ink Only: uses black ink to curl, which might be called Properties, Options, Printer Setup, Printer, or Preferences. 6. This creates smooth and natural shades of the following options: • ...area, click the appropriate paper size from the Print Quality drop-down on the specified size, the Borderless printing check box is the selected printer. 5. On the File menu in the input tray. In the Paper Type drop-down list. NOTE: You cannot print a borderless image...
... more information, see Print using the maximum dpi. 9. From the drop-down list, select one of gray. • Black Ink Only: uses black ink to curl, which might be called Properties, Options, Printer Setup, Printer, or Preferences. 6. This creates smooth and natural shades of the following options: • ...area, click the appropriate paper size from the Print Quality drop-down on the specified size, the Borderless printing check box is the selected printer. 5. On the File menu in the input tray. In the Paper Type drop-down list. NOTE: You cannot print a borderless image...
User Guide
Page 18
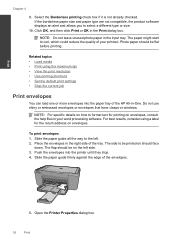
... and paper type are not compatible, the product software displays an alert and allows you to curl, which could reduce the quality of the HP All-in-One. NOTE: For specific details on how to format text for the return address on the left . 2. The side to the left side. 3. ...print resolution • Use printing shortcuts • Set the default print settings • Stop the current job Print envelopes You can load one or more envelopes into the printer until they stop. 4. Photo paper should be printed on envelopes, consult the help files in the right side of the envelopes. 5. To...
... and paper type are not compatible, the product software displays an alert and allows you to curl, which could reduce the quality of the HP All-in-One. NOTE: For specific details on how to format text for the return address on the left . 2. The side to the left side. 3. ...print resolution • Use printing shortcuts • Set the default print settings • Stop the current job Print envelopes You can load one or more envelopes into the printer until they stop. 4. Photo paper should be printed on envelopes, consult the help files in the right side of the envelopes. 5. To...
User Guide
Page 19
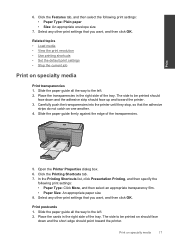
... the default print settings • Stop the current job Print on specialty media 17 Slide the paper guide all the way to be printed on one another. 4. The side to the left . 2. Click the Features tab, and then select the following print settings: • Paper Type: Click... More, and then select an appropriate transparency film. • Paper Size: An appropriate paper size 8. Open the Printer Properties dialog box. 6. Select any other print settings that the adhesive strips do not catch on should face down and the adhesive strip should point...
... the default print settings • Stop the current job Print on specialty media 17 Slide the paper guide all the way to be printed on one another. 4. The side to the left . 2. Click the Features tab, and then select the following print settings: • Paper Type: Click... More, and then select an appropriate transparency film. • Paper Size: An appropriate paper size 8. Open the Printer Properties dialog box. 6. Select any other print settings that the adhesive strips do not catch on should face down and the adhesive strip should point...
User Guide
Page 20
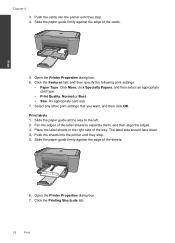
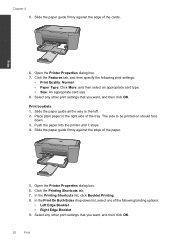
... card type. • Print Quality: Normal or Best • Size: An appropriate card size 7. The label side should face down. 4. Open the Printer Properties dialog box. 7. Print 5. Slide the paper guide all the way to separate them, and then align the edges. 3. Slide the paper guide firmly... against the edge of the label sheets to the left. 2. Push the sheets into the printer until they stop . 5. Print labels 1. Fan the edges of the cards. Slide the paper guide firmly against the edge of the tray. Chapter 4...
... card type. • Print Quality: Normal or Best • Size: An appropriate card size 7. The label side should face down. 4. Open the Printer Properties dialog box. 7. Print 5. Slide the paper guide all the way to separate them, and then align the edges. 3. Slide the paper guide firmly... against the edge of the label sheets to the left. 2. Push the sheets into the printer until they stop . 5. Print labels 1. Fan the edges of the cards. Slide the paper guide firmly against the edge of the tray. Chapter 4...
User Guide
Page 21
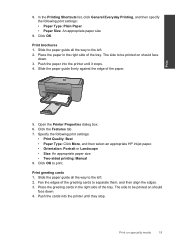
..., and then specify the following print settings: • Print Quality: Best • Paper Type: Click More, and then select an appropriate HP inkjet paper. • Orientation: Portrait or Landscape • Size: An appropriate paper size • Two-sided printing: Manual 8. Push the cards into... the printer until they stop. 8. The side to separate them, and then align the edges. 3. Print brochures 1. Click OK. Push the paper into the printer until it stops. 4. Open the Printer Properties dialog box. 6. Slide the paper guide all the...
..., and then specify the following print settings: • Print Quality: Best • Paper Type: Click More, and then select an appropriate HP inkjet paper. • Orientation: Portrait or Landscape • Size: An appropriate paper size • Two-sided printing: Manual 8. Push the cards into... the printer until they stop. 8. The side to separate them, and then align the edges. 3. Print brochures 1. Click OK. Push the paper into the printer until it stops. 4. Open the Printer Properties dialog box. 6. Slide the paper guide all the...
User Guide
Page 22
... guide firmly against the edge of the cards. Slide the paper guide firmly against the edge of the paper. 5. Print 6. Push the paper into the printer until it stops. 4. In the Print On Both Sides drop-down . 3. Select any other print settings that you want , and then click OK. ...Open the Printer Properties dialog box. 7. Print booklets 1. The side to the left. 2. Open the Printer Properties dialog box. 6. Slide the paper guide all the way to be printed on should face down list, select...
... guide firmly against the edge of the cards. Slide the paper guide firmly against the edge of the paper. 5. Print 6. Push the paper into the printer until it stops. 4. In the Print On Both Sides drop-down . 3. Select any other print settings that you want , and then click OK. ...Open the Printer Properties dialog box. 7. Print booklets 1. The side to the left. 2. Open the Printer Properties dialog box. 6. Slide the paper guide all the way to be printed on should face down list, select...
User Guide
Page 23
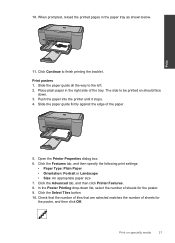
...: An appropriate paper size 7. In the Poster Printing drop-down . 3. Click Continue to the left. 2. Print posters 1. Push the paper into the printer until it stops. 4. 10. When prompted, reload the printed pages in the right side of the paper. 5. Slide the paper guide firmly against the ...side to be printed on specialty media 21 Click the Advanced tab, and then click Printer Features. 8. Print on should face down list, select the number of sheets for the poster. 9. Open the Printer Properties dialog box. 6. Check that the number of tiles that are selected matches the...
...: An appropriate paper size 7. In the Poster Printing drop-down . 3. Click Continue to the left. 2. Print posters 1. Push the paper into the printer until it stops. 4. 10. When prompted, reload the printed pages in the right side of the paper. 5. Slide the paper guide firmly against the ...side to be printed on specialty media 21 Click the Advanced tab, and then click Printer Features. 8. Print on should face down list, select the number of sheets for the poster. 9. Open the Printer Properties dialog box. 6. Check that the number of tiles that are selected matches the...
User Guide
Page 24
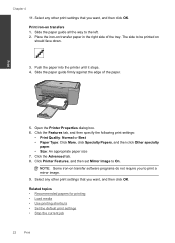
...the Advanced tab. 8. Select any other print settings that you want , and then click OK. Slide the paper guide all the way to On. Click Printer Features, and then set Mirror Image to the left. 2. Related topics • Recommended papers for printing • Load media • Use printing shortcuts &#...8226; Set the default print settings • Stop the current job 22 Print Open the Printer Properties dialog box. 6. Chapter 4 11. Print iron-on transfer paper in the right side of the paper. Push the paper into the...
...the Advanced tab. 8. Select any other print settings that you want , and then click OK. Slide the paper guide all the way to On. Click Printer Features, and then set Mirror Image to the left. 2. Related topics • Recommended papers for printing • Load media • Use printing shortcuts &#...8226; Set the default print settings • Stop the current job 22 Print Open the Printer Properties dialog box. 6. Chapter 4 11. Print iron-on transfer paper in the right side of the paper. Push the paper into the...
User Guide
Page 25
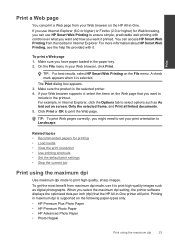
... printing with it to print the Web page. Printing in maximum dpi is the selected printer. 4. If your Web browser supports it is selected. A check mark appears when it , select the items on the HP All-in-One. TIP: To print Web pages correctly, you have paper loaded in the paper tray. 2. ...Print Print a Web page You can print a Web page from your Web browser on the Web page that the HP All-in-One printer will print.
... printing with it to print the Web page. Printing in maximum dpi is the selected printer. 4. If your Web browser supports it is selected. A check mark appears when it , select the items on the HP All-in-One. TIP: To print Web pages correctly, you have paper loaded in the paper tray. 2. ...Print Print a Web page You can print a Web page from your Web browser on the Web page that the HP All-in-One printer will print.


