
User Guide
Page 4
Contents Contents 1 How Do I?...3 2 Get to know the HP All-in-One Printer parts...5 Control panel features...6 3 Print Print documents...7 Print photos...8 Print envelopes...10 Print on specialty media...11 Print a Web page...17 5 Scan Scan... the estimated ink levels 31 Order ink supplies...31 Automatically clean print cartridges 32 Manually clean print cartridges 33 Replace the cartridges...34 Use ink-backup mode...36 Cartridge warranty information 36 8 Solve a problem HP support...39 Setup troubleshooting...40 Print troubleshooting...44 Scan troubleshooting...48 Copy troubleshooting...50 ...
Contents Contents 1 How Do I?...3 2 Get to know the HP All-in-One Printer parts...5 Control panel features...6 3 Print Print documents...7 Print photos...8 Print envelopes...10 Print on specialty media...11 Print a Web page...17 5 Scan Scan... the estimated ink levels 31 Order ink supplies...31 Automatically clean print cartridges 32 Manually clean print cartridges 33 Replace the cartridges...34 Use ink-backup mode...36 Cartridge warranty information 36 8 Solve a problem HP support...39 Setup troubleshooting...40 Print troubleshooting...44 Scan troubleshooting...48 Copy troubleshooting...50 ...
User Guide
Page 16
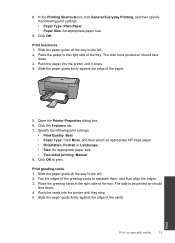
..., click General Everyday Printing, and then specify the following print settings: • Print Quality: Best • Paper Type: Click More, and then select an appropriate HP inkjet paper. • Orientation: Portrait or Landscape • Size: An appropriate paper size • Two-sided printing...
..., click General Everyday Printing, and then specify the following print settings: • Print Quality: Best • Paper Type: Click More, and then select an appropriate HP inkjet paper. • Orientation: Portrait or Landscape • Size: An appropriate paper size • Two-sided printing...
User Guide
Page 34
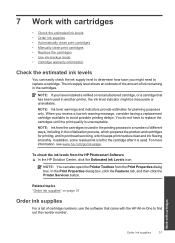
... smoothly. Work with cartridges • Check the estimated ink levels • Order ink supplies • Automatically clean print cartridges • Manually clean print cartridges • Replace the cartridges • Use ink-backup mode • Cartridge warranty information Check the estimated ink levels You... for planning purposes only. You do not have installed a refilled or remanufactured cartridge, or a cartridge that came with the HP All-in-One to determine how soon you have to replace the cartridges until the print quality is used in the cartridge after it is ...
... smoothly. Work with cartridges • Check the estimated ink levels • Order ink supplies • Automatically clean print cartridges • Manually clean print cartridges • Replace the cartridges • Use ink-backup mode • Cartridge warranty information Check the estimated ink levels You... for planning purposes only. You do not have installed a refilled or remanufactured cartridge, or a cartridge that came with the HP All-in-One to determine how soon you have to replace the cartridges until the print quality is used in the cartridge after it is ...

User Guide
Page 36
...from the back of the slot. Do not leave a print cartridge outside the HP All-in-One for ink and debris buildup. 5. Inspect the print cartridge contacts for more than 30 minutes. 4. Manually clean print cartridges Make sure you out of the product. 3. These can damage...print cartridges only when necessary. In the HP Solution Center, click Settings. To clean the print cartridge contacts 1. Hold the print cartridge by its sides. 7. Allow the print cartridges to clean the print cartridge contacts. Work with cartridges Manually clean print cartridges 33 Click Clean the ...
...from the back of the slot. Do not leave a print cartridge outside the HP All-in-One for ink and debris buildup. 5. Inspect the print cartridge contacts for more than 30 minutes. 4. Manually clean print cartridges Make sure you out of the product. 3. These can damage...print cartridges only when necessary. In the HP Solution Center, click Settings. To clean the print cartridge contacts 1. Hold the print cartridge by its sides. 7. Allow the print cartridges to clean the print cartridge contacts. Work with cartridges Manually clean print cartridges 33 Click Clean the ...

User Guide
Page 52
... the problem, continue trying the remaining solutions until the issue is one of the original and then scan the copy. Solution 2: Clean the glass and lid Solution: Turn off autocropping in the HP Solution Center software and crop the scanned image manually, or not at 300 x 300 dpi, in black and white. Scan...
... the problem, continue trying the remaining solutions until the issue is one of the original and then scan the copy. Solution 2: Clean the glass and lid Solution: Turn off autocropping in the HP Solution Center software and crop the scanned image manually, or not at 300 x 300 dpi, in black and white. Scan...

User Guide
Page 55
If the problem persists, you about manually cleaning the print cartridges, see "Manually clean print cartridges" on page 33. 52 Solve a ... messages about your error condition based on the product. Fast On blinking The tape was not removed from one or both print cartridges. The print cartridge might need to finish. Refer to be defective. to continue...on the product flash in special sequences to inform you might be cleaned or there was not removed from one or both print cartridges. Install or remove and reinsert print cartridges. The product has a paper jam....
If the problem persists, you about manually cleaning the print cartridges, see "Manually clean print cartridges" on page 33. 52 Solve a ... messages about your error condition based on the product. Fast On blinking The tape was not removed from one or both print cartridges. The print cartridge might need to finish. Refer to be defective. to continue...on the product flash in special sequences to inform you might be cleaned or there was not removed from one or both print cartridges. Install or remove and reinsert print cartridges. The product has a paper jam....


