
Full User Guide
Page 3
... such as constituting an additional warranty. Hewlett-Packard Company notices The information contained in the software and on the HP printer have simple text or icon labels that make it accessible for technical or editorial errors or omissions contained herein. ...vision through keyboard commands. Accessibility Your HP printer provides a number of this document is accessible for HP products and services are U.S. registered trademarks of Windows accessibility options and features. product accessibility, visit HP's Web site at: www.hp.com/accessibility. Support For more ...
... such as constituting an additional warranty. Hewlett-Packard Company notices The information contained in the software and on the HP printer have simple text or icon labels that make it accessible for technical or editorial errors or omissions contained herein. ...vision through keyboard commands. Accessibility Your HP printer provides a number of this document is accessible for HP products and services are U.S. registered trademarks of Windows accessibility options and features. product accessibility, visit HP's Web site at: www.hp.com/accessibility. Support For more ...

Full User Guide
Page 4
... cartridges...11 Ink-backup mode...12 Ink-backup mode output...13 Exit ink-backup mode...13 4 Connect the printer USB...14 5 Print photos Print borderless photos...15 Print photos with a border...17 HP Real Life Technologies photo fix 19 Exif Print...19 Store and handle photo paper 20 Save money and ink...
... cartridges...11 Ink-backup mode...12 Ink-backup mode output...13 Exit ink-backup mode...13 4 Connect the printer USB...14 5 Print photos Print borderless photos...15 Print photos with a border...17 HP Real Life Technologies photo fix 19 Exif Print...19 Store and handle photo paper 20 Save money and ink...
Full User Guide
Page 5
...one print cartridge 49 Installation instructions...49 Align the print cartridges...51 Automatically clean print cartridges 52 View estimated ink levels...52 Maintain the printer body...53 Remove ink from your skin and clothing 53 Manually clean print cartridges 53 Maintain print cartridges...54...or quality 40 Print resolution...41 Maximum dpi...41 Resize a document ...42 Bound two-sided documents...42 Print a Web page...43 Presentation printing...44 8 Printer software Make the HP Deskjet the default printer 45 Set default print settings...45 Printer Properties dialog box...46 What's This?
...one print cartridge 49 Installation instructions...49 Align the print cartridges...51 Automatically clean print cartridges 52 View estimated ink levels...52 Maintain the printer body...53 Remove ink from your skin and clothing 53 Manually clean print cartridges 53 Maintain print cartridges...54...or quality 40 Print resolution...41 Maximum dpi...41 Resize a document ...42 Bound two-sided documents...42 Print a Web page...43 Presentation printing...44 8 Printer software Make the HP Deskjet the default printer 45 Set default print settings...45 Printer Properties dialog box...46 What's This?

Full User Guide
Page 6
...58 Incompatible print cartridges 58 Out of paper...62 There was an error writing to USB port 62 Two-way communication cannot be established or Printer not responding 62 Installation problems...62 Power light is on or flashing...64 What the flashing light means 65 If an error message appears ...65 If no error message appears 65 Printer does not print...65 Verify the following...65 Unable to print...66 If the printer still does not print 71 Document prints slowly...71 Print cartridge problems...71 Resolving print cartridge error ...
...58 Incompatible print cartridges 58 Out of paper...62 There was an error writing to USB port 62 Two-way communication cannot be established or Printer not responding 62 Installation problems...62 Power light is on or flashing...64 What the flashing light means 65 If an error message appears ...65 If no error message appears 65 Printer does not print...65 Verify the following...65 Unable to print...66 If the printer still does not print 71 Document prints slowly...71 Print cartridge problems...71 Resolving print cartridge error ...
Full User Guide
Page 7
... new print settings 98 If you continue to have problems 98 A HP support Ink cartridge warranty information 99 Support process...99 HP support by phone...100 Phone support period...100 Placing a call...100 After the phone support period 100 B Technical information Printer specifications...101 Notice to Windows 2000 users 101 Environmental product stewardship... VCCI (Class B) compliance statement for users in Japan 106 Notice to users in Japan about the power cord 106 Toxic and hazardous substance table 106 HP Deskjet D1500 Printer series declaration of conformity 107 Index...108 4
... new print settings 98 If you continue to have problems 98 A HP support Ink cartridge warranty information 99 Support process...99 HP support by phone...100 Phone support period...100 Placing a call...100 After the phone support period 100 B Technical information Printer specifications...101 Notice to Windows 2000 users 101 Environmental product stewardship... VCCI (Class B) compliance statement for users in Japan 106 Notice to users in Japan about the power cord 106 Toxic and hazardous substance table 106 HP Deskjet D1500 Printer series declaration of conformity 107 Index...108 4

Full User Guide
Page 8
.... For more information, see the following table and select an appropriate topic. Learn how to connect the printer to your computer and the printer together, see Notice to use your computer. Find a solution to the HP Deskjet D1500 Printer series Help. Learn about installing the software, see the Setup Guide that came with a Windows 2000 computer...
.... For more information, see the following table and select an appropriate topic. Learn how to connect the printer to your computer and the printer together, see Notice to use your computer. Find a solution to the HP Deskjet D1500 Printer series Help. Learn about installing the software, see the Setup Guide that came with a Windows 2000 computer...

Full User Guide
Page 10
... Congratulations! For information, see View estimated ink levels. • Ink-backup mode: Print with the Estimated Ink Levels option in the printer Toolbox. For information, see Ink-backup mode. The HP Deskjet is equipped with several exciting features: • User friendly: Easy to install and operate. • Borderless printing: Print 4 x 6 inch photos to...
... Congratulations! For information, see View estimated ink levels. • Ink-backup mode: Print with the Estimated Ink Levels option in the printer Toolbox. For information, see Ink-backup mode. The HP Deskjet is equipped with several exciting features: • User friendly: Easy to install and operate. • Borderless printing: Print 4 x 6 inch photos to...
Full User Guide
Page 11
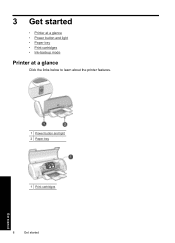
3 Get started • Printer at a glance • Power button and light • Paper tray • Print cartridges • Ink-backup mode Printer at a glance Click the links below to learn about the printer features. 1 Power button and light 2 Paper tray 1 Print cartridges 8 Get started Get started
3 Get started • Printer at a glance • Power button and light • Paper tray • Print cartridges • Ink-backup mode Printer at a glance Click the links below to learn about the printer features. 1 Power button and light 2 Paper tray 1 Print cartridges 8 Get started Get started

Full User Guide
Page 12
It can take a few seconds for the printer to be printed. Unfold the paper tray before printing. • Unfold the paper tray • Use the paper tray Power button and light 9 Get started ... on after you press the Power button. 1 Power button and light The Power light flashes when the printer is processing. 1 USB port Power button and light Use the Power button to turn the printer on and off might cause printer failure. Using a power strip, surge protector, or a wall-mounted switch to turn the...
It can take a few seconds for the printer to be printed. Unfold the paper tray before printing. • Unfold the paper tray • Use the paper tray Power button and light 9 Get started ... on after you press the Power button. 1 Power button and light The Power light flashes when the printer is processing. 1 USB port Power button and light Use the Power button to turn the printer on and off might cause printer failure. Using a power strip, surge protector, or a wall-mounted switch to turn the...

Full User Guide
Page 13
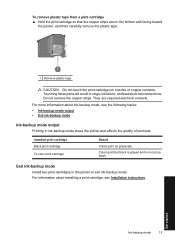
Lower the paper tray. 3. Chapter 3 Unfold the paper tray To unfold the paper tray 1. Fold out the tray extension. 4. Lower the printer cover. Get started 10 Get started Raise the printer cover. 2.
Lower the paper tray. 3. Chapter 3 Unfold the paper tray To unfold the paper tray 1. Fold out the tray extension. 4. Lower the printer cover. Get started 10 Get started Raise the printer cover. 2.
Full User Guide
Page 14
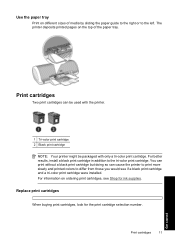
... tri-color print cartridge. Use the paper tray Print on different sizes of the paper tray. Print cartridges Two print cartridges can cause the printer to print more slowly and printed colors to differ from those you would see Shop for the print cartridge selection number. Replace print cartridges When... look for ink supplies. Print cartridges 11 Get started You can print without a black print cartridge but doing so can be used with the printer. 1 Tri-color print cartridge 2 Black print cartridge NOTE: Your printer might be packaged with only a tri-color print cartridge.
... tri-color print cartridge. Use the paper tray Print on different sizes of the paper tray. Print cartridges Two print cartridges can cause the printer to print more slowly and printed colors to differ from those you would see Shop for the print cartridge selection number. Replace print cartridges When... look for ink supplies. Print cartridges 11 Get started You can print without a black print cartridge but doing so can be used with the printer. 1 Tri-color print cartridge 2 Black print cartridge NOTE: Your printer might be packaged with only a tri-color print cartridge.
Full User Guide
Page 15
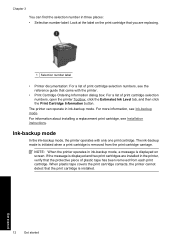
...the Print Cartridge Information button. For information about installing a replacement print cartridge, see Ink-backup mode. NOTE: When the printer operates in the printer, verify that the protective piece of print cartridge selection numbers, see the reference guide that came with only one print ...is removed from each print cartridge. If the message is displayed and two print cartridges are replacing. 1 Selection number label • Printer documentation: For a list of plastic tape has been removed from the print cartridge carriage. The ink-backup mode is initiated when ...
...the Print Cartridge Information button. For information about installing a replacement print cartridge, see Ink-backup mode. NOTE: When the printer operates in the printer, verify that the protective piece of print cartridge selection numbers, see the reference guide that came with only one print ...is removed from each print cartridge. If the message is displayed and two print cartridges are replacing. 1 Selection number label • Printer documentation: For a list of plastic tape has been removed from the print cartridge carriage. The ink-backup mode is initiated when ...
Full User Guide
Page 16
... topics: • Ink-backup mode output • Exit ink-backup mode Ink-backup mode output Printing in ink-backup mode slows the printer and affects the quality of printouts. For information about ink-backup mode, see Installation instructions. Exit ink-backup mode Install two print cartridges in...print cartridge ▲ Hold the print cartridge so that the copper strips are required electrical contacts. Touching these parts will result in the printer to exit ink-backup mode. Get started Ink-backup mode 13 Do not remove the copper strips. Colors print but black is grayed ...
... topics: • Ink-backup mode output • Exit ink-backup mode Ink-backup mode output Printing in ink-backup mode slows the printer and affects the quality of printouts. For information about ink-backup mode, see Installation instructions. Exit ink-backup mode Install two print cartridges in...print cartridge ▲ Hold the print cartridge so that the copper strips are required electrical contacts. Touching these parts will result in the printer to exit ink-backup mode. Get started Ink-backup mode 13 Do not remove the copper strips. Colors print but black is grayed ...

Full User Guide
Page 17
For instructions about connecting the printer with a USB cable, see the Setup Guide that came with a universal serial bus (USB) cable. Connect the printer 4 Connect the printer • USB USB The printer connects to the computer with the printer. NOTE: A USB cable might not be packaged with your printer. 14 Connect the printer NOTE: For best printing performance, use a USB 2.0 compatible cable.
For instructions about connecting the printer with a USB cable, see the Setup Guide that came with a universal serial bus (USB) cable. Connect the printer 4 Connect the printer • USB USB The printer connects to the computer with the printer. NOTE: A USB cable might not be packaged with your printer. 14 Connect the printer NOTE: For best printing performance, use a USB 2.0 compatible cable.

Full User Guide
Page 18
... Print-enabled software. • Prevent photo paper from curling, see Ink-backup mode. • Open the file in a software program such as HP Photosmart Software and resize the photo. Verify that you are using the product with a Windows 2000 computer, some features may not be available. Print... photos with 1.25 cm tab). • Do not print borderless photos in the printer. Ensure that the size corresponds to the paper size that you want to use. • For maximum fade resistance, use 4 x 6 inch photo paper...
... Print-enabled software. • Prevent photo paper from curling, see Ink-backup mode. • Open the file in a software program such as HP Photosmart Software and resize the photo. Verify that you are using the product with a Windows 2000 computer, some features may not be available. Print... photos with 1.25 cm tab). • Do not print borderless photos in the printer. Ensure that the size corresponds to the paper size that you want to use. • For maximum fade resistance, use 4 x 6 inch photo paper...
Full User Guide
Page 19
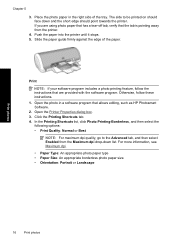
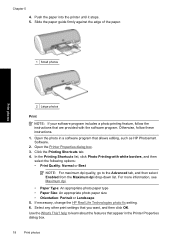
Otherwise, follow the instructions that allows editing, such as HP Photosmart Software. 2. Open the photo in the right side of the paper. Open the Printer Properties dialog box. 3. Push the paper into the printer until it stops. 5. In the Printing Shortcuts list, click Photo Printing-Borderless, and then...program. Slide the paper guide firmly against the edge of the tray. The side to the Advanced tab, and then select Enabled from the printer. 4. Click the Printing Shortcuts tab. 4. For more information, see Maximum dpi. • Paper Type: An appropriate photo paper type &#...
Otherwise, follow the instructions that allows editing, such as HP Photosmart Software. 2. Open the photo in the right side of the paper. Open the Printer Properties dialog box. 3. Push the paper into the printer until it stops. 5. In the Printing Shortcuts list, click Photo Printing-Borderless, and then...program. Slide the paper guide firmly against the edge of the tray. The side to the Advanced tab, and then select Enabled from the printer. 4. Click the Printing Shortcuts tab. 4. For more information, see Maximum dpi. • Paper Type: An appropriate photo paper type &#...

Full User Guide
Page 20
...you are using is flat. 3. For information about the features that you want, and then click OK. Place the photo paper in the Printer Properties dialog box. Print photos with a border NOTE: If you printed on should face down and the short edge should point towards the... printer. Print photos with a tear-off tab, remove the tab to be available. The side to make the document completely borderless. 5. If necessary, change the HP Real Life Technologies photo fix setting. 6. Select any other print ...
...you are using is flat. 3. For information about the features that you want, and then click OK. Place the photo paper in the Printer Properties dialog box. Print photos with a border NOTE: If you printed on should face down and the short edge should point towards the... printer. Print photos with a tear-off tab, remove the tab to be available. The side to make the document completely borderless. 5. If necessary, change the HP Real Life Technologies photo fix setting. 6. Select any other print ...
Full User Guide
Page 21
... dialog box. 3. Open the photo in the Printer Properties dialog box. 18 Print photos Select any other print settings that allows editing, such as HP Photosmart Software. 2. For more information, see Maximum dpi. • Paper Type: An appropriate photo paper type • Paper Size: An...instructions that appear in a software program that you want, and then click OK. If necessary, change the HP Real Life Technologies photo fix setting. 6. Push the paper into the printer until it stops. 5. In the Printing Shortcuts list, click Photo Printing-with the software program. help to...
... dialog box. 3. Open the photo in the Printer Properties dialog box. 18 Print photos Select any other print settings that allows editing, such as HP Photosmart Software. 2. For more information, see Maximum dpi. • Paper Type: An appropriate photo paper type • Paper Size: An...instructions that appear in a software program that you want, and then click OK. If necessary, change the HP Real Life Technologies photo fix setting. 6. Push the paper into the printer until it stops. 5. In the Printing Shortcuts list, click Photo Printing-with the software program. help to...
Full User Guide
Page 22
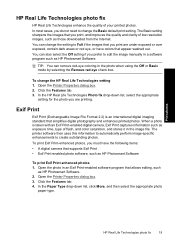
.... Open the photo in the photo when using the Off or Basic mode by selecting the Remove red eye check box. Open the Printer Properties dialog box. 3. Exif Print Exif Print (Exchangeable Image File Format 2.2) is taken with an Exif Print-enabled digital camera, Exif.... 2. The printer software then uses this information to automatically perform image-specific enhancements to Full if the images that allows editing, such as HP Photosmart Software To print Exif Print-enhanced photos 1. TIP: You can change the HP Real Life Technologies setting 1. In the HP Real Life Technologies...
.... Open the photo in the photo when using the Off or Basic mode by selecting the Remove red eye check box. Open the Printer Properties dialog box. 3. Exif Print Exif Print (Exchangeable Image File Format 2.2) is taken with an Exif Print-enabled digital camera, Exif.... 2. The printer software then uses this information to automatically perform image-specific enhancements to Full if the images that allows editing, such as HP Photosmart Software To print Exif Print-enhanced photos 1. TIP: You can change the HP Real Life Technologies setting 1. In the HP Real Life Technologies...

Full User Guide
Page 23
...the Maximum dpi drop-down list, click Normal or Best. The printer software automatically optimizes the printed image. Store the packaged photo paper on photo paper can reduce the quality of the curl until the paper lies flat. HP Everyday Photo Paper is printed on enabling the maximum dpi mode, ...mm (0.4 inch), flatten the paper by its edges. Save money and ink when printing photos To save money and ink when printing photos, use HP Premium Plus Photo Paper and set the print quality to maintain the quality of the photo paper curl more information, see Maximum dpi. Handling &#...
...the Maximum dpi drop-down list, click Normal or Best. The printer software automatically optimizes the printed image. Store the packaged photo paper on photo paper can reduce the quality of the curl until the paper lies flat. HP Everyday Photo Paper is printed on enabling the maximum dpi mode, ...mm (0.4 inch), flatten the paper by its edges. Save money and ink when printing photos To save money and ink when printing photos, use HP Premium Plus Photo Paper and set the print quality to maintain the quality of the photo paper curl more information, see Maximum dpi. Handling &#...


