Reference Guide
Page 1
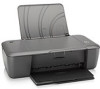
All other product information can be found in [English] DESKJET 1000 PRINTER J110 SERIES Information For setup information, see the setup poster. The Readme file contains HP support contact information, operating system requirements, and the most recent updates to ...Help After software installation, click Start > All Programs > HP > HP Deskjet 1000 Printer J110 series > Help. Register your device. Black Cartridge 61 Tri-color Cartridge 61 www.hp.com/support The electronic Help is automatically installed during printer software installation. Mac: Find electronic Help Mac OS X v10...
All other product information can be found in [English] DESKJET 1000 PRINTER J110 SERIES Information For setup information, see the setup poster. The Readme file contains HP support contact information, operating system requirements, and the most recent updates to ...Help After software installation, click Start > All Programs > HP > HP Deskjet 1000 Printer J110 series > Help. Register your device. Black Cartridge 61 Tri-color Cartridge 61 www.hp.com/support The electronic Help is automatically installed during printer software installation. Mac: Find electronic Help Mac OS X v10...
Reference Guide
Page 2
...1. In addition, some residual ink is left in the cartridge after it . The uninstaller does not remove components that are shared by HP. Remove the CD from the computer's CD/DVD drive, and then disconnect the USB cable from your computer. 2. Restart the computer. 3. Insert the...to print a test page: • Make sure the cable connections are U.S. See the setup poster. • Make sure the printer is not selected as the default printer, right-click the printer icon and choose "Set as your printer has a check mark in the computer's CD/DVD drive, then follow the on . ...
...1. In addition, some residual ink is left in the cartridge after it . The uninstaller does not remove components that are shared by HP. Remove the CD from the computer's CD/DVD drive, and then disconnect the USB cable from your computer. 2. Restart the computer. 3. Insert the...to print a test page: • Make sure the cable connections are U.S. See the setup poster. • Make sure the printer is not selected as the default printer, right-click the printer icon and choose "Set as your printer has a check mark in the computer's CD/DVD drive, then follow the on . ...
User Guide
Page 9
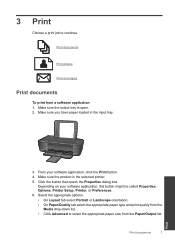
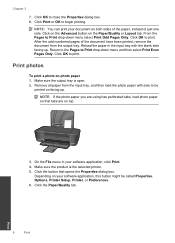
... a print job to select the appropriate paper size from the Paper/Output list. Make sure the output tray is the selected printer. 5. Make sure the product is open. 2. Depending on your software application, click the Print button. 4. Print documents 7... Print From your software application, this button might be called Properties, Options, Printer Setup, Printer, or Preferences. 6. Select the appropriate options. • On Layout tab select Portrait or Landscape orientation. • On Paper/Quality tab...
... a print job to select the appropriate paper size from the Paper/Output list. Make sure the output tray is the selected printer. 5. Make sure the product is open. 2. Depending on your software application, click the Print button. 4. Print documents 7... Print From your software application, this button might be called Properties, Options, Printer Setup, Printer, or Preferences. 6. Select the appropriate options. • On Layout tab select Portrait or Landscape orientation. • On Paper/Quality tab...
User Guide
Page 10
...Properties dialog box. Click OK to begin printing. On the File menu in the input tray with side to be called Properties, Options, Printer Setup, Printer, or Preferences. 6. From the Pages to Print drop-down menu select Print Odd Pages Only. Click on the Advanced button on both sides... drop-down menu and then select Print Even Pages Only. Click the Paper/Quality tab. 8 Print Print Make sure the output tray is the selected printer. 5. Click OK to close the Properties dialog box. 8. NOTE: You can print your software application, this button might be printed on facing up...
...Properties dialog box. Click OK to begin printing. On the File menu in the input tray with side to be called Properties, Options, Printer Setup, Printer, or Preferences. 6. From the Pages to Print drop-down menu select Print Odd Pages Only. Click on the Advanced button on both sides... drop-down menu and then select Print Even Pages Only. Click the Paper/Quality tab. 8 Print Print Make sure the output tray is the selected printer. 5. Click OK to close the Properties dialog box. 8. NOTE: You can print your software application, this button might be printed on facing up...
User Guide
Page 12
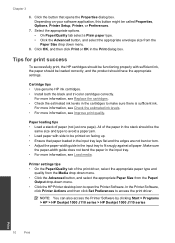
...; Check the estimated ink levels in the cartridges to open the Printer Software. NOTE: You can also access the Printer Software by clicking Start > Programs > HP > HP Deskjet 1000 J110 series > HP Deskjet 1000 J110 series Print 10 Print Cartridge tips • Use genuine HP ink cartridges. • Install both the black and tri-color ...functioning properly with side to fit snugly against all paper. Tips for print success To successfully print, the HP cartridges should be called Properties, Options, Printer Setup, Printer, or Preferences. 7. All of paper (not just one page).
...; Check the estimated ink levels in the cartridges to open the Printer Software. NOTE: You can also access the Printer Software by clicking Start > Programs > HP > HP Deskjet 1000 J110 series > HP Deskjet 1000 J110 series Print 10 Print Cartridge tips • Use genuine HP ink cartridges. • Install both the black and tri-color ...functioning properly with side to fit snugly against all paper. Tips for print success To successfully print, the HP cartridges should be called Properties, Options, Printer Setup, Printer, or Preferences. 7. All of paper (not just one page).
User Guide
Page 14
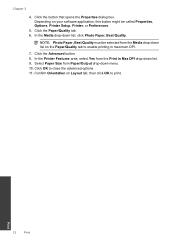
... Media drop-down menu. 10. Chapter 3 4. Print 12 Print Click the button that opens the Properties dialog box. Click the Paper/Quality tab. 6. In the Printer Features area, select Yes from Paper/Output drop-down list on the Paper/Quality tab to close the advanced options. 11. Click OK to enable.... In the Media drop-down list. 9. Select Paper Size from the Print in maximum DPI. 7. NOTE: Photo Paper, Best Quality must be called Properties, Options, Printer Setup, Printer, or Preferences. 5.
... Media drop-down menu. 10. Chapter 3 4. Print 12 Print Click the button that opens the Properties dialog box. Click the Paper/Quality tab. 6. In the Printer Features area, select Yes from Paper/Output drop-down list on the Paper/Quality tab to close the advanced options. 11. Click OK to enable.... In the Media drop-down list. 9. Select Paper Size from the Print in maximum DPI. 7. NOTE: Photo Paper, Best Quality must be called Properties, Options, Printer Setup, Printer, or Preferences. 5.


