
Getting Started Guide
Page 2
...capabilities on or off status of copies will be shown on the control panel display. HP ePrint button: Turns HP ePrint on or off. 10 HP ePrint light: Indicates the on or off . 7 Printhead Alert light: Indicates printhead problems. Resume button: Resumes a job after a disruption (for 3 seconds. 6 ...increase the number of copies will be shown on or off status of copies, printhead priming state, media errors, wireless 1 status and signal strength, Wi-Fi Direct status, and printhead problems. For more information about how to wirelessly connect your printer to your network ...
...capabilities on or off status of copies will be shown on the control panel display. HP ePrint button: Turns HP ePrint on or off. 10 HP ePrint light: Indicates the on or off . 7 Printhead Alert light: Indicates printhead problems. Resume button: Resumes a job after a disruption (for 3 seconds. 6 ...increase the number of copies will be shown on or off status of copies, printhead priming state, media errors, wireless 1 status and signal strength, Wi-Fi Direct status, and printhead problems. For more information about how to wirelessly connect your printer to your network ...
Getting Started Guide
Page 7
...freely move. Do not open the carriage latch but check that you have removed the tape from the printhead indicated by the flashing printhead icon. Note: For information about control panel display errors, visit www.hp.com/go /support to clear the paper jam. 2. OR The error icon ( ) and one ... to view or download the full User Guide. For more information about how to continue printing. 1. Open the printhead access door on your printer and are available at www.hp.com/go /support to continue printing. Make sure the carriage latch is pulled down firmly. Turn the ink valve...
...freely move. Do not open the carriage latch but check that you have removed the tape from the printhead indicated by the flashing printhead icon. Note: For information about control panel display errors, visit www.hp.com/go /support to clear the paper jam. 2. OR The error icon ( ) and one ... to view or download the full User Guide. For more information about how to continue printing. 1. Open the printhead access door on your printer and are available at www.hp.com/go /support to continue printing. Make sure the carriage latch is pulled down firmly. Turn the ink valve...
Getting Started Guide
Page 8
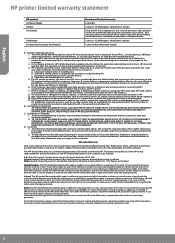
... the seller under two-year legal guarantee. b. However, if printer failure or damage is depleted or the "end of a non-HP ink or printheads; HP shall have the right to choose whether to the use of warranty" date printed on the ink bottle has been reached, whichever occurs.... 2. Improper maintenance or modification; or expired ink or printheads, HP will be free from seller of nonconformity of goods with . 1 year or 15,000 pages, whichever is a commercial guarantee voluntarily provided by HP; If HP is earlier. To the extent allowed by an authorized importer. The ...
... the seller under two-year legal guarantee. b. However, if printer failure or damage is depleted or the "end of a non-HP ink or printheads; HP shall have the right to choose whether to the use of warranty" date printed on the ink bottle has been reached, whichever occurs.... 2. Improper maintenance or modification; or expired ink or printheads, HP will be free from seller of nonconformity of goods with . 1 year or 15,000 pages, whichever is a commercial guarantee voluntarily provided by HP; If HP is earlier. To the extent allowed by an authorized importer. The ...

User Guide
Page 4
5 Copy and scan ...47 Copy documents ...48 Scan using the HP printer software ...49 Scan using Webscan ...53 Tips for copy and scan success ...54 6 Manage ink and printhead ...55 Ink valve ...56 Ink levels ...57 Refill Ink Tanks ...58 Order ink supplies ...61 Print with black ink only...(for networked printers 75 Tips for setting up and using a networked printer 77 8 Solve a problem ...78 Jams and paper-feed issues ...79 Printhead issues ...87 Printing issues ...93 Copy issues ...102 Scan issues ...103 Network and connection issues ...104 Printer hardware issues ...106 Control panel error codes...
5 Copy and scan ...47 Copy documents ...48 Scan using the HP printer software ...49 Scan using Webscan ...53 Tips for copy and scan success ...54 6 Manage ink and printhead ...55 Ink valve ...56 Ink levels ...57 Refill Ink Tanks ...58 Order ink supplies ...61 Print with black ink only...(for networked printers 75 Tips for setting up and using a networked printer 77 8 Solve a problem ...78 Jams and paper-feed issues ...79 Printhead issues ...87 Printing issues ...93 Copy issues ...102 Scan issues ...103 Network and connection issues ...104 Printer hardware issues ...106 Control panel error codes...
User Guide
Page 7
1 HP DeskJet GT 5820 series Help Learn how to use your HP DeskJet GT 5820 series. ● Get started on page 2 ● Print on page 29 ● Use Web Services on page 40 ● Copy and scan on page 47 ● Manage ink and printhead on page 55 ● Connect your printer on page 64 ● Solve a problem on page 78 ● Technical information on page 110 ENWW 1
1 HP DeskJet GT 5820 series Help Learn how to use your HP DeskJet GT 5820 series. ● Get started on page 2 ● Print on page 29 ● Use Web Services on page 40 ● Copy and scan on page 47 ● Manage ink and printhead on page 55 ● Connect your printer on page 64 ● Solve a problem on page 78 ● Technical information on page 110 ENWW 1

User Guide
Page 9
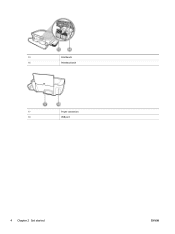
Printer parts 1 Paper-width guide 2 Input tray 3 Input tray shield 4 Scanner lid 5 Scanner glass 6 Output tray extender (also referred to as the tray extender) 7 Output tray 8 Front door 9 Ink valve 10 Ink tank 11 Ink tank caps 12 Ink tank lid 13 Control panel 14 Printhead access door ENWW Printer parts 3
Printer parts 1 Paper-width guide 2 Input tray 3 Input tray shield 4 Scanner lid 5 Scanner glass 6 Output tray extender (also referred to as the tray extender) 7 Output tray 8 Front door 9 Ink valve 10 Ink tank 11 Ink tank caps 12 Ink tank lid 13 Control panel 14 Printhead access door ENWW Printer parts 3
User Guide
Page 10
15 Printheads 16 Printhead latch 17 Power connection 18 USB port 4 Chapter 2 Get started ENWW
15 Printheads 16 Printhead latch 17 Power connection 18 USB port 4 Chapter 2 Get started ENWW
User Guide
Page 11
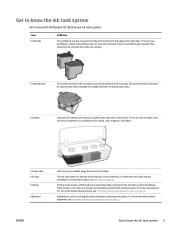
... Term Printheads Definition The printheads are four ink tanks. There are the components in the carriage. For more information about priming, see Ink valve on page 56 Priming is a process of filling the ink supply tubes that apply ink to the paper. ENWW Get to know the HP DeskJet GT 5820 series ...ink tank system. Ink tanks Ink tanks are installed and the ink system has primed. Get to know the ink tank system Get to know the ink tank system 5 Alignment is the process of aligning the printheads to improve print quality.
... Term Printheads Definition The printheads are four ink tanks. There are the components in the carriage. For more information about priming, see Ink valve on page 56 Priming is a process of filling the ink supply tubes that apply ink to the paper. ENWW Get to know the HP DeskJet GT 5820 series ...ink tank system. Ink tanks Ink tanks are installed and the ink system has primed. Get to know the ink tank system Get to know the ink tank system 5 Alignment is the process of aligning the printheads to improve print quality.

User Guide
Page 12
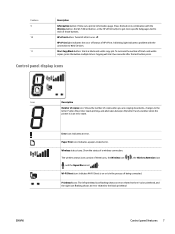
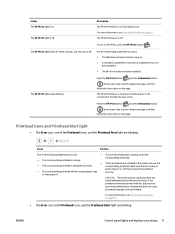
... diagnostics report by pressing and holding the Start Copy Color button for example, after loading paper or clearing a paper jam). Printhead Alert light: Indicates printhead problems. Resume button: Resumes a job after the last button press. Wi-Fi Direct button: Turns on or off Wi-Fi... warning or error state. 6 Chapter 2 Get started ENWW To increase the number of copies, printhead priming status, media errors, wireless status and signal strength, Wi-Fi Direct status, and printhead problems. Cancel button: Stops the current operation. Power button: Turns the printer on or off ....
... diagnostics report by pressing and holding the Start Copy Color button for example, after loading paper or clearing a paper jam). Printhead Alert light: Indicates printhead problems. Resume button: Resumes a job after the last button press. Wi-Fi Direct button: Turns on or off Wi-Fi... warning or error state. 6 Chapter 2 Get started ENWW To increase the number of copies, printhead priming status, media errors, wireless status and signal strength, Wi-Fi Direct status, and printhead problems. Cancel button: Stops the current operation. Power button: Turns the printer on or off ....
User Guide
Page 13
...pages tied to the black printhead ENWW Control panel features 7 Paper Error icon: Indicates a paper-related error. HP ePrint light: Indicates the on or is in an error state. The wireless status icons consist of HP ePrint. Printhead icons: The left printhead icon flashing shows an error... related to the tri-color printhead, and the right icon flashing shows an error related to each of being connected....
...pages tied to the black printhead ENWW Control panel features 7 Paper Error icon: Indicates a paper-related error. HP ePrint light: Indicates the on or is in an error state. The wireless status icons consist of HP ePrint. Printhead icons: The left printhead icon flashing shows an error... related to the tri-color printhead, and the right icon flashing shows an error related to each of being connected....
User Guide
Page 14
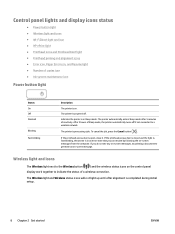
... door is processing a job. If the printhead access door is closed and the light is fast blinking, the printer is powered off if not connected to a wireless network. If you can resolve ... and display icons status ● Power button light ● Wireless light and icons ● Wi-Fi Direct light and icon ● HP ePrint light ● Printhead icons and Printhead Alert light ● Printhead priming and alignment icons ● Error icon, Paper Error icon, and Resume light ● Number of a wireless connection. The printer is...
... door is processing a job. If the printhead access door is closed and the light is fast blinking, the printer is powered off if not connected to a wireless network. If you can resolve ... and display icons status ● Power button light ● Wireless light and icons ● Wi-Fi Direct light and icon ● HP ePrint light ● Printhead icons and Printhead Alert light ● Printhead priming and alignment icons ● Error icon, Paper Error icon, and Resume light ● Number of a wireless connection. The printer is...
User Guide
Page 17
For more information, see Print with ink, you install pritheads during initial printer setup. One of the Printhead icons, and the Printhead Alert light are blinking. Press the HP ePrint button ( ) and the Information button ( ) at the same time to print a diagnostic page, and ...then follow the instructions on it , and then reinsert the printhead securely. If the printheads have occurred. - For more information, see Fix printhead problems on page 43. The HP ePrint light keeps blinking. If one of the following might have occurred. ●...
For more information, see Print with ink, you install pritheads during initial printer setup. One of the Printhead icons, and the Printhead Alert light are blinking. Press the HP ePrint button ( ) and the Information button ( ) at the same time to print a diagnostic page, and ...then follow the instructions on it , and then reinsert the printhead securely. If the printheads have occurred. - For more information, see Fix printhead problems on page 43. The HP ePrint light keeps blinking. If one of the following might have occurred. ●...
User Guide
Page 18
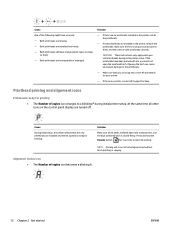
... and the ink system is ready for priming ● The Number of copies icon changes to the printheads. - Alignment status icon ● The Number of the following might have occurred. - If the error persists, contact HP Support for 3 seconds to start ink priming. Cause One of copies icon becomes a blinking A. 12 Chapter...
... and the ink system is ready for priming ● The Number of copies icon changes to the printheads. - Alignment status icon ● The Number of the following might have occurred. - If the error persists, contact HP Support for 3 seconds to start ink priming. Cause One of copies icon becomes a blinking A. 12 Chapter...
User Guide
Page 21
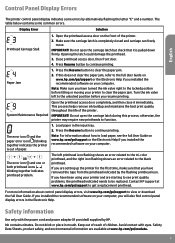
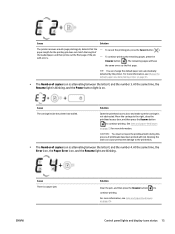
... time, the Error icon, the Paper Error icon, and the Resume light are blinking. CAUTION: You must not open the printhead latch during this process if printheads have the same errors as the first page. For more information, see Change the default paper size detected by the printer. ... At the same time, the Resume light is blinking, and the Power button light is not obstructed. Move the carriage to the right, close the printhead access door, and then press the Resume button ( ) to continue printing. Cause There is alternating between the letter E and the number 4. ENWW Solution...
... time, the Error icon, the Paper Error icon, and the Resume light are blinking. CAUTION: You must not open the printhead latch during this process if printheads have the same errors as the first page. For more information, see Change the default paper size detected by the printer. ... At the same time, the Resume light is blinking, and the Power button light is not obstructed. Move the carriage to the right, close the printhead access door, and then press the Resume button ( ) to continue printing. Cause There is alternating between the letter E and the number 4. ENWW Solution...
User Guide
Page 22
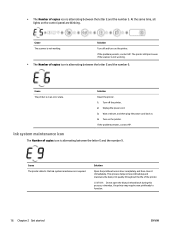
If the problem persists, contact HP. The printer still prints even if the scanner is not working .... alternating between the letter E and the number 5. Turn on the control panel are blinking. Solution Open the printhead access door completely, and then close it immediately. Solution Turn off the printer. 2. Cause The printer detects that... of copies icon is alternating between the letter E and the number 9. CAUTION: Do not open the blue printhead latch during this process; Cause The scanner is required. Turn off and turn on the printer. Solution Reset ...
If the problem persists, contact HP. The printer still prints even if the scanner is not working .... alternating between the letter E and the number 5. Turn on the control panel are blinking. Solution Open the printhead access door completely, and then close it immediately. Solution Turn off the printer. 2. Cause The printer detects that... of copies icon is alternating between the letter E and the number 9. CAUTION: Do not open the blue printhead latch during this process; Cause The scanner is required. Turn off and turn on the printer. Solution Reset ...
User Guide
Page 43
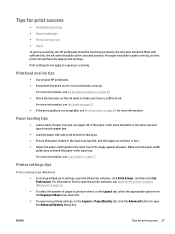
... on page 57. ● If the print quality is sufficient ink. Tips for print success ● Printhead and ink tips ● Paper loading tips ● Printer settings tips ● Notes To print successfully, the HP printheads should be functioning properly, the ink tanks should be filled with side to be loaded correctly, and.... ● Adjust the paper-width guide in the input tray to fit snugly against all paper. For more information, see Printing issues on page 17. Printhead and ink tips ● Use original HP printheads. ● Install both the black and tri-color...
... on page 57. ● If the print quality is sufficient ink. Tips for print success ● Printhead and ink tips ● Paper loading tips ● Printer settings tips ● Notes To print successfully, the HP printheads should be functioning properly, the ink tanks should be filled with side to be loaded correctly, and.... ● Adjust the paper-width guide in the input tray to fit snugly against all paper. For more information, see Printing issues on page 17. Printhead and ink tips ● Use original HP printheads. ● Install both the black and tri-color...

User Guide
Page 45
ENWW Tips for print success 39 NOTE: HP cannot guarantee the quality or reliability of using a non-HP supply will not be covered under warranty. Notes ● Original HP printheads and ink are designed and tested with HP printers and papers to help you easily produce great results, time after time. Product service or repairs required as a result of non-HP supplies.
ENWW Tips for print success 39 NOTE: HP cannot guarantee the quality or reliability of using a non-HP supply will not be covered under warranty. Notes ● Original HP printheads and ink are designed and tested with HP printers and papers to help you easily produce great results, time after time. Product service or repairs required as a result of non-HP supplies.
User Guide
Page 61
6 Manage ink and printhead This section contains the following topics: ● Ink valve ● Ink levels ● Refill Ink Tanks ● Order ink supplies ● Print with black ink only ● Tips for working with ink and printhead ENWW 55
6 Manage ink and printhead This section contains the following topics: ● Ink valve ● Ink levels ● Refill Ink Tanks ● Order ink supplies ● Print with black ink only ● Tips for working with ink and printhead ENWW 55
User Guide
Page 62
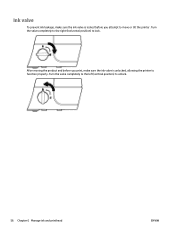
Turn the valve completely to the left (vertical position) to lock. After moving the product and before you attempt to move or tilt the printer. Ink valve To prevent ink leakage, make sure the ink valve is locked before you print, make sure the ink valve is unlocked, allowing the printer to function properly. Turn the valve completely to the right (horizontal position) to unlock. 56 Chapter 6 Manage ink and printhead ENWW
Turn the valve completely to the left (vertical position) to lock. After moving the product and before you attempt to move or tilt the printer. Ink valve To prevent ink leakage, make sure the ink valve is locked before you print, make sure the ink valve is unlocked, allowing the printer to function properly. Turn the valve completely to the right (horizontal position) to unlock. 56 Chapter 6 Manage ink and printhead ENWW

User Guide
Page 64
Lift the ink tank lid. 2. Remove the cap of the cap. 58 Chapter 6 Manage ink and printhead ENWW Refill Ink Tanks To refill the ink tanks 1. Twist to remove the cap of the ink bottle, remove the seal from the bottle, install the cap back onto the bottle, and then pull open the top part of the ink tank you plan to refill. 3.
Lift the ink tank lid. 2. Remove the cap of the cap. 58 Chapter 6 Manage ink and printhead ENWW Refill Ink Tanks To refill the ink tanks 1. Twist to remove the cap of the ink bottle, remove the seal from the bottle, install the cap back onto the bottle, and then pull open the top part of the ink tank you plan to refill. 3.

