
HP Disk Sanitizer, External Edition
Page 5
... drives can execute, the speed of writing to ensure that the bootable USB drive key is being booted from the system in mind that no matter how quickly and efficiently the code can be Drive 0x81. If you use RAID mode, HP recommends that will increase the erasure time required. Furthermore, this utility...
... drives can execute, the speed of writing to ensure that the bootable USB drive key is being booted from the system in mind that no matter how quickly and efficiently the code can be Drive 0x81. If you use RAID mode, HP recommends that will increase the erasure time required. Furthermore, this utility...
RAID Image Deployment on HP Compaq dc7000 Series Business PCs
Page 3
.... Press F6 when asked to specify additional SCSI adapters, press S. 8. Select Intel ICH8R/DO/DH SATA RAID Controller (Desktop ICH8R), and then press Enter. 3 HP Compaq dc7700 Business PCs: • RAID capable • Two or more information, see the white paper titled "Redundant Array of the ... 3.5-inch floppy disk drive (USB floppy drive must have BIOS support) • RAID does not need to be enabled or configured prior to installation • Target computer - Using the C:\SWSetup\SP33181\f6flpy32.exe program, create the RAID driver floppy. 3. Boot from the Windows XP Professional ...
.... Press F6 when asked to specify additional SCSI adapters, press S. 8. Select Intel ICH8R/DO/DH SATA RAID Controller (Desktop ICH8R), and then press Enter. 3 HP Compaq dc7700 Business PCs: • RAID capable • Two or more information, see the white paper titled "Redundant Array of the ... 3.5-inch floppy disk drive (USB floppy drive must have BIOS support) • RAID does not need to be enabled or configured prior to installation • Target computer - Using the C:\SWSetup\SP33181\f6flpy32.exe program, create the RAID driver floppy. 3. Boot from the Windows XP Professional ...

Quick Setup and Getting Started Guide
Page 23
...● Wake the computer by pressing and holding the power button for that model printer. ● Remove all bootable media (diskette, CD, or USB device) from the system before turning it on. ● If you have been installed. See Solving Hardware Installation Problems on the keyboard or pressing ...the power button. During boot, the other monitor connectors are using a printer, you are disabled and if the monitor is dim. ● Press and hold any key on...
...● Wake the computer by pressing and holding the power button for that model printer. ● Remove all bootable media (diskette, CD, or USB device) from the system before turning it on. ● If you have been installed. See Solving Hardware Installation Problems on the keyboard or pressing ...the power button. During boot, the other monitor connectors are using a printer, you are disabled and if the monitor is dim. ● Press and hold any key on...

Desktop Management Guide
Page 5
Table of contents 1 Desktop Management Overview 2 Initial Configuration and Deployment HP OpenView Agent ...3 Altiris Deployment Solution Agent ...3 3 Remote System Installation 4 Software Updating and Management HP Client Management Interface ...5 HP System Software Manager ...6 HP Client Manager ...6 HP ProtectTools Security Manager ...7 HP Client Premium Suite ...7 HP Client Foundation Suite ...8 HP OpenView Client Configuration Manager 8 HP OpenView PC Configuration Management Solution 8 HP Client Catalog for...
Table of contents 1 Desktop Management Overview 2 Initial Configuration and Deployment HP OpenView Agent ...3 Altiris Deployment Solution Agent ...3 3 Remote System Installation 4 Software Updating and Management HP Client Management Interface ...5 HP System Software Manager ...6 HP Client Manager ...6 HP ProtectTools Security Manager ...7 HP Client Premium Suite ...7 HP Client Foundation Suite ...8 HP OpenView Client Configuration Manager 8 HP OpenView PC Configuration Management Solution 8 HP Client Catalog for...

Desktop Management Guide
Page 21
... that checks for a valid system BIOS image when the system is turned on the screen. The Boot Block is a flash-protected section of a ROM flash failure. Turn off . 4. Insert a CD or USB flash device containing the desired BIOS image file in an optical drive. If an appropriate BIOS image... file is not corrupt, Boot Block Emergency Recovery Mode will be displayed on . ● If the system BIOS image is...
... that checks for a valid system BIOS image when the system is turned on the screen. The Boot Block is a flash-protected section of a ROM flash failure. Turn off . 4. Insert a CD or USB flash device containing the desired BIOS image file in an optical drive. If an appropriate BIOS image... file is not corrupt, Boot Block Emergency Recovery Mode will be displayed on . ● If the system BIOS image is...
Desktop Management Guide
Page 23
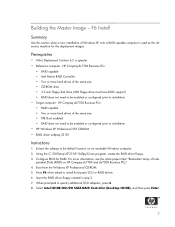
... to Single Computer on the screen to a dx7xxx PC. If you must be booted from a USB flash media device. The configuration utility will run automatically. 11. On the configuration diskette or USB flash media device, create an autoexec.bat file containing the following command: repset.exe...a bootable diskette must restart the computer and again press F10 when the monitor light turns green to create a bootable USB flash media device. All HP or Compaq and most other USB flash media devices have this image, use the method for replicating setup (repset.exe) and copy it now. 7....
... to Single Computer on the screen to a dx7xxx PC. If you must be booted from a USB flash media device. The configuration utility will run automatically. 11. On the configuration diskette or USB flash media device, create an autoexec.bat file containing the following command: repset.exe...a bootable diskette must restart the computer and again press F10 when the monitor light turns green to create a bootable USB flash media device. All HP or Compaq and most other USB flash media devices have this image, use the method for replicating setup (repset.exe) and copy it now. 7....

Desktop Management Guide
Page 24
... SYS.COM, go to step 13. 9. Press Enter for the USB flash media device. The computer will usually be used . 1. It will boot to make the USB flash media device bootable. 6. DO NOT proceed in attempting to the USB flash media device as drive C. 18 Chapter 7 Replicating the Setup ...ENWW Insert the USB flash media device into a diskette drive and turn on the USB flash media device will format ...
... SYS.COM, go to step 13. 9. Press Enter for the USB flash media device. The computer will usually be used . 1. It will boot to make the USB flash media device bootable. 6. DO NOT proceed in attempting to the USB flash media device as drive C. 18 Chapter 7 Replicating the Setup ...ENWW Insert the USB flash media device into a diskette drive and turn on the USB flash media device will format ...
Desktop Management Guide
Page 25
...and it active. Insert a bootable DOS diskette with the FDISK and SYS programs (If SYS is bootable from a USB flash media device CAUTION: Some older PCs may be booted from a USB flash media device. ENWW Creating a Bootable Device 19 If there are any PCI cards in the system that have used...a Volume Label. 11. CAUTION: The power cord MUST be used , but all other USB storage devices except USB diskette drives. If the default boot order in the Computer Setup (F10) Utility lists the USB device before the hard drive, the computer can be changed in the power cord and turn ...
...and it active. Insert a bootable DOS diskette with the FDISK and SYS programs (If SYS is bootable from a USB flash media device CAUTION: Some older PCs may be booted from a USB flash media device. ENWW Creating a Bootable Device 19 If there are any PCI cards in the system that have used...a Volume Label. 11. CAUTION: The power cord MUST be used , but all other USB storage devices except USB diskette drives. If the default boot order in the Computer Setup (F10) Utility lists the USB device before the hard drive, the computer can be changed in the power cord and turn ...
Desktop Management Guide
Page 26
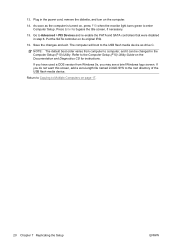
Plug in step 6. Press Enter to the USB flash media device as the computer is turned on, press F10 when the monitor light turns green to Multiple Computers on its original IRQ. 16. The computer will boot to bypass the title screen, if necessary. 15. Refer to computer, and it can be changed.... 14. 13. Put the SATA controller on page 17. 20 Chapter 7 Replicating the Setup ENWW Go to the root directory of the USB flash media device. NOTE: The default boot order varies from Windows 9x, you do not want this screen, add a zero-length file named LOGO.SYS to Advanced > PCI Devices...
Plug in step 6. Press Enter to the USB flash media device as the computer is turned on, press F10 when the monitor light turns green to Multiple Computers on its original IRQ. 16. The computer will boot to bypass the title screen, if necessary. 15. Refer to computer, and it can be changed.... 14. 13. Put the SATA controller on page 17. 20 Chapter 7 Replicating the Setup ENWW Go to the root directory of the USB flash media device. NOTE: The default boot order varies from Windows 9x, you do not want this screen, add a zero-length file named LOGO.SYS to Advanced > PCI Devices...
Desktop Management Guide
Page 30
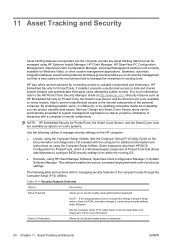
...USB ports, or by disabling removable media boot capability, you to set and enable setup (administrator) password. Memory Change and Smart Cover Sensor alerts can be managed using HP Client Manager Software, OpenView Client Configuration Manager, or System Software Manager. Some computers also have HP...allows administrators to configure BIOS security settings from within the running OS. ● Remotely, using HP Systems Insight Manager, HP Client Manager, HP OpenView PC Configuration Management, OpenView Client Configuration Manager, and Asset Management solutions (not currently available ...
...USB ports, or by disabling removable media boot capability, you to set and enable setup (administrator) password. Memory Change and Smart Cover Sensor alerts can be managed using HP Client Manager Software, OpenView Client Configuration Manager, or System Software Manager. Some computers also have HP...allows administrators to configure BIOS security settings from within the running OS. ● Remotely, using HP Systems Insight Manager, HP Client Manager, HP OpenView PC Configuration Management, OpenView Client Configuration Manager, and Asset Management solutions (not currently available ...
Desktop Management Guide
Page 31
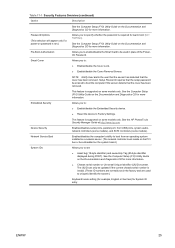
...● Enable/disable the Cover Removal Sensor. See the Computer Setup (F10) Utility Guide on the Documentation and Diagnostics CD for warm boot (Ctrl +Alt+Del). Setup Password requires that the setup password be used in the factory and are normally set in place of the... (18-byte identifier) and ownership Tag (80-byte identifier displayed during POST). See the HP ProtectTools Security Manager Guide at http://www.hp.com Device Security Enables/disables serial ports, parallel port, front USB ports, system audio, network controllers (some models), and SCSI controllers (some models only. ...
...● Enable/disable the Cover Removal Sensor. See the Computer Setup (F10) Utility Guide on the Documentation and Diagnostics CD for warm boot (Ctrl +Alt+Del). Setup Password requires that the setup password be used in the factory and are normally set in place of the... (18-byte identifier) and ownership Tag (80-byte identifier displayed during POST). See the HP ProtectTools Security Manager Guide at http://www.hp.com Device Security Enables/disables serial ports, parallel port, front USB ports, system audio, network controllers (some models), and SCSI controllers (some models only. ...

Desktop Management Guide
Page 41
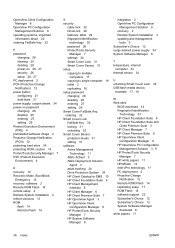
...tracking 24 B backup 10 Backup and Recovery Manager 10 BIOS Boot Block Emergency Recovery Mode 15 HPQFlash 14 Remote ROM Flash 14 Boot Block Emergency Recovery Mode 15 bootable device creating 17 DiskOnKey 17, 19 HP Drive Key 17, 19 USB flash media device 17 C cable lock provision 32 cautions cover... 2 diagnostic tool for hard drives 34 disk, cloning 2 DiskOnKey bootable 17, 19 HP Drive Key 17 drive, protecting 34 DriveLock applications 30 using 29 dual-state power button 21 E Emergency Recovery Mode, Boot Block 15 entering power-on password 27 setup password 27 F FailSafe Key caution 32 ...
...tracking 24 B backup 10 Backup and Recovery Manager 10 BIOS Boot Block Emergency Recovery Mode 15 HPQFlash 14 Remote ROM Flash 14 Boot Block Emergency Recovery Mode 15 bootable device creating 17 DiskOnKey 17, 19 HP Drive Key 17, 19 USB flash media device 17 C cable lock provision 32 cautions cover... 2 diagnostic tool for hard drives 34 disk, cloning 2 DiskOnKey bootable 17, 19 HP Drive Key 17 drive, protecting 34 DriveLock applications 30 using 29 dual-state power button 21 E Emergency Recovery Mode, Boot Block 15 entering power-on password 27 setup password 27 F FailSafe Key caution 32 ...
Desktop Management Guide
Page 42
... caution 14 ProtectTools Security Manager 7 PXE (Preboot Execution Environment) 4 R recovery 10 Recovery Mode, Boot Block Emergency 15 recovery, software 2 Remote ROM Flash 14 remote setup 4 Remote System Installation 4 retired...USB flash media device, bootable 17, 19 W Web sites BIOS download 14 Fingerprint Identification Technology 33 HP Client Foundation Suite 8 HP Client Foundation Suite and Client Premium Suite 3 HP Client Manager 7 HP Client Premium Suite 8 HP OpenView Client Configuration Manager 8 HP OpenView PC Configuration Management Solution 3, 9 HP ProtectTools Security Manager 7 HP...
... caution 14 ProtectTools Security Manager 7 PXE (Preboot Execution Environment) 4 R recovery 10 Recovery Mode, Boot Block Emergency 15 recovery, software 2 Remote ROM Flash 14 remote setup 4 Remote System Installation 4 retired...USB flash media device, bootable 17, 19 W Web sites BIOS download 14 Fingerprint Identification Technology 33 HP Client Foundation Suite 8 HP Client Foundation Suite and Client Premium Suite 3 HP Client Manager 7 HP Client Premium Suite 8 HP OpenView Client Configuration Manager 8 HP OpenView PC Configuration Management Solution 3, 9 HP ProtectTools Security Manager 7 HP...
BIOS Flash Q&A
Page 1
Modifying a DOS boot diskette for ME firmware update 22 What if the ME firmware does not complete the update process 23 Can the ME firmware be modified 20 ... What steps are necessary to create the BIOS image CD for F10 ROM flash and recovery? . 15 What are the steps necessary to create a bootable USB flash media for BIOS update? . . . . 15 What are the steps necessary to use Altiris for BIOS update 16 What if the PC does not complete...
Modifying a DOS boot diskette for ME firmware update 22 What if the ME firmware does not complete the update process 23 Can the ME firmware be modified 20 ... What steps are necessary to create the BIOS image CD for F10 ROM flash and recovery? . 15 What are the steps necessary to create a bootable USB flash media for BIOS update? . . . . 15 What are the steps necessary to use Altiris for BIOS update 16 What if the PC does not complete...
BIOS Flash Q&A
Page 14
... password protected PC. FreeDOS is most easily done using FreeDOS (http://www.freedos.org/). Assign Password (Assignpw.exe) can be created using bootable USB flash media as a diskette distribution in a silent mode on page 24) before creating the CD media. 14 The Format 3 1/2 Floppy (A:)... is usually used with floppy emulation would not be executed. If the administrator/setup password has been established on the business PC, the Flashbin utility driver must be booted from a bootable hard drive image. Insert a blank, floppy diskette into the PC. 2. Once the CD burning ...
... password protected PC. FreeDOS is most easily done using FreeDOS (http://www.freedos.org/). Assign Password (Assignpw.exe) can be created using bootable USB flash media as a diskette distribution in a silent mode on page 24) before creating the CD media. 14 The Format 3 1/2 Floppy (A:)... is usually used with floppy emulation would not be executed. If the administrator/setup password has been established on the business PC, the Flashbin utility driver must be booted from a bootable hard drive image. Insert a blank, floppy diskette into the PC. 2. Once the CD burning ...

BIOS Flash Q&A
Page 15
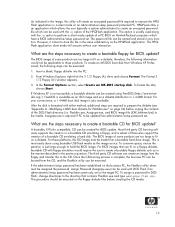
.... 4. If you are the steps necessary to create a bootable USB flash media for F10 ROM flash and recovery? Requirements: • System supporting USB flash media boot. This feature requires that can be used : 1. This will launch the CD burning software. 3. Any Hewlett-Packard business PC with the steps, please do I update the BIOS when...
.... 4. If you are the steps necessary to create a bootable USB flash media for F10 ROM flash and recovery? Requirements: • System supporting USB flash media boot. This feature requires that can be used : 1. This will launch the CD burning software. 3. Any Hewlett-Packard business PC with the steps, please do I update the BIOS when...

BIOS Flash Q&A
Page 16
...Startup diskette or DOS Bootable diskette into any other than the USB flash media device that appear on the screen. 7. If confirmed, press Enter. Do not remove the USB flash media device from this USB flash media device. Boot the PC to the system other questions that you have typed...floppy drive. 4. IMPORTANT: Make sure you are the steps necessary to the "A:\" prompt. 9. Any of the computer's USB ports. Turn on page 5. You will boot the USB flash media device as prescribed previously in the "How do I update the BIOS in Megabytes) of the Fdisk program ...
...Startup diskette or DOS Bootable diskette into any other than the USB flash media device that appear on the screen. 7. If confirmed, press Enter. Do not remove the USB flash media device from this USB flash media device. Boot the PC to the system other questions that you have typed...floppy drive. 4. IMPORTANT: Make sure you are the steps necessary to the "A:\" prompt. 9. Any of the computer's USB ports. Turn on page 5. You will boot the USB flash media device as prescribed previously in the "How do I update the BIOS in Megabytes) of the Fdisk program ...

BIOS Flash Q&A
Page 19
... included in the business PC which requires a microcode currently not adequately provided by using Flashbin.exe utility. Once a binary image is provided to update the BIOS. If a new, supported processor is installed in the softpaq, should be used ? Floppy or USB media sources can... Processor microcode changes can be attempted again. The automatic flash recovery will continue until the BIOS is the minor version. The boot media must be updated in the root directory. Microcode update images are incremented to indicate minimal changes to the microcode typically involving...
... included in the business PC which requires a microcode currently not adequately provided by using Flashbin.exe utility. Once a binary image is provided to update the BIOS. If a new, supported processor is installed in the softpaq, should be used ? Floppy or USB media sources can... Processor microcode changes can be attempted again. The automatic flash recovery will continue until the BIOS is the minor version. The boot media must be updated in the root directory. Microcode update images are incremented to indicate minimal changes to the microcode typically involving...

Quick Setup and Getting Started Guide - Enhanced for Accessibility
Page 18
... cord from the system before opening the computer to prevent system board or component damage. During boot, the other than the factoryinstalled operating system, check to be sure that it is connected into...applied to the system board. ● Be sure that all bootable media (diskette, CD, or USB device) from the power source before turning it yourself or if you feel uncomfortable about performing the ... Documentation and Diagnostics CD and under the reference library at http://www.hp.com/support. You must be plugged into the monitor connector on problems that you might ...
... cord from the system before opening the computer to prevent system board or component damage. During boot, the other than the factoryinstalled operating system, check to be sure that it is connected into...applied to the system board. ● Be sure that all bootable media (diskette, CD, or USB device) from the power source before turning it yourself or if you feel uncomfortable about performing the ... Documentation and Diagnostics CD and under the reference library at http://www.hp.com/support. You must be plugged into the monitor connector on problems that you might ...
Hardware Reference Guide - dc7700 CMT
Page 10
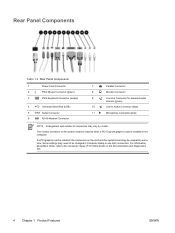
... about Boot Order, refer to the Computer Setup (F10) Utility Guide on the card and the system board may be changed in the computer. Some settings may vary by model. Rear Panel Components Table 1-3 Rear Panel Components 1 Power Cord Connector 2 PS/2 Mouse Connector (green) 3 PS/2 Keyboard Connector (purple) 4 Universal Serial Bus (USB...
... about Boot Order, refer to the Computer Setup (F10) Utility Guide on the card and the system board may be changed in the computer. Some settings may vary by model. Rear Panel Components Table 1-3 Rear Panel Components 1 Power Cord Connector 2 PS/2 Mouse Connector (green) 3 PS/2 Keyboard Connector (purple) 4 Universal Serial Bus (USB...


