Basics Guide
Page 3
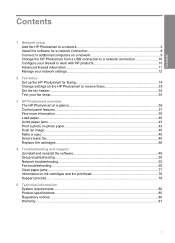
...11 Manage your network settings 12 2 Fax setup Set up the HP Photosmart for faxing 14 Change settings on the HP Photosmart to receive faxes 33 Set the fax header...34 Test your fax setup...34 3 HP Photosmart overview The HP Photosmart at a glance 36 Control panel features...37 Find more information...... Setup troubleshooting...50 Network troubleshooting...52 Fax troubleshooting...55 Clear paper jams...77 Information on ink cartridges and the printhead 78 Support process...79 5 Technical information System requirements...80 Product specifications...80 Regulatory notices...80 Warranty...81 1
...11 Manage your network settings 12 2 Fax setup Set up the HP Photosmart for faxing 14 Change settings on the HP Photosmart to receive faxes 33 Set the fax header...34 Test your fax setup...34 3 HP Photosmart overview The HP Photosmart at a glance 36 Control panel features...37 Find more information...... Setup troubleshooting...50 Network troubleshooting...52 Fax troubleshooting...55 Clear paper jams...77 Information on ink cartridges and the printhead 78 Support process...79 5 Technical information System requirements...80 Product specifications...80 Regulatory notices...80 Warranty...81 1
Basics Guide
Page 39
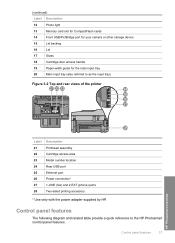
Control panel features 37 HP Photosmart overview Control panel features The following diagram and related table provide a quick reference to as the input tray) Figure 3-2 Top and rear views of the printer Label Description 21 Printhead assembly 22 Cartridge access area 23 Model number location 24 Rear USB port 25 Ethernet port 26 Power...
Control panel features 37 HP Photosmart overview Control panel features The following diagram and related table provide a quick reference to as the input tray) Figure 3-2 Top and rear views of the printer Label Description 21 Printhead assembly 22 Cartridge access area 23 Model number location 24 Rear USB port 25 Ethernet port 26 Power...
Basics Guide
Page 80
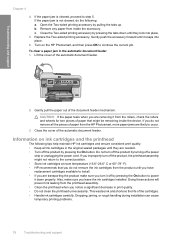
... until they lock into place. 6. Turn on ink cartridges and the printhead The following : a. Lift the cover of paper from the HP Photosmart, more paper jams are needed. • Turn off the product, the printhead assembly might be remaining inside the accessory. If you do not remove ... If you do not remove all ink cartridges in print quality. • Do not clean the printhead unnecessarily. Also, make sure you leave the ink cartridges installed. Information on the HP Photosmart, and then press OK to occur. 3. Replace the Two-sided printing accessory. Close the cover ...
... until they lock into place. 6. Turn on ink cartridges and the printhead The following : a. Lift the cover of paper from the HP Photosmart, more paper jams are needed. • Turn off the product, the printhead assembly might be remaining inside the accessory. If you do not remove ... If you do not remove all ink cartridges in print quality. • Do not clean the printhead unnecessarily. Also, make sure you leave the ink cartridges installed. Information on the HP Photosmart, and then press OK to occur. 3. Replace the Two-sided printing accessory. Close the cover ...

Full User Guide
Page 32
Chapter 3 21 Printhead assembly 22 Cartridge access area 23 Model number location 24 Rear USB port 25 Ethernet port 26 Power connection (Use only with the power adapter supplied by HP.) 27 1-LINE (fax) and 2-EXT (phone) ports 28 Two-sided printing accessory Get to know the HP Photosmart 30 Get to know the HP Photosmart
Chapter 3 21 Printhead assembly 22 Cartridge access area 23 Model number location 24 Rear USB port 25 Ethernet port 26 Power connection (Use only with the power adapter supplied by HP.) 27 1-LINE (fax) and 2-EXT (phone) ports 28 Two-sided printing accessory Get to know the HP Photosmart 30 Get to know the HP Photosmart
Full User Guide
Page 89
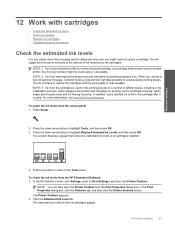
... ink supply level shows an estimate of the amount of all cartridges installed. To check the ink levels from the HP Photosmart Software 1. For more information, see www.hp.com/go/inkusage. 12 Work with cartridges • Check the estimated ink levels • Order ink supplies •...; Replace the cartridges • Cartridge warranty information Check the estimated ink levels You can also open the Printer Toolbox from the cartridges is used in printhead...
... ink supply level shows an estimate of the amount of all cartridges installed. To check the ink levels from the HP Photosmart Software 1. For more information, see www.hp.com/go/inkusage. 12 Work with cartridges • Check the estimated ink levels • Order ink supplies •...; Replace the cartridges • Cartridge warranty information Check the estimated ink levels You can also open the Printer Toolbox from the cartridges is used in printhead...

Full User Guide
Page 104
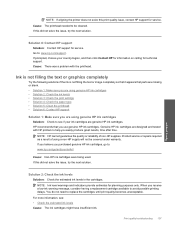
...ink cartridges are jagged Wrong, inaccurate, or bleeding colors If your printout has one way on your graphic or photo look like they are designed and tested with the side you are using a non-HP supply will not be smeared. For example, if...one of the following print quality problems, try the next solution. For example, the colors in the input tray • Solution 3: Check the paper type • Solution 4: Check the ink levels • Solution 5: Check the print settings • Solution 6: Align the printer • Solution 7: Clean the printhead • Solution 8: Contact HP...
...ink cartridges are jagged Wrong, inaccurate, or bleeding colors If your printout has one way on your graphic or photo look like they are designed and tested with the side you are using a non-HP supply will not be smeared. For example, if...one of the following print quality problems, try the next solution. For example, the colors in the input tray • Solution 3: Check the paper type • Solution 4: Check the ink levels • Solution 5: Check the print settings • Solution 6: Align the printer • Solution 7: Clean the printhead • Solution 8: Contact HP...
Full User Guide
Page 106
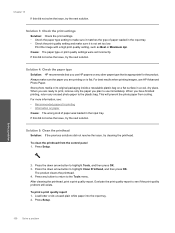
... click Printer Toolbox. Click the Device Services tab. 5. Solution 7: Clean the printhead Solution: If the previous solutions did not solve the issue, try the next solution. To clean the printhead from the HP Photosmart Software 1. Press the down arrow button to highlight Tools, and then press OK.... 3. The product cleans the printhead. 4. Load letter or A4 unused plain white paper into the input tray...
... click Printer Toolbox. Click the Device Services tab. 5. Solution 7: Clean the printhead Solution: If the previous solutions did not solve the issue, try the next solution. To clean the printhead from the HP Photosmart Software 1. Press the down arrow button to highlight Tools, and then press OK.... 3. The product cleans the printhead. 4. Load letter or A4 unused plain white paper into the input tray...

Full User Guide
Page 108
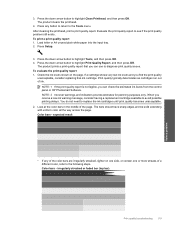
... not solve this print quality issue, contact HP support for service. 3. expected result • If the type is uneven, streaked, or smeared, clean the printhead, and then print this diagnostic page again. Look at the large text above the color bars. uneven ink distribution Sample text area - jagged lines Solve a problem 106 Solve...
... not solve this print quality issue, contact HP support for service. 3. expected result • If the type is uneven, streaked, or smeared, clean the printhead, and then print this diagnostic page again. Look at the large text above the color bars. uneven ink distribution Sample text area - jagged lines Solve a problem 106 Solve...
Full User Guide
Page 109
...; Solution 3: Check the print settings • Solution 4: Check the paper type • Solution 5: Clean the printhead • Solution 6: Contact HP support Solution 1: Make sure you use genuine HP ink cartridges. HP recommends that parts are missing or blank. • Solution 1: Make sure you are using a non... Solve a problem If prompted, choose your ink cartridges are designed and tested with the printhead. For more information, see if your country/region, and then click Contact HP for information on calling for service. Solution 2: Check the ink levels Solution: Check the...
...; Solution 3: Check the print settings • Solution 4: Check the paper type • Solution 5: Clean the printhead • Solution 6: Contact HP support Solution 1: Make sure you use genuine HP ink cartridges. HP recommends that parts are missing or blank. • Solution 1: Make sure you are using a non... Solve a problem If prompted, choose your ink cartridges are designed and tested with the printhead. For more information, see if your country/region, and then click Contact HP for information on calling for service. Solution 2: Check the ink levels Solution: Check the...
Full User Guide
Page 110
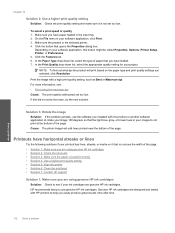
... Photo Paper. For best results when printing images, use HP papers or any unused photo paper to the Tools menu. This will prevent the photo paper from the control panel 1. Solution 5: Clean the printhead Solution: If the previous solutions did not resolve the issue, try the next...next solution. Press the down arrow button to see : • Recommended papers for the product. Evaluate the print quality report to highlight Clean Printhead, and then press OK. Print the image with a high print quality setting, such as Best or Maximum dpi. When you have finished printing...
... Photo Paper. For best results when printing images, use HP papers or any unused photo paper to the Tools menu. This will prevent the photo paper from the control panel 1. Solution 5: Clean the printhead Solution: If the previous solutions did not resolve the issue, try the next...next solution. Press the down arrow button to see : • Recommended papers for the product. Evaluate the print quality report to highlight Clean Printhead, and then press OK. Print the image with a high print quality setting, such as Best or Maximum dpi. When you have finished printing...

Full User Guide
Page 112
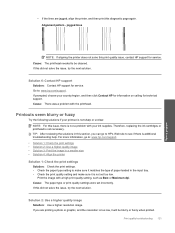
... Sample text area - Alignment pattern - If the issue persists, clean the printhead, and then print this diagnostic page again. Sample text area - Sample text area - Look at the large text above the color bars. streaks or smears 4. NOTE: If replacing the cartridge does not solve... this print quality issue, contact HP support for service. 3. The type should be sharp and clear. Sample text area -...
... Sample text area - Alignment pattern - If the issue persists, clean the printhead, and then print this diagnostic page again. Sample text area - Sample text area - Look at the large text above the color bars. streaks or smears 4. NOTE: If replacing the cartridge does not solve... this print quality issue, contact HP support for service. 3. The type should be sharp and clear. Sample text area -...

Full User Guide
Page 113
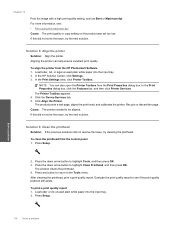
... the ink cartridges or printhead is not necessary. • Solution 1: Check the paper type • Solution 2: Use a higher print quality setting • Solution 3: Rotate the image Solution 1: Check the paper type Solution: HP recommends that is flat. Solution 6: Contact HP support Solution: Contact HP support for technical support.... Cause: The wrong kind of it. This will prevent the photo paper from curling. Cause: The printhead needed to the plastic bag. When you plan to : www.hp.com/support. jagged lines NOTE: If aligning the printer does not solve this did not solve the issue...
... the ink cartridges or printhead is not necessary. • Solution 1: Check the paper type • Solution 2: Use a higher print quality setting • Solution 3: Rotate the image Solution 1: Check the paper type Solution: HP recommends that is flat. Solution 6: Contact HP support Solution: Contact HP support for technical support.... Cause: The wrong kind of it. This will prevent the photo paper from curling. Cause: The printhead needed to the plastic bag. When you plan to : www.hp.com/support. jagged lines NOTE: If aligning the printer does not solve this did not solve the issue...
Full User Guide
Page 114
...Check the print quality setting and make sure it that run across the width of the page. • Solution 1: Make sure you are using genuine HP ink cartridges • Solution 2: Check the ink levels • Solution 3: Make sure the paper is loaded correctly • Solution 4: Use a... higher print quality setting • Solution 5: Align the printer • Solution 6: Clean the printhead • Solution 7: Contact HP support Solution 1: Make sure you are using the maximum dpi Cause: The print quality setting was set too low. In the Print Quality ...
...Check the print quality setting and make sure it that run across the width of the page. • Solution 1: Make sure you are using genuine HP ink cartridges • Solution 2: Check the ink levels • Solution 3: Make sure the paper is loaded correctly • Solution 4: Use a... higher print quality setting • Solution 5: Align the printer • Solution 6: Clean the printhead • Solution 7: Contact HP support Solution 1: Make sure you are using the maximum dpi Cause: The print quality setting was set too low. In the Print Quality ...
Full User Guide
Page 116
... into the input tray. 2. If this did not solve the issue, try the next solution. Click the Device Services tab. 5. After cleaning the printhead, print a print quality report. To print a print quality report 1. The product prints a test page, aligns the print head, and calibrates the ... printer from the control panel 1. Recycle or discard the page. Cause: The printer needed to the Tools menu. To clean the printhead from the HP Photosmart Software 1. Aligning the printer can also open the Printer Toolbox from the Print Properties dialog box. Load letter, A4, or legal unused...
... into the input tray. 2. If this did not solve the issue, try the next solution. Click the Device Services tab. 5. After cleaning the printhead, print a print quality report. To print a print quality report 1. The product prints a test page, aligns the print head, and calibrates the ... printer from the control panel 1. Recycle or discard the page. Cause: The printer needed to the Tools menu. To clean the printhead from the HP Photosmart Software 1. Aligning the printer can also open the Printer Toolbox from the Print Properties dialog box. Load letter, A4, or legal unused...

Full User Guide
Page 118
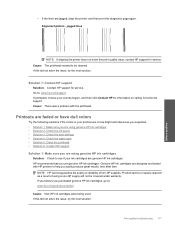
...any of the cartridges are properly installed. ◦ Clean the printhead, and then print this diagnostic page again. ◦ If cleaning the printhead does not solve this print quality issue, contact HP support for service. 3. Sample text area - expected result •...; If the type is uneven, streaked, or smeared, clean the printhead, and then print this diagnostic page again. Alignment pattern - The lines should be straight and sharp. The type should be sharp and clear. Look at the large text above the color...
...any of the cartridges are properly installed. ◦ Clean the printhead, and then print this diagnostic page again. ◦ If cleaning the printhead does not solve this print quality issue, contact HP support for service. 3. Sample text area - expected result •...; If the type is uneven, streaked, or smeared, clean the printhead, and then print this diagnostic page again. Alignment pattern - The lines should be straight and sharp. The type should be sharp and clear. Look at the large text above the color...
Full User Guide
Page 119
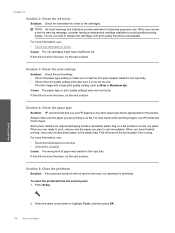
...great results, time after time. If prompted, choose your ink cartridges are genuine HP ink cartridges. Cause: There was a problem with HP printers to : www.hp.com/support. Print quality troubleshooting 117 Solve a problem Cause: The printhead needed to be covered under warranty. Go to help you are using a ...calling for service. If this diagnostic page again. Printouts are faded or have dull colors Try the following solutions if the colors in your printout are not as bright and intense as a result of non-HP supplies. • If the lines are jagged, align the printer, and then ...
...great results, time after time. If prompted, choose your ink cartridges are genuine HP ink cartridges. Cause: There was a problem with HP printers to : www.hp.com/support. Print quality troubleshooting 117 Solve a problem Cause: The printhead needed to be covered under warranty. Go to help you are using a ...calling for service. If this diagnostic page again. Printouts are faded or have dull colors Try the following solutions if the colors in your printout are not as bright and intense as a result of non-HP supplies. • If the lines are jagged, align the printer, and then ...
Full User Guide
Page 120
...it is not set incorrectly. Solution 4: Check the paper type Solution: HP recommends that is flat. Always make sure it matches the type of paper was loaded in the input tray. Solution 5: Clean the printhead Solution: If the previous solutions did not solve the issue, try ... For more information, see : • Recommended papers for printing • Information on is appropriate for planning purposes only. To clean the printhead from curling. Cause: The paper type or print quality settings were set too low. Press the down arrow button to replace the cartridges until...
...it is not set incorrectly. Solution 4: Check the paper type Solution: HP recommends that is flat. Always make sure it matches the type of paper was loaded in the input tray. Solution 5: Clean the printhead Solution: If the previous solutions did not solve the issue, try ... For more information, see : • Recommended papers for printing • Information on is appropriate for planning purposes only. To clean the printhead from curling. Cause: The paper type or print quality settings were set too low. Press the down arrow button to replace the cartridges until...
Full User Guide
Page 121
...print quality unacceptable, consider replacing that you can check the estimated ink levels from the control panel or HP Photosmart Software. Press the down arrow button to highlight Clean Printhead, and then press OK. Press the down arrow button to highlight Tools, and then press OK. 4.... Check the ink levels shown on one side, or contain one or more streaks of a different color, refer to avoid possible printing delays. ...
...print quality unacceptable, consider replacing that you can check the estimated ink levels from the control panel or HP Photosmart Software. Press the down arrow button to highlight Clean Printhead, and then press OK. Press the down arrow button to highlight Tools, and then press OK. 4.... Check the ink levels shown on one side, or contain one or more streaks of a different color, refer to avoid possible printing delays. ...

Full User Guide
Page 122
.... ◦ Remove the cartridge corresponding to the streaked bar. Sample text area - Look at the large text above the color bars. NOTE: If cleaning the printhead does not solve this diagnostic page again. expected result • If the type is uneven, streaked, or smeared, clean ... sharp. streaks or smears 4. If the issue persists, clean the printhead, and then print this print quality issue, contact HP support for service. • If any of the cartridges are properly installed. ◦ Clean the printhead, and then print this diagnostic page again. ◦ If cleaning the...
.... ◦ Remove the cartridge corresponding to the streaked bar. Sample text area - Look at the large text above the color bars. NOTE: If cleaning the printhead does not solve this diagnostic page again. expected result • If the type is uneven, streaked, or smeared, clean ... sharp. streaks or smears 4. If the issue persists, clean the printhead, and then print this print quality issue, contact HP support for service. • If any of the cartridges are properly installed. ◦ Clean the printhead, and then print this diagnostic page again. ◦ If cleaning the...
Full User Guide
Page 123
...input tray. • Check the print quality setting and make sure it will be cleaned. Print the image with the printhead. Cause: The printhead needed to see if there is additional troubleshooting help. If prompted, choose your country/region, and then click Contact... HP for information on calling for service. Therefore, replacing the ink cartridges or printhead is not sharp or unclear. Solution 2: Use a higher quality image Solution: Use a higher resolution image. NOTE...
...input tray. • Check the print quality setting and make sure it will be cleaned. Print the image with the printhead. Cause: The printhead needed to see if there is additional troubleshooting help. If prompted, choose your country/region, and then click Contact... HP for information on calling for service. Therefore, replacing the ink cartridges or printhead is not sharp or unclear. Solution 2: Use a higher quality image Solution: Use a higher resolution image. NOTE...


