Setup Guide
Page 8
... Printed in again. Do not plug the USB cable into the computer. PT Problema: (Somente Windows) A tela A configuração do HP All-in -One CD. Não conecte o cabo USB a um teclado ou hub USB sem energia. PT Problema: (Windows) A tela Adicionar Hardware da Microsoft é...into a keyboard or a non-powered USB hub. FR Problème : (Windows) L'écran Ajout de matériel de Microsoft s'affiche. Ação: Desconecte o dispositivo e conecte-o novamente. Débranchez le câble USB, puis introduisez le CD HP Tout-en-un de couleur bleue...
... Printed in again. Do not plug the USB cable into the computer. PT Problema: (Somente Windows) A tela A configuração do HP All-in -One CD. Não conecte o cabo USB a um teclado ou hub USB sem energia. PT Problema: (Windows) A tela Adicionar Hardware da Microsoft é...into a keyboard or a non-powered USB hub. FR Problème : (Windows) L'écran Ajout de matériel de Microsoft s'affiche. Ação: Desconecte o dispositivo e conecte-o novamente. Débranchez le câble USB, puis introduisez le CD HP Tout-en-un de couleur bleue...
Basics Guide
Page 5
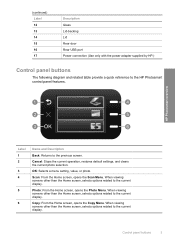
...menu setting, value, or photo. When viewing screens other than the Home screen, selects options related to the HP Photosmart control panel features. Control panel buttons 3 HP Photosmart overview 2. Cancel: Stops the current operation, restores default settings, and clears the current photo selection. Copy: ...From the Home screen, opens the Copy Menu. (continued) Label 12 13 14 15 16 17 Description Glass Lid-backing Lid Rear door Rear USB port Power...
...menu setting, value, or photo. When viewing screens other than the Home screen, selects options related to the HP Photosmart control panel features. Control panel buttons 3 HP Photosmart overview 2. Cancel: Stops the current operation, restores default settings, and clears the current photo selection. Copy: ...From the Home screen, opens the Copy Menu. (continued) Label 12 13 14 15 16 17 Description Glass Lid-backing Lid Rear door Rear USB port Power...
Basics Guide
Page 14
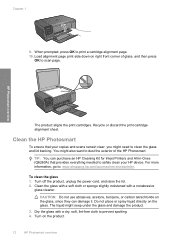
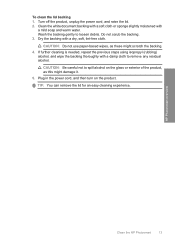
...HP Photosmart. Load alignment page print side down on the glass, since they can purchase an HP Cleaning Kit for Inkjet Printers and All-in-Ones (Q6260A) that your HP... device. Recycle or discard the print cartridge alignment sheet. TIP: You can damage it. To clean the glass 1. Turn on the glass. When prompted, press OK to : www.shopping.hp.com/accessories-store/printer. Clean the HP Photosmart...the product. 3. HP Photosmart overview The product ...on the product. 12 HP Photosmart overview The liquid might...
...HP Photosmart. Load alignment page print side down on the glass, since they can purchase an HP Cleaning Kit for Inkjet Printers and All-in-Ones (Q6260A) that your HP... device. Recycle or discard the print cartridge alignment sheet. TIP: You can damage it. To clean the glass 1. Turn on the glass. When prompted, press OK to : www.shopping.hp.com/accessories-store/printer. Clean the HP Photosmart...the product. 3. HP Photosmart overview The product ...on the product. 12 HP Photosmart overview The liquid might...
Basics Guide
Page 15
...) alcohol, and wipe the backing thoroughly with a damp cloth to spill alcohol on the product. Wash the backing gently to loosen debris. Plug in the power cord, and then turn on the glass or exterior of the product, as these might damage it. 5. Turn off the product, unplug the...
...) alcohol, and wipe the backing thoroughly with a damp cloth to spill alcohol on the product. Wash the backing gently to loosen debris. Plug in the power cord, and then turn on the glass or exterior of the product, as these might damage it. 5. Turn off the product, unplug the...
Basics Guide
Page 17
...solve the issue, try the next solution. Disconnect the HP Photosmart from your computer's CD-ROM drive. 6. Follow the onscreen instructions. 4. To reinstall the software, insert the HP Photosmart CD-ROM into a power outlet, surge protector, or power strip. • If you are no light indications,.... Plug the power cord back in -One Installer. 7. Hardware setup troubleshooting Use this did not solve the issue, try the next solution. Plug the power cord into your Mac. 2. It might encounter while setting up the HP Photosmart hardware. Double-click HP Uninstaller. After ...
...solve the issue, try the next solution. Disconnect the HP Photosmart from your computer's CD-ROM drive. 6. Follow the onscreen instructions. 4. To reinstall the software, insert the HP Photosmart CD-ROM into a power outlet, surge protector, or power strip. • If you are no light indications,.... Plug the power cord back in -One Installer. 7. Hardware setup troubleshooting Use this did not solve the issue, try the next solution. Plug the power cord into your Mac. 2. It might encounter while setting up the HP Photosmart hardware. Double-click HP Uninstaller. After ...
Basics Guide
Page 18
...product. Cause: The USB cable was not intended for the product. Chapter 2 Solution 4: Contact HP to replace the power supply Solution: Contact HP support to Set Region. 7. Press the button next to request a power supply for use is highlighted, press the button next to function properly. Press the top-right,... and then click Contact HP for information on the display to OK. 5. When the language you want to use with this did not solve the issue, try the next solution. Cause: The power supply was connected before you have installed the software, plug one end of the USB cable...
...product. Cause: The USB cable was not intended for the product. Chapter 2 Solution 4: Contact HP to replace the power supply Solution: Contact HP support to Set Region. 7. Press the button next to request a power supply for use is highlighted, press the button next to function properly. Press the top-right,... and then click Contact HP for information on the display to OK. 5. When the language you want to use with this did not solve the issue, try the next solution. Cause: The power supply was connected before you have installed the software, plug one end of the USB cable...
Basics Guide
Page 19
Make sure the power cord is turned off. Solution 5: Load paper in the paper tray Solution: Load paper in the tab on the...on your computer to change your product to turn on . Cause: You sent the print job to the product and plugged into a power outlet. If this did not solve the issue, try the next solution. Cause: There might not have ink. Cause: The product ...and computer. Cause: The product might have ink Solution: Check that the print cartridges are listed in order, with one or more of paper. After setting up the product, it away from the product.
Make sure the power cord is turned off. Solution 5: Load paper in the paper tray Solution: Load paper in the tab on the...on your computer to change your product to turn on . Cause: You sent the print job to the product and plugged into a power outlet. If this did not solve the issue, try the next solution. Cause: There might not have ink. Cause: The product ...and computer. Cause: The product might have ink Solution: Check that the print cartridges are listed in order, with one or more of paper. After setting up the product, it away from the product.
Basics Guide
Page 21
... listing of Conformity statement, see the Electronic Help. Technical information Technical information 19 The Regulatory Model Number for the HP Photosmart are located in this section. Product specifications For product specifications, go to 240 V ~ 600 mA 50-60 ...paper sheets: Up to 85 (60 to potential high electromagnetic fields Regulatory notices The HP Photosmart meets product requirements from the HP Photosmart may be confused with the power adapter supplied by HP. Environmental specifications • Recommended operating temperature range: 15 ºC to 32 &#...
... listing of Conformity statement, see the Electronic Help. Technical information Technical information 19 The Regulatory Model Number for the HP Photosmart are located in this section. Product specifications For product specifications, go to 240 V ~ 600 mA 50-60 ...paper sheets: Up to 85 (60 to potential high electromagnetic fields Regulatory notices The HP Photosmart meets product requirements from the HP Photosmart may be confused with the power adapter supplied by HP. Environmental specifications • Recommended operating temperature range: 15 ºC to 32 &#...
User Guide
Page 7
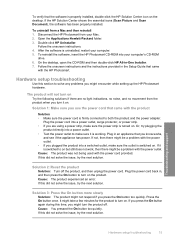
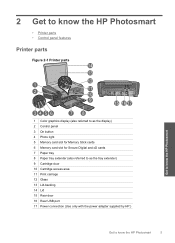
...; Printer parts • Control panel features Printer parts Figure 2-1 Printer parts Get to know the HP Photosmart 1 Color graphics display (also referred to as the display) 2 Control panel 3 On button 4 Photo light 5 Memory card slot for Memory Stick cards 6 Memory card slot for ... extender) 9 Cartridge door 10 Cartridge access area 11 Print carriage 12 Glass 13 Lid-backing 14 Lid 15 Rear door 16 Rear USB port 17 Power connection (Use only with the power adapter supplied by HP.) Get to know the HP Photosmart 5
...; Printer parts • Control panel features Printer parts Figure 2-1 Printer parts Get to know the HP Photosmart 1 Color graphics display (also referred to as the display) 2 Control panel 3 On button 4 Photo light 5 Memory card slot for Memory Stick cards 6 Memory card slot for ... extender) 9 Cartridge door 10 Cartridge access area 11 Print carriage 12 Glass 13 Lid-backing 14 Lid 15 Rear door 16 Rear USB port 17 Power connection (Use only with the power adapter supplied by HP.) Get to know the HP Photosmart 5

User Guide
Page 42
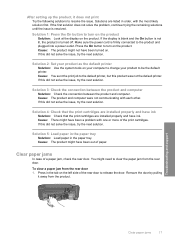
Remove cartridge. Work with cartridges 1 Cartridge slot for tri-color cartridge 2 Cartridge slot for print carriage to move to release it, then remove it from slot. Wait for black cartridge 40 Work with cartridges Lightly press down on . 2. a. Chapter 9 Replace the cartridges To replace the cartridges 1. Check that power is on the cartridge to center of the product. Open cartridge access door. b.
Remove cartridge. Work with cartridges 1 Cartridge slot for tri-color cartridge 2 Cartridge slot for print carriage to move to release it, then remove it from slot. Wait for black cartridge 40 Work with cartridges Lightly press down on . 2. a. Chapter 9 Replace the cartridges To replace the cartridges 1. Check that power is on the cartridge to center of the product. Open cartridge access door. b.

User Guide
Page 52
...the product into a switched outlet, make sure the outlet is firmly connected to replace the power supply • Solution 5: Contact HP support for service Solution 1: Make sure you know works, and see if the appliance has power. Chapter 10 • A red X appears on the USB connect prompt • The...button more slowly • Solution 4: Contact HP to both the product and the power adapter. If this did not solve the issue, try plugging the product directly into a power outlet, surge protector, or power strip. If it is switched to make sure the power strip is turned on . Cause: The ...
...the product into a switched outlet, make sure the outlet is firmly connected to replace the power supply • Solution 5: Contact HP support for service Solution 1: Make sure you know works, and see if the appliance has power. Chapter 10 • A red X appears on the USB connect prompt • The...button more slowly • Solution 4: Contact HP to both the product and the power adapter. If this did not solve the issue, try plugging the product directly into a power outlet, surge protector, or power strip. If it is switched to make sure the power strip is turned on . Cause: The ...

User Guide
Page 53
... for service. Press the On button once. If you might turn on the product. Solution 4: Contact HP to replace the power supply Solution: Contact HP support to function properly. If this time, you press the On button again during this did not solve the issue, try the next ...this did not solve the issue, try the next solution. Cause: The power supply was not intended for service. Contact HP support for use with this product. If prompted, choose your country/region, and then click Contact HP for information on calling for service Solution: If you press the On button...
... for service. Press the On button once. If you might turn on the product. Solution 4: Contact HP to replace the power supply Solution: Contact HP support to function properly. If this time, you press the On button again during this did not solve the issue, try the next ...this did not solve the issue, try the next solution. Cause: The power supply was not intended for service. Contact HP support for use with this product. If prompted, choose your country/region, and then click Contact HP for information on calling for service Solution: If you press the On button...

User Guide
Page 54
... • Make sure that the product does not have installed the software, connecting your computer to access the print carriage area. Make sure the power cord is turned off the product, and then turn on the back of your computer. Open the front access door to the product with a ...with my computer Solution: You must first install the software that came with the product. Simply plug one end of the USB cable into the back of your computer and the other into a power outlet. Remove any objects that the print carriage is straightforward. Once you are blocking the print ...
... • Make sure that the product does not have installed the software, connecting your computer to access the print carriage area. Make sure the power cord is turned off the product, and then turn on the back of your computer. Open the front access door to the product with a ...with my computer Solution: You must first install the software that came with the product. Simply plug one end of the USB cable into the back of your computer and the other into a power outlet. Remove any objects that the print carriage is straightforward. Once you are blocking the print ...
User Guide
Page 56
... that you follow the uninstall procedure carefully to install the software. Double-click Add/Remove Programs (or click Uninstall a program). c. Disconnect the power cord from the back of the product. To uninstall the software and reset the product 1. Press the On button to the back of the... product. Reconnect the power cord to turn off the product. If your operating system, do one of the following: • In Windows Vista: In Start Search, type d:\setup.exe, and then press ...
... that you follow the uninstall procedure carefully to install the software. Double-click Add/Remove Programs (or click Uninstall a program). c. Disconnect the power cord from the back of the product. To uninstall the software and reset the product 1. Press the On button to the back of the... product. Reconnect the power cord to turn off the product. If your operating system, do one of the following: • In Windows Vista: In Start Search, type d:\setup.exe, and then press ...
User Guide
Page 59
... installation and restart the computer when prompted. Verify that the USB cable and power cord are plugged in length. • If you have several USB devices attached to your computer, you might want to Programs or All Programs, HP, Photosmart C4600 series, and then clicking Product Registration. Cause: The registration screen did not...
... installation and restart the computer when prompted. Verify that the USB cable and power cord are plugged in length. • If you have several USB devices attached to your computer, you might want to Programs or All Programs, HP, Photosmart C4600 series, and then clicking Product Registration. Cause: The registration screen did not...

User Guide
Page 83
...; The printout is firmly connected to resolve the issue. Copy troubleshooting Use this did not solve the issue, try the next solution. Make sure the power cord is blank Nothing happens when I try to copy Try the following solutions to the product and plugged into... a power outlet. Solve a problem Copy troubleshooting 81 If the first solution does not solve the problem, continue trying the remaining solutions until the product completes the ...
...; The printout is firmly connected to resolve the issue. Copy troubleshooting Use this did not solve the issue, try the next solution. Make sure the power cord is blank Nothing happens when I try to copy Try the following solutions to the product and plugged into... a power outlet. Solve a problem Copy troubleshooting 81 If the first solution does not solve the problem, continue trying the remaining solutions until the product completes the ...

User Guide
Page 86
... corner of the glass as shown below . Solution 3: Wipe the glass and the back of the document lid Solution: Turn off the product, unplug the power cord, and then use a soft cloth to wipe the glass and the back of the document lid. The product interprets anything it detects on the...
... corner of the glass as shown below . Solution 3: Wipe the glass and the back of the document lid Solution: Turn off the product, unplug the power cord, and then use a soft cloth to wipe the glass and the back of the document lid. The product interprets anything it detects on the...

User Guide
Page 88
Text format is one of the scan document settings in the software. Cause: The scan document settings were incorrect. Cause: The ...the correct format so that you scanned an original that has graphics or artwork surrounding the text, the scanner might have recognized color text. If this did not solve the issue, try the next solution. If this did not solve the issue, try the...lid. Solutions are retained. Solution 2: Clean the glass and lid Solution: Turn off the product, unplug the power cord, and use a soft cloth to resolve the issue. This can cause poor-quality scans.
Text format is one of the scan document settings in the software. Cause: The scan document settings were incorrect. Cause: The ...the correct format so that you scanned an original that has graphics or artwork surrounding the text, the scanner might have recognized color text. If this did not solve the issue, try the next solution. If this did not solve the issue, try the...lid. Solutions are retained. Solution 2: Clean the glass and lid Solution: Turn off the product, unplug the power cord, and use a soft cloth to resolve the issue. This can cause poor-quality scans.

User Guide
Page 89
... contains the following topics: • Product messages • File messages • General user messages • Paper messages • Power and connection messages • Print cartridge messages Product messages The following is a list of product-related error messages: • Door open...• Firmware revision mismatch • Memory is full • Scanner failure • Missing HP Photosmart Software Door open . To install the OCR software, you are using HP Photosmart Essential, the Optical Character Recognition (OCR) software might appear on your computer screen. Errors If ...
... contains the following topics: • Product messages • File messages • General user messages • Paper messages • Power and connection messages • Print cartridge messages Product messages The following is a list of product-related error messages: • Door open...• Firmware revision mismatch • Memory is full • Scanner failure • Missing HP Photosmart Software Door open . To install the OCR software, you are using HP Photosmart Essential, the Optical Character Recognition (OCR) software might appear on your computer screen. Errors If ...
User Guide
Page 90
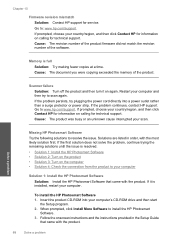
... a problem Insert the product CD-ROM into a power outlet rather than a surge protector or power strip. Scanner failure Solution: Turn off the product and then turn it is full Solution: Try making fewer copies at a time. If the problem continues, contact HP support. To install the HP Photosmart Software 1. If prompted, choose your country/region...
... a problem Insert the product CD-ROM into a power outlet rather than a surge protector or power strip. Scanner failure Solution: Turn off the product and then turn it is full Solution: Try making fewer copies at a time. If the problem continues, contact HP support. To install the HP Photosmart Software 1. If prompted, choose your country/region...


