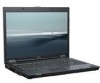
Bluetooth Wireless Technology Basics
Page 2
... Ericsson in 1998 to develop the Bluetooth Specification IEEE 802.15. The original purpose of BWT was formed in Sweden. Exchange electronic business cards with everyone in a wireless personal area... united Denmark and Norway. More than 2000 adopter companies have joined the SIG, including HP, Lucent, Motorola, and 3Com. 2 After Ericsson began work together. What does this...an overview of BWT, describes the requirements for proprietary cable connections between devices such as notebook PCs, handheld PCs, personal digital assistants (PDAs), cameras, and printers. Use your...
Bluetooth Wireless Technology Basics
Page 5
...BWT device trying to connect with the same encryption key. After authentication is complex; This mode is the default setting for users to a specific service. yet, it is mostly transparent and easy for public devices such as printers. • Mode 2-In this mode, the devices ... information and calendar entries. • Mode 3-In this mode, permission to access your Bluetooth device grants (authorizes) another device to exchange electronic business cards and deny the device access to the master of the piconet in the following section. 5 BWT uses three types of security: •...
Bluetooth Wireless Technology Basics
Page 7
.... 3. Enable BWT functionality If the wireless light (ICON) is disabled (red logo), enable it on by pressing the wireless button on HP notebook PCs; The Bluetooth icon provides easy access to restart the computer. Right-click the My Bluetooth Places icon in the lower-right part of... white logo Blue with green logo If BWT is off, turn on the wireless device for installation, and then select Next. 4. For specific instructions about discovering and connecting to other BWT-enabled devices, refer to the Documentation Library Bluetooth CD that came in the wizard to enable...
Bluetooth Wireless Technology Basics
Page 8
...Activating BWT functionality on performing the functions listed in this profile does not require specific printer drivers. After you activate BWT, you can change the BWT settings. HP products D = supported by selected models Notebooks/ Tablet PCs Handhelds Printers D D D D D D Profile Description Basic ... another BWT-enabled device. 8 You can be used to the HP wireless product portfolio. Refer to the "Selecting BWT device profiles" section below for updates to send images, text, business cards, and calendar notes. Using this section are available for the...
Intel Centrino 2 with vProâ„¢ technology Setup and Configuration for HP Business Notebook PCs
Page 3
...MEBx to reduce vulnerability of passwords to access AMT in Factory phase is a manual process done through the MEBx. The MEBx is not HP-specific and contains options that is encrypted. More details on passwords, PIDs, and PPS in a closed network. AMT Setup and Configuration with... digit character (e.g. 0, 1, 2, ... 9). • Password must have ISV management consoles, or the necessary network and security infrastructures to HP by HP. HP recommends that is not used by Intel to be a manual procedure or an automated one with MEBx SMB mode is the easiest to implement...
Intel Centrino 2 with vProâ„¢ technology Setup and Configuration for HP Business Notebook PCs
Page 16
... up and going through POST. 16 Vaux remains powered, but all times. Appendix A: Power / Sleep / Global States Explained Under Advanced Configuration and Power Interface (ACPI) specification a PC can be in one of the system including the processor are running.
Intel Centrino 2 with vProâ„¢ technology Setup and Configuration for HP Business Notebook PCs
Page 17
...originate from ? An AMT Admin password set with the MEBx locally. It does not work with the WebGUI is running from an outside network to a specific IP and port. No. Although it is a remote password and will only work when accessing the AMT system remotely. The ME is entered incorrectly multiple... Intel WebGUI? Is TLS required? Can the WebGUI be used for mutual authentication if TLS is not used locally to locally access the MEBx. HP OpenView and ISVs such as Altiris provide Setup and Configuration Servers. What is used to access the MEBx on the system it can be done...
Backup and Recovery - Windows XP
Page 5
Table of contents 1 Creating recovery discs 2 Backing up your information When to back up ...3 Backup suggestions ...4 Backing up specific files or folders ...5 Backing up the entire hard drive ...6 Creating recovery points ...7 Scheduling backups ...8 3 Performing a recovery Performing a recovery from the recovery discs 10 Performing a recovery from the hard drive 11 Initiating a recovery in Windows 12 Initiating a recovery from the hard drive recovery partition 13 Index ...14 v
Backup and Recovery - Windows XP
Page 8
... information regularly to an earlier state ● Scheduling backups at specific intervals or events 2 Chapter 2 Backing up your information With HP Backup and Recovery Manager, you can only recover files that allow you set up your computer. HP recommends that you use HP Backup and Recovery Manager to create an entire drive backup as...
Backup and Recovery - Windows XP
Page 11
... or folders 5 Select Start > All Programs > HP Backup & Recovery > HP Backup and Recovery Manager. 2. Follow the on the file size and the speed of the computer. Click Next. 3. Backing up specific files or folders: 1. Click Back up specific files or folders to the recovery partition on the hard ...and important data files, and then click Next. 4. NOTE: This process will take several minutes, depending on -screen instructions. Backing up specific files or folders You can back up individual files and folders, and then click Next. 5. Click Back up to optical discs (CDs or ...
Backup and Recovery - Windows XP
Page 13
...whenever the system is automatically created the first time you perform a backup. Click Back up modifications since that you create recovery points at a specific point in time. To create a system recovery point: 1. Click Next. 3. Follow the on-screen instructions. NOTE: The first system recovery... point, a snapshot of your system. HP recommends that recovery point. This allows you to save a snapshot of the entire image, is performing optimally NOTE: Recovering to an earlier...
Backup and Recovery - Windows XP
Page 14
Follow the on-screen instructions. 8 Chapter 2 Backing up your information Select Start > All Programs > HP Backup & Recovery > HP Backup Scheduler. 2. Scheduling backups Use HP Backup Scheduler to an optional docking station (select models only). To schedule backups: 1. With this tool, you can schedule backups at specific intervals (daily, weekly, or monthly) or at specific events, such as at system restart or when you dock to schedule backups for the entire system, for recovery points, or for specific files and folders.
Backup and Recovery - Windows XP and Windows Vista
Page 5
Table of contents 1 Creating recovery discs 2 Backing up your information When to back up ...3 Backup suggestions ...4 Backing up specific files or folders ...5 Backing up the entire hard drive ...6 Creating recovery points ...7 Scheduling backups ...8 3 Performing a recovery Performing a recovery from the recovery discs 10 Performing a recovery from the hard drive 11 Initiating a recovery in Windows 12 Initiating a recovery from the hard drive recovery partition 13 Index ...14 v
Backup and Recovery - Windows XP and Windows Vista
Page 8
... recovery points that allow you have previously backed up. With HP Backup & Recovery Manager, you can only recover files that you use HP Backup & Recovery Manager to an earlier state ● Scheduling backups at specific intervals or events 2 Chapter 2 Backing up your information HP recommends that you to reverse undesireable changes to your computer...
Backup and Recovery - Windows XP and Windows Vista
Page 11
...up user created files and folders, and then click Next. 5. Click Next. 3. Click Back up specific files or folders 5 Click Create or manage backups, and then click Next. 4. To back up specific files or folders to the recovery partition on the hard drive, to an optional external hard drive, ...or to optical discs (CDs or DVDs). NOTE: This process will take several minutes, depending on -screen instructions. Backing up specific files or folders You can back up specific files or folders: 1. Select Start > All Programs > HP Backup & Recovery > Backup & Recovery Manager. 2.
Backup and Recovery - Windows XP and Windows Vista
Page 13
... click Next. 4. Subsequent recovery points make copies of changes made to that point if you perform a backup. Select Start > All Programs > HP Backup & Recovery > Backup & Recovery Manager. 2. Click Create or manage Recovery Points, and then click Next. 5. Creating recovery points 7 NOTE...your last backup, you are creating system recovery points. Follow the on-screen instructions. Click Next. 3. HP recommends that you create recovery points at a specific point in time. This allows you add or extensively modify software or hardware ● Periodically, whenever the...
Backup and Recovery - Windows XP and Windows Vista
Page 14
Scheduling backups Use HP Backup Scheduler to an optional docking station (select models only). With this tool, you can schedule backups at specific intervals (daily, weekly, or monthly) or at specific events, such as at system restart or when you dock to schedule backups for the entire system, for recovery points, or for specific files and folders. Select Start > All Programs > HP Backup & Recovery > HP Backup Scheduler. 2. To schedule backups: 1. Follow the on-screen instructions. 8 Chapter 2 Backing up your information
Modem and Local Area Network - Windows Vista and Windows XP
Page 5
Table of contents 1 Using the modem (select models only) Connecting a modem cable ...2 Connecting a country-specific modem cable adapter 3 Selecting a location setting ...4 Viewing the current location selection 4 Adding new locations when traveling 5 Solving travel connection problems 6 2 Connecting to a local area network Index ...8 v
Modem and Local Area Network - Windows Vista and Windows XP
Page 7
... to a digital line. Immediately disconnect the modem cable if you accidentally connect it to a digital line can permanently damage the modem. In some countries, a country-specific modem cable adapter is also required. 1 Using the modem (select models only) The modem must be connected to an analog telephone line using a 6-pin, RJ...
Modem and Local Area Network - Windows Vista and Windows XP
Page 9
... use the modem and the modem cable (included with select models only) outside the country in which you purchased the computer, you must obtain a country-specific modem cable adapter. Plug the modem cable into the telephone wall jack. To connect the modem to an analog telephone line that does not have... an RJ-11 telephone jack, follow these steps: 1. Plug the modem cable into the country-specific modem cable adapter (2). 3. Connecting a country-specific modem cable adapter Telephone jacks vary by country.