Setup Guide
Page 1
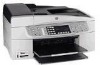
... either your computer or a working network. If you are asked to set up the hardware and connect the HP All-in -One series Setup Guide * *Purchased separately. The contents may differ. * Start Here 1 USB cable users: To ensure that the software is installed correctly, do not connect ...
... either your computer or a working network. If you are asked to set up the hardware and connect the HP All-in -One series Setup Guide * *Purchased separately. The contents may differ. * Start Here 1 USB cable users: To ensure that the software is installed correctly, do not connect ...

Setup Guide
Page 2
Make sure the buttons are attached. IMPORTANT: The control panel faceplate must be attached for the HP All-in -One Move the paper adjuster to the edge of the faceplate until it snaps into place. e e Pull out and flip over to work! 5 Attach paper ... paper. d d Attach the top (output) tray. b Press down firmly on all edges of the paper. b b Slide the paper adjuster over the tray extender. 2 • HP All-in -One to the left.
Make sure the buttons are attached. IMPORTANT: The control panel faceplate must be attached for the HP All-in -One Move the paper adjuster to the edge of the faceplate until it snaps into place. e e Pull out and flip over to work! 5 Attach paper ... paper. d d Attach the top (output) tray. b Press down firmly on all edges of the paper. b b Slide the paper adjuster over the tray extender. 2 • HP All-in -One to the left.

Setup Guide
Page 3
...) and the other to a wall jack. Additional fax setup information is in -One • 3 See the User Guide if you want to the HP All-in this guide. 7 Connect the phone cord a b 8 Press the On button a (1-LINE) Connect one end of these features: • DSL • VoIP/FoIP • ISDN ...• Voice mail • Distinctive ring a After you press the On button, wait for the print cartridge prompt before continuing. HP All-in the User Guide. b (2-EXT) Also follow the...
...) and the other to a wall jack. Additional fax setup information is in -One • 3 See the User Guide if you want to the HP All-in this guide. 7 Connect the phone cord a b 8 Press the On button a (1-LINE) Connect one end of these features: • DSL • VoIP/FoIP • ISDN ...• Voice mail • Distinctive ring a After you press the On button, wait for the print cartridge prompt before continuing. HP All-in the User Guide. b (2-EXT) Also follow the...
Setup Guide
Page 4
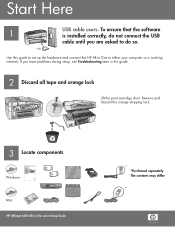
... or re-tape the cartridges. 11 Insert the tri-color print cartridge a The device must be On before you can insert the print cartridges. c Push the cartridge firmly into the slot until it snaps ... Remove tape from both cartridges Remove the tape from both print cartridges. Make sure the print carriage is on the right side. a Hold the tri-color print cartridge with the green label. b Place the tri-color print cartridge in -One b 4 • HP All-in front of the left slot marked with the...
... or re-tape the cartridges. 11 Insert the tri-color print cartridge a The device must be On before you can insert the print cartridges. c Push the cartridge firmly into the slot until it snaps ... Remove tape from both cartridges Remove the tape from both print cartridges. Make sure the print carriage is on the right side. a Hold the tri-color print cartridge with the green label. b Place the tri-color print cartridge in -One b 4 • HP All-in front of the left slot marked with the...
Setup Guide
Page 5
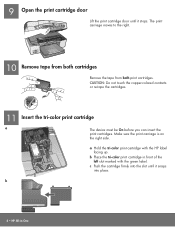
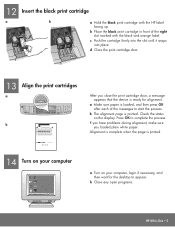
...your computer, login if necessary, and then wait for alignment. Check the status on your computer a Turn on the display. b Close any open programs. HP All-in front of the messages to complete the process. d Close the print cartridge door. 13 Align the print cartridges a b After you loaded plain white... paper. c Push the cartridge firmly into the slot until it snaps into place. b Place the black print cartridge in -One • 5 12 Insert the black print cartridge a b a Hold the black print cartridge with the black and orange label.
...your computer, login if necessary, and then wait for alignment. Check the status on your computer a Turn on the display. b Close any open programs. HP All-in front of the messages to complete the process. d Close the print cartridge door. 13 Align the print cartridges a b After you loaded plain white... paper. c Push the cartridge firmly into the slot until it snaps into place. b Place the black print cartridge in -One • 5 12 Insert the black print cartridge a b a Hold the black print cartridge with the black and orange label.
Setup Guide
Page 6
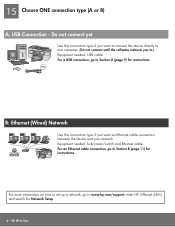
Do not connect yet Use this connection type if you want to connect the device directly to one computer. (Do not connect until the software instructs you want an Ethernet cable connection between the device and your network. For an Ethernet cable connection, ...) Network Use this connection type if you to Section B (page 11) for instructions. 15 Choose ONE connection type (A or B) A: USB Connection - For more information on how to set up a network, go to www.hp.com/support, enter HP Officejet 6300, and search for instructions. For a USB connection, go to Section A (page...
Do not connect yet Use this connection type if you want to connect the device directly to one computer. (Do not connect until the software instructs you want an Ethernet cable connection between the device and your network. For an Ethernet cable connection, ...) Network Use this connection type if you to Section B (page 11) for instructions. 15 Choose ONE connection type (A or B) A: USB Connection - For more information on how to set up a network, go to www.hp.com/support, enter HP Officejet 6300, and search for instructions. For a USB connection, go to Section A (page...

Setup Guide
Page 7
Mac Users: a Insert the gray HP All-in -One Windows CD. c On the Connection Type screen, make sure to select directly to the next page. Section A: USB Connection A1 Choose the correct CD Windows Users: a Insert the green HP All-in -One Mac CD. Continue to this computer. b Follow the onscreen instructions to the next page. NOTE: If the startup screen does not appear, double-click My Computer, double-click the CD-ROM icon, and then double-click setup.exe. b Continue to install the software. HP All-in-One • 7
Mac Users: a Insert the gray HP All-in -One Windows CD. c On the Connection Type screen, make sure to select directly to the next page. Section A: USB Connection A1 Choose the correct CD Windows Users: a Insert the green HP All-in -One Mac CD. Continue to this computer. b Follow the onscreen instructions to the next page. NOTE: If the startup screen does not appear, double-click My Computer, double-click the CD-ROM icon, and then double-click setup.exe. b Continue to install the software. HP All-in-One • 7
Setup Guide
Page 8
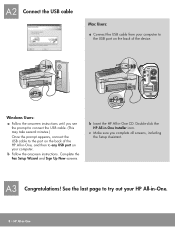
... instructions. A2 Connect the USB cable Mac Users: a Connect the USB cable from your computer to the USB port on the back of the HP All-in-One, and then to any USB port on the back of the device. Windows Users: a Follow the onscreen instructions until you complete all screens, including... the prompt to connect the USB cable. (This may take several minutes.) Once the prompt appears, connect the USB cable to the port on your HP All-in-One. 8 • HP All-in-One Double-click the HP All-in -One CD. b Insert the HP All-in -One Installer icon. A3 Congratulations!
... instructions. A2 Connect the USB cable Mac Users: a Connect the USB cable from your computer to the USB port on the back of the HP All-in-One, and then to any USB port on the back of the device. Windows Users: a Follow the onscreen instructions until you complete all screens, including... the prompt to connect the USB cable. (This may take several minutes.) Once the prompt appears, connect the USB cable to the port on your HP All-in-One. 8 • HP All-in-One Double-click the HP All-in -One CD. b Insert the HP All-in -One Installer icon. A3 Congratulations!
Setup Guide
Page 9
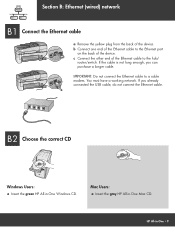
... modem. IMPORTANT: Do not connect the Ethernet cable to the hub/ router/switch. You must have a working network. Mac Users: a Insert the gray HP All-in -One Windows CD. If you can purchase a longer cable. If the cable is not long enough, you already connected the USB cable, do not connect... the Ethernet cable. B2 Choose the correct CD Windows Users: a Insert the green HP All-in -One Mac CD. b Connect one end of the Ethernet cable to the Ethernet port on the back of the device. Section B: Ethernet (wired) network B1 Connect the...
... modem. IMPORTANT: Do not connect the Ethernet cable to the hub/ router/switch. You must have a working network. Mac Users: a Insert the gray HP All-in -One Windows CD. If you can purchase a longer cable. If the cable is not long enough, you already connected the USB cable, do not connect... the Ethernet cable. B2 Choose the correct CD Windows Users: a Insert the green HP All-in -One Mac CD. b Connect one end of the Ethernet cable to the Ethernet port on the back of the device. Section B: Ethernet (wired) network B1 Connect the...

Setup Guide
Page 10
...then search for each computer. c Make sure you choose the connection type between the network and your HP All-in-One (not between your network, install the HP All-in -One Installer icon. See the last page to the next page. Continue to select through the network. Continue ...to try out your HP All-in-One. 10 • HP All-in -One CD for Firewalls. B4 Congratulations! Follow the onscreen instructions. Choose the correct HP All-in -One B2 B2 Continued: Mac Users: b Double-click the HP All-in -One software on each installation.
...then search for each computer. c Make sure you choose the connection type between the network and your HP All-in-One (not between your network, install the HP All-in -One Installer icon. See the last page to the next page. Continue to select through the network. Continue ...to try out your HP All-in-One. 10 • HP All-in -One CD for Firewalls. B4 Congratulations! Follow the onscreen instructions. Choose the correct HP All-in -One B2 B2 Continued: Mac Users: b Double-click the HP All-in -One software on each installation.
Setup Guide
Page 11
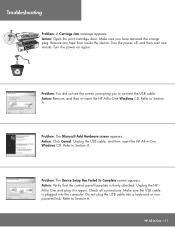
Turn the power on again. Action: Remove, and then re-insert the HP All-in -One • 11 Make sure the USB cable is firmly attached. HP All-in -One Windows CD. Unplug the HP All-in-One and plug it in -One Windows CD. Action: Open the print cartridge door. Turn the power off, and... then wait one minute. Unplug the USB cable, and then insert the HP All-in again. Action: Click Cancel....
Turn the power on again. Action: Remove, and then re-insert the HP All-in -One • 11 Make sure the USB cable is firmly attached. HP All-in -One Windows CD. Unplug the HP All-in-One and plug it in -One Windows CD. Action: Open the print cartridge door. Turn the power off, and... then wait one minute. Unplug the USB cable, and then insert the HP All-in again. Action: Click Cancel....

Setup Guide
Page 12
... plain white paper and load the 4 x 6 inch (10 x15 cm) photo paper. c Place the photo (face down . d d Press the Start Copy Color button. b b Make sure plain white paper is a simple way to print. Test the features a b c **QQ88006611--9900114466** Q8061-90146 Congratulations! Move the paper...make prints directly from a memory card without using your original photo. c c After you have printed the proof sheet, you can use your HP All-in -One makes a copy of the glass. a A proof sheet is loaded, and then press the Proofsheet button. For additional help . Place the paper...
... plain white paper and load the 4 x 6 inch (10 x15 cm) photo paper. c Place the photo (face down . d d Press the Start Copy Color button. b b Make sure plain white paper is a simple way to print. Test the features a b c **QQ88006611--9900114466** Q8061-90146 Congratulations! Move the paper...make prints directly from a memory card without using your original photo. c c After you have printed the proof sheet, you can use your HP All-in -One makes a copy of the glass. a A proof sheet is loaded, and then press the Proofsheet button. For additional help . Place the paper...
User Guide
Page 1
HP Officejet 6300 All-in-One series User Guide
HP Officejet 6300 All-in-One series User Guide

User Guide
Page 2
HP Officejet 6300 All-in-One series User Guide
HP Officejet 6300 All-in-One series User Guide
User Guide
Page 3
...be found in the United States and/or other countries. Warning Potential shock hazard 1. Use in a protected location where no one can be inoperable when main power fails. The Hewlett-Packard Company shall not be damaged. 8. Publication number: Q8061-90101 February... 2006 Notice The only warranties for HP products and services are wet. 6. Passports - Reproduction, adaptation or translation without notice. Note: Regulatory information can step on a stable ...
...be found in the United States and/or other countries. Warning Potential shock hazard 1. Use in a protected location where no one can be inoperable when main power fails. The Hewlett-Packard Company shall not be damaged. 8. Publication number: Q8061-90101 February... 2006 Notice The only warranties for HP products and services are wet. 6. Passports - Reproduction, adaptation or translation without notice. Note: Regulatory information can step on a stable ...
User Guide
Page 4
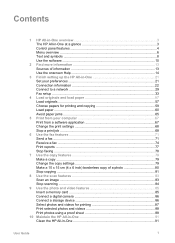
... ...6 Text and symbols 8 Use the software 10 2 Find more information 13 Sources of information 13 Use the onscreen Help 14 3 Finish setting up the HP All-in-One 21 Set your preferences 21 Connection information 22 Connect to a network 29 Fax setup ...33 4 Load originals and load paper 57 Load originals ...57... a storage device 86 Select photos and videos for printing 87 Print selected photos and videos 88 Print photos using a proof sheet 88 10 Maintain the HP All-in-One 91 Clean the HP All-in-One 91 User Guide 1
... ...6 Text and symbols 8 Use the software 10 2 Find more information 13 Sources of information 13 Use the onscreen Help 14 3 Finish setting up the HP All-in-One 21 Set your preferences 21 Connection information 22 Connect to a network 29 Fax setup ...33 4 Load originals and load paper 57 Load originals ...57... a storage device 86 Select photos and videos for printing 87 Print selected photos and videos 88 Print photos using a proof sheet 88 10 Maintain the HP All-in-One 91 Clean the HP All-in-One 91 User Guide 1
User Guide
Page 5
... Call in North America during warranty 140 Call elsewhere in the world 140 HP Quick Exchange Service (Japan 142 Call HP Korea customer support 142 Prepare the HP All-in-One for shipment 142 Pack the HP All-in-One 144 14 Technical information 147 System requirements 147 Paper specifications 147 Print specifications... 150 Environmental specifications 151 Memory specifications 151 Environmental product stewardship program 151 Regulatory notices 152 Declaration of conformity (European Economic Area 156 HP Officejet 6300 All-in-One series declaration of conformity 157 Index...159...
... Call in North America during warranty 140 Call elsewhere in the world 140 HP Quick Exchange Service (Japan 142 Call HP Korea customer support 142 Prepare the HP All-in-One for shipment 142 Pack the HP All-in-One 144 14 Technical information 147 System requirements 147 Paper specifications 147 Print specifications... 150 Environmental specifications 151 Memory specifications 151 Environmental product stewardship program 151 Regulatory notices 152 Declaration of conformity (European Economic Area 156 HP Officejet 6300 All-in-One series declaration of conformity 157 Index...159...

User Guide
Page 6
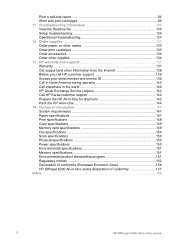
...extender (also referred to as the display) Front USB port for your computer. This section describes the HP All-in-One hardware features and control panel functions. ● The HP All-in-One at a glance ● Control panel features ● Menu overview ● Text and symbols ●...; Use the software The HP All-in-One at a glance Label 1 2 3 4 5 6 Description Automatic document feeder Control panel Control panel display (also referred to as the tray extender) User Guide 3 Overview 1 HP All-in-One overview You can quickly and easily accomplish tasks such as...
...extender (also referred to as the display) Front USB port for your computer. This section describes the HP All-in-One hardware features and control panel functions. ● The HP All-in-One at a glance ● Control panel features ● Menu overview ● Text and symbols ●...; Use the software The HP All-in-One at a glance Label 1 2 3 4 5 6 Description Automatic document feeder Control panel Control panel display (also referred to as the tray extender) User Guide 3 Overview 1 HP All-in-One overview You can quickly and easily accomplish tasks such as...

User Guide
Page 7
... table provide a quick reference to the device. Label 1 2 3 4 Name and Description On: Turns the HP All-in -One series Speed Dial: Selects a speed dial number. 4 HP Officejet 6300 All-in -One on . To completely disconnect the power supply to the HP All-in a fax number. Redial/Pause: Redials the most recently dialed number, or insert a 3-second...
... table provide a quick reference to the device. Label 1 2 3 4 Name and Description On: Turns the HP All-in -One series Speed Dial: Selects a speed dial number. 4 HP Officejet 6300 All-in -One on . To completely disconnect the power supply to the HP All-in a fax number. Redial/Pause: Redials the most recently dialed number, or insert a 3-second...
User Guide
Page 8
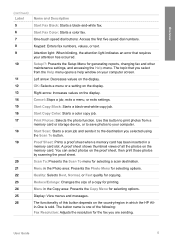
... an error that you select from a memory card or storage device, or to save photos to your computer screen. Start Copy Color: Starts a color copy job. Menu in which the HP Allin-One is one of this button to the destination you are sending. Menu in a memory card slot. Overview (continued) Label 5 6 7 8 9 10 11 ...12 13 14 15 16 17 18 19 20 21 22 23 24 25 26 Name and Description Start Fax Black: Starts a black-and-white fax. One-touch...
... an error that you select from a memory card or storage device, or to save photos to your computer screen. Start Copy Color: Starts a color copy job. Menu in which the HP Allin-One is one of this button to the destination you are sending. Menu in a memory card slot. Overview (continued) Label 5 6 7 8 9 10 11 ...12 13 14 15 16 17 18 19 20 21 22 23 24 25 26 Name and Description Start Fax Black: Starts a black-and-white fax. One-touch...
