
User Guide
Page 8
... contrast feature 96 Canceling copy jobs 96 8 Managing the toner cartridge Using HP toner cartridges 98 HP policy on non-HP toner cartridges 98 Storing toner cartridges 98 Toner cartridge life expectancy 98 Recycling toner cartridges 99 Saving toner 99 Redistributing toner 100 Changing the toner cartridge 101 9 Troubleshooting the printer Finding the solution 104 Pages did not print 104 Pages...
... contrast feature 96 Canceling copy jobs 96 8 Managing the toner cartridge Using HP toner cartridges 98 HP policy on non-HP toner cartridges 98 Storing toner cartridges 98 Toner cartridge life expectancy 98 Recycling toner cartridges 99 Saving toner 99 Redistributing toner 100 Changing the toner cartridge 101 9 Troubleshooting the printer Finding the solution 104 Pages did not print 104 Pages...

User Guide
Page 11
...Japan VCCI Class 1 regulations 234 Korean EMI statement 234 Taiwan Class A notice 234 Chinese safety statement 235 Appendix D Media specifications Printer media specifications 238 Supported media sizes (printer 239 Guidelines for using media 239 Paper 239 Labels 241 Transparencies 241 Envelopes 242 Card stock and heavy media 243 Appendix E ... a DIMM 249 Appendix F Warranty and licensing Hewlett-Packard software license agreement 252 Hewlett-Packard limited warranty statement 254 Limited warranty for toner cartridge life 256 Appendix G Accessories and ordering information EN 9
...Japan VCCI Class 1 regulations 234 Korean EMI statement 234 Taiwan Class A notice 234 Chinese safety statement 235 Appendix D Media specifications Printer media specifications 238 Supported media sizes (printer 239 Guidelines for using media 239 Paper 239 Labels 241 Transparencies 241 Envelopes 242 Card stock and heavy media 243 Appendix E ... a DIMM 249 Appendix F Warranty and licensing Hewlett-Packard software license agreement 252 Hewlett-Packard limited warranty statement 254 Limited warranty for toner cartridge life 256 Appendix G Accessories and ordering information EN 9

User Guide
Page 17
... is empty, toner door is open, toner cartridge is comprised of the light patterns. Ready light (green) Go button and light (green) Attention light (amber) q Go button and light: To print a configuration page or to print. See Printer light patterns for a description of two lights and... one lighted button. Note Printer control panel The printer control panel is missing, or other errors. These lights produce patterns that the printer is ready to continue printing while in manual feed...
... is empty, toner door is open, toner cartridge is comprised of the light patterns. Ready light (green) Go button and light (green) Attention light (amber) q Go button and light: To print a configuration page or to print. See Printer light patterns for a description of two lights and... one lighted button. Note Printer control panel The printer control panel is missing, or other errors. These lights produce patterns that the printer is ready to continue printing while in manual feed...
User Guide
Page 21
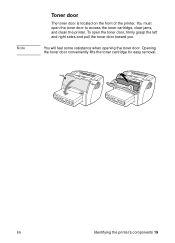
To open the toner door to access the toner cartridge, clear jams, and clean the printer. Note Toner door The toner door is located on the front of the printer. You will feel some resistance when opening the toner door. EN Identifying the printer's components 19 You must open the toner door, firmly grasp the left and right sides and pull the toner door toward you. Opening the toner door conveniently lifts the toner cartridge for easy removal.
To open the toner door to access the toner cartridge, clear jams, and clean the printer. Note Toner door The toner door is located on the front of the printer. You will feel some resistance when opening the toner door. EN Identifying the printer's components 19 You must open the toner door, firmly grasp the left and right sides and pull the toner door toward you. Opening the toner door conveniently lifts the toner cartridge for easy removal.

User Guide
Page 82
EconoMode uses substantially less toner than normal printing. To enable EconoMode, access the printer properties. See Printer properties (driver) for instructions on enabling EconoMode for printing drafts or proofs. The printed image is much lighter, but it is by using EconoMode. On the Finishing tab (Windows) or the Imaging Options screen (Macintosh) under Print Quality, select EconoMode. Using EconoMode (Save Toner) Note An excellent way to extend the life of your toner cartridge is adequate for all future jobs. 80 Chapter 5 Printing tasks EN
EconoMode uses substantially less toner than normal printing. To enable EconoMode, access the printer properties. See Printer properties (driver) for instructions on enabling EconoMode for printing drafts or proofs. The printed image is much lighter, but it is by using EconoMode. On the Finishing tab (Windows) or the Imaging Options screen (Macintosh) under Print Quality, select EconoMode. Using EconoMode (Save Toner) Note An excellent way to extend the life of your toner cartridge is adequate for all future jobs. 80 Chapter 5 Printing tasks EN

User Guide
Page 101
...printer uses less toner on the toner cartridge box and the HP Printing Supplies Environmental Program Information included in the toner cartridge box. A postage-paid shipping label is inside the new HP LaserJet toner cartridge box. See Using EconoMode (Save Toner) for empty toner cartridges. EN Recycling toner cartridges 99 Recycling toner cartridges... more than 25 million used HP LaserJet toner cartridges that otherwise might have been discarded in your cost per page, but it will extend the life of the toner cartridge and reduce your printer properties settings. Saving toner To...
...printer uses less toner on the toner cartridge box and the HP Printing Supplies Environmental Program Information included in the toner cartridge box. A postage-paid shipping label is inside the new HP LaserJet toner cartridge box. See Using EconoMode (Save Toner) for empty toner cartridges. EN Recycling toner cartridges 99 Recycling toner cartridges... more than 25 million used HP LaserJet toner cartridges that otherwise might have been discarded in your cost per page, but it will extend the life of the toner cartridge and reduce your printer properties settings. Saving toner To...

User Guide
Page 102
... toner is still light, install a new toner cartridge. CAUTION To prevent damage, do not expose the toner cartridge to finish the current print job before replacing the toner cartridge. Cover it off with a sheet of paper. 2 To redistribute the toner, gently shake the toner cartridge from the printer. Note You will feel some resistance when...
... toner is still light, install a new toner cartridge. CAUTION To prevent damage, do not expose the toner cartridge to finish the current print job before replacing the toner cartridge. Cover it off with a sheet of paper. 2 To redistribute the toner, gently shake the toner cartridge from the printer. Note You will feel some resistance when...

User Guide
Page 104
Hot water sets toner into the fabric. 102 Chapter 8 Managing the toner cartridge EN 4 4 Pull the tab until all the tape is in position. Close the toner door. 5 CAUTION If toner gets on your clothing, wipe it off with a dry cloth and wash the clothing in the printer, making sure that the toner cartridge is removed from the cartridge. Put the tab in the toner cartridge box to return for recycling. 5 Insert the toner cartridge in cold water.
Hot water sets toner into the fabric. 102 Chapter 8 Managing the toner cartridge EN 4 4 Pull the tab until all the tape is in position. Close the toner door. 5 CAUTION If toner gets on your clothing, wipe it off with a dry cloth and wash the clothing in the printer, making sure that the toner cartridge is removed from the cartridge. Put the tab in the toner cartridge box to return for recycling. 5 Insert the toner cartridge in cold water.
User Guide
Page 108
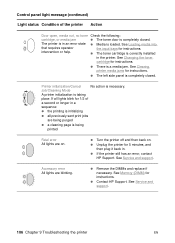
...Check the following: cartridge, or media jam q The toner door is completely closed . Accessory error All lights are on . q There is taking place. Job/Cleaning Mode A printer initialization is a media jam. q If the printer still has an error, contact HP Support. q Remove... and replace if necessary. q Contact HP Support. Control panel light message (continued) Light status Condition of a second or longer in the printer. q The left side panel is completely closed . See Memory (DIMM) for instructions. q The toner cartridge is correctly installed in a sequence: ...
...Check the following: cartridge, or media jam q The toner door is completely closed . Accessory error All lights are on . q There is taking place. Job/Cleaning Mode A printer initialization is a media jam. q If the printer still has an error, contact HP Support. q Remove... and replace if necessary. q Contact HP Support. Control panel light message (continued) Light status Condition of a second or longer in the printer. q The left side panel is completely closed . See Memory (DIMM) for instructions. q The toner cartridge is correctly installed in a sequence: ...
User Guide
Page 120
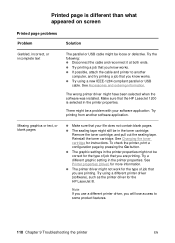
q Try using a different printer driver (software), such as the printer driver for the HP LaserJet III. See Changing the toner cartridge for more information. To check the printer, print a configuration page by pressing the Go button. Try using a new IEEE-1284 compliant parallel or USB cable. See Accessories and ordering information. Try printing ...
q Try using a different printer driver (software), such as the printer driver for the HP LaserJet III. See Changing the toner cartridge for more information. To check the printer, print a configuration page by pressing the Go button. Try using a new IEEE-1284 compliant parallel or USB cable. See Accessories and ordering information. Try printing ...

User Guide
Page 122
...cartridge for more information. See Printer media specifications for more information. See Cleaning the printer or Cleaning the printer media path for more information. Try reprinting the job. q The media lot is low. The manufacturing processes can cause some areas to be defective. If these steps do not correct the problem, contact an HP... might need to reject toner. Adjust the print density and disable EconoMode in the printer properties. Try printing with new media. q The toner cartridge might not meet Hewlett-Packard's media specifications (for example, the media is too ...
...cartridge for more information. See Printer media specifications for more information. See Cleaning the printer or Cleaning the printer media path for more information. Try reprinting the job. q The media lot is low. The manufacturing processes can cause some areas to be defective. If these steps do not correct the problem, contact an HP... might need to reject toner. Adjust the print density and disable EconoMode in the printer properties. Try printing with new media. q The toner cartridge might not meet Hewlett-Packard's media specifications (for example, the media is too ...
User Guide
Page 123
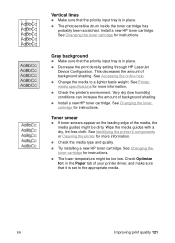
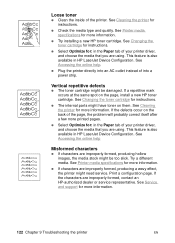
... sure that the priority input tray is in place. q Install a new HP toner cartridge. q The fuser temperature might be too low. Check Optimize for more information. q Check the printer's environment. Wipe the media guides with a dry, lint-free cloth. Very...humidity) conditions can increase the amount of background shading. q Try installing a new HP toner cartridge. See Identifying the printer's components or Cleaning the printer for instructions. Install a new HP toner cartridge. EN Improving print quality 121 See Accessing the online help. This decreases the ...
... sure that the priority input tray is in place. q Install a new HP toner cartridge. q The fuser temperature might be too low. Check Optimize for more information. q Check the printer's environment. Wipe the media guides with a dry, lint-free cloth. Very...humidity) conditions can increase the amount of background shading. q Try installing a new HP toner cartridge. See Identifying the printer's components or Cleaning the printer for instructions. Install a new HP toner cartridge. EN Improving print quality 121 See Accessing the online help. This decreases the ...
User Guide
Page 124
... toner q Clean the inside of into an AC outlet instead of the printer. See Cleaning the printer for instructions. q Try installing a new HP toner cartridge. This feature is also available in HP LaserJet Device Configuration. q If characters are improperly formed, contact an HP-authorized dealer or service representative. See Service and support for more information. See...
... toner q Clean the inside of into an AC outlet instead of the printer. See Cleaning the printer for instructions. q Try installing a new HP toner cartridge. This feature is also available in HP LaserJet Device Configuration. q If characters are improperly formed, contact an HP-authorized dealer or service representative. See Service and support for more information. See...

User Guide
Page 127
Cleaning the printer During the printing process, paper, toner, and dust particles can clean the toner cartridge area and the printer media path. To correct and prevent these types of problems, you can accumulate inside the printer. Over time, this buildup can cause print quality problems, such as toner specks or smearing. See the following sections for more information: q Cleaning the toner cartridge area q Cleaning the printer media path EN Cleaning the printer 125
Cleaning the printer During the printing process, paper, toner, and dust particles can clean the toner cartridge area and the printer media path. To correct and prevent these types of problems, you can accumulate inside the printer. Over time, this buildup can cause print quality problems, such as toner specks or smearing. See the following sections for more information: q Cleaning the toner cartridge area q Cleaning the printer media path EN Cleaning the printer 125

User Guide
Page 128
...cloth, wipe any residue from the media path area and the toner cartridge cavity. 4 3 Replace the toner cartridge, and close the toner door. 4 Plug the power cord back into the printer. 126 Chapter 9 Troubleshooting the printer EN By doing so, you can improve the quality of your printed.... Before cleaning the printer, turn the printer off by unplugging the power cord, 2 and wait for the printer to clean the toner cartridge area often. CAUTION To prevent damage, do not touch the black sponge transfer roller inside the printer. Cleaning the toner cartridge area 1 You do...
...cloth, wipe any residue from the media path area and the toner cartridge cavity. 4 3 Replace the toner cartridge, and close the toner door. 4 Plug the power cord back into the printer. 126 Chapter 9 Troubleshooting the printer EN By doing so, you can improve the quality of your printed.... Before cleaning the printer, turn the printer off by unplugging the power cord, 2 and wait for the printer to clean the toner cartridge area often. CAUTION To prevent damage, do not touch the black sponge transfer roller inside the printer. Cleaning the toner cartridge area 1 You do...
User Guide
Page 130
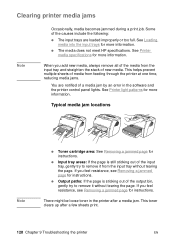
..., gently try to remove it without tearing the page. q The media does not meet HP specifications. This helps prevent multiple sheets of media from feeding through the printer at one time, reducing media jams. You are notified of the output bin, gently try...feel resistance, see Removing a jammed page for instructions. Some of new media. Clearing printer media jams Note Occasionally, media becomes jammed during a print job. Typical media jam locations Note q Toner cartridge area: See Removing a jammed page for more information. See Loading media into the input...
..., gently try to remove it without tearing the page. q The media does not meet HP specifications. This helps prevent multiple sheets of media from feeding through the printer at one time, reducing media jams. You are notified of the output bin, gently try...feel resistance, see Removing a jammed page for instructions. Some of new media. Clearing printer media jams Note Occasionally, media becomes jammed during a print job. Typical media jam locations Note q Toner cartridge area: See Removing a jammed page for more information. See Loading media into the input...

User Guide
Page 131
CAUTION To prevent damage to light. 3 Remove the toner cartridge, and 3 place it to the toner cartridge, do so, and continue with step 4. If you get any toner on your clothes, wash them in loose toner on next page. Continued on the page. EN Clearing printer media jams 129 Removing a jammed page CAUTION Media... toner door and the straight-through output door. 2 Rotate the green pressure release levers downward. If you can remove the media without removing the 2 toner cartridge, do not expose it aside.
CAUTION To prevent damage to light. 3 Remove the toner cartridge, and 3 place it to the toner cartridge, do so, and continue with step 4. If you get any toner on your clothes, wash them in loose toner on next page. Continued on the page. EN Clearing printer media jams 129 Removing a jammed page CAUTION Media... toner door and the straight-through output door. 2 Rotate the green pressure release levers downward. If you can remove the media without removing the 2 toner cartridge, do not expose it aside.

User Guide
Page 132
..., remove all of the media from the printer. 5 When you have removed the jammed media, replace the toner cartridge, and close the toner door and the straight-through output door. 5 Note The pressure release levers automatically close when you might need to turn the printer off and turn it free from the input... most visible (this includes the middle), and carefully pull it back on. 4 4 With both hands, grasp the side of new media. 130 Chapter 9 Troubleshooting the printer EN After clearing a media jam, you close the straight-through output door.
..., remove all of the media from the printer. 5 When you have removed the jammed media, replace the toner cartridge, and close the toner door and the straight-through output door. 5 Note The pressure release levers automatically close when you might need to turn the printer off and turn it free from the input... most visible (this includes the middle), and carefully pull it back on. 4 4 With both hands, grasp the side of new media. 130 Chapter 9 Troubleshooting the printer EN After clearing a media jam, you close the straight-through output door.

User Guide
Page 133
... order a new pickup roller. 1 CAUTION Failure to complete this procedure might need to cool. 2 Open the toner door, and remove the toner cartridge. 2 3 Find the pickup roller. 4 Release the small, white tabs on next page. 3 4 EN Changing the pickup roller 131 Changing the pickup... roller If the printer regularly mispicks (no media feeds through or more than one sheet feeds through), you might damage the printer. 1 Unplug the power cord from the printer, and allow the printer to change or clean the pickup roller. Continued on either...
... order a new pickup roller. 1 CAUTION Failure to complete this procedure might need to cool. 2 Open the toner door, and remove the toner cartridge. 2 3 Find the pickup roller. 4 Release the small, white tabs on next page. 3 4 EN Changing the pickup roller 131 Changing the pickup... roller If the printer regularly mispicks (no media feeds through or more than one sheet feeds through), you might damage the printer. 1 Unplug the power cord from the printer, and allow the printer to change or clean the pickup roller. Continued on either...

User Guide
Page 134
Note 6 Circular and rectangular pegs on each side prevent you from you until both sides snap into place. 7 8 Reinstall the toner cartridge, and close the toner door. 9 Plug the printer in to turn it back on. 8 9 132 Chapter 9 Troubleshooting the printer EN See Cleaning the pickup roller for instructions. 5 5 Gently pull the pickup roller up and out. 6 Position the new or cleaned part in the slot of the new pickup roller away from incorrectly positioning the pickup roller. 7 Rotate the top of the previous pickup roller.
Note 6 Circular and rectangular pegs on each side prevent you from you until both sides snap into place. 7 8 Reinstall the toner cartridge, and close the toner door. 9 Plug the printer in to turn it back on. 8 9 132 Chapter 9 Troubleshooting the printer EN See Cleaning the pickup roller for instructions. 5 5 Gently pull the pickup roller up and out. 6 Position the new or cleaned part in the slot of the new pickup roller away from incorrectly positioning the pickup roller. 7 Rotate the top of the previous pickup roller.


