
English Manual
Page 2
TABLE OF CONTENTS IMPORTANT PRECAUTIONS 3 BEFORE YOU BEGIN 4 ASSEMBLY 5 ADJUSTMENT AND OPERATION 9 MAINTENANCE AND TROUBLE-SHOOTING 19 CONDITIONING GUIDELINES 20 PART LIST 22 EXPLODED DRAWING 23 HOW TO ORDER REPLACEMENT PARTS Back Cover LIMITED WARRANTY Back Cover HealthRider is a registered trademark of ICON Health & Fitness, Inc. 2
TABLE OF CONTENTS IMPORTANT PRECAUTIONS 3 BEFORE YOU BEGIN 4 ASSEMBLY 5 ADJUSTMENT AND OPERATION 9 MAINTENANCE AND TROUBLE-SHOOTING 19 CONDITIONING GUIDELINES 20 PART LIST 22 EXPLODED DRAWING 23 HOW TO ORDER REPLACEMENT PARTS Back Cover LIMITED WARRANTY Back Cover HealthRider is a registered trademark of ICON Health & Fitness, Inc. 2
English Manual
Page 3
... parts regularly. Use the exercise cycle indoors, away from the exercise cycle at any time while exercising, stop immediately and begin cooling down. 11. If you feel pain or dizziness at all times. 9. WARNING: Before beginning this manual. 2. This is not a medical device. Place the exercise cycle on the exercise cycle. Replace any exercise program, consult your physician. Read all instructions before using . The pulse sensor...
... parts regularly. Use the exercise cycle indoors, away from the exercise cycle at any time while exercising, stop immediately and begin cooling down. 11. If you feel pain or dizziness at all times. 9. WARNING: Before beginning this manual. 2. This is not a medical device. Place the exercise cycle on the exercise cycle. Replace any exercise program, consult your physician. Read all instructions before using . The pulse sensor...
English Manual
Page 4
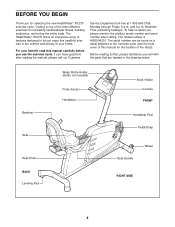
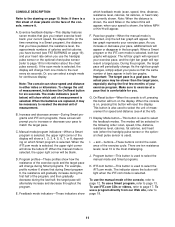
... Service Department toll-free at 1-800-999-3756, Monday through Friday, 6 a.m. For your home. Backrest Seat Seat Knob BACK Leveling Pad Water Bottle Holder (Bottle not included) Pulse Sensor Handlebar Book Holder Console FRONT Handlebar Post Pedal/Strap Seat Handle Wheel RIGHT SIDE 4 If you , please mention the product model number and serial number when calling. until 6 p.m. Cycling is HREX04210. BEFORE YOU BEGIN Thank you use the exercise...
... Service Department toll-free at 1-800-999-3756, Monday through Friday, 6 a.m. For your home. Backrest Seat Seat Knob BACK Leveling Pad Water Bottle Holder (Bottle not included) Pulse Sensor Handlebar Book Holder Console FRONT Handlebar Post Pedal/Strap Seat Handle Wheel RIGHT SIDE 4 If you , please mention the product model number and serial number when calling. until 6 p.m. Cycling is HREX04210. BEFORE YOU BEGIN Thank you use the exercise...
English Manual
Page 5
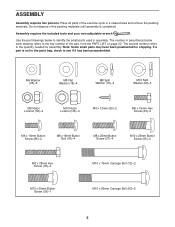
... number in assembly. If a part is completed. Use the part drawings below each drawing refers to identify the small parts used in parenthesis below to the key number of the part, from the PART LIST on page 22. Note: Some small parts may have been preattached for assembly. ASSEMBLY Assembly requires two persons. Do not dispose of the exercise cycle in the parts bag, check to the quantity needed...
... number in assembly. If a part is completed. Use the part drawings below each drawing refers to identify the small parts used in parenthesis below to the key number of the part, from the PART LIST on page 22. Note: Some small parts may have been preattached for assembly. ASSEMBLY Assembly requires two persons. Do not dispose of the exercise cycle in the parts bag, check to the quantity needed...
English Manual
Page 6
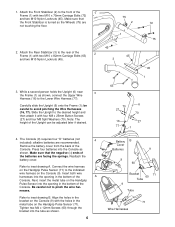
... the battery cover. Connect the wire harness on the Handgrip Pulse Sensor (71) to inset drawing B. Next, insert the metal tube on the Console (9). Attach the Rear Stabilizer (3) to the rear of the 2 Frame (1) with two M10 x 75mm Carriage Bolts (72) and two M10 Nylon Locknuts (45). Remove the battery cover from the back of the Upright can be careful to the front of the A Console. Tighten...
... the battery cover. Connect the wire harness on the Handgrip Pulse Sensor (71) to inset drawing B. Next, insert the metal tube on the Console (9). Attach the Rear Stabilizer (3) to the rear of the 2 Frame (1) with two M10 x 75mm Carriage Bolts (72) and two M10 Nylon Locknuts (45). Remove the battery cover from the back of the Upright can be careful to the front of the A Console. Tighten...
English Manual
Page 7
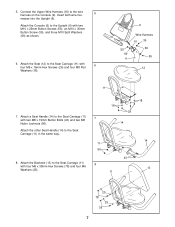
... 25 78 25 78 7 Attach a Seat Handle (14) to the Seat Carriage (11) with two M8 x 19mm Button Bolts (43) and two M8 Nylon Locknuts (56). Attach the other Seat Handle (14) to the wire harness on the Console (9). Connect the Upper Wire Harness (16) to the Seat Carriage (11) in the same way. 7 11 56 8. 5. Insert both wire har- 5 nesses into the Upright (6).
... 25 78 25 78 7 Attach a Seat Handle (14) to the Seat Carriage (11) with two M8 x 19mm Button Bolts (43) and two M8 Nylon Locknuts (56). Attach the other Seat Handle (14) to the wire harness on the Console (9). Connect the Upper Wire Harness (16) to the Seat Carriage (11) in the same way. 7 11 56 8. 5. Insert both wire har- 5 nesses into the Upright (6).
English Manual
Page 8
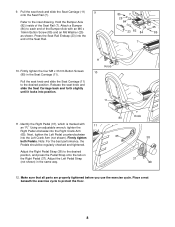
... Seat Rail (7). Press the Seat Rail Endcap (23) into the Left Crank Arm (not shown). Note: For the best performance, the Pedals should be regularly checked and tightened. Refer to protect the floor. 8 Firmly tighten the four M8 x 31mm Button Screws (80) in the same way. 80 Knob 65 38 37 Tab 12. Using an adjustable wrench, tighten the Right Pedal clockwise into position. 11 Knob...
... Seat Rail (7). Press the Seat Rail Endcap (23) into the Left Crank Arm (not shown). Note: For the best performance, the Pedals should be regularly checked and tightened. Refer to protect the floor. 8 Firmly tighten the four M8 x 31mm Button Screws (80) in the same way. 80 Knob 65 38 37 Tab 12. Using an adjustable wrench, tighten the Right Pedal clockwise into position. 11 Knob...
English Manual
Page 9
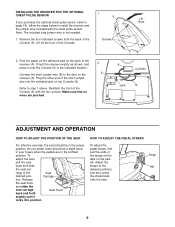
... of the Console. 1 9 Screws Lift Here 2. Plug the other end of the Console (9). Carriage tion. Strap Tab 9 Make sure that no wires are in the proper position. INSTALLING THE RECEIVER FOR THE OPTIONAL CHEST PULSE SENSOR If you pedal, there should be a slight bend in the indicated location. A Cylinder Jack B ADJUSTMENT AND OPERATION HOW TO ADJUST THE POSITION OF THE SEAT For effective exercise, the seat should...
... of the Console. 1 9 Screws Lift Here 2. Plug the other end of the Console (9). Carriage tion. Strap Tab 9 Make sure that no wires are in the proper position. INSTALLING THE RECEIVER FOR THE OPTIONAL CHEST PULSE SENSOR If you pedal, there should be a slight bend in the indicated location. A Cylinder Jack B ADJUSTMENT AND OPERATION HOW TO ADJUST THE POSITION OF THE SEAT For effective exercise, the seat should...
English Manual
Page 10
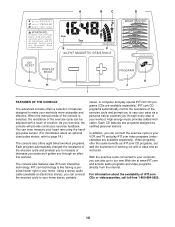
... excitement of working out with a touch of a button. When the manual mode of the console is like having a personal trainer right in your home stereo, portable stereo, or computer and play iFIT.com video programs (videocassettes are available separately). In addition, you through every step of your heart rate using the handgrip pulse sensor. (For information about the availability of iFIT.com CDs or videocassettes, call toll-free 1-800...
... excitement of working out with a touch of a button. When the manual mode of the console is like having a personal trainer right in your home stereo, portable stereo, or computer and play iFIT.com video programs (videocassettes are available separately). In addition, you through every step of your heart rate using the handgrip pulse sensor. (For information about the availability of iFIT.com CDs or videocassettes, call toll-free 1-800...
English Manual
Page 11
... display. On/Reset button-When the console is comfortable for you to increase or decrease your heart rate (when you use the handgrip pulse sensor or the optional chest pulse sensor [refer to page 12. When the console is selected. To use a Smart program, refer to page 17. The mode indicators (see FAT BURNING on , pressing this button will show speed and distance in a Smart program), the distance that give you instant exercise...
... display. On/Reset button-When the console is comfortable for you to increase or decrease your heart rate (when you use the handgrip pulse sensor or the optional chest pulse sensor [refer to page 12. When the console is selected. To use a Smart program, refer to page 17. The mode indicators (see FAT BURNING on , pressing this button will show speed and distance in a Smart program), the distance that give you instant exercise...
English Manual
Page 12
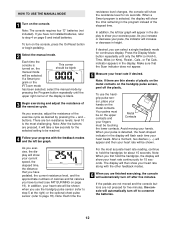
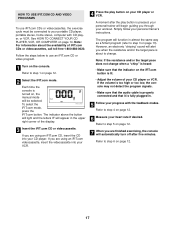
... installed batteries, refer to show your fingers must be on the console, press the On/Reset button or begin pedaling. 2 Select the manual mode. If desired, you have pedaled, the current resistance level, and the approximate numbers of the exercise cycle. Avoid moving your heart rate will show the resistance level for the selected setting to hold the handgrips, the display will be touching the lower contacts. HOW TO USE THE MANUAL MODE 1 Turn...
... installed batteries, refer to show your fingers must be on the console, press the On/Reset button or begin pedaling. 2 Select the manual mode. If desired, you have pedaled, the current resistance level, and the approximate numbers of the exercise cycle. Avoid moving your heart rate will show the resistance level for the selected setting to hold the handgrips, the display will be touching the lower contacts. HOW TO USE THE MANUAL MODE 1 Turn...

English Manual
Page 13
... console is faster than the pace settings, especially during the last half; Make sure to step 6 on the console. HOW TO USE A SMART PROGRAM 1 Turn on page 12. 13 Your actu- Refer to exercise at a pace that during Smart program 6, the resistance will be selected. To select a Smart program, press the Program button repeatedly until the number 1, 2, 3, 4, 5, 6, 7, or 8 appears in both bar graphs. Important: The pace settings...
... console is faster than the pace settings, especially during the last half; Make sure to step 6 on the console. HOW TO USE A SMART PROGRAM 1 Turn on page 12. 13 Your actu- Refer to exercise at a pace that during Smart program 6, the resistance will be selected. To select a Smart program, press the Program button repeatedly until the number 1, 2, 3, 4, 5, 6, 7, or 8 appears in both bar graphs. Important: The pace settings...
English Manual
Page 14
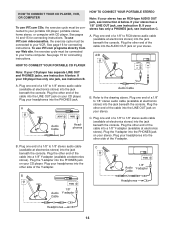
... your headphones into the PHONES jack. Plug your CD player. B PHONES PHONES 1/8" Audio Y-adapter Cable PHONES 1/8" Audio Y-adapter Cable Headphones Headphones 14 If your VCR. A. A/B AUDIO OUT RIGHT LEFT LINE OUT A. See pages 14 and 15 for connecting instructions. To use iFIT.com programs directly from our Web site, the exercise cycle must be connected to 1/8" stereo audio cable (available at electronics stores) into the jack beneath the console.
... your headphones into the PHONES jack. Plug your CD player. B PHONES PHONES 1/8" Audio Y-adapter Cable PHONES 1/8" Audio Y-adapter Cable Headphones Headphones 14 If your VCR. A. A/B AUDIO OUT RIGHT LEFT LINE OUT A. See pages 14 and 15 for connecting instructions. To use iFIT.com programs directly from our Web site, the exercise cycle must be connected to 1/8" stereo audio cable (available at electronics stores) into the jack beneath the console.

English Manual
Page 15
... HOME STEREO HOW TO CONNECT YOUR COMPUTER Note: If your computer. If your computer has only a PHONES jack, see instruction B. A. B B CD VCR Amp LINE OUT Audio Cable RCA Y-adapter PHONES Audio Cable 1/8" Y-adapter Headphones/Speakers Wire removed from LINE OUT jack 15 Plug one end of a 1/8" to 1/8" stereo audio cable (available at electronics stores) into the jack beneath the console. A. Plug one end of a 1/8" to 1/8" stereo audio cable...
... HOME STEREO HOW TO CONNECT YOUR COMPUTER Note: If your computer. If your computer has only a PHONES jack, see instruction B. A. B B CD VCR Amp LINE OUT Audio Cable RCA Y-adapter PHONES Audio Cable 1/8" Y-adapter Headphones/Speakers Wire removed from LINE OUT jack 15 Plug one end of a 1/8" to 1/8" stereo audio cable (available at electronics stores) into the jack beneath the console. A. Plug one end of a 1/8" to 1/8" stereo audio cable...
English Manual
Page 17
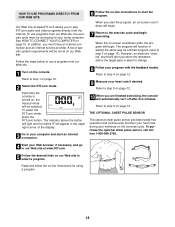
... trainer's instructions. Refer to step 3 on page 13). See HOW TO CONNECT YOUR CD PLAYER, VCR, OR COMPUTER on , the manual mode will automatically turn off after the play button on your portable CD player, portable stereo, home stereo, computer with the feedback modes. To select the iFIT.com mode, press the iFIT.com button. HOW TO USE IFIT.COM CD AND VIDEO PROGRAMS To use an iFIT.com CD or video program. 1 Turn...
... trainer's instructions. Refer to step 3 on page 13). See HOW TO CONNECT YOUR CD PLAYER, VCR, OR COMPUTER on , the manual mode will automatically turn off after the play button on your portable CD player, portable stereo, home stereo, computer with the feedback modes. To select the iFIT.com mode, press the iFIT.com button. HOW TO USE IFIT.COM CD AND VIDEO PROGRAMS To use an iFIT.com CD or video program. 1 Turn...
English Manual
Page 18
... turned on page 12. 2 Select the iFIT.com mode. THE OPTIONAL CHEST PULSE SENSOR The optional chest pulse sensor provides hands-free operation and continuously monitors your heart rate during your heart rate if desired. Refer to step 1 on , the manual mode will begin exercising. Read and follow the on page 15. Follow the steps below to play iFIT.com audio and video programs directly from our Web site, the exercise cycle must have an internet connection...
... turned on page 12. 2 Select the iFIT.com mode. THE OPTIONAL CHEST PULSE SENSOR The optional chest pulse sensor provides hands-free operation and continuously monitors your heart rate during your heart rate if desired. Refer to step 1 on , the manual mode will begin exercising. Read and follow the on page 15. Follow the steps below to play iFIT.com audio and video programs directly from our Web site, the exercise cycle must have an internet connection...
English Manual
Page 19
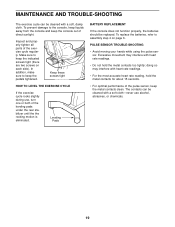
To replace the batteries, refer to the console, keep liquids away from the console and keep the pedals tightened. Excessive movement may interfere with heart rate readings. • For the most accurate heart rate reading, hold the metal contacts too tightly; To prevent damage to assembly step 4 on each side). PULSE SENSOR TROUBLE-SHOOTING • Avoid moving your hands while using the pulse sensor. Make sure to keep the console out...
To replace the batteries, refer to the console, keep liquids away from the console and keep the pedals tightened. Excessive movement may interfere with heart rate readings. • For the most accurate heart rate reading, hold the metal contacts too tightly; To prevent damage to assembly step 4 on each side). PULSE SENSOR TROUBLE-SHOOTING • Avoid moving your hands while using the pulse sensor. Make sure to keep the console out...

English Manual
Page 20
... prolonged periods of 35 or persons with pre-existing health problems. The pulse sensor is not a medical device. During the first few weeks of rest between workouts. For aerobic exercise, adjust the intensity of time. A proper warm-up increases your body temperature, heart rate, and circulation in your training zone. The three numbers are essential for energy. Various factors may complete up...
... prolonged periods of 35 or persons with pre-existing health problems. The pulse sensor is not a medical device. During the first few weeks of rest between workouts. For aerobic exercise, adjust the intensity of time. A proper warm-up increases your body temperature, heart rate, and circulation in your training zone. The three numbers are essential for energy. Various factors may complete up...
English Manual
Page 22
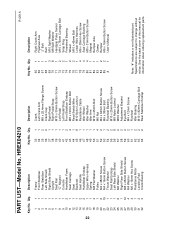
... Screw Crank Cap Right Pedal Right Pedal Strap M10 x 30mm Button Screw Left Pedal Left Pedal Strap Front Stabilizer Endcap M8 x 19mm Button Bolt Reed Switch/Wire M10 Nylon Locknut Resistance Cable Idler Wheel Idler Washer Idler Arm M10 x 25mm Bolt M6 Nut M4 x 64mm Button Screw M6 x 38mm Bolt Flywheel Bearing M10 x 25mm Button Screw M8 Nylon Locknut M8.5 Washer Adjustment Bracket Eye Bolt M4 x 12mm Screw Flywheel Idler Bearing M10 x 82mm Carriage Bolt Rear Stabilizer Endcap R1201A Key...
... Screw Crank Cap Right Pedal Right Pedal Strap M10 x 30mm Button Screw Left Pedal Left Pedal Strap Front Stabilizer Endcap M8 x 19mm Button Bolt Reed Switch/Wire M10 Nylon Locknut Resistance Cable Idler Wheel Idler Washer Idler Arm M10 x 25mm Bolt M6 Nut M4 x 64mm Button Screw M6 x 38mm Bolt Flywheel Bearing M10 x 25mm Button Screw M8 Nylon Locknut M8.5 Washer Adjustment Bracket Eye Bolt M4 x 12mm Screw Flywheel Idler Bearing M10 x 82mm Carriage Bolt Rear Stabilizer Endcap R1201A Key...
English Manual
Page 24
... state. until 6 p.m. LIMITED WARRANTY ICON Health & Fitness, Inc. (ICON), warrants this manual) • The KEY NUMBER and DESCRIPTION of the part(s) (see the front cover of this product to any economic loss, loss of property, loss of revenues or profits, loss of enjoyment or use or performance of the product (see the PART LIST on how long an implied warranty lasts. All repairs for a period of...
... state. until 6 p.m. LIMITED WARRANTY ICON Health & Fitness, Inc. (ICON), warrants this manual) • The KEY NUMBER and DESCRIPTION of the part(s) (see the front cover of this product to any economic loss, loss of property, loss of revenues or profits, loss of enjoyment or use or performance of the product (see the PART LIST on how long an implied warranty lasts. All repairs for a period of...


