
English Manual
Page 3
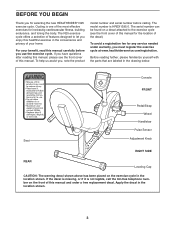
...manual for the location of the decal). Cycling is one of the most effective exercises for selecting the new HEALTHRIDER® N25 exercise cycle. Before reading further, please familiarize yourself with the parts that are labeled... in the location shown. 3 The serial number can be found on the exercise cycle in the location shown. For your home. If you must register the exercise cycle at www.healthriderservice.com/registration. Console FRONT Seat Pedal...
...manual for the location of the decal). Cycling is one of the most effective exercises for selecting the new HEALTHRIDER® N25 exercise cycle. Before reading further, please familiarize yourself with the parts that are labeled... in the location shown. 3 The serial number can be found on the exercise cycle in the location shown. For your home. If you must register the exercise cycle at www.healthriderservice.com/registration. Console FRONT Seat Pedal...
English Manual
Page 5
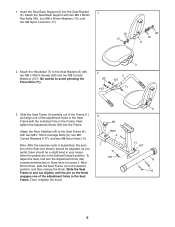
... should be a slight bend in your knees when the pedals are in the Seat Frame. Slide the Seat Frame (4) partially out of the Frame (1), and align one of the adjustment holes in the Seat Frame ... (4) with two M8 x 80mm Hex Bolts (40), four M8 x 20mm Washers (10), and two M8 Nylon Locknuts (17). 10 17 40 10 2 2. Note: After the exercise cycle is assembled, the position of the Seat (not shown) should be adjusted; Next, tighten the Adjustment Knob (99) into the Seat Bracket 1 (3). Then, retighten...
... should be a slight bend in your knees when the pedals are in the Seat Frame. Slide the Seat Frame (4) partially out of the Frame (1), and align one of the adjustment holes in the Seat Frame ... (4) with two M8 x 80mm Hex Bolts (40), four M8 x 20mm Washers (10), and two M8 Nylon Locknuts (17). 10 17 40 10 2 2. Note: After the exercise cycle is assembled, the position of the Seat (not shown) should be adjusted; Next, tighten the Adjustment Knob (99) into the Seat Bracket 1 (3). Then, retighten...
English Manual
Page 7
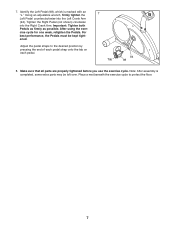
... an "L." Important: Tighten both Pedals as firmly as possible. Make sure that all parts are properly tightened before you use the exercise cycle. Place a mat beneath the exercise cycle to the desired position by pressing the end of each pedal strap onto the tab on each pedal. 7 Tab 94 98 8.... Identify the Left Pedal (98), which is completed, some extra parts may...
... an "L." Important: Tighten both Pedals as firmly as possible. Make sure that all parts are properly tightened before you use the exercise cycle. Place a mat beneath the exercise cycle to the desired position by pressing the end of each pedal strap onto the tab on each pedal. 7 Tab 94 98 8.... Identify the Left Pedal (98), which is completed, some extra parts may...

English Manual
Page 8
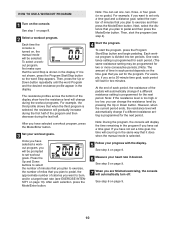
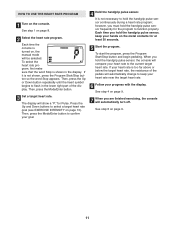
... console is a sheet of the console, remove it guides you have not been installed, see assembly step 6 on page 6. HOW TO OPERATE THE EXERCISE CYCLE The advanced console offers a selection of features designed to make your heart rate using the built-in the display. 8 During each workout, the...turned on the console. HOW TO USE THE MANUAL MODE 1 Turn on , the manual mode will display continuous exercise feedback-you exercise, the console will be changed with the touch of the pedals as it . As you can be selected. The console also features five preset workout programs and a heart ...
... console is a sheet of the console, remove it guides you have not been installed, see assembly step 6 on page 6. HOW TO OPERATE THE EXERCISE CYCLE The advanced console offers a selection of features designed to make your heart rate using the built-in the display. 8 During each workout, the...turned on the console. HOW TO USE THE MANUAL MODE 1 Turn on , the manual mode will display continuous exercise feedback-you exercise, the console will be changed with the touch of the pedals as it . As you can be selected. The console also features five preset workout programs and a heart ...

English Manual
Page 9
...the console will display a heart symbol when you are sheets of the pedals. 5 Measure your heart rate if desired. Make sure that you have pedaled, and the approximate num- Note: If there are finished exercising, the console will show the resistance level of clear plastic on the handgrip... plastic. 3 Start your workout and adjust the resistance of calories you have burned. Avoid moving your pulse is detect- If the pedals are not moved and the console buttons are eight resistance levels. There are not pressed for continuous display. When your hands. Press ...
...the console will display a heart symbol when you are sheets of the pedals. 5 Measure your heart rate if desired. Make sure that you have pedaled, and the approximate num- Note: If there are finished exercising, the console will show the resistance level of clear plastic on the handgrip... plastic. 3 Start your workout and adjust the resistance of calories you have burned. Avoid moving your pulse is detect- If the pedals are not moved and the console buttons are eight resistance levels. There are not pressed for continuous display. When your hands. Press ...
English Manual
Page 10
... when the current period ends, the resistance level will be prompted to pedal and then press the Mode/Enter button. Note: During the program, the console will automatically turn off. After you are finished exercising, the console will display the time remaining in each period. (The... same resistance setting may be selected. Press the Up and Down buttons to select the number of the pedals will automatically change if a different resistance setting...
... when the current period ends, the resistance level will be prompted to pedal and then press the Mode/Enter button. Note: During the program, the console will automatically turn off. After you are finished exercising, the console will display the time remaining in each period. (The... same resistance setting may be selected. Press the Up and Down buttons to select the number of the pedals will automatically change if a different resistance setting...
English Manual
Page 11
... rate, the resistance of the display. Press the Up and Down buttons to keep your goal. 4 Hold the handgrip pulse sensor. however, you are finished exercising, the console will show a "P," for Pulse. See step 4 on , the manual mode will compare your progress with the display. If it is shown... in the lower right part of the pedals will automatically change to select a target heart rate goal (see EXERCISE INTENSITY on page 13). Then, press the Up or Down button repeatedly until the heart symbol begins to function...
... rate, the resistance of the display. Press the Up and Down buttons to keep your goal. 4 Hold the handgrip pulse sensor. however, you are finished exercising, the console will show a "P," for Pulse. See step 4 on , the manual mode will compare your progress with the display. If it is shown... in the lower right part of the pedals will automatically change to select a target heart rate goal (see EXERCISE INTENSITY on page 13). Then, press the Up or Down button repeatedly until the heart symbol begins to function...
English Manual
Page 14
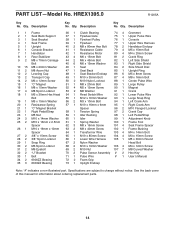
... 1 M8 x 15mm Washer 17 4 M8 Nylon Locknut 18 1 M5 x 30mm Hex Head Bolt 19 1 M5 x 15mm Washer 20 1 Resistance Spring 21 1 "C" Magnet Bracket 22 1 Right Pedal/Strap 23 1 M5 Nut 24 3 M10 x 14mm Washer 25 2 M10 x 16mm x 2.5mm Spacer 26 1 M10 x 16mm x 10mm Spacer 27 2 3/8" x 15mm Screw 28 2 3/8" Nylon ... 57 1 M10 x 16mm x 6mm 95 1 Right Crank Arm Spacer 96 2 M10 Flanged Locknut 58 1 Tension Spring 97 2 Crank Cap 59 1 Idler Bushing 98 1 Left Pedal/Strap 60 1 Idler 99 1 Adjustment Knob 61 1 Spring Washer 100 1 Frame Foot 62 3 M8 x 16mm Screw 101 4 Seat Frame Spacer 63 2 M8 x 40mm Screw ...
... 1 M8 x 15mm Washer 17 4 M8 Nylon Locknut 18 1 M5 x 30mm Hex Head Bolt 19 1 M5 x 15mm Washer 20 1 Resistance Spring 21 1 "C" Magnet Bracket 22 1 Right Pedal/Strap 23 1 M5 Nut 24 3 M10 x 14mm Washer 25 2 M10 x 16mm x 2.5mm Spacer 26 1 M10 x 16mm x 10mm Spacer 27 2 3/8" x 15mm Screw 28 2 3/8" Nylon ... 57 1 M10 x 16mm x 6mm 95 1 Right Crank Arm Spacer 96 2 M10 Flanged Locknut 58 1 Tension Spring 97 2 Crank Cap 59 1 Idler Bushing 98 1 Left Pedal/Strap 60 1 Idler 99 1 Adjustment Knob 61 1 Spring Washer 100 1 Frame Foot 62 3 M8 x 16mm Screw 101 4 Seat Frame Spacer 63 2 M8 x 40mm Screw ...


