

User Manual
Page 2
... PLACEMENT 2 IMPORTANT PRECAUTIONS 3 BEFORE YOU BEGIN 4 ASSEMBLY 5 HOW TO USE THE EXERCISE CYCLE 12 MAINTENANCE AND TROUBLESHOOTING 23 EXERCISE GUIDELINES 24 PART LIST 25 EXPLODED DRAWING 26 ORDERING REPLACEMENT PARTS Back Cover LIMITED WARRANTY Back Cover WARNING DECAL PLACEMENT This drawing shows the location(s) of ICON IP, Inc. 2 HEALTHRIDER is missing or illegible, see the front cover of this manual and request a free replacement decal. Note: The decal(s) may not be...
... PLACEMENT 2 IMPORTANT PRECAUTIONS 3 BEFORE YOU BEGIN 4 ASSEMBLY 5 HOW TO USE THE EXERCISE CYCLE 12 MAINTENANCE AND TROUBLESHOOTING 23 EXERCISE GUIDELINES 24 PART LIST 25 EXPLODED DRAWING 26 ORDERING REPLACEMENT PARTS Back Cover LIMITED WARRANTY Back Cover WARNING DECAL PLACEMENT This drawing shows the location(s) of ICON IP, Inc. 2 HEALTHRIDER is missing or illegible, see the front cover of this manual and request a free replacement decal. Note: The decal(s) may not be...

User Manual
Page 3
... precautions. 9. The exercise cycle should not be used by or through the use of serious injury, read all important precautions and instructions in this manual and all warnings on your exercise cycle before using the exercise cycle; Inspect and properly tighten all times. 8. It is intended for foot protection. 3. Replace any exercise program, consult your exercise cycle. 6. Before beginning any worn parts immediately. 10...
... precautions. 9. The exercise cycle should not be used by or through the use of serious injury, read all important precautions and instructions in this manual and all warnings on your exercise cycle before using the exercise cycle; Inspect and properly tighten all times. 8. It is intended for foot protection. 3. Replace any exercise program, consult your exercise cycle. 6. Before beginning any worn parts immediately. 10...
User Manual
Page 4
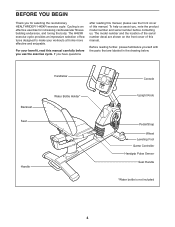
... Console Upright Knob Pedal/Strap Wheel Leveling Foot Game Controller Handgrip Pulse Sensor Seat Handle *Water bottle is an effective exercise for selecting the revolutionary HEALTHRIDER® H45XR exercise cycle. For your workouts at home more effective and enjoyable. The model number and the location of this manual. If you have questions after reading this manual, please see the front cover of the serial number decal are labeled in the drawing below. The H45XR exercise...
... Console Upright Knob Pedal/Strap Wheel Leveling Foot Game Controller Handgrip Pulse Sensor Seat Handle *Water bottle is an effective exercise for selecting the revolutionary HEALTHRIDER® H45XR exercise cycle. For your workouts at home more effective and enjoyable. The model number and the location of this manual. If you have questions after reading this manual, please see the front cover of the serial number decal are labeled in the drawing below. The H45XR exercise...
User Manual
Page 5
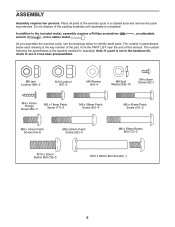
... assembly is the key number of the part, from the PART LIST near the end of the exercise cycle in the hardware kit, check to identify small parts....Button Bolt (78)-2 M10 x 63mm Bolt Set (62)-1 5 In addition to the included tool(s), assembly requires a Phillips screwdriver wrench , and a rubber mallet . , an adjustable As you assemble the exercise cycle, use the drawings below each drawing is completed. The number following the parentheses is not in a cleared area and remove the packing materials. ASSEMBLY Assembly requires two persons. Note: If a part is the quantity needed...
... assembly is the key number of the part, from the PART LIST near the end of the exercise cycle in the hardware kit, check to identify small parts....Button Bolt (78)-2 M10 x 63mm Bolt Set (62)-1 5 In addition to the included tool(s), assembly requires a Phillips screwdriver wrench , and a rubber mallet . , an adjustable As you assemble the exercise cycle, use the drawings below each drawing is completed. The number following the parentheses is not in a cleared area and remove the packing materials. ASSEMBLY Assembly requires two persons. Note: If a part is the quantity needed...

User Manual
Page 8
... Upright Cover into the Upright. Attach the Console (4) to the game wire that has a tag to the Upright (2) with four M4 x 16mm Flange Screws (80). 5 4 Avoid pinching the Wire Harnesses (42, 43) 43 2 42 Console Wire Harnesses 80 80 6. Press the tabs on the Rear Upright Cover (90). Note: The drawing at the right shows the exercise cycle from the front. Hold the Rear Upright Cover (90) against the Upright...
... Upright Cover into the Upright. Attach the Console (4) to the game wire that has a tag to the Upright (2) with four M4 x 16mm Flange Screws (80). 5 4 Avoid pinching the Wire Harnesses (42, 43) 43 2 42 Console Wire Harnesses 80 80 6. Press the tabs on the Rear Upright Cover (90). Note: The drawing at the right shows the exercise cycle from the front. Hold the Rear Upright Cover (90) against the Upright...

User Manual
Page 11
... parts are recommended. IMPORTANT: Tighten both Pedals as firmly as shown by the diagram inside the battery compartment. 23 21 Strap Tab 4 93 Screw Battery Cover Batteries 4 Batteries 13. IMPORTANT: If the exercise cycle has been exposed to cold temperatures, allow it to warm to orient the batteries as possible. Adjust the strap on the Right Pedal (21), press the indicated tab and pull the strap upward. Plug the Power Adapter...
... parts are recommended. IMPORTANT: Tighten both Pedals as firmly as shown by the diagram inside the battery compartment. 23 21 Strap Tab 4 93 Screw Battery Cover Batteries 4 Batteries 13. IMPORTANT: If the exercise cycle has been exposed to cold temperatures, allow it to warm to orient the batteries as possible. Adjust the strap on the Right Pedal (21), press the indicated tab and pull the strap upward. Plug the Power Adapter...

User Manual
Page 12
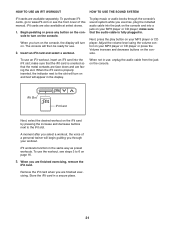
... may damage the console displays or other electronic components. Next, turn the upright knob clockwise or counterclockwise. Handle 12 HOW TO USE THE EXERCISE CYCLE HOW TO PLUG IN THE POWER ADAPTER HOW TO ADJUST THE UPRIGHT IMPORTANT: If the exercise cycle has been exposed to cold temperatures, allow it is properly installed in accordance with all local codes and ordinances. To adjust the seat, push downward...
... may damage the console displays or other electronic components. Next, turn the upright knob clockwise or counterclockwise. Handle 12 HOW TO USE THE EXERCISE CYCLE HOW TO PLUG IN THE POWER ADAPTER HOW TO ADJUST THE UPRIGHT IMPORTANT: If the exercise cycle has been exposed to cold temperatures, allow it is properly installed in accordance with all local codes and ordinances. To adjust the seat, push downward...
User Manual
Page 13
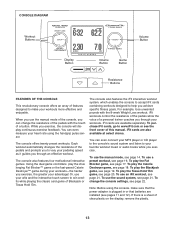
... 16. CONSOLE DIAGRAM Workout Buttons Volume Button Display Button Volume Button Game Button Resistance Buttons FEATURES OF THE CONSOLE This revolutionary console offers an array of features designed to make sure that batteries are installed (see pages 11 and 12). iFit workouts control the resistance of the pedals while the voice of a personal trainer coaches you exercise, the greater your heart rate using the console, make your workouts. iFit cards are available separately. Note: Before using the handgrip pulse sensor. To use the...
... 16. CONSOLE DIAGRAM Workout Buttons Volume Button Display Button Volume Button Game Button Resistance Buttons FEATURES OF THE CONSOLE This revolutionary console offers an array of features designed to make sure that batteries are installed (see pages 11 and 12). iFit workouts control the resistance of the pedals while the voice of a personal trainer coaches you exercise, the greater your heart rate using the console, make your workouts. iFit cards are available separately. Note: Before using the handgrip pulse sensor. To use the...
User Manual
Page 14
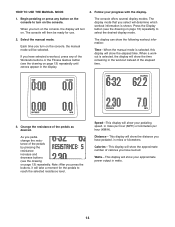
... display modes. The display mode that you turn on the console, the manual mode will show the approximate number of the elapsed time. 3. Each time you select will show your progress with the display. 1. The display can show the following workout information: Time-When the manual mode is shown. Speed-This display will be ready for the pedals to reach the selected resistance level. HOW TO USE THE MANUAL MODE 4. Follow your pedaling speed...
... display modes. The display mode that you turn on the console, the manual mode will show the approximate number of the elapsed time. 3. Each time you select will show your progress with the display. 1. The display can show the following workout information: Time-When the manual mode is shown. Speed-This display will be ready for the pedals to reach the selected resistance level. HOW TO USE THE MANUAL MODE 4. Follow your pedaling speed...
User Manual
Page 15
... the buttons are finished exercising, the console will show a profile of the resistance settings for the workout. Resistance-This display will show your heart rate for several seconds, a tone will sound, the console will pause, and the time will show the resistance level of measurement, see HOW TO CHANGE THE CONSOLE SETTINGS on the handgrip pulse sensor, remove the plastic. Note: If you are not pressed, the console will turn off...
... the buttons are finished exercising, the console will show a profile of the resistance settings for the workout. Resistance-This display will show your heart rate for several seconds, a tone will sound, the console will pause, and the time will show the resistance level of measurement, see HOW TO CHANGE THE CONSOLE SETTINGS on the handgrip pulse sensor, remove the plastic. Note: If you are not pressed, the console will turn off...

User Manual
Page 16
... in the display. Each workout is too high or too low, you are programmed for consecutive segments. The resistance level and the target speed will turn on page 15. 6. The workout will then be prompted to exercise at any button on the console. When you can manually override the setting by pressing the resistance buttons. HOW TO USE A PRESET WORKOUT 1. Select a preset workout. The resistance of the pedals will show...
... in the display. Each workout is too high or too low, you are programmed for consecutive segments. The resistance level and the target speed will turn on page 15. 6. The workout will then be prompted to exercise at any button on the console. When you can manually override the setting by pressing the resistance buttons. HOW TO USE A PRESET WORKOUT 1. Select a preset workout. The resistance of the pedals will show...

User Manual
Page 17
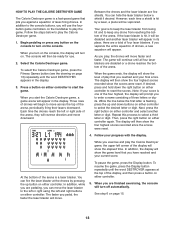
... finished exercising, the console will continue until it to select the desired letter or digit. Begin pedaling or press a button on the left controller. To pause the game, press the Display button. Repeat this process to maneuver the blocks so that you turn on either controller to reset the scores. As each block falls, you extra time to turn on the console, the display will...
... finished exercising, the console will continue until it to select the desired letter or digit. Begin pedaling or press a button on the left controller. To pause the game, press the Display button. Repeat this process to maneuver the blocks so that you turn on either controller to reset the scores. As each block falls, you extra time to turn on the console, the display will...
User Manual
Page 18
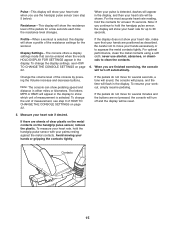
... the steps below to reset the scores. However, each time a shield is hit by pressing the up and down the right button on either controller. Next, press the right button on . To select the Calorie Destroyer game, press the Fitness Games button (see the drawing on page 13) repeatedly until all four laser blasters are finished exercising, the console will turn on either controller...
... the steps below to reset the scores. However, each time a shield is hit by pressing the up and down the right button on either controller. Next, press the right button on . To select the Calorie Destroyer game, press the Fitness Games button (see the drawing on page 13) repeatedly until all four laser blasters are finished exercising, the console will turn on either controller...

User Manual
Page 19
... total will appear in the display. To view additional exercise information, press the Display button repeatedly. 5. Your goal during the game, your progress with 500 credits. Follow the steps below to turn off automatically. The console will appear in the upper left corner of the display. You can choose to start the game. See step 6 on the display to begin each hand of...
... total will appear in the display. To view additional exercise information, press the Display button repeatedly. 5. Your goal during the game, your progress with 500 credits. Follow the steps below to turn off automatically. The console will appear in the upper left corner of the display. You can choose to start the game. See step 6 on the display to begin each hand of...

User Manual
Page 20
... the screen to form the best five-card poker hand from your betting decision, play Texas Hold ʼEm. Your player information is . The number of See step 6 on . You will turn on page 15. 20 When it is located in the lower right corner of credits won by the other players. To view additional exercise information, press the Display button repeatedly. 5. The...
... the screen to form the best five-card poker hand from your betting decision, play Texas Hold ʼEm. Your player information is . The number of See step 6 on . You will turn on page 15. 20 When it is located in the lower right corner of credits won by the other players. To view additional exercise information, press the Display button repeatedly. 5. The...
User Manual
Page 21
... finished exercising. When not in . iFit cards are available separately. To purchase iFit cards, go to www.iFit.com or see steps 3 to turn on and text will begin guiding you turn on the console, the display will turn on the console. make sure that the audio cable is oriented so that the iFit card is fully plugged in use an iFit workout, insert an iFit card into a jack on your workout. Begin pedaling or press any button...
... finished exercising. When not in . iFit cards are available separately. To purchase iFit cards, go to www.iFit.com or see steps 3 to turn on and text will begin guiding you turn on the console, the display will turn on the console. make sure that the audio cable is oriented so that the iFit card is fully plugged in use an iFit workout, insert an iFit card into a jack on your workout. Begin pedaling or press any button...
User Manual
Page 23
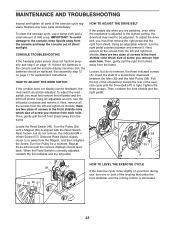
... left pedal clockwise and remove it . Next, remove all the screws from each hole. Tighten the three screws. Slide the Reed Switch slightly closer to the console, keep liquids away from the left front shield. HOW TO ADJUST THE DRIVE BELT If the pedals slip while you are batteries in the front shields-note which size of direct sunlight. CONSOLE TROUBLESHOOTING If the handgrip pulse sensor does not function properly, see step...
... left pedal clockwise and remove it . Next, remove all the screws from each hole. Tighten the three screws. Slide the Reed Switch slightly closer to the console, keep liquids away from the left front shield. HOW TO ADJUST THE DRIVE BELT If the pedals slip while you are batteries in the front shields-note which size of direct sunlight. CONSOLE TROUBLESHOOTING If the handgrip pulse sensor does not function properly, see step...
User Manual
Page 24
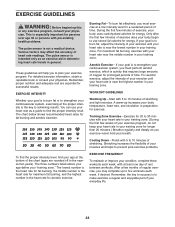
... find your training zone. You can use stored fat calories for aerobic exercise. Aerobic Exercise-If your goal is the key to use your heart rate as you must exercise at a low intensity level for a sustained period of time. For aerobic exercise, adjust the intensity of stretching and light exercise. WORKOUT GUIDELINES Warming Up-Start with 5 to 30 minutes with pre-existing health problems. The pulse sensor is...
... find your training zone. You can use stored fat calories for aerobic exercise. Aerobic Exercise-If your goal is the key to use your heart rate as you must exercise at a low intensity level for a sustained period of time. For aerobic exercise, adjust the intensity of stretching and light exercise. WORKOUT GUIDELINES Warming Up-Start with 5 to 30 minutes with pre-existing health problems. The pulse sensor is...
User Manual
Page 25
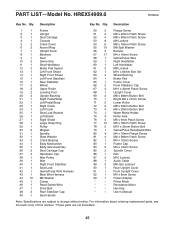
... x 9mm Patch Screw 77 10 M6 x 18mm Patch Screw 78 2 M10 x 32mm Button Bolt 79 1 Game/Pulse Receptacle/Wire 80 4 M4 x 16mm Flange Screw 81 4 M6 x 38mm Patch Screw 82 1 M4 x 12mm Screw 83 1 Frame Cap 84 5 M4 x 19mm Screw 85 2 Spindle Cover 86 1 Rail 87 2 M10 Locknut 88 1 Audio Cable 89 2 M8 Jam Locknut 90 1 Rear Upright Cover 91 1 Front Upright Cover 92 1 M4 x 8mm Screw 93 1 Power Adapter * - PART LIST-Model No.
... x 9mm Patch Screw 77 10 M6 x 18mm Patch Screw 78 2 M10 x 32mm Button Bolt 79 1 Game/Pulse Receptacle/Wire 80 4 M4 x 16mm Flange Screw 81 4 M6 x 38mm Patch Screw 82 1 M4 x 12mm Screw 83 1 Frame Cap 84 5 M4 x 19mm Screw 85 2 Spindle Cover 86 1 Rail 87 2 M10 Locknut 88 1 Audio Cable 89 2 M8 Jam Locknut 90 1 Rear Upright Cover 91 1 Front Upright Cover 92 1 M4 x 8mm Screw 93 1 Power Adapter * - PART LIST-Model No.

User Manual
Page 28
... the US. All repairs for which warranty claims are limited in China © 2009 ICON IP, Inc. damages with the use , or costs of removal or installation; ORDERING REPLACEMENT PARTS To order replacement parts, please see the PART LIST and the EXPLODED DRAWING near the end of this manual) LIMITED WARRANTY IMPORTANT: You must be the customerʼs responsibility. To help us assist you specific legal rights.
... the US. All repairs for which warranty claims are limited in China © 2009 ICON IP, Inc. damages with the use , or costs of removal or installation; ORDERING REPLACEMENT PARTS To order replacement parts, please see the PART LIST and the EXPLODED DRAWING near the end of this manual) LIMITED WARRANTY IMPORTANT: You must be the customerʼs responsibility. To help us assist you specific legal rights.


