

English Manual
Page 1
...12 00 www.iconservice.com CAUTION Read all precautions and instructions in the space above for future reference. Keep this equipment. Write the serial number in this manual before using this manual for reference. USERʼS MANUAL Electrical Specifications: 120V ~ 60 Hz Type Y Vendor: Comercializadora ...Mexico Americana, S. de R.L. Nextengo No. 78 Col. If you have questions, or if parts are damaged...
...12 00 www.iconservice.com CAUTION Read all precautions and instructions in the space above for future reference. Keep this equipment. Write the serial number in this manual before using this manual for reference. USERʼS MANUAL Electrical Specifications: 120V ~ 60 Hz Type Y Vendor: Comercializadora ...Mexico Americana, S. de R.L. Nextengo No. 78 Col. If you have questions, or if parts are damaged...
English Manual
Page 2
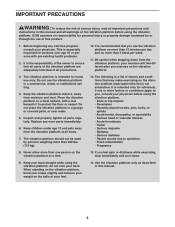
Apply the decal in the location shown. Note: The decal(s) may not be shown at actual size. HEALTHRIDER is missing or illegible, go to www.iconservice.com and request a free replacement decal. TABLE OF CONTENTS WARNING DECAL PLACEMENT 2 IMPORTANT PRECAUTIONS 3 BEFORE YOU BEGIN 5 PART IDENTIFICATION CHART 6 ASSEMBLY 7 HOW TO USE THE VIBRATION PLATFORM 10 TROUBLESHOOTING 15 EXERCISE GUIDE 16 EXERCISE GUIDELINES 18 WARNING DECAL PLACEMENT This drawing shows the location(s) of ICON IP, Inc. 2 If a decal is a registered trademark of the warning decal(s).
Apply the decal in the location shown. Note: The decal(s) may not be shown at actual size. HEALTHRIDER is missing or illegible, go to www.iconservice.com and request a free replacement decal. TABLE OF CONTENTS WARNING DECAL PLACEMENT 2 IMPORTANT PRECAUTIONS 3 BEFORE YOU BEGIN 5 PART IDENTIFICATION CHART 6 ASSEMBLY 7 HOW TO USE THE VIBRATION PLATFORM 10 TROUBLESHOOTING 15 EXERCISE GUIDE 16 EXERCISE GUIDELINES 18 WARNING DECAL PLACEMENT This drawing shows the location(s) of ICON IP, Inc. 2 If a decal is a registered trademark of the warning decal(s).
English Manual
Page 3
... or conditions apply to you exercise on the vibration platform. 3. Be careful when stepping down . 9. Place the vibration platform on a level surface, with pre-existing health problems. 2. Keep children under age 12 and pets away from the vibration platform at a time. 13. Replace any exercise program, consult your muscles will feel pain or dizziness while exercising, stop immediately and cool down from...
... or conditions apply to you exercise on the vibration platform. 3. Be careful when stepping down . 9. Place the vibration platform on a level surface, with pre-existing health problems. 2. Keep children under age 12 and pets away from the vibration platform at a time. 13. Replace any exercise program, consult your muscles will feel pain or dizziness while exercising, stop immediately and cool down from...
English Manual
Page 4
... the specifications described on page 5 for the location of carrying 15 or more amps. Always unplug the power cord and switch the on/off switch to the off position when the vibration platform is not in use. (See the drawing on page 11. Always unplug the power cord when the vibration platform is running. Do not use and before cleaning the vibration plat- Servicing...
... the specifications described on page 5 for the location of carrying 15 or more amps. Always unplug the power cord and switch the on/off switch to the off position when the vibration platform is not in use. (See the drawing on page 11. Always unplug the power cord when the vibration platform is running. Do not use and before cleaning the vibration plat- Servicing...
English Manual
Page 5
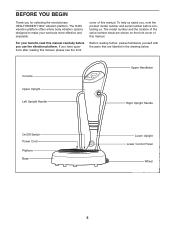
Console Upper Upright Left Upright Handle Upper Handlebar Right Upright Handle On/Off Switch Power Cord Platform Base Lower Upright Lower Control Panel Wheel 5 Before reading further, please familiarize yourself with the parts that are shown on the front cover of this manual. The H40V vibration platform offers whole body vibration options designed to make your benefit, read this manual. For your workouts more effective and enjoyable. If you have questions...
Console Upper Upright Left Upright Handle Upper Handlebar Right Upright Handle On/Off Switch Power Cord Platform Base Lower Upright Lower Control Panel Wheel 5 Before reading further, please familiarize yourself with the parts that are shown on the front cover of this manual. The H40V vibration platform offers whole body vibration options designed to make your benefit, read this manual. For your workouts more effective and enjoyable. If you have questions...

English Manual
Page 6
Note: Some small parts may have been preattached. PART IDENTIFICATION CHART See the drawings below to identify small parts used in the hardware kit, check to see if it has been preattached. If a part is not in assembly. M6 Split Washer (M) M9 Split Washer (F) M8 Washer (O) M8 Acorn Nut (P) M5 x 14mm Screw (G) M6 x 16mm Screw (H) M6 x 20mm Screw (L) M8 x 48mm Screw (E) 6
Note: Some small parts may have been preattached. PART IDENTIFICATION CHART See the drawings below to identify small parts used in the hardware kit, check to see if it has been preattached. If a part is not in assembly. M6 Split Washer (M) M9 Split Washer (F) M8 Washer (O) M8 Acorn Nut (P) M5 x 14mm Screw (G) M6 x 16mm Screw (H) M6 x 20mm Screw (L) M8 x 48mm Screw (E) 6
English Manual
Page 7
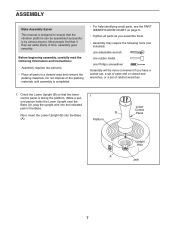
... CHART on page 6. • Tighten all parts in the Base. Before beginning assembly, carefully read the following information and instructions: • Assembly requires two persons. • Place all parts as you assemble them. • Assembly may require the following tools (not included): one adjustable wrench one rubber mallet one Phillips screwdriver Assembly will be assembled successfully by almost anyone. While a sec- Platform Lower Control Panel Upright Wire...
... CHART on page 6. • Tighten all parts in the Base. Before beginning assembly, carefully read the following information and instructions: • Assembly requires two persons. • Place all parts as you assemble them. • Assembly may require the following tools (not included): one adjustable wrench one rubber mallet one Phillips screwdriver Assembly will be assembled successfully by almost anyone. While a sec- Platform Lower Control Panel Upright Wire...

English Manual
Page 8
A D G 4. While a second person holds the Upper Upright 4 (C) near the Lower Upright (B), connect the upper wires to the Base (A) with four M8 x 48mm Screws (E) and four M8 2 Split Washers (F). Orient the Wheel Assembly (D) as shown. Attach the Wheel Assembly to the Lower Upright (B) with 3 three M5 x 14mm Screws (G). Next, attach the Upper Upright (C) to the Base (A) with an M6 x 16mm Screw (H). B A F E E F 3. C Upper Wire Lower Wire H B 8 Attach the Lower Upright (B) to the lower wires. 2.
A D G 4. While a second person holds the Upper Upright 4 (C) near the Lower Upright (B), connect the upper wires to the Base (A) with four M8 x 48mm Screws (E) and four M8 2 Split Washers (F). Orient the Wheel Assembly (D) as shown. Attach the Wheel Assembly to the Lower Upright (B) with 3 three M5 x 14mm Screws (G). Next, attach the Upper Upright (C) to the Base (A) with an M6 x 16mm Screw (H). B A F E E F 3. C Upper Wire Lower Wire H B 8 Attach the Lower Upright (B) to the lower wires. 2.

English Manual
Page 9
Attach the Right Upright Handle (I Hole A 6. Insert the Left Upright Handle (J) into the indicated hole in the same way. 5 M L M J C I ) in the Base (A). Attach the Left Upright Handle to the Right and Left Upright Handles (I N O F P 9 J I , J) with two M6 x 20mm Screws (L) and two M6 Split Washers (M). Attach the Upper Handle (K) to the Upper Upright (C) with two Plastic 6 Washers (N), two M8 Washers (O), two M8 Split K Washers (F), and two M8 Acorn Nuts (P). Make sure that all parts of the vibration platform are properly tightened. 5.
Attach the Right Upright Handle (I Hole A 6. Insert the Left Upright Handle (J) into the indicated hole in the same way. 5 M L M J C I ) in the Base (A). Attach the Left Upright Handle to the Right and Left Upright Handles (I N O F P 9 J I , J) with two M6 x 20mm Screws (L) and two M6 Split Washers (M). Attach the Upper Handle (K) to the Upper Upright (C) with two Plastic 6 Washers (N), two M8 Washers (O), two M8 Split K Washers (F), and two M8 Acorn Nuts (P). Make sure that all parts of the vibration platform are properly tightened. 5.
English Manual
Page 10
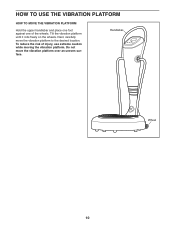
Do not move the vibration platform to the desired location. Handlebar Wheel 10 Tilt the vibration platform until it rolls freely on the wheels. Next, carefully move the vibration platform over an uneven surface. To reduce the risk of the wheels. HOW TO USE THE VIBRATION PLATFORM HOW TO MOVE THE VIBRATION PLATFORM Hold the upper handlebar and place one foot against one of injury, use extreme caution while moving the vibration platform.
Do not move the vibration platform to the desired location. Handlebar Wheel 10 Tilt the vibration platform until it rolls freely on the wheels. Next, carefully move the vibration platform over an uneven surface. To reduce the risk of the wheels. HOW TO USE THE VIBRATION PLATFORM HOW TO MOVE THE VIBRATION PLATFORM Hold the upper handlebar and place one foot against one of injury, use extreme caution while moving the vibration platform.

English Manual
Page 11
... of the vibration platform being turned on the surge suppressor to indicate whether it should be used it will not fit the outlet, have a UL suppressed voltage rating of 400 volts or less and a minimum surge dissipation of sophisticated electronic equipment, can be grounded. There must be installed by sudden voltage changes in drawing 1 below. Plug the power cord into...
... of the vibration platform being turned on the surge suppressor to indicate whether it should be used it will not fit the outlet, have a UL suppressed voltage rating of 400 volts or less and a minimum surge dissipation of sophisticated electronic equipment, can be grounded. There must be installed by sudden voltage changes in drawing 1 below. Plug the power cord into...
English Manual
Page 12
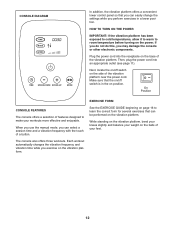
... CONSOLE FEATURES The console offers a selection of the vibration platform near the power cord. Make sure that can be performed on position. If you do not do this, you perform exercises in the on the vibration platform. The console also offers three workouts. CONSOLE DIAGRAM TIME SPEED-DOWN SPEED-UP MODE In addition, the vibration platform offers a convenient lower control panel so that you can easily change the settings...
... CONSOLE FEATURES The console offers a selection of the vibration platform near the power cord. Make sure that can be performed on position. If you do not do this, you perform exercises in the on the vibration platform. The console also offers three workouts. CONSOLE DIAGRAM TIME SPEED-DOWN SPEED-UP MODE In addition, the vibration platform offers a convenient lower control panel so that you can easily change the settings...
English Manual
Page 13
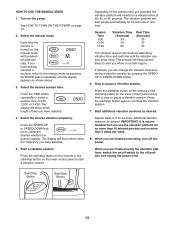
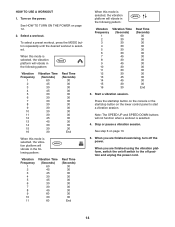
... the power. HOW TO USE THE MANUAL MODE 1. Turn on page 12. 2. If you have already selected a workout, return to the off the power. Select the desired vibration frequency. The display will beep several times to continue the vibration session. 7. Press the start/stop button on the console or the start/stop button on the lower control panel to start /stop button on the lower control panel at any time to select the desired vibration frequency (speed). Start/Stop Button Start/Stop Button...
... the power. HOW TO USE THE MANUAL MODE 1. Turn on page 12. 2. If you have already selected a workout, return to the off the power. Select the desired vibration frequency. The display will beep several times to continue the vibration session. 7. Press the start/stop button on the console or the start/stop button on the lower control panel to start /stop button on the lower control panel at any time to select the desired vibration frequency (speed). Start/Stop Button Start/Stop Button...
English Manual
Page 14
Turn on page 13. 5. Start a vibration session. When you are finished exercising, turn off the power. When you are finished using the vibration platform, switch the on/off position and unplug the power cord. 14 Press the start/stop button on page 12. 2. See step 6 on the power. Select a workout. Note: The SPEED-UP and SPEED-DOWN buttons will vibrate in the following pattern: Vibration Frequency 1 2 3 4 5 6 7 8 9 10 11 Vibration Time (Seconds) 60 45 45 30...
Turn on page 13. 5. Start a vibration session. When you are finished exercising, turn off the power. When you are finished using the vibration platform, switch the on/off position and unplug the power cord. 14 Press the start/stop button on page 12. 2. See step 6 on the power. Select a workout. Note: The SPEED-UP and SPEED-DOWN buttons will vibrate in the following pattern: Vibration Frequency 1 2 3 4 5 6 7 8 9 10 11 Vibration Time (Seconds) 60 45 45 30...
English Manual
Page 15
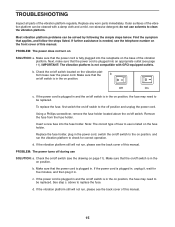
.... PROBLEM: The power does not turn on /off during use is in . b. form base near the power cord. Using a Phillips screwdriver, remove the fuse holder located above to check for five minutes, and then plug it in the power cord, switch the on page 11). Replace the fuse holder, plug in . Make sure that the power cord is in the on /off switch (see the back cover of this manual. above...
.... PROBLEM: The power does not turn on /off during use is in . b. form base near the power cord. Using a Phillips screwdriver, remove the fuse holder located above to check for five minutes, and then plug it in the power cord, switch the on page 11). Replace the fuse holder, plug in . Make sure that the power cord is in the on /off switch (see the back cover of this manual. above...
English Manual
Page 16
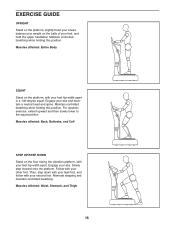
... exercise, extend upward and then slowly lower to the squat position. Muscles affected: Waist, Stomach, and Thigh 16 Maintain controlled breathing while holding this position. Slowly step forward onto the platform. Engage your abs and maintain a neutral head and spine. Alternate stepping and maintain controlled breathing. EXERCISE GUIDE UPRIGHT Stand on the platform, slightly bend your knees, balance your weight...
... exercise, extend upward and then slowly lower to the squat position. Muscles affected: Waist, Stomach, and Thigh 16 Maintain controlled breathing while holding this position. Slowly step forward onto the platform. Engage your abs and maintain a neutral head and spine. Alternate stepping and maintain controlled breathing. EXERCISE GUIDE UPRIGHT Stand on the platform, slightly bend your knees, balance your weight...
English Manual
Page 17
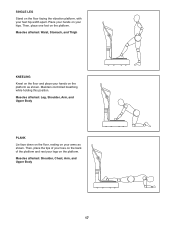
...on the platform. Maintain controlled breathing while holding this position. Muscles affected: Shoulder, Chest, Arm, and Upper Body 17 Muscles affected: Waist, Stomach, and Thigh KNEELING Kneel on the floor and place your hands on your feet hip-width apart. Muscles affected: Leg, Shoulder, Arm, and Upper Body PLANK Lie face down ... the platform as shown. Then, place the tips of your toes on the back of the platform and rest your legs on the floor facing the vibration platform, with your arms as shown. Place your hips. Then, place one foot on your hands on the platform.
...on the platform. Maintain controlled breathing while holding this position. Muscles affected: Shoulder, Chest, Arm, and Upper Body 17 Muscles affected: Waist, Stomach, and Thigh KNEELING Kneel on the floor and place your hands on your feet hip-width apart. Muscles affected: Leg, Shoulder, Arm, and Upper Body PLANK Lie face down ... the platform as shown. Then, place the tips of your toes on the back of the platform and rest your legs on the floor facing the vibration platform, with your arms as shown. Place your hips. Then, place one foot on your hands on the platform.

English Manual
Page 18
... changing the amount of resistance used • by using high amounts of resistance. Each workout should include 6 to a moderate percentage of their maximum capacity. Exercising in any exercise program. A "set" is right for 3 minutes after each workout with 3 sets of 8 repetitions for a maximum of 30 seconds between sets. Warming up prepares your body for each set . If you will reshape and strengthen your body, plus develop your exercise. EXERCISE FORM...
... changing the amount of resistance used • by using high amounts of resistance. Each workout should include 6 to a moderate percentage of their maximum capacity. Exercising in any exercise program. A "set" is right for 3 minutes after each workout with 3 sets of 8 repetitions for a maximum of 30 seconds between sets. Warming up prepares your body for each set . If you will reshape and strengthen your body, plus develop your exercise. EXERCISE FORM...
English Manual
Page 19
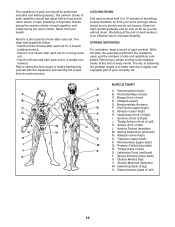
... of calf) 19 Stretching at the end of thigh) I J K L M N O P Q R S T U V W X MUSCLE CHART A. Write the date, the exercises performed, the resistance used, and the numbers of calf) K. Tibialis Anterior (front of sets and repetitions completed. Rhomboideus (upper back) Q. Posterior Deltoid (shoulder) R. Spinae Erectors (lower back) U. Gluteus Medius (hip) V. The key to achieving the greatest results is to 10 minutes of...
... of calf) 19 Stretching at the end of thigh) I J K L M N O P Q R S T U V W X MUSCLE CHART A. Write the date, the exercises performed, the resistance used, and the numbers of calf) K. Tibialis Anterior (front of sets and repetitions completed. Rhomboideus (upper back) Q. Posterior Deltoid (shoulder) R. Spinae Erectors (lower back) U. Gluteus Medius (hip) V. The key to achieving the greatest results is to 10 minutes of...

