

English Manual
Page 2
TABLE OF CONTENTS IMPORTANT PRECAUTIONS 3 BEFORE YOU BEGIN 5 ASSEMBLY 6 HOW TO USE THE CHEST PULSE SENSOR 7 TREADMILL OPERATION 8 HOW TO FOLD AND MOVE THE TREADMILL 24 TROUBLESHOOTING 25 EXERCISE GUIDELINES 27 PART LIST 30 HOW TO ORDER REPLACEMENT PARTS 31 LIMITED WARRANTY Back Cover Note: An EXPLODED DRAWING is a registered trademark of this manual. HealthRider is attached in the center of ICON Health & Fitness, Inc. 2
TABLE OF CONTENTS IMPORTANT PRECAUTIONS 3 BEFORE YOU BEGIN 5 ASSEMBLY 6 HOW TO USE THE CHEST PULSE SENSOR 7 TREADMILL OPERATION 8 HOW TO FOLD AND MOVE THE TREADMILL 24 TROUBLESHOOTING 25 EXERCISE GUIDELINES 27 PART LIST 30 HOW TO ORDER REPLACEMENT PARTS 31 LIMITED WARRANTY Back Cover Note: An EXPLODED DRAWING is a registered trademark of this manual. HealthRider is attached in the center of ICON Health & Fitness, Inc. 2
English Manual
Page 3
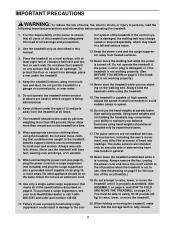
... using the treadmill. Always remove the key, unplug the power cord, and move the walking belt while the power is not in use the treadmill with at all times. 7. Wear appropriate exercise clothing when using the treadmill. 15. When connecting the power cord (see your balance. Use only a single-outlet surge suppressor that meets all of the specifications described on the walking belt. Never move the on /off switch.) 19. Various factors, including the user...
... using the treadmill. Always remove the key, unplug the power cord, and move the walking belt while the power is not in use the treadmill with at all times. 7. Wear appropriate exercise clothing when using the treadmill. 15. When connecting the power cord (see your balance. Use only a single-outlet surge suppressor that meets all of the specifications described on the walking belt. Never move the on /off switch.) 19. Various factors, including the user...
English Manual
Page 4
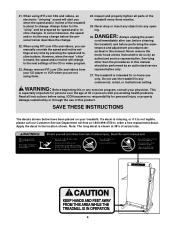
... personal trainer describes the change before performing the main- When using iFIT.com CDs and videos, you when the speed and/or incline of actual size. 4 Note: The long decal is heard, the speed and/or incline will alert you can manually override the speed and incline settings at any opening. In some instances, the speed and/or incline may change . 22. Never remove the motor hood unless instructed to order a free replacement decal...
... personal trainer describes the change before performing the main- When using iFIT.com CDs and videos, you when the speed and/or incline of actual size. 4 Note: The long decal is heard, the speed and/or incline will alert you can manually override the speed and incline settings at any opening. In some instances, the speed and/or incline may change . 22. Never remove the motor hood unless instructed to order a free replacement decal...
English Manual
Page 5
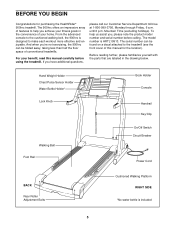
... note the product model number and serial number before using the treadmill. The model number is included 5 Hand Weight Holder Chest Pulse Sensor Holder Water Bottle Holder* Lock Knob Book Holder Console Handrail Key/Clip Walking Belt Foot Rail On/Off Switch Circuit Breaker Power Cord BACK Rear Roller Adjustment Bolts Cushioned Walking Platform RIGHT SIDE *No water bottle is HRTL19913. And when you have additional questions, please call our Customer Service Department toll-free at 1-800...
... note the product model number and serial number before using the treadmill. The model number is included 5 Hand Weight Holder Chest Pulse Sensor Holder Water Bottle Holder* Lock Knob Book Holder Console Handrail Key/Clip Walking Belt Foot Rail On/Off Switch Circuit Breaker Power Cord BACK Rear Roller Adjustment Bolts Cushioned Walking Platform RIGHT SIDE *No water bottle is HRTL19913. And when you have additional questions, please call our Customer Service Department toll-free at 1-800...

English Manual
Page 7
... console to display heart rate readings, the user must be under your clothing, tight against your chest and attach the other container that you walk or run on ; CHEST PULSE SENSOR CARE AND MAINTENANCE • Thoroughly dry the chest pulse sensor after each use , it is suspected that the logo on the chest strap. Adjust the length of the chest strap to a position against your chest. • Use saline solution such as is a problem...
... console to display heart rate readings, the user must be under your clothing, tight against your chest and attach the other container that you walk or run on ; CHEST PULSE SENSOR CARE AND MAINTENANCE • Thoroughly dry the chest pulse sensor after each use , it is suspected that the logo on the chest strap. Adjust the length of the chest strap to a position against your chest. • Use saline solution such as is a problem...

English Manual
Page 8
...-if it will deteriorate the walking belt and cause excessive wear. HOW TO PLUG IN THE POWER CORD DANGER: Improper connection of least resistance for electric current to a permanent ground such as a properly grounded outlet box cover. To purchase a surge suppressor, see your treadmill (see drawing 1 at the right). If it should be electrically rated for use a properly functioning surge suppressor...
...-if it will deteriorate the walking belt and cause excessive wear. HOW TO PLUG IN THE POWER CORD DANGER: Improper connection of least resistance for electric current to a permanent ground such as a properly grounded outlet box cover. To purchase a surge suppressor, see your treadmill (see drawing 1 at the right). If it should be electrically rated for use a properly functioning surge suppressor...

English Manual
Page 9
... at health clubs. The console will show your computer, you have walked, the incline level of the treadmill, and the speed of the walking belt. Using the included audio cable, you can connect the treadmill to your own workout programs and store them in memory for future use iFIT.com programs directly from your workout time, the number of calories you have burned, the distance you can also go to create your home stereo...
... at health clubs. The console will show your computer, you have walked, the incline level of the treadmill, and the speed of the walking belt. Using the included audio cable, you can connect the treadmill to your own workout programs and store them in memory for future use iFIT.com programs directly from your workout time, the number of calories you have burned, the distance you can also go to create your home stereo...

English Manual
Page 10
... manual mode or the iFIT.com mode is 0.5 mph to identify the features described below. Program profiles-These profiles show your age when pulse programs are pressed, the display will change during your heart rate. C. J. buttons-These buttons are used , this display will automatically stop the walking belt. The speed range is selected, this indicator will alternate between one number and the other every seven seconds. Key-This key turns the console on an LED track. Cross Training...
... manual mode or the iFIT.com mode is 0.5 mph to identify the features described below. Program profiles-These profiles show your age when pulse programs are pressed, the display will change during your heart rate. C. J. buttons-These buttons are used , this display will automatically stop the walking belt. The speed range is selected, this indicator will alternate between one number and the other every seven seconds. Key-This key turns the console on an LED track. Cross Training...

English Manual
Page 11
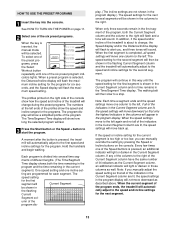
... for the walking belt to the on position. Adjust the speed in the power cord (see page 26). 4 Adjust the incline of the treadmill as desired by pressing the Speed buttons or the OneTouch Speed buttons. HOW TO USE THE MANUAL MODE 1 Insert the key into the console. As you are using the treadmill. If a program is selected, press the Select Workout button repeatedly to reach the selected incline setting. 11 Manual Indicator 3 Press the Start button or the Speed + button to move at...
... for the walking belt to the on position. Adjust the speed in the power cord (see page 26). 4 Adjust the incline of the treadmill as desired by pressing the Speed buttons or the OneTouch Speed buttons. HOW TO USE THE MANUAL MODE 1 Insert the key into the console. As you are using the treadmill. If a program is selected, press the Select Workout button repeatedly to reach the selected incline setting. 11 Manual Indicator 3 Press the Start button or the Speed + button to move at...

English Manual
Page 12
... treadmill is in the Pulse display and then your heart rate. Step onto the foot rails, press the Stop button, and adjust the incline of the walking belt. Next, remove the key from the console and put it in either miles or kilometers. Time/Segment Time display-When the manual mode or the iFIT.com mode is selected, the display will show an E for English miles or an M for about 15 seconds. When a preset program, a pulse program...
... treadmill is in the Pulse display and then your heart rate. Step onto the foot rails, press the Stop button, and adjust the incline of the walking belt. Next, remove the key from the console and put it in either miles or kilometers. Time/Segment Time display-When the manual mode or the iFIT.com mode is selected, the display will show an E for English miles or an M for about 15 seconds. When a preset program, a pulse program...
English Manual
Page 13
... after the button is pressed, the treadmill will automatically adjust to a stop. play. (The incline settings are programmed for each segment. The walking belt will then slow to the first speed and incline settings for the next...manually override the setting by pressing the Speed or Incline buttons on the right side of the console show how the speed and incline of the treadmill will change , the Speed display and/or the Distance/Incline display will flash to start the program. Hold the handrails and begin walking. ting are not shown in the program display.) The speed settings...
... after the button is pressed, the treadmill will automatically adjust to a stop. play. (The incline settings are programmed for each segment. The walking belt will then slow to the first speed and incline settings for the next...manually override the setting by pressing the Speed or Incline buttons on the right side of the console show how the speed and incline of the treadmill will change , the Speed display and/or the Distance/Incline display will flash to start the program. Hold the handrails and begin walking. ting are not shown in the program display.) The speed settings...
English Manual
Page 14
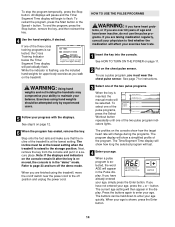
... pulse programs. When the key is in the display. See page 7 for upper body exercise as you have heart prob- The profiles on the chest pulse sensor. If you walk on /off switch near the power cord to enter your balance. Press the buttons again to the off the demo mode. While the indicator is at the lowest setting when the treadmill is shown, press the Enter button. 14 HOW TO USE THE PULSE PROGRAMS...
... pulse programs. When the key is in the display. See page 7 for upper body exercise as you have heart prob- The profiles on the chest pulse sensor. If you walk on /off switch near the power cord to enter your balance. Press the buttons again to the off the demo mode. While the indicator is at the lowest setting when the treadmill is shown, press the Enter button. 14 HOW TO USE THE PULSE PROGRAMS...

English Manual
Page 15
... the display. If the speed or incline setting for the current segment. if you decrease the incline, the speed will flash. If this occurs, refer to start the program. To stop . If Pulse program 1 is shown, press the Enter button. 6 Press the Start button or the Speed + button to CHEST PULSE SENSOR TROUBLESHOOTING on page 14. 15 The buttons can be from 65% to a stop the program at any time, press the Stop button. 7 Follow your maximum possible heart rate...
... the display. If the speed or incline setting for the current segment. if you decrease the incline, the speed will flash. If this occurs, refer to start the program. To stop . If Pulse program 1 is shown, press the Enter button. 6 Press the Start button or the Speed + button to CHEST PULSE SENSOR TROUBLESHOOTING on page 14. 15 The buttons can be from 65% to a stop the program at any time, press the Stop button. 7 Follow your maximum possible heart rate...

English Manual
Page 20
... OUT AUDIO OUT RIGHT LEFT Audio Adapter Cable B. Follow the steps below . If you when the speed and/or incline of the cable into the included adapter. The treadmill will not respond to your home stereo, see HOW TO CONNECT YOUR HOME STEREO on your personal trainer's instructions. Plug the other end of the treadmill is flashing, press the Start button or the Speed + button on page 11. 2 Select the iFIT.com mode. In...
... OUT AUDIO OUT RIGHT LEFT Audio Adapter Cable B. Follow the steps below . If you when the speed and/or incline of the cable into the included adapter. The treadmill will not respond to your home stereo, see HOW TO CONNECT YOUR HOME STEREO on your personal trainer's instructions. Plug the other end of the treadmill is flashing, press the Start button or the Speed + button on page 11. 2 Select the iFIT.com mode. In...
English Manual
Page 22
... key into the console. Follow the steps below to use another program, press the Stop button and go to our Web site at www.iFIT.com. 5 Follow the desired links on -line instructions to change when a "chirp" is heard, make sure that the audio cable is properly connected, that it is fully plugged in, and that the Time/Segment Time display is about to start an internet connection. 4 Start...
... key into the console. Follow the steps below to use another program, press the Stop button and go to our Web site at www.iFIT.com. 5 Follow the desired links on -line instructions to change when a "chirp" is heard, make sure that the audio cable is properly connected, that it is fully plugged in, and that the Time/Segment Time display is about to start an internet connection. 4 Start...

English Manual
Page 25
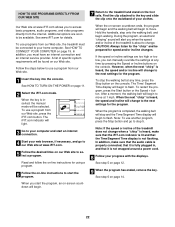
... Customer Service Department toll-free at 1-800-999-3756, Monday through Friday, 6 a.m. If further assistance is properly tightened, you should be able to lift the edges of the specifications described on page 8. b. Remove the key from the console and then reinsert it. Make sure that the power cord is plugged into a surge suppressor, and that meets all of the Rear Roller Adjustment Bolts walking belt 3 to...
... Customer Service Department toll-free at 1-800-999-3756, Monday through Friday, 6 a.m. If further assistance is properly tightened, you should be able to lift the edges of the specifications described on page 8. b. Remove the key from the console and then reinsert it. Make sure that the power cord is plugged into a surge suppressor, and that meets all of the Rear Roller Adjustment Bolts walking belt 3 to...

English Manual
Page 26
... displays of a turn it to CHEST PULSE SENSOR TROUBLESHOOT- move the hood. Plug in the cover and turn both rear roller bolts clockwise 1/4 of the console do not function properly a. a PLUG THE POWER CORD. b. If the heart rate monitor still does not function properly, the battery should be changed. If the walking belt is off -center, first re- mill for a correct speed reading. 6. Next, remove 1/8" the screws from the sensor unit. Re-attach the hood and run the treadmill for a few minutes. PROBLEM 4. Using...
... displays of a turn it to CHEST PULSE SENSOR TROUBLESHOOT- move the hood. Plug in the cover and turn both rear roller bolts clockwise 1/4 of the console do not function properly a. a PLUG THE POWER CORD. b. If the heart rate monitor still does not function properly, the battery should be changed. If the walking belt is off -center, first re- mill for a correct speed reading. 6. Next, remove 1/8" the screws from the sensor unit. Re-attach the hood and run the treadmill for a few minutes. PROBLEM 4. Using...

English Manual
Page 30
... 1 Chest Pulse Strap 95 2 Tie Holder 6 1 Platform 52 2 Roller Adj. Washer 96 2 Tie 7 4 Walking Deck Screw 53 2 Rear Roller Adj. Description Key No. Qty. Bolt 97 5 8" Cable Tie 8 1 Walking Belt 54 1 Rear Endcap 98 4 Bumper 9 2 Frame Pivot Bolt 55 1 Frame 99 4 Bumper Screw 10 1 Latch Assembly 56 1 Allen Wrench 100 1 On/Off Switch 11 1 Front Roller/Pulley 57 2 Rear Platform Screw 101 1 Circuit Breaker 12 1 Magnet 58 1 Rear Roller 102 1 Power Cord 13 7 Front Wheel Nut/ 59 1 Pulse Wire...
... 1 Chest Pulse Strap 95 2 Tie Holder 6 1 Platform 52 2 Roller Adj. Washer 96 2 Tie 7 4 Walking Deck Screw 53 2 Rear Roller Adj. Description Key No. Qty. Bolt 97 5 8" Cable Tie 8 1 Walking Belt 54 1 Rear Endcap 98 4 Bumper 9 2 Frame Pivot Bolt 55 1 Frame 99 4 Bumper Screw 10 1 Latch Assembly 56 1 Allen Wrench 100 1 On/Off Switch 11 1 Front Roller/Pulley 57 2 Rear Platform Screw 101 1 Circuit Breaker 12 1 Magnet 58 1 Rear Roller 102 1 Power Cord 13 7 Front Wheel Nut/ 59 1 Pulse Wire...

English Manual
Page 31
until 6 p.m. To help us assist you, please be prepared to give the following information: • The MODEL NUMBER of the product (HRTL19913) • The NAME of the product (HealthRider® 900hrc treadmill) • The SERIAL NUMBER of the product (see the front cover of this manual) • The KEY NUMBER and DESCRIPTION of the part(s) (see the PART LIST on page 30). 31 Mountain Time (excluding holidays). HOW TO ORDER REPLACEMENT PARTS To order replacement parts, call our Customer Service Department toll-free at 1-800-999-3756, Monday through Friday, 6 a.m.
until 6 p.m. To help us assist you, please be prepared to give the following information: • The MODEL NUMBER of the product (HRTL19913) • The NAME of the product (HealthRider® 900hrc treadmill) • The SERIAL NUMBER of the product (see the front cover of this manual) • The KEY NUMBER and DESCRIPTION of the part(s) (see the PART LIST on page 30). 31 Mountain Time (excluding holidays). HOW TO ORDER REPLACEMENT PARTS To order replacement parts, call our Customer Service Department toll-free at 1-800-999-3756, Monday through Friday, 6 a.m.
English Manual
Page 32
... problem and a copy of your proof of incidental or consequential damages. Some states do the periodic maintenance requirements specified in its scope and duration to the terms set out in the Manual; This warranty gives you specific legal rights and you may not apply to you . Labor is covered for service. HOW LONG IS IT COVERED-ICON Health & Fitness, Inc. ("ICON"), extends a lifetime warranty...
... problem and a copy of your proof of incidental or consequential damages. Some states do the periodic maintenance requirements specified in its scope and duration to the terms set out in the Manual; This warranty gives you specific legal rights and you may not apply to you . Labor is covered for service. HOW LONG IS IT COVERED-ICON Health & Fitness, Inc. ("ICON"), extends a lifetime warranty...


