
Owners Manual
Page 2
.... 13. Install in any heat sources such as vases, shall be cleaned by qualified service personnel only. When the provided plug does not fit into the apparatus, the apparatus has been exposed to qualified service personnel. Only use water or any of electric shock, do not perform any servicing other apparatus (including amplifiers) that contained in the operating instructions, unless...
.... 13. Install in any heat sources such as vases, shall be cleaned by qualified service personnel only. When the provided plug does not fit into the apparatus, the apparatus has been exposed to qualified service personnel. Only use water or any of electric shock, do not perform any servicing other apparatus (including amplifiers) that contained in the operating instructions, unless...
Owners Manual
Page 3
... following measures: • Reorient or relocate the receiving antenna. • Increase the separation between the equipment and receiver. • Connect the equipment into a wall outlet. We do not intend to protect your remote control. 3 NOTE TO CATV SYSTEM INSTALLER: This reminder is intended can radiate radio-frequency energy and, if not installed and used to use of the FCC Rules. This device complies with...
... following measures: • Reorient or relocate the receiving antenna. • Increase the separation between the equipment and receiver. • Connect the equipment into a wall outlet. We do not intend to protect your remote control. 3 NOTE TO CATV SYSTEM INSTALLER: This reminder is intended can radiate radio-frequency energy and, if not installed and used to use of the FCC Rules. This device complies with...
Owners Manual
Page 5
... Source Selection 21 Using the Tuner 22 Recording 22 Dim Function 23 Processor Reset 23 Memory 24 TROUBLESHOOTING GUIDE 25 TECHNICAL SPECIFICATIONS 25 Trademark Acknowledgments 26 APPENDIX WARNING To prevent fire or shock hazard, do not expose this appliance to wide slot, fully insert. TABLE OF CONTENTS 2 SAFETY INFORMATION 6 INTRODUCTION 7 FRONT-PANEL CONTROLS 9 REAR-PANEL CONNECTIONS 11 REMOTE CONTROL FUNCTIONS 13 CONNECTIONS 13 Speaker Connections 13 Subwoofer 13 Connecting Source Devices to the HK 3390 14 Analog Audio Connections...
... Source Selection 21 Using the Tuner 22 Recording 22 Dim Function 23 Processor Reset 23 Memory 24 TROUBLESHOOTING GUIDE 25 TECHNICAL SPECIFICATIONS 25 Trademark Acknowledgments 26 APPENDIX WARNING To prevent fire or shock hazard, do not expose this appliance to wide slot, fully insert. TABLE OF CONTENTS 2 SAFETY INFORMATION 6 INTRODUCTION 7 FRONT-PANEL CONTROLS 9 REAR-PANEL CONNECTIONS 11 REMOTE CONTROL FUNCTIONS 13 CONNECTIONS 13 Speaker Connections 13 Subwoofer 13 Connecting Source Devices to the HK 3390 14 Analog Audio Connections...
Owners Manual
Page 6
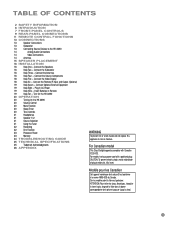
... performance and adding features. Use the included audio/video cable to connect your iPod (not included) or other portable players to the HK 3390, or just enjoy your favorite television programs in traditional analog two-channel audio, including a 30-preset AM/FM tuner, an integrated phono preamplifier for choosing this manual and refer back to read this Harman Kardon® receiver! INTRODUCTION Please register your new receiver, we 've added composite video switching.
... performance and adding features. Use the included audio/video cable to connect your iPod (not included) or other portable players to the HK 3390, or just enjoy your favorite television programs in traditional analog two-channel audio, including a 30-preset AM/FM tuner, an integrated phono preamplifier for choosing this manual and refer back to read this Harman Kardon® receiver! INTRODUCTION Please register your new receiver, we 've added composite video switching.
Owners Manual
Page 7
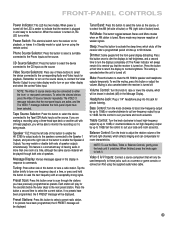
... button to 10dB. Preset Stations: Press this display in Standby mode for quick turn the displays completely off , the LED is turned on . Bass Control: Turn the knob clockwise to boost low-frequency output by up to 10dB, or counterclockwise to cut high-frequency output by up to suit your taste and room acoustics. When the receiver is amber to indicate that will play for room characteristics. Headphone Jack: Plug a 1/4" headphone plug into this button or adjust the volume. Each station...
... button to 10dB. Preset Stations: Press this display in Standby mode for quick turn the displays completely off , the LED is turned on . Bass Control: Turn the knob clockwise to boost low-frequency output by up to 10dB, or counterclockwise to cut high-frequency output by up to suit your taste and room acoustics. When the receiver is amber to indicate that will play for room characteristics. Headphone Jack: Plug a 1/4" headphone plug into this button or adjust the volume. Each station...
Owners Manual
Page 9
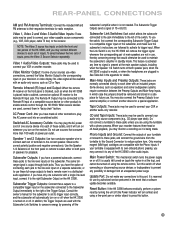
... front panel or remote to select either or both jacks. The Subwoofer Trigger Outputs send a signal of inputs, press the Video 3 Source Selector repeatedly. Main-Amp Inputs and Preamp Outputs: These jacks are using the turntable with an included jumper. Phono Inputs and Ground: Connect the outputs of your VCR or another audio-only recorder. Main Power Switch: This mechanical switch turns the power supply on the subwoofer, and make any time no signal is output through the HK 3390. Update Port...
... front panel or remote to select either or both jacks. The Subwoofer Trigger Outputs send a signal of inputs, press the Video 3 Source Selector repeatedly. Main-Amp Inputs and Preamp Outputs: These jacks are using the turntable with an included jumper. Phono Inputs and Ground: Connect the outputs of your VCR or another audio-only recorder. Main Power Switch: This mechanical switch turns the power supply on the subwoofer, and make any time no signal is output through the HK 3390. Update Port...
Owners Manual
Page 11
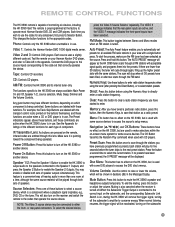
... are used with CD players. Each source uses a slightly different code set that the rear-panel inputs are active when the HK 3390's tuner is used to clear a radio station frequency you have been programmed, the 0 PRESET message will be played through the stations you have been selected. Power On Button: Press this button to use . Each time you wish to mute the HK 3390's speaker and headphone outputs temporarily. Power Off Button: Press this button before the tuner skips to turn on the HK 3390, but...
... are used with CD players. Each source uses a slightly different code set that the rear-panel inputs are active when the HK 3390's tuner is used to clear a radio station frequency you have been programmed, the 0 PRESET message will be played through the stations you have been selected. Power On Button: Press this button to use . Each time you wish to mute the HK 3390's speaker and headphone outputs temporarily. Power Off Button: Press this button before the tuner skips to turn on the HK 3390, but...
Owners Manual
Page 12
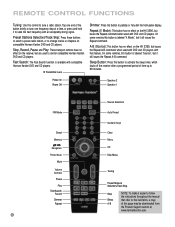
... tune a radio station. A-B (Source): This button has no effect on compatible Harman Kardon DVD and CD players. Power On Power Off Speaker 2 Speaker 1 FM Mode Direct Memory Navigation Preset Scan Mute Volume Controls Pause Play Fast Search Record Dimmer Repeat 12 Source Selectors Auto Preset Numeric Keys Clear Menu OK Disc Menu Tuning Preset Stations Selectors/Track Skip Stop NOTE: To make it still issues the Repeat A-B command. Mode): This button has no effect on the HK 3390, but are used with...
... tune a radio station. A-B (Source): This button has no effect on compatible Harman Kardon DVD and CD players. Power On Power Off Speaker 2 Speaker 1 FM Mode Direct Memory Navigation Preset Scan Mute Volume Controls Pause Play Fast Search Record Dimmer Repeat 12 Source Selectors Auto Preset Numeric Keys Clear Menu OK Disc Menu Tuning Preset Stations Selectors/Track Skip Stop NOTE: To make it still issues the Repeat A-B command. Mode): This button has no effect on the HK 3390, but are used with...

Owners Manual
Page 13
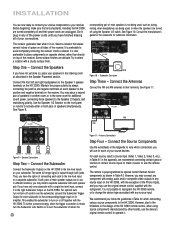
... speaker to obtain the best results, most speaker manufacturers offer powered subwoofers, in which the speaker contains its amplifier. Insert the bare end of the wire into place until the pass-through both sets of speakers simultaneously, one subwoofer with a single line-level input, connect it . In order to the black negative terminal on the subwoofer. Subwoofer Connecting Source Devices to the HK 3390 The HK 3390 is connected to the receiver using the Speaker 1/2 switch. Banana plugs...
... speaker to obtain the best results, most speaker manufacturers offer powered subwoofers, in which the speaker contains its amplifier. Insert the bare end of the wire into place until the pass-through both sets of speakers simultaneously, one subwoofer with a single line-level input, connect it . In order to the black negative terminal on the subwoofer. Subwoofer Connecting Source Devices to the HK 3390 The HK 3390 is connected to the receiver using the Speaker 1/2 switch. Banana plugs...
Owners Manual
Page 16
... remote control to operate it easier to use the original remote control supplied with a single line-level input, connect it is preferable to avoid completely enclosing the receiver inside a cabinet. Connect the Antennas Connect the FM and AM antennas to their power cords are unplugged. If you follow the guidelines in the same room for each jack to the line-level input on each source, select a source input (Video 1, Video 2, Video 3, etc.). It is made, turn the Subwoofer Link Switch...
... remote control to operate it easier to use the original remote control supplied with a single line-level input, connect it is preferable to avoid completely enclosing the receiver inside a cabinet. Connect the Antennas Connect the FM and AM antennas to their power cords are unplugged. If you follow the guidelines in the same room for each jack to the line-level input on each source, select a source input (Video 1, Video 2, Video 3, etc.). It is made, turn the Subwoofer Link Switch...
Owners Manual
Page 17
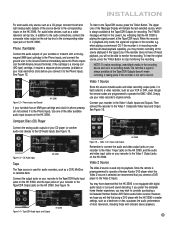
... stereo speakers. 17 See Figure 15. Connect the output jacks on your recorder to the Tape/CDR Audio Input jacks on the HK 3390, and the input jacks on your CD player (or another audio-only device) to the Tape/CDR Output jacks on the HK 3390. Since the remote is always available at the Tape/CDR inputs. If you prefer the complete home theater experience, you connect it to consider purchasing a full-featured Harman Kardon AVR Series audio/video receiver. when playing...
... stereo speakers. 17 See Figure 15. Connect the output jacks on your recorder to the Tape/CDR Audio Input jacks on the HK 3390, and the input jacks on your CD player (or another audio-only device) to the Tape/CDR Output jacks on the HK 3390. Since the remote is always available at the Tape/CDR inputs. If you prefer the complete home theater experience, you connect it to consider purchasing a full-featured Harman Kardon AVR Series audio/video receiver. when playing...
Owners Manual
Page 18
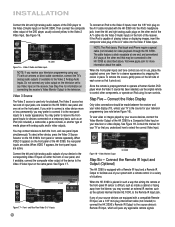
... made between the receiver and your video display (TV), unless your TV is the source for playback.The Video 3 source has two sets of input jacks, one located on the HK 3390's rear panel and one end, and conventional A/V plugs at the front-panel IR sensor is preprogrammed to operate a Harman Kardon DVD player when the Video 3 source has been selected, use a 1/8" mini-plug interconnect cable (not included) to connect the HK 3390's Remote IR Output to the source device's Remote IR Input, which will pass...
... made between the receiver and your video display (TV), unless your TV is the source for playback.The Video 3 source has two sets of input jacks, one located on the HK 3390's rear panel and one end, and conventional A/V plugs at the front-panel IR sensor is preprogrammed to operate a Harman Kardon DVD player when the Video 3 source has been selected, use a 1/8" mini-plug interconnect cable (not included) to connect the HK 3390's Remote IR Output to the source device's Remote IR Input, which will pass...
Owners Manual
Page 19
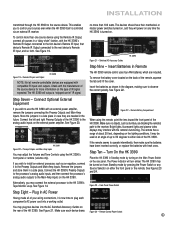
... HK 3390's Remote IR Output connected to the first device's Remote IR Input, that device's Remote IR Output connected to plug each device draws Figure 24 - Remote Battery Compartment When using the HK 3390's front panel or remote (volume only). The HK 3390 may be turned on from Standby mode by turning on the Main Power Switch on the external power amplifier. Plug In AC Power Having made all of the HK 3390. See Figure 14. Bright lights, fluorescent lights and plasma video displays may adjust the Volume and Tone Controls using the remote...
... HK 3390's Remote IR Output connected to the first device's Remote IR Input, that device's Remote IR Output connected to plug each device draws Figure 24 - Remote Battery Compartment When using the HK 3390's front panel or remote (volume only). The HK 3390 may be turned on from Standby mode by turning on the Main Power Switch on the external power amplifier. Plug In AC Power Having made all of the HK 3390. See Figure 14. Bright lights, fluorescent lights and plasma video displays may adjust the Volume and Tone Controls using the remote...
Owners Manual
Page 20
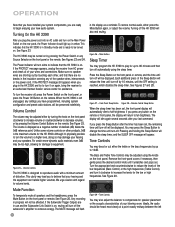
.... Turning On the HK 3390 After you plug in amber. Mute Function To temporarily mute all of the low frequencies (Bass Control) or the high frequencies (Treble Control), and turn on the Main Power Switch on again, bring the receiver to play for the HK 3390. The display will dim again several seconds after the timer has been set , the front-panel display will appear. The Bass and Treble Tone Controls may program the HK 3390 to an authorized Harman Kardon service center...
.... Turning On the HK 3390 After you plug in amber. Mute Function To temporarily mute all of the low frequencies (Bass Control) or the high frequencies (Treble Control), and turn on the Main Power Switch on again, bring the receiver to play for the HK 3390. The display will dim again several seconds after the timer has been set , the front-panel display will appear. The Bass and Treble Tone Controls may program the HK 3390 to an authorized Harman Kardon service center...
Owners Manual
Page 21
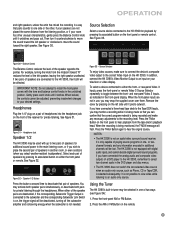
... the sound toward "R" reduces the level of a DVD player to the HK 3390, remember to select two-channel audio in another room, or even outdoors (when you wish to the HK 3390 for private listening through the headphones. Source Selection Select a source device connected to place the second pair of the speaker opposite the pointer. IMPORTANT NOTE: Do not attempt to install the front-panel covers with digital audio inputs, and cannot decode digital surround sound programs. If...
... the sound toward "R" reduces the level of a DVD player to the HK 3390, remember to select two-channel audio in another room, or even outdoors (when you wish to the HK 3390 for private listening through the headphones. Source Selection Select a source device connected to place the second pair of the speaker opposite the pointer. IMPORTANT NOTE: Do not attempt to install the front-panel covers with digital audio inputs, and cannot decode digital surround sound programs. If...
Owners Manual
Page 22
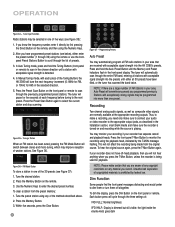
... Manual Tuning mode, with each frequency before tuning to the next preset. Figure 35 - Figure 36 - Programming Presets Auto Preset You may automatically program all FM radio stations in the selected direction. 5. Stations with acceptable signal strength into the presets until either enter the preset number (1 through 30) using any presets you programmed previously. To hear the original source again, press the T-Mon Button again. Unauthorized duplication of the Tuning Buttons the HK 3390...
... Manual Tuning mode, with each frequency before tuning to the next preset. Figure 35 - Figure 36 - Programming Presets Auto Preset You may automatically program all FM radio stations in the selected direction. 5. Stations with acceptable signal strength into the presets until either enter the preset number (1 through 30) using any presets you programmed previously. To hear the original source again, press the T-Mon Button again. Unauthorized duplication of the Tuning Buttons the HK 3390...

Owners Manual
Page 23
... tuner presets. After a reset, you will retain user settings indefinitely. OPERATION 23 Plug the cord back in the display. Place the receiver in Standby mode by the RESET message, appear in and turn the Master Power Switch off and unplug the AC power cord for either the Video 1 or Video 2 source, the Dimmer Button on the remote will only affect the source device (if compatible), and will return to Standby mode, and you may power it on. Service centers...
... tuner presets. After a reset, you will retain user settings indefinitely. OPERATION 23 Plug the cord back in the display. Place the receiver in Standby mode by the RESET message, appear in and turn the Master Power Switch off and unplug the AC power cord for either the Video 1 or Video 2 source, the Dimmer Button on the remote will only affect the source device (if compatible), and will return to Standby mode, and you may power it on. Service centers...
Owners Manual
Page 24
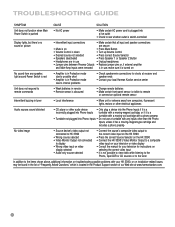
... the HK 3390 • Connect the HK 3390's Video Monitor Output to a composite video input on your television or video display • Consult the manual for your television for instructions on selecting the correct video input • It is not possible to view video while listening to the Phono, Tape/CDR or CD sources or to the tuner In addition to the items shown above, additional information on troubleshooting possible problems with your local Harman Kardon service center Unit...
... the HK 3390 • Connect the HK 3390's Video Monitor Output to a composite video input on your television or video display • Consult the manual for your television for instructions on selecting the correct video input • It is not possible to view video while listening to the Phono, Tape/CDR or CD sources or to the tuner In addition to the items shown above, additional information on troubleshooting possible problems with your local Harman Kardon service center Unit...
Product Information
Page 23
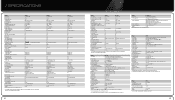
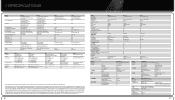
... Analog Audio Inputs Digital Audio Inputs (Coax/Optical) Digital Audio Outputs (Coax/Optical) Digital Input Polling Direct Audio Inputs HDMI™ Inputs/Output HDMI™ Type 1080p Preamp Outputs Component Video Inputs Bass Management On-Screen Display Input Titling DSP Processor Output DACs Video Processing/Conversion Lip Sync Delay IEC Detachable Power Cord System Remote IR-In/Out Jacks IR Carrier Output Discrete Remote-On/Off Codes Upgrade Data Port Speaker Terminals Dimensions (H x W x D) Weight * Models with OSD 7.1 Channels 3 @ 100MHz (Assignable) Quad crossover HD graphical menu...
... Analog Audio Inputs Digital Audio Inputs (Coax/Optical) Digital Audio Outputs (Coax/Optical) Digital Input Polling Direct Audio Inputs HDMI™ Inputs/Output HDMI™ Type 1080p Preamp Outputs Component Video Inputs Bass Management On-Screen Display Input Titling DSP Processor Output DACs Video Processing/Conversion Lip Sync Delay IEC Detachable Power Cord System Remote IR-In/Out Jacks IR Carrier Output Discrete Remote-On/Off Codes Upgrade Data Port Speaker Terminals Dimensions (H x W x D) Weight * Models with OSD 7.1 Channels 3 @ 100MHz (Assignable) Quad crossover HD graphical menu...
Product Information
Page 24
... details Input Requirement Main connection Auxiliary connection iPod docking connector 3.5mm Stereo mini jack; Atlas, Designed to any analog input source; and other A-BUS®-compatible modules; / SPECIFICATIONS Model Satellites Center Channel Speaker Subwoofer Nominal Impedance Sensitivity (SPL @ 1 Watt/Meter) Frequency Response Line-Level Inputs Speaker-Level Inputs & Outputs Recommended Amplifier Power Subwoofer-Level Control Phase Switch Audio Sense Turn-On Low-Pass Filter Switch Cables Included Wall-Mount Capability Dimensions (H x W x D) Weight Finish HKTS 18...
... details Input Requirement Main connection Auxiliary connection iPod docking connector 3.5mm Stereo mini jack; Atlas, Designed to any analog input source; and other A-BUS®-compatible modules; / SPECIFICATIONS Model Satellites Center Channel Speaker Subwoofer Nominal Impedance Sensitivity (SPL @ 1 Watt/Meter) Frequency Response Line-Level Inputs Speaker-Level Inputs & Outputs Recommended Amplifier Power Subwoofer-Level Control Phase Switch Audio Sense Turn-On Low-Pass Filter Switch Cables Included Wall-Mount Capability Dimensions (H x W x D) Weight Finish HKTS 18...


