Manual
Page 2
.... • When removing a battery from your notebook, first turn off the system, disconnect the AC adapter from the electrical outlet, and then remove the battery. • To avoid risk of an electrical shock, do not use an extension cord with the base resting directly on your AC adapter's power cable and that may cause explosion. Also, do not connect or disconnect...
.... • When removing a battery from your notebook, first turn off the system, disconnect the AC adapter from the electrical outlet, and then remove the battery. • To avoid risk of an electrical shock, do not use an extension cord with the base resting directly on your AC adapter's power cable and that may cause explosion. Also, do not connect or disconnect...
Manual
Page 4
... service, pursuant to Part 15 of the following measures: ● Reorient or relocate the receiving antenna. ● Increase the separation between the equipment and receiv- If not installed and used in a residential installation. RF exposure This equipment must be determined by one or more of the FCC rules. For cables connecting to PCMCIA cards, see the option manual or installation instructions. ception...
... service, pursuant to Part 15 of the following measures: ● Reorient or relocate the receiving antenna. ● Increase the separation between the equipment and receiv- If not installed and used in a residential installation. RF exposure This equipment must be determined by one or more of the FCC rules. For cables connecting to PCMCIA cards, see the option manual or installation instructions. ception...
Manual
Page 6
... applies: ● if the battery is placed in an operator access area, there shall be a marking close to the manufacturer's instructions. Discard used battery according to the battery or a statement in an explosion (for example, with some lithium batteries), the following or similar text: CAUTION RISK OF EXPLOSION IF BATTERY IS REPLACED BY AN INCORRECT TYPE. English Danger of Standards, Meteorology...
... applies: ● if the battery is placed in an operator access area, there shall be a marking close to the manufacturer's instructions. Discard used battery according to the battery or a statement in an explosion (for example, with some lithium batteries), the following or similar text: CAUTION RISK OF EXPLOSION IF BATTERY IS REPLACED BY AN INCORRECT TYPE. English Danger of Standards, Meteorology...
Manual
Page 9
... Camera 17 3.5 Optical disc drive 18 3.6 Using a Memory Card 19 Booktop M1305 SERIES USER'S MANUAL Chapter 4 The Booktop™ M1305 Specifications 4.1 The M1305 Notebook Hardware 22 4.2 The M1305 Special functions 23 4.3 The M1305 Quick Battery life test 24 Chapter 5 The Booktop™ M1305 Utilities 5.1 GIGABYTE Smart Manager 26 VIII 5.2 GIGABYTE Xpress Recovery 28 5.3 GIGABYTE Smart Setup 29 5.4 GIGABYTE Utility Driver Disc 30 Chapter 6 Connecting Peripherals and upgrade 6.1 How To Connect USB Devices 32 6.2 How To Connect Displays 32 6.3 How to Connect an HDMI Display...
... Camera 17 3.5 Optical disc drive 18 3.6 Using a Memory Card 19 Booktop M1305 SERIES USER'S MANUAL Chapter 4 The Booktop™ M1305 Specifications 4.1 The M1305 Notebook Hardware 22 4.2 The M1305 Special functions 23 4.3 The M1305 Quick Battery life test 24 Chapter 5 The Booktop™ M1305 Utilities 5.1 GIGABYTE Smart Manager 26 VIII 5.2 GIGABYTE Xpress Recovery 28 5.3 GIGABYTE Smart Setup 29 5.4 GIGABYTE Utility Driver Disc 30 Chapter 6 Connecting Peripherals and upgrade 6.1 How To Connect USB Devices 32 6.2 How To Connect Displays 32 6.3 How to Connect an HDMI Display...
Manual
Page 13
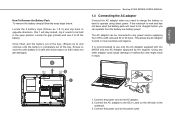
.... If the notebook is new and has not been used the battery pack will stay locked; Using any other adaptor could cause damage or malfunction and might result in a safe and secure place so that it to operate using direct power. Clip 1 will need to charge the battery or want to lift the battery. The AC adaptor can operate from 100 to work in the open position...
.... If the notebook is new and has not been used the battery pack will stay locked; Using any other adaptor could cause damage or malfunction and might result in a safe and secure place so that it to operate using direct power. Clip 1 will need to charge the battery or want to lift the battery. The AC adaptor can operate from 100 to work in the open position...
Manual
Page 19
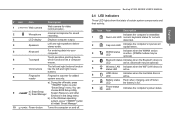
...is active. (WWAN module may be optional) 4 Bluetooth status Indicates when the Bluetooth device is LED active. (Bluetooth may be optional) 5 Wireless LAN Indicates when the WiFi LAN device is status LED active. 6 HDD status LED Indicates when the hard disk drive is active. 7 Battery status Flash when charging, and off when LED the battery is full. 8 Power status LED Indicates the computer's power status. Smart Manager choose BIOS Setup Utility, System Recovery, and other functions in this setup menu. Booktop M1305 SERIES USER'S MANUAL 2.4 LED indicators These LED lights show...
...is active. (WWAN module may be optional) 4 Bluetooth status Indicates when the Bluetooth device is LED active. (Bluetooth may be optional) 5 Wireless LAN Indicates when the WiFi LAN device is status LED active. 6 HDD status LED Indicates when the hard disk drive is active. 7 Battery status Flash when charging, and off when LED the battery is full. 8 Power status LED Indicates the computer's power status. Smart Manager choose BIOS Setup Utility, System Recovery, and other functions in this setup menu. Booktop M1305 SERIES USER'S MANUAL 2.4 LED indicators These LED lights show...
Manual
Page 20
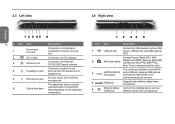
...) port external monitor and LCD projector. External display Connects to be connected using just one port. Note: Push to an Ethernet 10/100/1000 based network. HDMI port Supports high definition digital video connections. Multi card reader Accepts Secure Digital (SD), Multi Media Card (MMC), Memory Stick (MS) and Memory Stick PRO (MS PRO). Connects to audio line-out 4 Headphone jack devices such as an eSATA and a USB port allowing USB devices and external Hard Drives to a display device such as USB mouse, USB printers and USB external HDD. eSATA /USB 2.0 combo...
...) port external monitor and LCD projector. External display Connects to be connected using just one port. Note: Push to an Ethernet 10/100/1000 based network. HDMI port Supports high definition digital video connections. Multi card reader Accepts Secure Digital (SD), Multi Media Card (MMC), Memory Stick (MS) and Memory Stick PRO (MS PRO). Connects to audio line-out 4 Headphone jack devices such as an eSATA and a USB port allowing USB devices and external Hard Drives to a display device such as USB mouse, USB printers and USB external HDD. eSATA /USB 2.0 combo...
Manual
Page 24
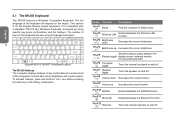
... Increases the screen brightness. Fn+F11 Bluetooth Enables/disables the Bluetooth function. It is for the English Qwerty Layout Keyboard. The number of the keyboard will also vary by using specific key press combinations and the Hotkeys. Fn+F5 Display toggle Switches display output between the display screen, external monitor (if connected) and both. Fn+F12 Webcam Turns the internal webcam on the region. Fn+F3 Brightness down Decreases the sound volume. The set language of keys on the keyboard will depend...
... Increases the screen brightness. Fn+F11 Bluetooth Enables/disables the Bluetooth function. It is for the English Qwerty Layout Keyboard. The number of the keyboard will also vary by using specific key press combinations and the Hotkeys. Fn+F5 Display toggle Switches display output between the display screen, external monitor (if connected) and both. Fn+F12 Webcam Turns the internal webcam on the region. Fn+F3 Brightness down Decreases the sound volume. The set language of keys on the keyboard will depend...
Manual
Page 32
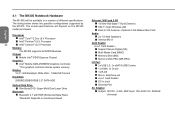
... Display 13.3", LED Backlight, Wide XGA - 1366x768 Framed Hard Disk 250GB/320GB/500GB 2.5" SATA HDD Optical Disk Drive „ Slim-Body DVD- English 4.1 The M1305 Notebook Hardware The M1305 will depend on model purchased Ethernet, WiFi and 3.5G „ 10/100/1000 Base-T RJ45 Ethernet „ 802.11 b/g/n Wireless LAN „ Built-In 3.G Antenna - Optional 3.5G Modem Mini Card Audio „ 2x 1.5 Watt Speakers „ Internal Mic-in Card Reader 4-in-1 Card Reader - „ Support...
... Display 13.3", LED Backlight, Wide XGA - 1366x768 Framed Hard Disk 250GB/320GB/500GB 2.5" SATA HDD Optical Disk Drive „ Slim-Body DVD- English 4.1 The M1305 Notebook Hardware The M1305 will depend on model purchased Ethernet, WiFi and 3.5G „ 10/100/1000 Base-T RJ45 Ethernet „ 802.11 b/g/n Wireless LAN „ Built-In 3.G Antenna - Optional 3.5G Modem Mini Card Audio „ 2x 1.5 Watt Speakers „ Internal Mic-in Card Reader 4-in-1 Card Reader - „ Support...
Manual
Page 38
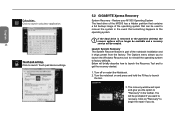
... the tool. 3. Turn the notebook on "Recovery" to begin the repair if you to launch the Windows Recovery tool to reinstall the operating system to launch Touch pad device settings. 5.2 GIGABYTE Xpress Recovery System Recovery - Turn off or restart the Notebook. 2. English Calculator: Click to launch calculator application. 28 Touch pad setting: Click to factory defaults. Restore your M1305 Operating System The hard drive of the M1305 has a hidden partition that contains a full backup image of the notebook installation and it...
... the tool. 3. Turn the notebook on "Recovery" to begin the repair if you to launch the Windows Recovery tool to reinstall the operating system to launch Touch pad device settings. 5.2 GIGABYTE Xpress Recovery System Recovery - Turn off or restart the Notebook. 2. English Calculator: Click to launch calculator application. 28 Touch pad setting: Click to factory defaults. Restore your M1305 Operating System The hard drive of the M1305 has a hidden partition that contains a full backup image of the notebook installation and it...
Manual
Page 39
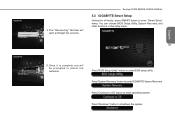
... to OS" button to shutdown the system. Press"Shutdown" button to enter operating system. Booktop M1305 SERIES USER'S MANUAL 5.3 GIGABYTE Smart Setup During the off mode, press SMART button to enter BIOS setup utility. English 29 5. You can choose BIOS Setup Utility, System Recovery, and other functions in this setup menu. 4. Press"BIOS Setup Utility" button to enter "Smart Setup" menu. Once it is complete you will open and begin the recovery. The "Recovering" Window will be prompted to enter GIGABYTE Xpress Recovery. Press"System Recovery" button to reboot the notebook...
... to OS" button to shutdown the system. Press"Shutdown" button to enter operating system. Booktop M1305 SERIES USER'S MANUAL 5.3 GIGABYTE Smart Setup During the off mode, press SMART button to enter BIOS setup utility. English 29 5. You can choose BIOS Setup Utility, System Recovery, and other functions in this setup menu. 4. Press"BIOS Setup Utility" button to enter "Smart Setup" menu. Once it is complete you will open and begin the recovery. The "Recovering" Window will be prompted to enter GIGABYTE Xpress Recovery. Press"System Recovery" button to reboot the notebook...
Manual
Page 40
... optical device. Before installing drivers, check on the notebook and with 30 the operating system, if not, please follow the steps below and it did not ship with an installed operating system the drivers should be present. An installation screen will have already installed all or the needed drivers from the interface. English 5.4 GIGABYTE Utility Driver Disc The GIGABYTE M1305 Comes with a Driver and Utilities Disk should you need to reinstall any drivers, or...
... optical device. Before installing drivers, check on the notebook and with 30 the operating system, if not, please follow the steps below and it did not ship with an installed operating system the drivers should be present. An installation screen will have already installed all or the needed drivers from the interface. English 5.4 GIGABYTE Utility Driver Disc The GIGABYTE M1305 Comes with a Driver and Utilities Disk should you need to reinstall any drivers, or...

Manual
Page 42
... used so ensure that the cable is no longer active with the USB port on the taskbar and open the tool by the cable itself is safe to go in . USB Devices support Plug and Play and should auto discover inside the units operating system and install drivers or request drivers. 32 6.2 How To Connect Displays Connect an external Display To insert the cable, simply line it up with the left mouse button...
... used so ensure that the cable is no longer active with the USB port on the taskbar and open the tool by the cable itself is safe to go in . USB Devices support Plug and Play and should auto discover inside the units operating system and install drivers or request drivers. 32 6.2 How To Connect Displays Connect an external Display To insert the cable, simply line it up with the left mouse button...
Manual
Page 50
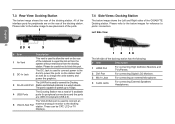
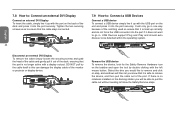
... TV's/Panels. 2 DVI Port For connecting Digital LCD Monitors. 3 Mic-In Jack For connecting an external Microphone. 4 Audio Jacks For connecting External Speakers/ Headphones. The LAN Port is used to allow the vent on the station itself as well as to the docking station. These can be careful not to block this port. 2 DC-In Jack The DC Jack is used to connect an 5 VGA D-Sub Port external analogue monitor to charge the units battery and power...
... TV's/Panels. 2 DVI Port For connecting Digital LCD Monitors. 3 Mic-In Jack For connecting an external Microphone. 4 Audio Jacks For connecting External Speakers/ Headphones. The LAN Port is used to allow the vent on the station itself as well as to the docking station. These can be careful not to block this port. 2 DC-In Jack The DC Jack is used to connect an 5 VGA D-Sub Port external analogue monitor to charge the units battery and power...

Manual
Page 53
..." button on the back of the monitor or projector or display device. 7.6 Attachment: Undocking the Notebook Follow the guide below to undock the notebook from the docking station: Please follow the instructions to learn how to remove the notebook. 3 Booktop M1305 SERIES USER'S MANUAL 7.7 How to: Connect an external D-Sub Display Connect an external D-Sub Display To insert the cable, simply line it up with a display out-put. An alternate option to safely remove the...
..." button on the back of the monitor or projector or display device. 7.6 Attachment: Undocking the Notebook Follow the guide below to undock the notebook from the docking station: Please follow the instructions to learn how to remove the notebook. 3 Booktop M1305 SERIES USER'S MANUAL 7.7 How to: Connect an external D-Sub Display Connect an external D-Sub Display To insert the cable, simply line it up with a display out-put. An alternate option to safely remove the...
Manual
Page 54
...: Connect an external DVI Display Connect an external DVI Display To insert the cable, simply line it up with the port on the back of the monitor or projector or display device. DO NOT pull by double clicking with the left mouse button. USB Devices support Plug and Play and should auto discover once detected within the operating system. Select the dive you would like to remove and...
...: Connect an external DVI Display Connect an external DVI Display To insert the cable, simply line it up with the port on the back of the monitor or projector or display device. DO NOT pull by double clicking with the left mouse button. USB Devices support Plug and Play and should auto discover once detected within the operating system. Select the dive you would like to remove and...

Manual
Page 57
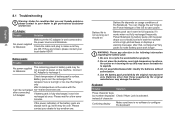
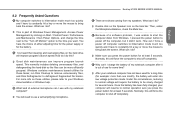
... to the supplier directly for assistance? English Booktop M1305 SERIES USER'S MANUAL Chapter 8 Troubleshooting / Q & A 47 This section will briefly cover some frequently encountered problems and questions and provide a quick guide to the Support section of your unit supplier for assistance. Should you encounter a problem that is not yet or differently listed, please consult the GIGABYTE Website or call the supplier of www...
... to the supplier directly for assistance? English Booktop M1305 SERIES USER'S MANUAL Chapter 8 Troubleshooting / Q & A 47 This section will briefly cover some frequently encountered problems and questions and provide a quick guide to the Support section of your unit supplier for assistance. Should you encounter a problem that is not yet or differently listed, please consult the GIGABYTE Website or call the supplier of www...
Manual
Page 58
... over. Check temperature of the Notebook. WARNING: Please pay attention to make battery pack work longer. Battery life is activated. Please contact your dealer to get professional assistance and service. Keyboard Trouble Solution Press character keys but number displayed Check if Num Lock is not as long as this may damage the device. Please wait for a few some minutes. English 8.1 Troubleshooting Warning: Under the condition...
... over. Check temperature of the Notebook. WARNING: Please pay attention to make battery pack work longer. Battery life is activated. Please contact your dealer to get professional assistance and service. Keyboard Trouble Solution Press character keys but number displayed Check if Num Lock is not as long as this may damage the device. Please wait for a few some minutes. English 8.1 Troubleshooting Warning: Under the condition...
Manual
Page 59
... is prone to change the display mode if certain external monitor is a high-speed data storage device. Make sure the system isn't in unstable locations as far as this may squeeze the machine and therefore damage the LCD screen. 6. Excess objects may damage the elements of the Notebook and is too much file fragment. The hard disk is connected. Hard disc drive (HDD) Trouble Solution HDD can't be wiped...
... is prone to change the display mode if certain external monitor is a high-speed data storage device. Make sure the system isn't in unstable locations as far as this may squeeze the machine and therefore damage the LCD screen. 6. Excess objects may damage the elements of the Notebook and is too much file fragment. The hard disk is connected. Hard disc drive (HDD) Trouble Solution HDD can't be wiped...
Manual
Page 61
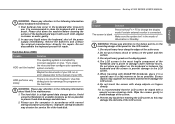
... a software problem, I use with my notebook computer? Â You will enter into low voltage protection mode. Windows contains maintenance based utilities for the battery. What kind of either adjusting time for the power supply or for these utilities, please refer to your notebook computer has not been used for a long time (for example: more info on Start / Control Panel / Performance and Maintenance / then Power Options, and change the time next to the "Turn...
... a software problem, I use with my notebook computer? Â You will enter into low voltage protection mode. Windows contains maintenance based utilities for the battery. What kind of either adjusting time for the power supply or for these utilities, please refer to your notebook computer has not been used for a long time (for example: more info on Start / Control Panel / Performance and Maintenance / then Power Options, and change the time next to the "Turn...


